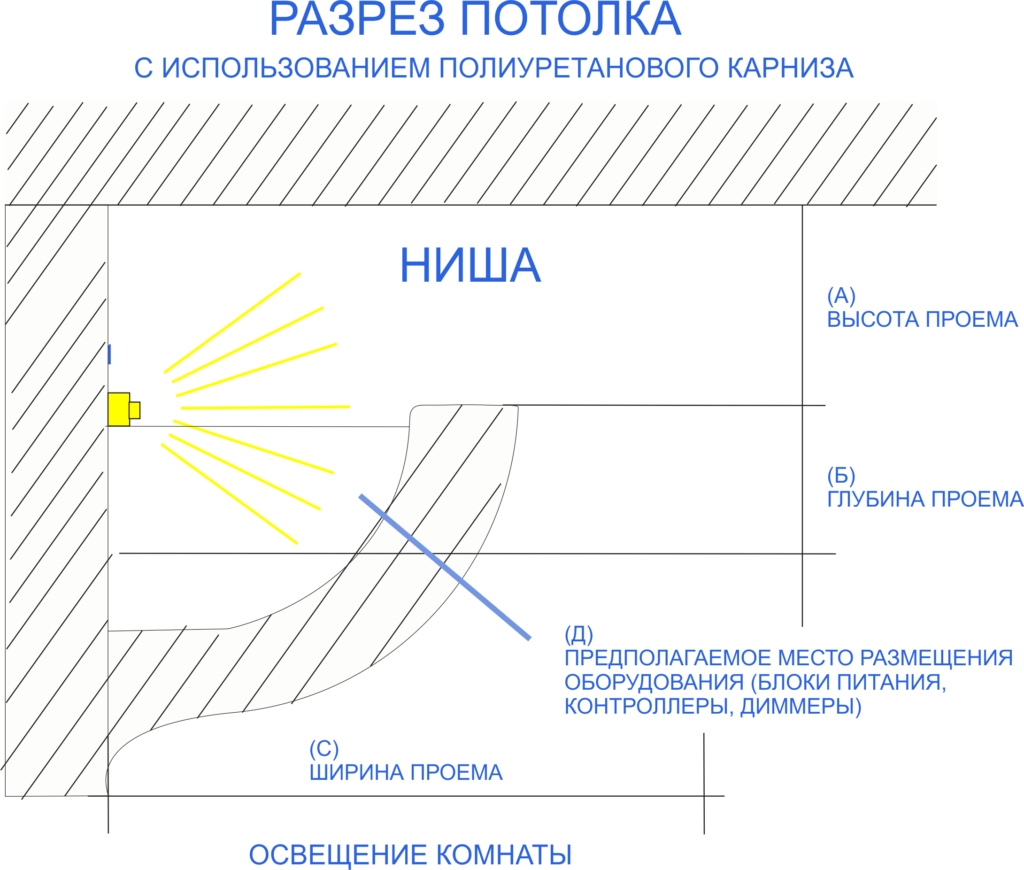
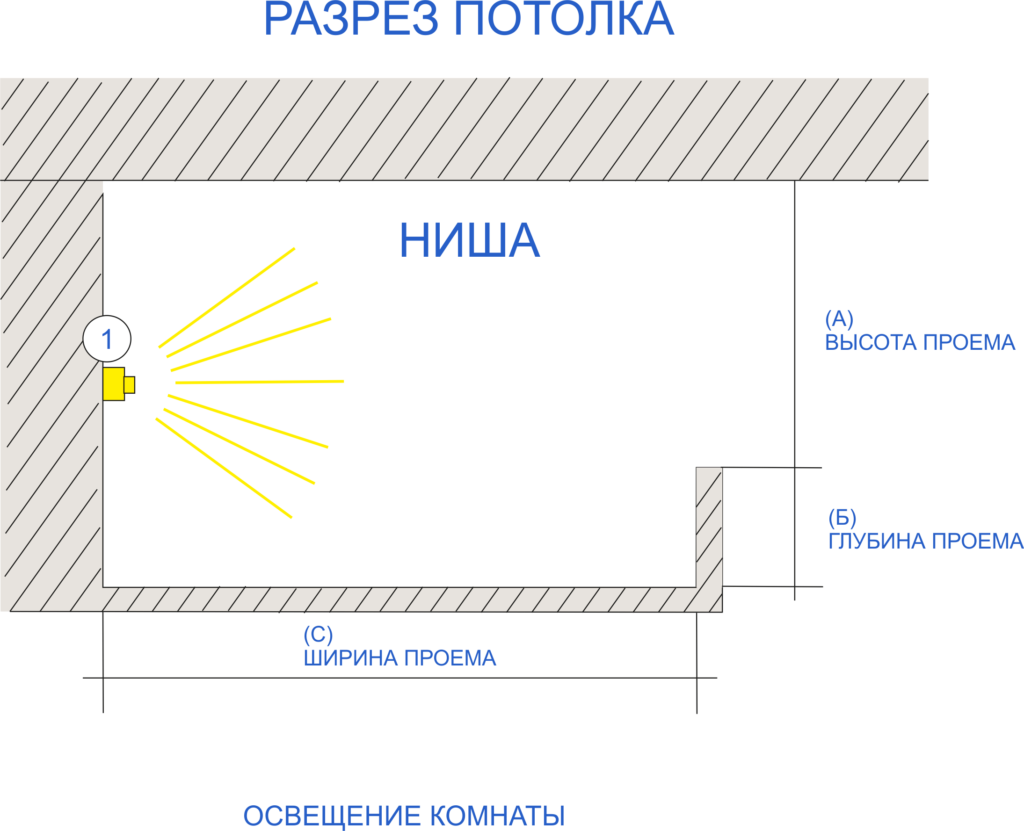
Illumination of a niche in the wall with LED strip. How to correctly install LED strips on plasterboard ceilings: recommendations
Drywall is used during interior decoration, leveling walls and ceilings. The process itself is not difficult, and the cost of the structures leaves a pleasant impression. Accordingly, you can realize your creative ideas.
Plasterboard ceiling with lighting decorates the interior of any room. Techniques and methods of work will not take much effort. In this case, the result can significantly transform even the most seedy room. One has only to start and competently bring the process to its logical conclusion. In our article, instructions will be given on how to perform the work.
Choosing a backlight
Luminaires used for lighting rooms:
Most often, fluorescent lamps are used to organize such illumination. As an alternative to them - LED elements.
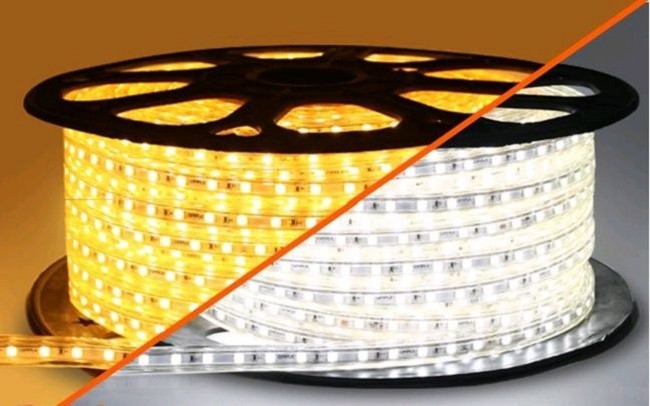
LED lighting and its benefits
![]()
Ceiling installation
The first step is the marking and assembly of the frame.
markup
To begin with, horizontal markings for wall profiles are carried out along the perimeter of the room:
Wires of the required section are recommended to be laid using a corrugated sleeve. As a rule, it can be made of metal or PVC. The connections are mounted in special boxes, which must first be soldered and insulated.
Note: Spotlights should not be located at the location of the profiles. Be sure to move the lamp or move the profile markings to another place.
Frame of the first level and its installation
Illuminated plasterboard ceilings have a special frame, which consists of a frame and sheathing.
Thus, you will get the first level frame. It will look like a lattice with a cell of 40x40 cm.
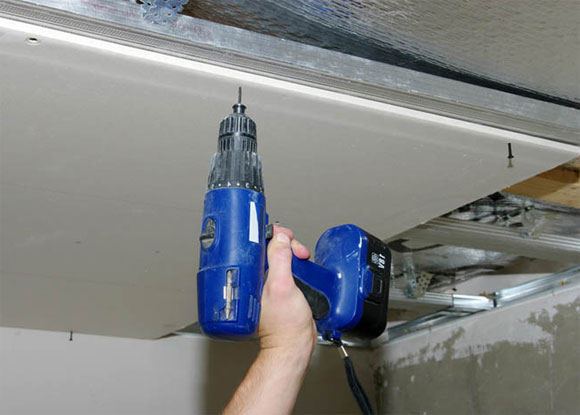
We fix drywall sheets
- A plasterboard ceiling with illumination is hemmed with sheets (GKL), 9.5 or 12.5 mm thick. The dimensions of the sheets should be 1.2x2.5 m.
- Using sheets of 12.5 mm, it is possible to hem the frame with only one layer. To fasten the GKL, metal screws are used (their length is 25 mm), and the pitch is usually 250 mm.
- The joints between the sheets will be eliminated by branded putty. A mesh is also useful - a sickle and a construction bandage.
Note: When installing the GKL, move the transverse joints (in a run).
In this case, the first layer will be laid according to the scheme described above, and the second - with an offset of the longitudinal and transverse joints. The sheets used for filing the second layer must be smeared with PVA glue on the reverse side. This procedure is carried out before installation work. Further, the sheets are screwed with screws (length 35 mm).
Tip: Before installing the second layer of GKL, carefully cover with putty all the joints of the first layer formed.
If a backlit plasterboard ceiling is sewn up in two layers, then this is a definite plus. So, you will not be bothered by a common problem associated with the appearance of cracks at the joints during operation. Of course, the surface of the ceiling will acquire additional strength. However, here there is back side- the ceiling will require financial costs for filing and will become somewhat heavier. Ready-made photo and video materials of plasterboard ceilings will help you get a complete picture of the entire structure.
Installation of the frame of the second level
A backlit plasterboard ceiling has a frame supporting all of the weight. But you also need to organize a niche in which the LED strip would be located.
Let's start with the markup process again:
- The location of the starting profile is marked on the walls. We reported about this a little higher.
- Marking the location of the transition between tiers is applied to the surface of the ceiling. In other words, they are stairs.
Tip: To draw a circle, it is recommended to replace the compass with a piece of wire. The latter should have two loops at the ends. One loop is put on the screw (screw it into center point), and a pencil is inserted into the second niche of the wire.
Note: The main profiles of the second level must be installed under the profiles of the first level. For additional protection, you can fix them with direct suspension brackets.
Lighting in a plasterboard ceiling: creating a niche
- When filing, it is necessary to ensure that the sheets protrude beyond the "step" at a distance of 80 to 120 mm. The extreme elements of the sheets are cut along a line parallel to the "step". To further strengthen them, they use a second “flexible” self-made profile.
- A side (strip of drywall) is usually fixed to it, 50 - 60 mm high. In this case, it is recommended to strengthen the upper edge of the side with a U-shaped profile (PVC or a plastic arched corner are used as materials). The resulting joints of the GKL are putty.
- Finally, you can start filling all ceiling surfaces. Further, the irregularities of the putty must be rubbed, primed and painted.
Note: If you are using a remote control, please install the infrared receiver on the remote control.
Based on the material of our article, it will not be difficult for you to build plasterboard ceilings with LED lighting (read also: ""). The whole procedure is within the power of any novice master. In extreme cases, you can always turn to professionals for help. They will do all the work for you in the shortest possible time and guarantee the safe operation of the structure.
Today, interior design is moving away from old formats such as the whitewashed ceiling. Instead, plasterboard suspended structures are often constructed. A great way to emphasize the unusualness of such a ceiling is the correct organization of its lighting. For drywall, an excellent choice would be a backlight made from LED strip.
Plasterboard ceiling with LED lighting
The main advantage of such lighting is the possibility of organizing it with your own hands. Our article will tell you what you need to know and how to proceed in order to create an incredible, unique plasterboard ceiling lighting in your home using LED strip.
Advantages of led
Many people prefer LED plasterboard ceiling lighting for the following reasons:
- uniform lighting;
- bright luminous flux;
The glow of the LED strip
- affordable price;
- simple installation of the tape itself. In the presence of a self-adhesive base, the product can be installed in a matter of minutes;
- a wide range of lighting fixtures to choose from;
- ribbons can create a glow of various colors: green, blue, red, etc.;
- long service life;
- high energy efficiency;
- the ability to remotely control the backlight, as well as adjust the glow mode. This requires a controller.
With such advantages, it is not surprising that led strip Today, not only plasterboard ceilings are illuminated, but also furniture, shop windows and much more.
Lighting options
At the very beginning of work on organizing plasterboard ceiling lighting, you need to understand what type of lighting will be mounted. The design features of the suspended plasterboard ceiling make it possible to organize two types of lighting:
- open lighting. Its design involves placing the LED strip directly on the ceiling. This type of lighting is not very common, since LED products of this kind are best installed hidden. Such installation has one main advantage - there is no need to make a hidden niche;
- hidden lighting. Here, the LED strip is placed in a special niche or mounted on a hidden cornice. This is a more suitable lighting option for a plasterboard ceiling, as it allows you to create interesting lighting effects (for example, a “floating ceiling”). In this case, the light will be distributed evenly, reflected and scattered from the ceiling, which will create the desired effect.
Note! The hidden type of lighting is applicable only if there is at least a two-level ceiling structure.
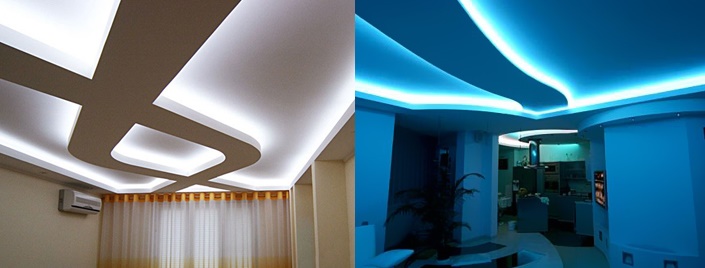
Hidden ceiling lighting
Both options for lighting the ceiling surface of drywall can be implemented with your own hands. Despite the apparent complexity in terms of organizing a hidden niche, it is not so difficult to make it. It does not even require special and deep knowledge in electrics. In this case, the lighting will be much more effective.
Choosing the Right
To make a beautiful plasterboard ceiling with lighting, you must first of all choose the right light source. Despite the fact that the choice fell on the LED strip, this does not mean that it will be easy to decide on its option. The range of these lighting products is quite diverse and can cause significant difficulties in choosing.

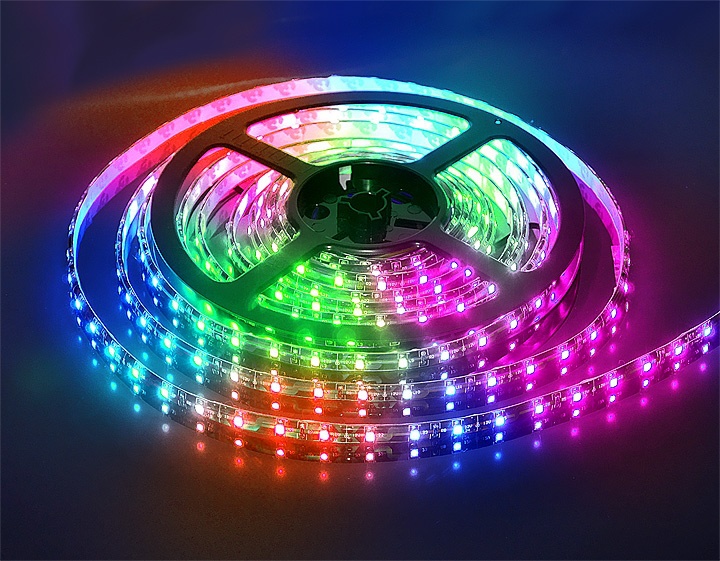
Variety of LED strips
In this situation, for lighting a plasterboard ceiling, the choice should be made from the following three options:
- SMD 5050;
- SMD 3528;
When choosing a light source from these options, it should be remembered that SMD 5050 and SMD 3528 will begin to lose their brightness in just a couple of years. Typically, a drop in this light characteristic occurs by about 20-40%. But if the backlight is used only as additional lighting, then this figure will decrease by 10%. For a plasterboard ceiling, the best solution would be to purchase an RGB tape.
It is characterized by the following advantages, compared with the other two options for lighting products:
- the tape does not lose its glow intensity over time;
- durability;
- creating a soft and diffused light flux at a power of approximately 12 lumens.
In addition, the choice of lighting products is made according to the number of LEDs placed in one meter of the product. This parameter can vary from 30 to 120 pieces.
Note! The more diodes per meter of tape, the brighter it will glow. But such models are much more expensive, and their installation will be somewhat more difficult.
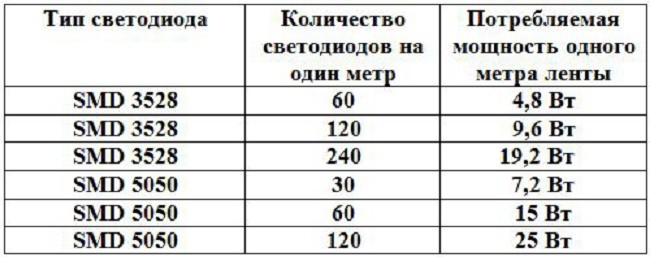
The number of LEDs in one meter of tape
Installing LED strips with 120 diodes per meter will be more expensive due to the fact that to power such a lighting installation it will require a larger power supply unit, which will entail additional waste. Remember that the power reserve of the voltage converter should be at least 20-30%. Therefore, in order to minimize the cost of installing such a backlight, it is worth choosing models that have 60 LEDs per meter. With such a tape, the lighting will be pleasant enough for the human eye. This is due to the fact that in this case it will be as close as possible to natural light. In this case, the room will be lit brightly enough.
Light source selection options
For right choice LED strip for do-it-yourself lighting of a plasterboard ceiling, you need to select a light source according to the following parameters:
- LED type;
- density of diodes per meter of tape;
- glow color. There are monochrome and color models. With color models, the design of the ceiling will turn out to be more spectacular;
- Colorful temperature. This setting has a range of 2700k to 10000k;
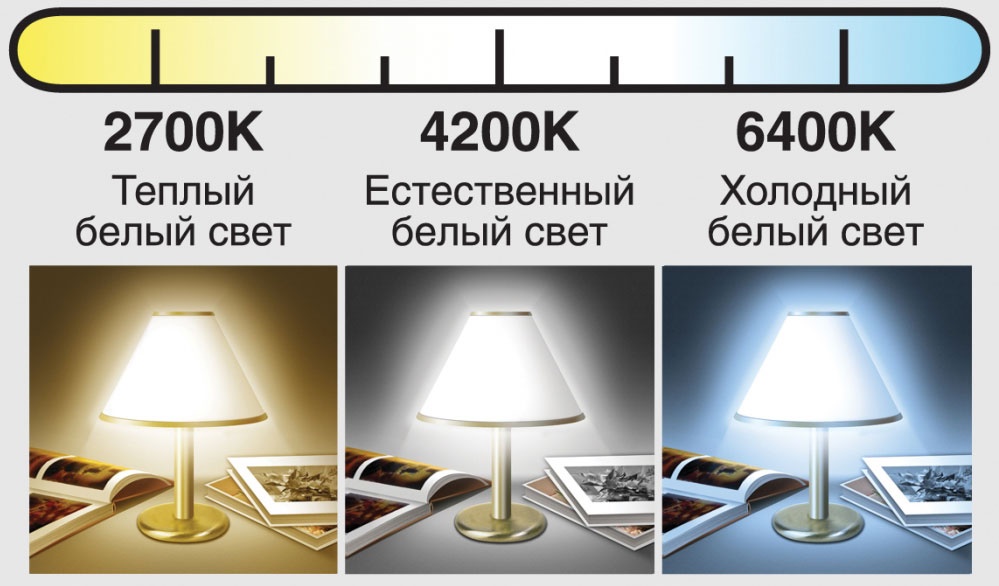
Light color temperature
- what voltage will the product have (12 or 24 V);
- water resistance class. This parameter determines the tightness of the product. Sealed models can be cleaned and washed without fear of damaging the electronic component of the installation.
Note! For rooms such as kitchen, bathroom and balcony, you should choose models with a high moisture resistance class (IP 54 and higher). For all other rooms, tapes with a low moisture resistance class can be used.
Based on these parameters, you can choose the ideal lighting option for each specific case of the ceiling, and also easily sweep its installation with your own hands.
Installation of led in the ceiling structure
Since the hidden LED lighting of the ceiling made of drywall is the most common, we will consider in detail this type of lighting organization with our own hands. AT this case work must begin at the stage of erecting a frame for a suspended structure. Here, in addition to the frame itself, you need to assemble a niche from guides and rack profiles.
Note! A niche should be assembled depending on the type of backlight. Most often, its installation is carried out around the entire perimeter of the room.
Do-it-yourself installation of a niche is as follows:
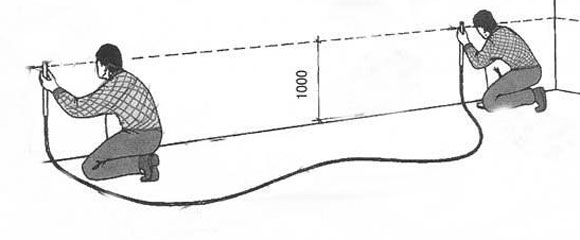
- about 10 cm should be retreated from the starting ceiling and a horizontal line around the entire perimeter of the room. To make it perfectly even, you need to use a level (laser or hydro level);
- along this line we attach the starting profile to the wall;
![]()
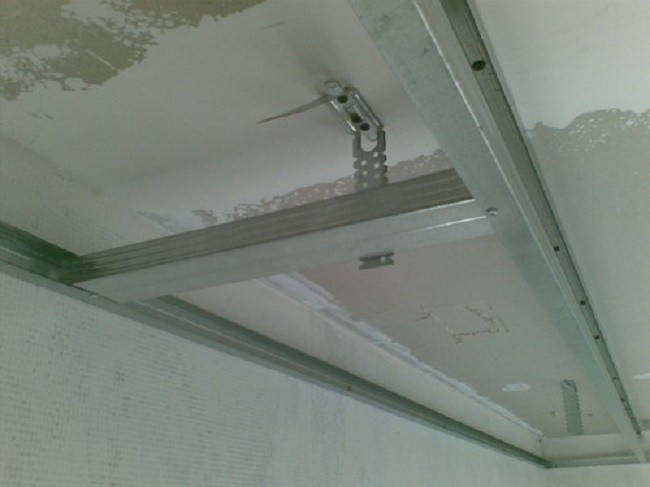
Setting the start profile
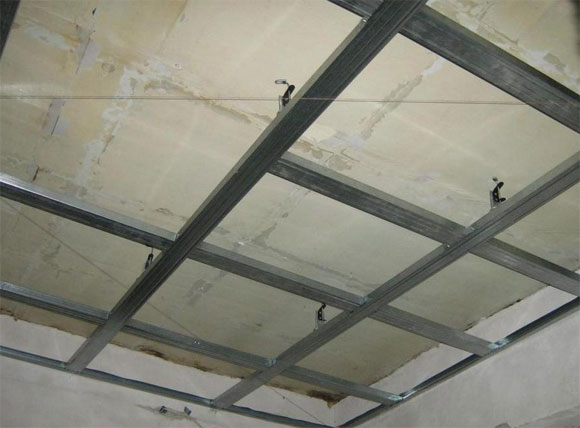
- then we insert the main profile into it and fix it on the ceiling with the help of suspensions. The step of its fastening is 40 cm;
- after that, we derive the first level and build on it the second - for a niche;
First frame level
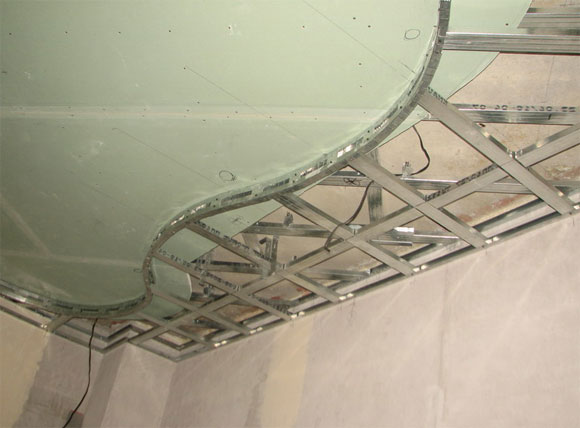
- to increase the strength of the structure being erected, jumpers are inserted into the niche frame, which are fastened with the help of special connectors - crabs;
- you need to retreat 4-6 cm from the first level. Again, draw a horizontal line and set the starting profile along it;
- then we cut the main profile into segments of the height of the niche and install them in the frame using self-tapping screws;
- then insert the main profile into the starting profile and display the niche.
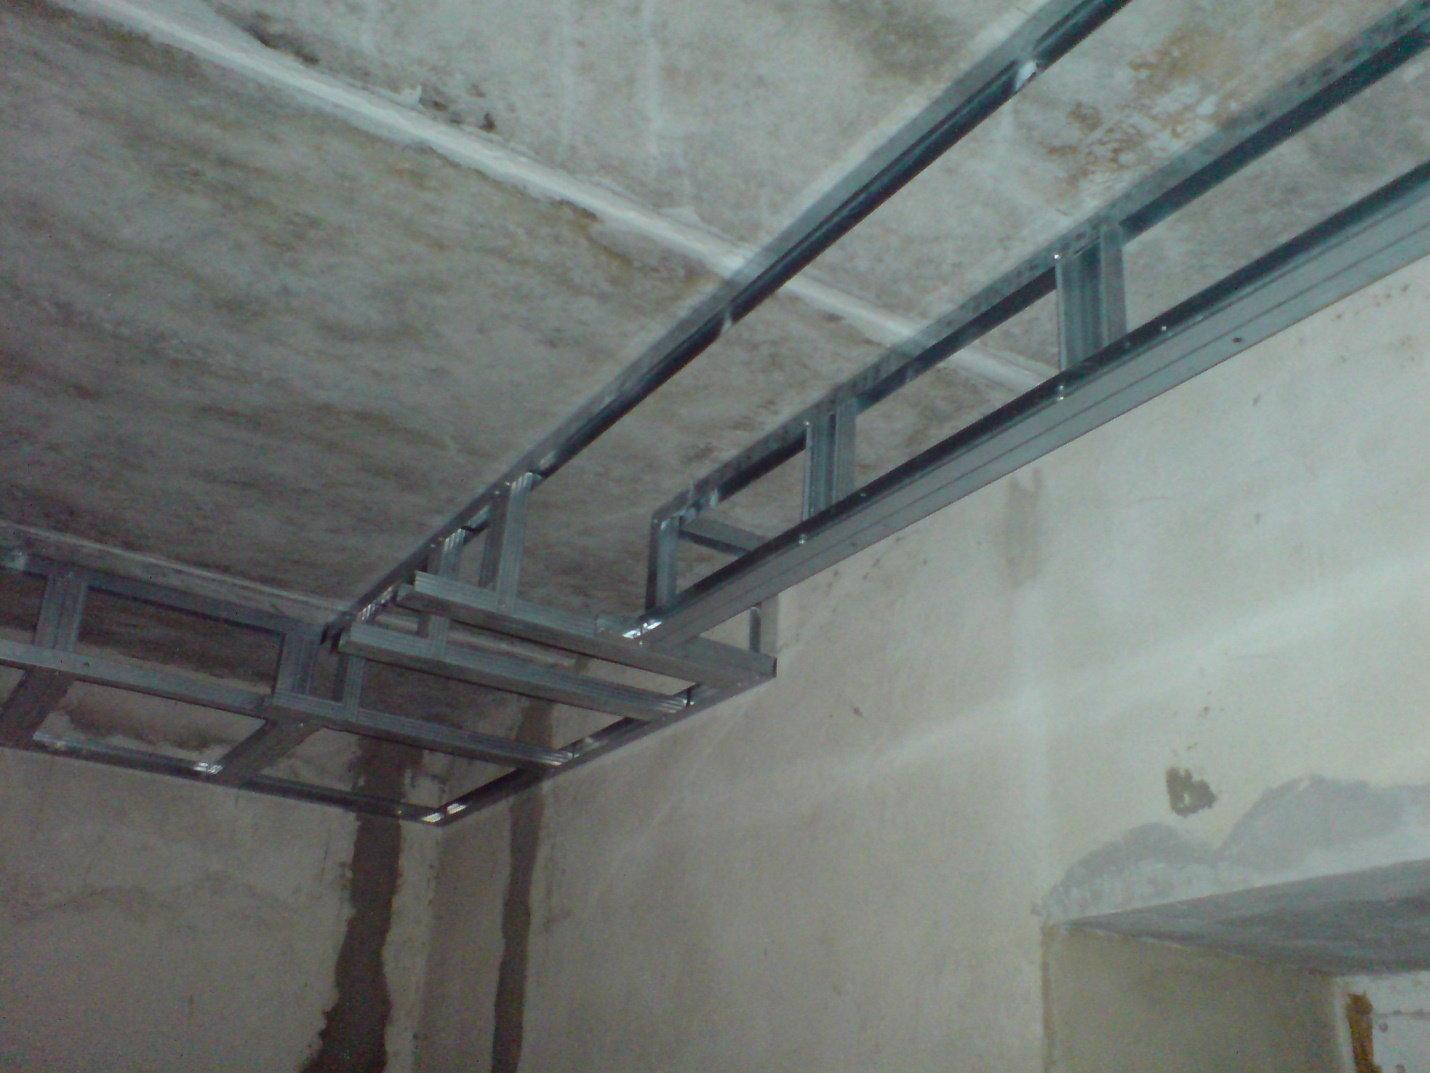
Finished niche frame
Remember that at the frame stage you need to hold a leash for lighting. This completes the installation of a niche with your own hands. It remains only to sheathe it with plasterboard sheets and apply the final finish to it.
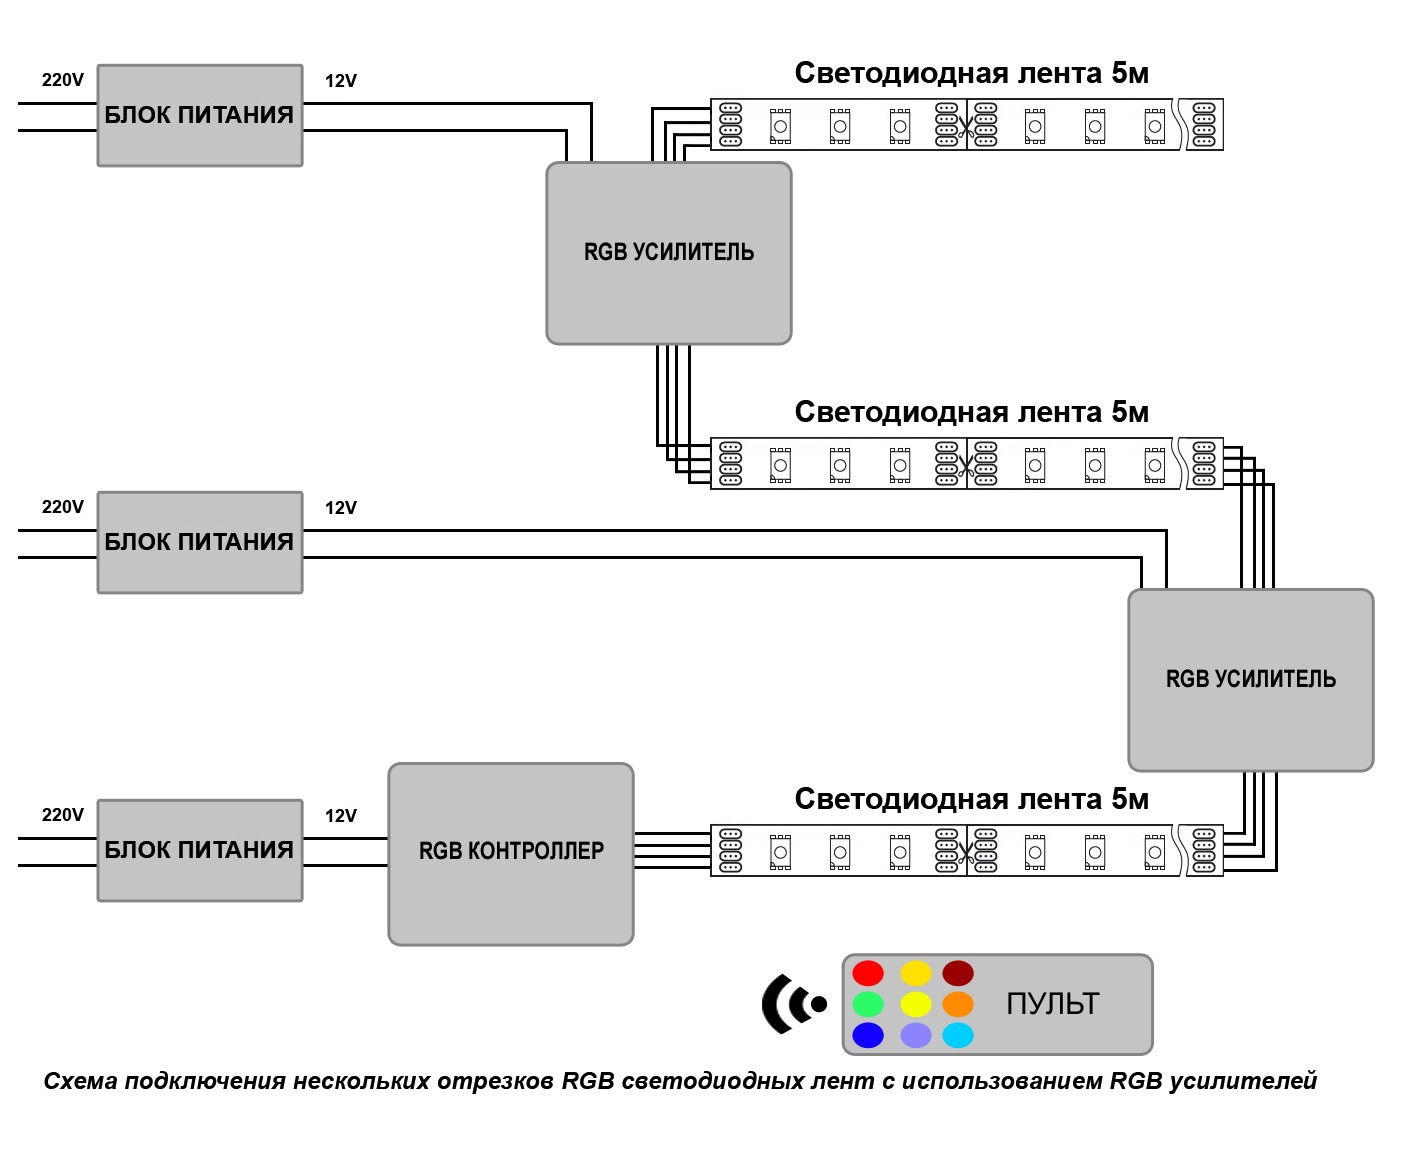
Now we are installing the LED strip. To do it yourself do-it-yourself installation correctly, you should use the following diagram.
To connect the tape with your own hands, you need to do the following:
- cut the tape in the right places into separate pieces. This is done to create a backlight of the desired length;
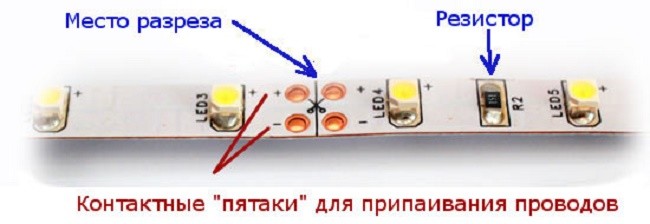
Place to cut the tape
- then solder two separate pieces of the product. You can use special connectors for connection. But such devices are expensive;
Note! A more reliable connection is considered to be soldering individual pieces.
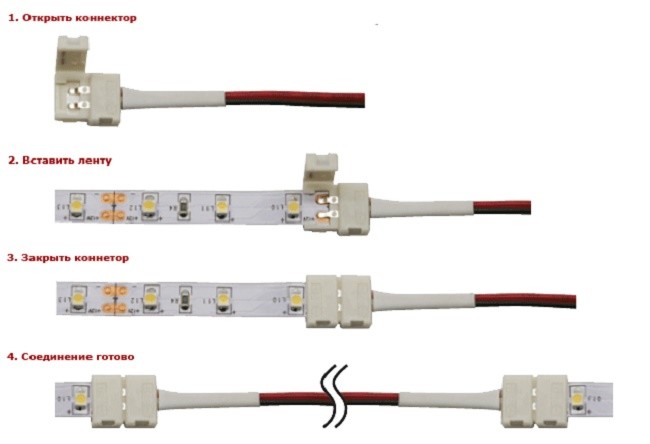
Connection connectors
- now you need to connect the LED strip to the power supply and controller (if available). To do this, use the scheme;
- we check the backlight for operability and install it in a niche made by ourselves.
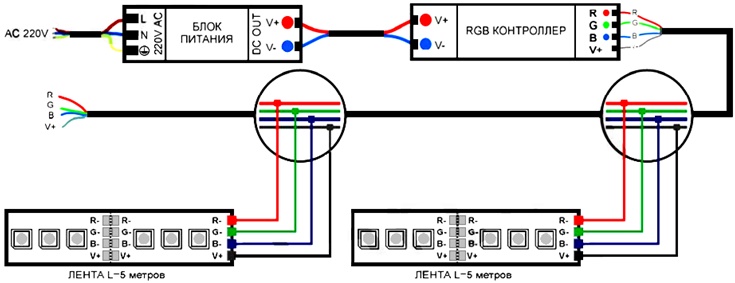
LED strip connection diagram
On this, the installation of the backlight is considered complete.
Things to Remember
When connecting the LED strip, remember the following points:
- the power of the power supply must be at least 20% more than the total power of the led strip;
- You can cut the product only in specially designated places. AT otherwise tape will not work;
- the soldering of the contacts must be carried out carefully and efficiently so that they do not move away during the operation of the backlight;
- all metal sections of the niche must be covered with insulating material;
- all work should be carried out with the electricity turned off;
- the connection of the product must always take place according to the selected scheme;
- when connecting the wires, be sure to observe their polarity (red - plus, and black / blue - minus).
Conclusion
The beauty and effectiveness of illuminating a plasterboard ceiling with LED strip depends on the correct assembly of the niche and the connection of the led. Only with the correct and consistent performance of the work will you get excellent lighting, which you can easily do with your own hands.
Plasterboard ceilings are widely used. They have earned popularity due to the ease of installation of the structure and attractive appearance. And with such ceilings, various types of lighting devices are used. Let's look at how to independently install an LED strip on a plasterboard ceiling.
LED lighting and its benefits
Such lighting devices are also called LED strips. They are flexible strips equipped with LEDs and resistors on one side, and on the opposite side there is adhesive double-sided tape with which they are attached. The tape is divided into sections of five centimeters. Each of them contains three LEDs. The sections are marked with cut-off marks of the diode strip. The LEDs are connected in series.
There are two types of LED strip:
- protected. It is covered with silicone or plastic overlays. This allows you to close the LED system from the negative impact. environment and damage;
- open.
In the manufacture of plasterboard ceiling tapes, two types of diodes are used: 3528 and 5060. The latter are used as independent light sources and are characterized by more powerful light than the former. Often, for ceilings with plasterboard boxes, multi-colored LED strips are used, which are equipped with four outputs. One wire, when connected, goes to ground, and the other three - each to its own color.
The advantages of devices with LEDs are presented:
- ease of installation with your own hands;
- long service life and independence from the number of times the light is turned on and off;
- moderate cost of lighting fixtures with LEDs;
- a variety of color palettes;
- flexibility and consumption of a minimum amount of electricity;
- minimum degree of heating, unlike other types of lamps;
- mechanical strength during installation of the tape. Unlike a fluorescent or neon lamp, it is impossible to break it, but it is afraid of breaking;
- eye safety.
How to attach tape to a plasterboard ceiling frame
Keep in mind that when illuminating a large area, it is not rational to mount a long strip of LEDs on a drywall box. This is due to the rapid failure of diodes located close to the power supply, as they take on a large amount of voltage.
Important! The maximum length of the ribbon for one power supply should not be more than fifteen meters so that the diodes last longer and do not burn out.
Choice of tape for mounting
It includes the following subtleties:
- the type of LEDs used in the tape is initially selected: bright or dimmer. It depends on the purpose of the backlight. If it should work as a night light, then the second option is preferable. the cost of bright lamps is higher;
- the second step is to determine the density of the diodes on the LED lighting device. Three options are offered on the market: 30, 60 or 120 centimeters. These values show the number of diodes on a piece of tape in one meter. The more of them, the brighter the lighting;
- at the third step, the device type is selected: open or protected. If lighting is provided for the kitchen or bathroom, then the use of the first is unacceptable;
- the fourth stage is the choice of single-color or multi-color illumination. The second option requires a controller.
Choosing a controller and power supply
It directly depends on the correctness of the calculations and measurements of the section of the drywall box in which the lighting device with LEDs is installed. To do this, first calculate the area of \u200b\u200bthe room. After this action is completed, the resulting parameter is multiplied by the power consumption of the tape meter.
After that, the location of the tape is planned, and then the main stage of installation follows.
Backlight setting
If the strip of LEDs is single-color, then the connection of the ends is carried out in strict observance of the polarity, that is, the positive wire to the positive one, and the negative wire to the negative one. If it is multi-color, then it is necessary to select sections with the designation of colors on the tape.
Important! The tape is cut exclusively according to the marks on it, otherwise you can ruin it by damaging the chain.
The light cord is connected to the contacts marked with the letters N and L. When choosing a multi-color tape, the connection scheme becomes more complicated and becomes as follows: from the power supply, the connection goes to the controller, and from it to the tape itself.
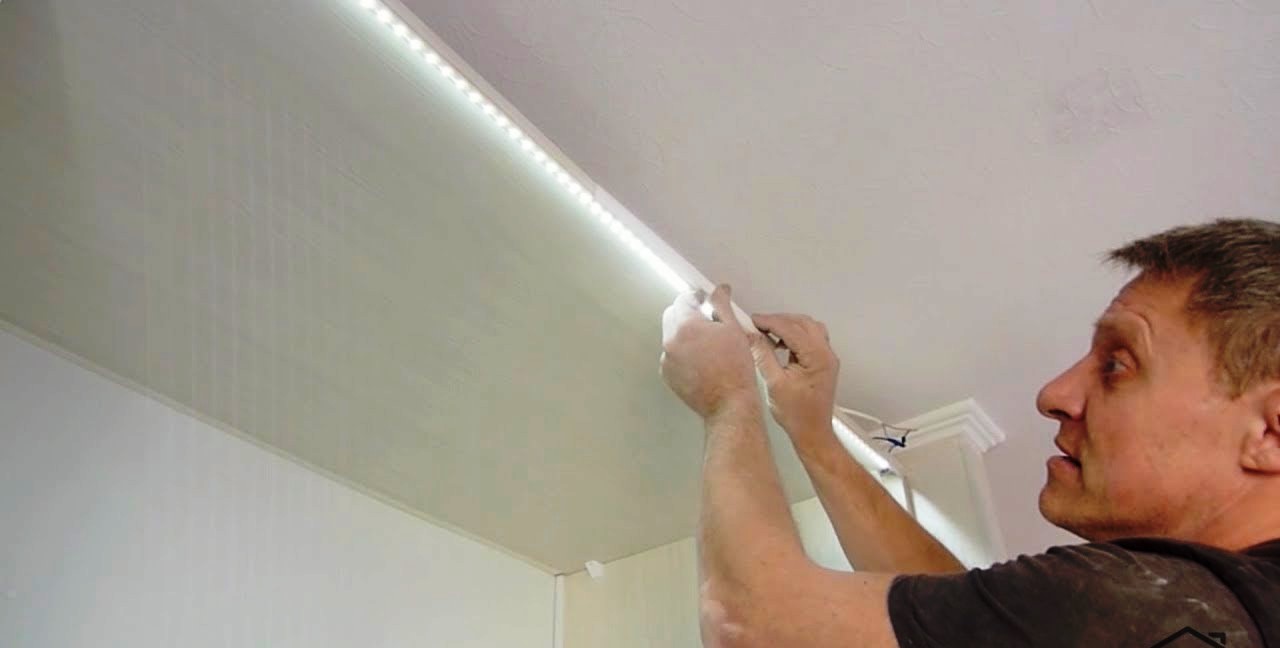
Fastening the tape to the cornice and drywall box
In most cases, lamps of this type are mounted in the form of a circuit. The second option is used for the purpose of zoning a room or emphasizing certain interior details. For example, it could be a starry sky.
The installation of this type of lamp on the cornice and frame is carried out in such a way that it is not visible from below. For this purpose, special cornices are used, ledges are made on a drywall box, mounted on a profile frame. It is important to take into account the distance from the edge of the frame to the location of the tape. If it is too small, then the diodes will be visible from below, and if it is very large, then the lighting will be directed to the niche of the ceiling, and not to the surface itself.
Before installation, a project is created and a drawing is drawn that will help draw up a work plan. At the same stage, the number of tapes is planned. Next, a tape is glued to the frame and cornice. For better fastening, it is better to use additional glue and a construction stapler.
For better fastening of the tape to the surface of the frame and cornice, it is degreased with an alcohol solution. If you want to bend the tape, then keep in mind that the diameter of the bends should be no more than 2 centimeters.
It is not uncommon to use LED lighting in the kitchen, but as mentioned earlier, they must be protected. Illumination of this type provides the possibility of dividing the room into a working and dining area. A special place is given to the areas of niches, cabinets, apron. Devices with LEDs look spectacular in restaurants, bars and cafes, giving these establishments elegance and a special atmosphere. They are mounted on a drywall box created on a metal profile.
Panels with LEDs
This is a good alternative to ribbons. They are multi-colored, the thickness is from 13 to 15 centimeters. Unlike tapes, LEDs are fixed to a profile or bar. They are available on the market as separate elements or integrated, for example for stretch ceilings. Such elements, when fixed to the profile, allow solving the problem of low ceiling ceilings. These models are equipped with a device for adjusting the saturation of lighting, which makes it possible to select the most comfortable brightness level.
Mounting devices with LEDs on a drywall case will not cause difficulties if you follow simple tips. It is important to study the instructions for installation and selection of the required device. We need a responsible approach and compliance with the rules during installation work. A strip with diodes will help to achieve an interesting design option for the ceiling and give the room originality.
Video advice will help you understand and learn all the intricacies of mounting LED backlighting on a ceiling surface: