Back paintings with your own hands. How to make stylish paintings for your kitchen interior using scrap materials with your own hands. D paper painting
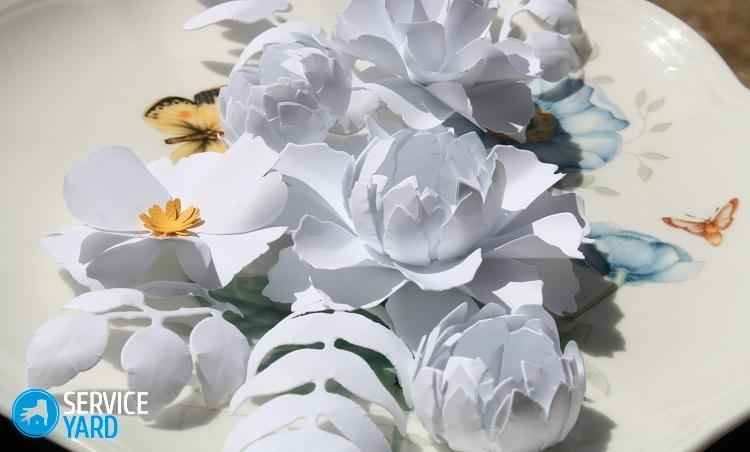
The easiest way to decorate any interior is with paintings, panels and posters. And if ordinary, flat paintings seem too banal to you, then you can create original three-dimensional compositions. You don't have to be a professional designer or artist to do this. In this article we will talk about how you can create paintings from paper flowers with your own hands, so that your interior will be decorated with a beautiful and unusual craft made by you.
Three-dimensional painting with flowers
To make a beautiful and original painting you will need the following:
- A three-dimensional frame that can be purchased at any craft store.
- Postcard paper, fabric or colored cardboard in a suitable color.
- Paper artificial colors.
- Hot glue gun.
- Aerosol glue.
- Scalpel or stationery knife.
- Metal ruler.
- Wire cutters.
Sequencing:
- Remove the back wall of the frame. As a rule, it is made of thick brown cardboard.
- Apply spray adhesive to the cardboard and glue colored paper or other material of your choice on top.
- Let the glue dry, and then trim the protruding edges of the material to fit the base.
- Select flowers and other little things so that you can use them to create a beautiful composition. Try everything on in its place.
- Using a hot glue gun, secure the artificial flowers inside the three-dimensional frame.
Important! Try to make sure that the droplets of glue are hidden behind the leaves and stems of flowers and are not noticeable.
In principle, the picture is already ready. All that remains is to decide whether to frame the glass or not.
Important! If you insert glass, then dust will not accumulate inside the painting made of paper flowers with your own hands. But in a panel without glass you can glue voluminous paper flowers that will beautifully protrude beyond the edges of the frame.
3D paper painting
In addition to the above-described option for creating wall decor, you can also try to make a three-dimensional picture in the shape of a heart. To make it you will need the following:
- Frame with deep sides.
- Stationery knife.
- Colored cardboard with a bright print.
- Pencil.
- Thin cardboard and white watercolor paper.
- PVA glue.
- Scissors.
- Ruler.
Important! Instead of a purchased frame, you can use a candy box.
Sequencing:
- Cut a rectangle from a white sheet of paper to fit the selected frame.
- Draw by hand or print a heart of such a size that it can easily fit into the frame 9 times in 3 rows.
Important! The approximate size of one heart is 5x4 cm.
- The heart needs to be cut out and circled with a pencil, placing it on previously prepared white paper. There should be 3 rows of 3 hearts.
- Now it's time important step— Using a stationery knife, carefully cut out the “wings” of the hearts. To do this, make cuts along the contour of the hearts, without touching the upper and lower parts.
- Bend the cut parts of the hearts up and towards the center, making them voluminous.
- The blank with hearts must be glued onto colored cardboard.
Important! It is desirable that it be scrap paper with some beautiful small pattern. It will be visible through the bent “wings” of the hearts.
- The final step is to place the composition in a frame and secure it with glue or a stapler.
Important! Based on this master class, you can make your own 3D plot, for example, fluttering birds, butterflies, people or other original patterns.
Video material
From the proposed master classes we can conclude that making a painting from paper flowers with your own hands is a very interesting and exciting process. And what you made is beautiful and original composition will be a wonderful decoration for your home.
Having decided on the style, you can begin to select materials for the future work:
- Paint and canvas.
- Cardboard, designer paper, magazine clippings, old photos.
- Textiles, leather, ribbons, braid.
- Glass or crystals.
- Buttons.
- Dried flowers, shells.
Advice! Don't throw away old children's drawings, scraps of fabric, magazines, decorations– all this can become part of the picture. Store them in a separate box, periodically reviewing and arranging them together.
Painting with paints
The easiest way to create an original painting for your interior with your own hands is to paint it. The subject is limited only by the imagination of the creator. Even if you have no artistic skills, you can create a masterpiece: use abstract techniques, study master classes and photos of finished works.
Oil, watercolor, and acrylic paints will become faithful assistants in creating paintings for the interior. As a base, you can use either professional canvas or regular thick paper or a primed board.
Advice! You can draw inspiration from nature if there are picturesque places near your home. If you are unlucky with either the location or the weather, feel free to draw your household, pets, fruit compositions - whatever. The accuracy of the reproduction of reality does not play any role, the main thing is to approach the process with soul.
Modular paintings are suitable for almost any room: from kitchens before living room, but it is important to select appropriate images. If you don’t have time at all to create a masterpiece with your own hands, then we have for you good news- today you can buy them in any specialized store!
Photo printing
The technical side of the issue is taken care of by a photo workshop, which can print a suitable image on almost any basis: canvas, paper, ceramics, etc. These can be ordinary posters depicting interesting places, people, ornaments.
Advice! A poster is not just a picture, it must convey a certain idea, correspond to the interior, the theme of the room and the character of the owners of the house. IN Lately Pin-up and retro style posters have gained particular popularity.
If the poster is large-format, you can divide the image into several segments and, when combined into a single canvas, play with the joints, making it look like a modular picture.
If there is a child in the house, then you can scan his drawings and select the ones that match the color, shape, etc. Such a poster can be complemented by a photo of the artist himself. All that remains is to print the poster and place it in a frame that matches the color and style.
Collage of old and new family photos You can hang it as a picture in the bedroom or living room, and posters depicting the corresponding paraphernalia and fruits are suitable for the kitchen. Finally, it is worth noting that it is recommended to choose posters and panels for the kitchen in rich and bright colors, however, no one forbids you to go against the rules and create stylish ones.
Textile
From all kinds of scraps, fabric with beautiful patterns, ribbons, braid or lace, you can create real masterpieces in patchwork style with your own hands. Fabric paintings are most often made using the appliqué technique. The basis is taken of dense textiles with discreet and inconspicuous patterns (stripes, polka dots, etc.), and the main elements are cut out from bright shreds.
Most often, kitchens and children's rooms are decorated with textile works, since these rooms are characterized by a certain simplicity present in the appliqué.
Advice! From felt, flannel and other fabrics that hold their shape well, you can cut out fruits, animals, cars, and houses. You can safely combine different textures and patterns on fabrics, use braid, decorative cord, and buttons for decoration. For the living room, you can make a textile picture from crinkled silk with abstract patterns.
From buttons
With their help, you can create original things by sewing or appliqué. Often this type of fittings is used to depict leaves on trees. Buttons can be glued in an original way inside any contour, for example, a silhouette butterflies or cats. In sewing stores you can pick up details various forms, colors and materials and lay them out like a mosaic according to a pre-prepared pattern. Such button creations will fit perfectly into the kitchen, however, they can also be used for the living room and bedroom.
Advice! Buttons can be glued around the perimeter of the picture frame, giving it individuality.
Wallpaper and panels
Often after repairs large pieces remain beautiful wallpaper, which are useful for making unusual interior paintings.
- Wallpaper in a frame is the easiest option to create something like this panel. A piece of the desired shape is cut from the roll and placed in a frame. Moreover, the ornament may coincide with the pattern on the walls or differ from it. Such elements can come in a row of 2-3 pieces.
- A framed canvas will help revive a boring canvas golden paint and a stencil or small black and white photos, stylized as antique. Similar wallpaper pictures will fit perfectly into
Every interior should have its own flair, and often the simplest and most elegant option to bring uniqueness to a room is a painting.
But how to find something that will decorate your bedroom, living room or other room? Most likely, you will have to pay a large sum of money for an original work.

But if you don’t expect to spend extra money, but still want to have something original, then it’s quite possible to make an interesting painting with your own hands.

At the same time, it is not at all necessary to be able to draw well. After all, paintings in the usual sense have long replaced three-dimensional images on the walls, abstract ideas embodied in a variety of techniques.

DIY fabric paintings
All high-quality canvases are made on a fabric basis. However, the modern interpretation of such paintings changes our view of art.
Modular fabric paintings have become very popular. But making them yourself is not so difficult. In stores now you can find a lot of fabrics with very beautiful, interesting and bright prints.

If you like one of them, then you can safely buy it and make an original piece of decor.

Modular picture
To create a room decoration such as a modular picture made of fabric, you will need a base in addition to the selected material. It could even be a door from an old cabinet or a piece of chipboard that could easily be lying around somewhere in the garage after renovation.

Cut out several pieces from the base to the size of your fabric and cover the tree with it. Make sure that the fabric is well stretched and does not form wrinkles. Your painting is almost ready. All that remains is to attach the hooks with which it will be attached to the wall.
Most often, such paintings consist of three or more modules, which may be the same size or different. Their shape can also be different.

The most common and easiest to manufacture are square and rectangular elements. But there are round, oval and other forms of modules for paintings. Frames for painting modules in in this case Not needed.

Paintings from clothes
Even a T-shirt can decorate your interior. It often happens that stains or holes appear on clothes that you have not worn for very long, and their colors are still bright. You don’t have to throw away a seemingly damaged item, but make an original painting out of it.

Cut out a rectangle with an image from your clothing, glue it onto paper and place it in a frame. The photo shows that such paintings depicting cartoon characters will fit perfectly into the interior of a children's room.

Embroidery
In some ways, embroidery can also be classified as fabric paintings. This method of interior decoration is not new. Even our great-grandmothers had at least one hand-embroidered image in their house.

However, to embroider a picture, you still need some skills and patience. This method is not suitable for everyone, but if you do needlework, then hand-embroidered pictures can say a lot about you as a housewife.
Three-dimensional paintings
Relief images on the wall are also very popular as decorative elements in the interior. Three-dimensional paintings can be made with plaster on the wall even before its finishing.

But such decoration can only take place if there are no plans to stick wallpaper on the wall.
Note!


The method of making such paintings requires training and a considerable amount of time. Therefore, it will not suit everyone.

Paper paintings
There is an easier way to make a three-dimensional image. For this you will need colored paper or cardboard. Cut out several figures of the same or different sizes from it. These could be, for example, butterflies.

Using pins or double-sided tape, attach them to the wall in a chaotic manner or forming some kind of pattern. Your paper painting will look more impressive if you choose a color that contrasts with the tone of the wall itself.
The butterflies themselves can also be of different colors. Such a picture will sparkle with new colors when turned on artificial lighting, therefore it will look most advantageous in rooms where the light is turned on most often, for example, in the corridor.

If your house has a staircase to the second floor, then the kittens will look original different poses, placed on the wall to which the steps adjoin.

Paintings from bushings
Rolls of toilet paper or paper towels will help you create voluminous decor with images of flowers and leaves. It is enough to flatten the cylinder a little and cut it into equal parts approximately 2-3 cm wide.
Note!


In order for the flowers to be brighter and the leaves to stand out in color even before work begins, the bushings can be painted different colors. The individual parts of the sleeve should be placed so that a flower is formed, so it is possible to create entire compositions.

Artificial flower paintings
The easiest to make are paintings made from artificial flowers or other decorative elements. The main thing here is to beautifully glue the finished parts onto the base.

For this technique you will need a frame, a plain material and the image itself. Cover a sheet of paper with fabric, wrapping its edges and gluing it on the back side.

Then, having first removed the glass from the frame, insert the base of your picture into it and glue artificial flowers or other details (shells, dry twigs, etc.) to it. Finally, you can decorate the frame with beads.

If you already have a finished canvas, then there are many master classes on how to decorate a painting that is already boring to you and thereby update the interior.
Note!


A flat image of nature or still life can look completely different if several three-dimensional details are attached to it.

This can be either an image cut out of paper or natural materials in the form of dry leaves or even butterflies.

Photos of paintings with your own hands


Paintings created independently will help give a tired interior design a new character and flavor, as well as add a fresh spirit to the design of the kitchen, bedroom, and nursery. You can make unique paintings with your own hands from any available materials; this absolutely does not require professional art education. Stylish works of art, which rightfully occupy a dominant role in the house, are a bright accent that can enliven the interior, filling it with individual features.
In fact, you can make a painting with your own hands from almost anything. Yes, yes, this is not a joke. Using imagination, all creativity and creativity, you can really use any available materials: coins, shells, buttons, threads, pieces of fabric, leaves, dried berries, small branches, cutlery, sewing accessories, personal photographs and even miniature children's toys .
Perfect solution not only for the kitchen, but also for the bedroom, living room, children's room. Such modular compositions look holistic due to a single trunk and branches extending from it. The background of each individual element corresponds to a specific season (autumn - orange, summer - emerald, spring - light green, winter - blue). The button foliage is also done in a tone that matches the seasons represented.
Button painting

Composition of buttons “Seasons”
A few more buttons
Buttons are the ideal material for self-creation interior paintings. Using structure, size, shape and materials wisely, you can create real masterpieces without having an art education.

fluttering butterfly

Cat for cat lovers

Seascape made of buttons

Color spectrum - rainbow
Leather products
Although leather is quite easy to process, painting is not so easy to handle. This requires an understanding of working with the material, knowledge of the basic properties of leather, considerable patience and perseverance. Therefore, it is recommended to first try to make small test compositions, and then move on to large-scale, fundamental works.
The most commonly used color palette in paintings made from genuine leather is brown-beige. But some daredevils are happy to use green, red, orange, and yellow scraps.
The main advantages of leather images:
- Exclusivity – due to the originality of the material, it is impossible to repeat the picture exactly the same;
- Relief – depth, elevations, highlights and shadows create an unsurpassed 3D effect, thanks to which the picture “comes to life”;
- Availability - small pieces of leather can be found either at home or purchased at a flea market or from shoemakers for literally nothing.

Still life of colorful leather

A game of contrasts (red, black and white patches are used)

Convex leather flowers
Video master class: DIY leather painting
Panel of products
One of the most current techniques for creating paintings for the kitchen is considered to be object appliqué. Moreover, in this case, the most in demand are cereals, coffee beans, small dry vegetables and fruits, citrus peels, spices and the like.
Panels made from food products look harmonious in the interior of the kitchen, as they look not only stylish, but also appetizing.


Monochrome composition of black and white beans

Landscape of various cereals and seeds

Round panel made of legumes
Wallpaper in frame
Wallpaper paintings are a very budget-friendly addition to the interior. Moreover, you can create in several techniques at once: appliqué, 3D format, stretching on a wooden base, etc. The good thing about wallpaper is that it fits perfectly into any room in style - after all, the remnants of rolls purchased in abundance are used.

Ornament elements

creative collage

Panel from leftover wallpaper

Wallpaper frames
Applique of dried flowers and leaves
Pictures made from pre-dried vegetation also look unusual on the wall. Buds, flower buds, petals, small twigs, leaves, blades of grass - everything goes into use. Having drawn a pencil sketch on paper, the necessary elements are simply pasted on top, taking into account the preferred color and shape.

Vase with Flowers

Three-dimensional picture from dry vegetation

Unusual applique of flower petals
Photography in the kitchen interior
For those who prefer to follow the path of least resistance, photographic paintings are a great way to add color to a room. In this case, it is enough to select a photo on the Internet or from a personal archive and print it on a wide-format color printer.

DIY photo triptych for the kitchen

Thematic composition of several photos

Photo collage on canvas
Fabric designs
Fabric paintings are also widely used in kitchen decoration. They always look original, colorful and stylish. To prevent dust and grease from penetrating inside, upon completion of the creation of a work of art, textiles are usually treated with varnish. For fabric products, synthetic material, burlap and silk are best suited.

Textile applique in 3D format

Flat applique from fabric scraps

Fabric painting made using a sewing machine
- When creating a picture for the interior with your own hands, it is best not to be colorful with colors, but to use a tone that matches the design of the kitchen. You should also always adhere to the style of the overall interior design concept. For example, in a classic room, leather goods and linens painted in oil are acceptable. The following materials are suitable for high-tech style: glass, metal, mirror. Provence can be filled with floral ornaments and pictures of cereals. Volumetric works look harmonious in modern and combined styles kitchens.
- The color palette should include three primary colors and several (at the owner’s request) similar shades. Cold tones are allowed to be diluted with warm accents, but you need to take colors from the opposite spectrum.

Color spectrum: correct principles combinations of shades
- For convex shapes, you should always use alternating light and dark tones. Moreover, oversized dark volumes on a light plane look best. The principle of tandem of glossy and matte materials is approximately the same: matte should protrude above the glossy. This way, greater depth of the paintings and maximum 3D effect are achieved.
- At self-production paintings, be it appliqué or drawing, it is important to observe the basic compositional principles, dynamics and balance.


- The easy way to make the picture original - to bring the internal drawing beyond the basic outline. For example, extend the image onto the frame or, with relief shapes, beyond the border of the frame.
Four simple master classes

Photo of the final result
You will need:
- an empty candy box or any deep frame
- double-sided colored paper
- simple pencil, eraser
- cardboard scraps
- sharp scissors
- PVA or transparent stationery glue.
Step-by-step instruction:
- At the bottom of the candy box you need to draw a big heart. It is advisable that there be a distance of at least 20...50 mm to the frame (depending on the size of the box).
- Make several templates from cardboard different sizes in the shape of hearts.
- Cut out multi-colored paper hearts using cardboard templates. Fold each heart in half vertically.
- Glue together two hearts of the same color and size. Gluing is done along the edge of the upper figure.
- Place a composition of double miniature hearts inside the frame. It is important that you cannot go beyond the contours of the drawn big heart.
- Glue all the elements according to the laid out diagram. Glue should only be applied to the edges of the hearts.
- The volumetric 3D painting is ready! Then you can decorate it by painting a plain frame or using hanging decor (sweets on ribbons, paper butterflies on a fishing line, etc.).
DIY drawing

Photo of the final result
You will need:
- colored cardboard
- simple pencil, eraser
- ruler
- black marker or felt-tip pen
- PVA glue
- scissors
Even a child can make such a picture on his own. After all, exact shapes and proportions are not important here. The main thing is to skillfully use a ruler and pencil, and also have at least a little creative potential.
How to draw a picture yourself: step by step

Tip: The drawing can be left in monochrome or painted with colored pencils, watercolors, and wax crayons to match the interior color.
How to make a modular composition yourself

Photo of the final result
You will need:
- piece of fabric (the size must be generous - each piece needs a margin of at least 10 cm in width and 10 cm in height)
- pieces of plywood and wood slats for the frame
- foam or chipboard for the base
- furniture stapler
- scissors
- tape measure or long ruler
- a simple pencil or chalk (chalk is useful if the fabric is dark in color)
Step-by-step instructions:
- Two options for creating a base for a painting with your own hands:
- Making a stretcher with your own hands. Saw the ends of the slats at 45 degrees and connect them with glue or a stapler. For reliability, it is recommended to fix small isosceles triangles at the corners of the frame. Triangles can be made from plywood or fiberboard. Also, for structural rigidity, you can stretch the fabric around the perimeter, attaching it with a stapler.

Making a subframe with your own hands
- Cut the finished base strictly to size from chipboard (16...25 mm) or prepared foam plastic.

Chipboard base
- Fixing textile fabric. Cut the fabric to a size larger than the stretcher, taking into account all the folds. Next, you should slightly moisten the material and only then begin to stretch it onto the base. Corners require special care and attention.
Advice: first you need to stretch the long sides of the future painting, and then the short ones.
Before fixing one of the sides, you need to make sure that the material is not crumpled or crushed.


- That's all - the modular picture is ready. Using the same principle, you can make a photo decoration for the interior.
DIY kitchen decor made from threads

Photo of the finished work
You will need:
- base - you can use wood, laminated chipboard, cork board, etc.
- miniature carnations with wide heads (so that the thread does not slip off)
- medium-thick ball of thread
- scissors
- hammer
Step-by-step master class

This technique of creating paintings yourself is only the first step towards making masterpiece works of art from threads. Having learned the basics, you will be able to make paintings of the most complex configurations from multi-colored threads.
Thread paintings: video master class
Be bursting with ideas, create and get creative - let the interior paintings made with your own hands please not only you, but also amaze, amaze, and delight your guests! Stylish interior the kitchen and the whole house are the merit of proactive owners who are not afraid to experiment.