Pack a gift box for a man. How to pack a gift: ideal packaging for any gift. We use corrugated paper
We offer ideas that can decorate any gift, plus flower packaging options.
CLASSIC PACKAGING IN A SHEET OF WRAP PAPER
happygreylucky.com
The simplest packaging method, suitable for a voluminous or flat rectangular gift (for example, something already sold packaged in a box) is gift paper. For packaging you will need a suitable size sheet of fancy printed or plain craft paper, tape or glue. 
bowsandbands.net
Wrap the gift in a piece of paper and secure the long edges with tape or glue. Using your own hands, fold the paper over the short edges to form corners. Bend the corners inward and also secure with tape or glue.
GIFT BAGS
A bag made of fabric or paper can be of any size - accordingly, it can hold almost any gift.
PAPER GIFT BAG

abeautifulmess.com
“Unformatted” gift - very small, very large, unusual shape? You can pack this in a paper bag made by yourself. By the way, you can write or draw whatever you want on it. You will need: the gift itself (for the template) or suitable size cardboard box, craft (or any other thick) paper, scissors, glue (a glue stick will do), hole punch, ribbons for pens. If you will be making inscriptions or drawings, also paint, brushes and/or a stencil. 
abeautifulmess.com
STEP 1

abeautifulmess.com
Trace the bottom of the box on paper. Cut it out. Also cut out two parts equal in width to the width of the box (and the future package) - then you will need to use them to strengthen the places for the handles.
STEP 2

abeautifulmess.com
Place the box flat on the paper. Cut the sheet so that there is enough paper to wrap the entire gift, plus there are significant allowances left. Bend one of the edges and fold it inward - the handles of the bag will be attached there.
STEP 3

abeautifulmess.com
Wrap the box in paper and glue the edges.
STEP 4

abeautifulmess.com
From the bottom of the box, fold the remaining edges of the paper as shown in the figure, fold and glue the corners.
STEP 5

abeautifulmess.com
If you wish, add drawings or messages to the bag.
STEP 6

abeautifulmess.com
Glue parts into the bag to strengthen the place for the handles.
STEP 7

abeautifulmess.com
Place a piece inside the bottom to make it tougher. Punch holes for the handles with a hole punch and insert ribbons into them, tying each end with a knot inside the bag.

Master Class:
PAPER AND CARDBOARD PACKAGING
You can put a souvenir, decoration or any other small gift in handmade boxes.
PAPER “CHEST” WITH CLASP
This colored paper box is suitable for hiding a small or medium-sized gift. The size of the chest may vary - if necessary, change the dimensions of the pattern accordingly and take a larger sheet. You will need: a sheet of thick colored paper, a ruler and pencil, scissors, a breadboard knife. Draw in advance and cut out two patterns from rough paper, one with a valve, the other with a slot for it. Draw a square on a sheet of paper, trace the patterns, cut out the blank and fold the box.
CARDBOARD PACKAGING - “PILLOW”

artsycraftsymom.com
Making such packaging is quite simple, but it is universal and can look both strict and romantic - depending on the choice of paper. You will need: a piece of colored paper or cardboard with or without a pattern, paper glue, a pencil, a ruler, a protractor or any round object that can be used as a template, scissors, ribbon or string for decoration.
STEP 1

artsycraftsymom.com
Prepare cardboard or paper the right size. The length of the sheet will correspond to the length of the future packaging, the width of the sheet will be twice the width of the box. WITH three sides leave room for “seam allowances.”
STEP 2
artsycraftsymom.com
On back side Draw fold lines on the sheet. To draw rounded lines, use a protractor (saucer or something suitable). Using the blunt end of the scissors, trace the outer edges of the future package along the ruler and template - this will make it easier to fold.
STEP 3

artsycraftsymom.com
Cut along the outer edge.
STEP 4

artsycraftsymom.com
Fold the workpiece along the marked lines.
STEP 5

artsycraftsymom.com
Glue the box along the side seam. After hiding the gift there, tie it with a ribbon or cord.
PACKAGING - “CAKE”

This kind of packaging is more suitable for giving something to a girl, girl or woman - for example, in the video, one of the “pieces of cake” hides a ring in a case. But if your loved one or dad has a sweet tooth, you can hide a gift for him in such a “cake”. If you need to give gifts to a whole family or company, you can hide one gift in each “piece”. You will need: 12 sheets of thick colored paper “chocolate” or other “confectionery” color, scissors, glue, white ribbon, flowers for decoration, paper napkin or cake box for serving. To get started, download and print the packaging template. Next, follow the steps shown in the video.
BOX WITH COVER USING ORIGAMI TECHNIQUE

You can put a souvenir, sweets or decoration in such a box. You will need: two square sheets of double-sided colored paper, perseverance and attention.
TYING BOWS
An already wrapped gift can be decorated with bows - here are a few different ways, how to do it.
SIMPLE CLASSIC BOW

bowsandbands.net
Wrap the gift with ribbon and tie a simple single knot. Turn the gift over with the knot facing down and rotate it 90 degrees, wrap the ribbon around it again to make a cross, and tie the knot again. Make a bow from the remaining ends of the ribbon and tie.
COMPLEX CLASSIC BOW

alifeofgeekery.co.uk
This cute bow is also a classic and a great decoration for any gift. Choose the color and width of the ribbon - you can make a miniature one-color bow or a large one from ribbons different colors.You will need: packing tape (the kind they use, for example, in flower shops), scissors, stapler and paper clips, glue.
STEP 1

alifeofgeekery.co.uk
Cut 6 pieces from the ribbon: 3 - longer, 2 - slightly shorter, 1 - the smallest. Make “figure eights” out of five segments, as in the picture, and fasten them with a stapler. Roll the smallest piece in a circle and secure it too.
STEP 2

alifeofgeekery.co.uk
Staple three large “eights” and two small ones into bow blanks. Then glue the remaining cylinder in the center of the small piece so as to hide the paper clips. Glue the resulting blank into the center of the large blank.
STEP 3

alifeofgeekery.co.uk
Wrap the gift with ribbon. Glue the resulting bow to it.
LUXURIOUS LONG RIBBON BOW
A large fluffy bow can be made from one piece of packaging tape without cutting it into pieces. You will need long paper or plastic (not textile) tape and scissors. Roll the ribbon into a roll the size of the future bow and fold the roll in half. Use scissors to cut off the corners at the fold on both sides. Tie the resulting bottleneck with a thin ribbon and straighten the bow.

This is useful:
ROSE FROM SATIN RIBBON Ribbon flowers can replace a bow on gift wrapping. This romantic decoration option is more suitable as a gift for one of the fair sex. 
You will need: a fairly wide satin ribbon about 1 m long, a needle and thread, superglue.
STEP 1

Fold the edge of the tape and make a seam. Without cutting the thread, twist a small tube from the ribbon - the base of the flower. Folding the edges of the tape, make turns around the base and secure at the bottom using small seams.
STEP 2

Wrap the entire ribbon around the base, making the petals more and more voluminous. Cover the last turn with glue, having first cut the thread and made a small knot. This will help hide seams and blemishes.
DRY FLOWER JEWELRY
 secondstreet.ru
A small bouquet of dried flowers, wrapped in paper, can replace the bow on the package.
WE PACK FLOWERS
If you are giving a bouquet, a “single” flower or a plant in a pot, you can also come up with packaging for such a gift that adds a festive mood and makes it special. The simplest option is to wrap the flower in a sheet of double-sided colored paper and tie it with a ribbon at the bottom. 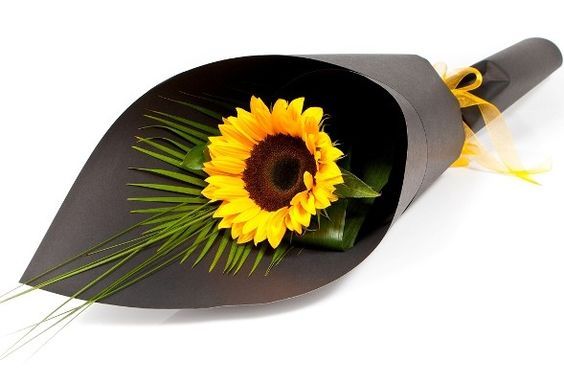
expressionsflorist.co.nz
A more rigorous option is to use craft paper and coarse rope.
Another option is a delicate smoky packaging made from regular tracing paper.

To prevent flowers from wilting if they are placed in a vase directly in the package, before wrapping them in paper or cloth, wrap the ends of the stems with a damp cloth and on top with cling film.
joannagoddard.blogspot.com
The flowers themselves, or rather the leaves, can also be used as gift wrapping. For example, they can be used to decorate large candles. Place a rubber band on each candle and tuck flowers or leaves under it. Then hide the attachment point by tying the candle with ribbon or string.

fabianascaranzi.com.br
If your gift is a plant in a pot, you can also make packaging for it, for example, from fabric... 
s-u-n-s-h-i-n-e-soul.tumblr.com
...or - from colored paper.
Useful tips
Sometimes you want gifts beautifully packaged so that the gift makes a pleasant impression.
Can be important present a gift beautifully so that it is remembered by the one to whom you give it.
On our website you will also find:
The gift can be wrapped in special stores, from people who have been doing this kind of thing for a long time.
But you totally can do beautiful packaging themselves, and this does not require any special talent or skill. You just need to learn a few rules and tricks.
Once you have mastered them, you will be able to make gift wrapping for any occasion, be it a birthday, New Year, anniversary, etc.
DIY gift wrapping. Origami packaging.


Make your own packaging. Machine.


Packaging for New Year's gifts. Cedar branches and cones.

You will need:
Small cedar branches
Thin wire
Jute rope
Wrapping
Decorations to taste
1. Make a small bundle of several branches and secure them with wire. Make another bun like this.

2. Now, using wire or fishing line, fasten two bunches of cedar branches with two cones.

3. Wrap the gift in wrapping paper, tie it with a rope and attach a blank of cedar twigs and cones to the rope.

You've got a beautiful gift wrapping for the New Year holidays.
How to wrap a gift with paper (photo)


How to wrap a gift with paper (video)
Packaging for sweet New Year's gifts. Original packaging with quilling elements.
This master class consists of two main parts: making a box and design, which is made using the quilling technique. You can put sweets in such a box and give them to children.

You will need:
Thick paper
Round plate or CD (any round object) - the larger the circle you have, the larger the package.
Simple pencil
Scissors
Creasing tool (or something similar)
Bright ribbon
Paper strips for quilling (width approximately 0.5 cm and length 60 cm)
PVA glue
Quilling tool (can be replaced with a toothpick)
Glitter or something similar

1. Making a box


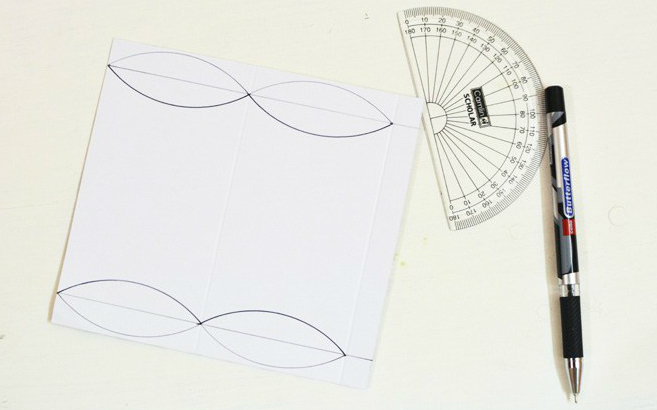
1.1 Prepare a sheet of thick paper and draw a circle on it. Draw two perpendicular diameters through the center of the circle.
1.2 Now through the indicated points A and B you need to draw another circle. In the new circle you also need to draw perpendicular diameters (see picture).


1.3 Use a plate or disk and a creasing tool to trace, cut, and fold the paper along the contours.

1.4 Cut out the entire shape and bend along the curves.
1.5 Start folding the box.

2. We arrange the packaging
2.1 Using the quilling technique you need to make a bump. You will need half a brown paper strip and a third light brown. These strips need to be glued together.

2.2 For a cone you need to make a lot of scales - in in this example out of 18. This means that you need to make 18 strips as in paragraph 2.1. Start twisting the strips, starting with the one that is light brown.

2.3 Once you have a roll, you need to release it until its diameter is about 2 cm.

2.4 Make an “eye” shape from the roll (see picture). You've got a scale.


2.5 The middle of each scale needs to be squeezed out and immediately greased well from the inside with PVA glue. This way you will fix the volumetric part. Let the glue dry.
2.6 Glue 3 others around one scale. Next, glue the remaining scales in rows to form a cone.


2.7 To make a hat for a pine cone, you need to prepare three paper strips and glue them into one long strip. This long strip now needs to be rolled into a roll.
2.8 Thread a thread with a small loop through the middle.

2.9 Shape the roll into a cone and coat well with glue. Let the glue dry.

2.10 Glue the cap onto the pine cone and you can decorate the piece with liquid glitter that imitates snow.

All that remains is to put all the details together. Place a gift in the package and tie it with a bright ribbon. Hang the pine cone on the loop. You can add a couple of artificial fir branches.

DIY Christmas packaging. Decoration with yarn.
A very simple example of how you can decorate a gift using yarn.

You will need:
Green felt in the shape of a Christmas tree
Wrapping
Decorations to taste
1. Wrap the gift in wrapping paper and tie it with string. Leave a tail about 20 cm long.
2. Cut out a small Christmas tree from green felt. Make a hole in it and thread the yarn through it and tie a knot.

3. Add decorations: glitter, stickers. You can draw or write something yourself on wrapping paper.
Packaging for children's New Year's gifts. Father Frost.


Gift wrapping for New Year's gifts. Gift box.

You will need:
Empty box (from shoes, for example)
Wrapping
Scissors
Double tape
Adhesive tape

1. Prepare wrapping paper. It should be larger than the box on all sides. Place the box in the middle of the paper and start making cuts on the paper as shown in the picture, going all the way to the edge of the box.


2. Start wrapping the box by folding the paper inside the box and securing with tape.


3. Repeat the same with the box lid.
4. You wrapped the box, now you need to decorate it. This can be done in many ways and one of them is to use homemade garlands.
You will need:
Thick paper
Scissors
Shaped staplers
Superglue or PVA glue
* Cut out circles, stars and/or other shapes from thick paper. You can use regular staplers to speed up the process.

* Glue all the figures onto the threads as shown in the image. Choose the order of the figures yourself.

*After the glue has dried, wrap the garland around your gift wrap.

DIY packaging (diagram). Simple gift wrapping.

You will need:
Colored thick paper
Scissors
Decorations to taste.


Making surprises with your own hands is always great! It’s especially nice to please your closest people with your gifts: husband, boyfriend, mother, girlfriend or sister. And when you have already come up with an idea, or for your mother for the holiday, one question remains unresolved - how to wrap the gift. And we will teach you how to do it fast, beautiful and correct.
The simplest and available material for packaging is, of course, gift paper. It is dense, beautiful and easy to process. When you are preparing a surprise for a person, pay attention to the moment of decorating your gift - and it will make an incredible impression!
There are several options how to pack a gift gift paper.
- You can make a bag from thick polished paper and place a gift in it.
- Make or purchase a gift box and pack it in beautiful paper.
- Pack a gift without a box.
How to make a gift bag with your own hands?

You can place a small and fairly light gift in a beautiful paper bag: for example, a T-shirt or soft toy.

Select a suitable piece of paper, fold it as in the photo and continue to follow the instructions. Use glue to glue joints- it will be much more reliable than double-sided tape. It's better to use both.

To secure the handles, make holes with a hole punch and string ropes through them. To decorate the package, you can use a gift tag, also made by yourself.
How to pack a box in gift paper?
The classic packaging method is using a box. You can make it yourself or purchase it at a gift shop. Also, most gifts are sold already in a box (household appliances, dishes, cosmetics, etc.) All you have to do is package everything beautifully.
To make the packaging you will need:
- gift paper;
- decorative elements: ribbons, bows, accessories, beads, natural materials;
- scissors;
- centimeter;
- double sided tape.
First, we need to measure and then cut a paper rectangle, from which we will make a gift wrapper. We determine the amount of paper for a gift as follows::
- the width of the rectangle is equal to the perimeter of the box + 2-3 cm for the hem;
- the length of the rectangle will be 2 times the height of the box.
These parameters should be taken into account, especially if you are going to pack a large box, and even for the first time. To avoid mistakes and spoil the gift material, practice on a regular newspaper. By the way, the method of packaging in newsprint and glossy paper is considered one of the most popular today. Gift packaging in eco-style or retro style looks very original and funny.

And we begin the responsible process of wrapping the gift in wrapping paper. 
- Once you have cut out a rectangle of the required size, place the gift box in the center. At one of the vertical ends we make a bend of 0.5-1 cm and glue it with double-sided tape.

- Wrap the box tightly in paper and secure the edge with double-sided tape.

- Bend the top of the paper and press it tightly against the end of the box.

- We also bend and fix the side parts.

- We also bend the lower end, but then we bend it and hide the cut of paper inside. We fix it on the sides with tape.

- We repeat the same thing on the opposite side.

- To decorate a gift cut out a single-color strip of paper and wrap it around the entire box lengthwise. We fasten the strip with tape at the back. Decorate with decorative cord. Today, a laconic style – minimalism – is in fashion. Bows should be small and neat; you can use decorative elements, but no more than 1-2 pieces per box.

 To find out even more useful information To learn how to beautifully wrap a gift with your own hands, watch interesting and educational video lessons from real designers.
How to pack a book in gift paper: video lessons for why
Perhaps not the best, but the most practical and universal gift is a book. A suitable book can be found as a gift for a man, a woman, or a child. Such a gift can be presented for a professional holiday or a birthday. And beautiful and stylish packaging will only emphasize the festivity and solemnity of the moment. When packing a book you can safely do without a box, because this item has a suitable shape and solid texture. Let's start creative experiments!
How to beautifully wrap flowers: the most aesthetic master class
Did you know that gift paper is used not only for gifts, but also for wrapping flowers? Bouquets in transparent cellophane have not been in fashion for a long time - Natural materials and natural beauty are trending today!

Take a look at these simple ways, and you will forever forget about artificial store packaging.


How to pack a bottle with your own hands: a simple master class
The standard “gentleman's set”, as we know, consists of something blooming, sweet and semi-sweet. We offer you turn standard gifts into something original and stylish. For example, either pack the bottle beautifully.


Do you know how to wrap a gift so that it will delight you even before opening? Packaging techniques can be different - from the simplest and most unpretentious to real masterpieces, the ideas of which are invented by artists. You can start training on small boxes, and when your imagination runs wild, move on to more complex forms.
Packing in paper
To present a gift beautifully, special wrapping paper was invented. It differs from other types of paper in its strength and design. The wrapper can be textured or smooth, plain, colored or patterned. The paper even received a special name “gift” to make it easier to find among a variety of products. Using this paper, wrapping a gift with your own hands will not be difficult.
Here are the instructions for packing a small rectangular box.
- Measure the width (W), height (H) and length (L) of the gift box in centimeters.
- Fold W+W+H+H+2. This will be the width of the required piece of paper.
- Fold D+B+C. This will be the length of the piece of paper.
- Measure the resulting dimensions with a pencil on gift paper and cut out a rectangle with scissors.
- Place the gift in the center of the rectangle.
- Apply double-sided tape along the length of the paper.
- Wrap the box tightly lengthwise, sealing the edges with tape.
- Carefully fold the edges on both sides. They can also be secured with tape.
If you wish, you can make decorations from thick cardboard and glue them to the box, tie the gift with a gold ribbon, attach flowers, butterflies and other decor to it. You can create an unusual package if you add knitted parts, pieces of fur or a small soft toy.
Find wrapping patterns that can be quickly and easily implemented, and practice folding paper correctly. Often original ideas for packaging they arrive exactly at the moment of training.
Creative packaging
If you don't have the time or desire to buy special paper, then you can use improvised materials. The most accessible of them is a newspaper. Simple gift wrapping with your own hands will turn into a creative process.
You can make a paper rose from newspaper. You can tie the newspaper packaging with twine or bright ribbon, and stick a contrasting decoration on it. The person who receives a gift in such packaging will be very interested to know what is inside. To make the newspaper tear easily, it is folded in several layers.
You can create an unusual package if you choose patterns that need to be cut out of cardboard. Children really like cardboard packaging in the shape of animals.
Another packaging option is music paper, pages old map or books glued together into a large canvas. An alternative to paper is fabric. Fabric bags are very easy to make yourself, sewing them by hand or on a machine. As a result, you will succeed creative packaging gifts. Ribbon, frills, lace or laces are used to decorate the bags. There are ideas for embroidery or simple rough stitches with contrasting threads.
Original jewelry
If we are talking about a New Year or Christmas gift, then you can decorate it with Christmas tree tinsel, shiny plastic balls, paper snowflakes or pine branches, which also looks quite unusual.
Decorations can be cut out of felt or crocheted. In this case, the threads should be thick and contrasting with the main color of the packaging.
Pompoms, cones, paper flowers, and colorful stickers look original and cute. Here, ideas come to mind endlessly as soon as excitement strikes.
You can wrap a gift in the simplest white paper and write a lot of congratulations on it. This DIY packaging will completely replace greeting card. If you are preparing a gift for parents from grandchildren, then ask the children to color the packaging. Let them draw something and write nice wishes. In this case, felt-tip pens or colored markers are suitable for coloring.
If the gift is big
Gifts come in different sizes, including large ones. Moreover, this does not mean that they are incredibly expensive in price. If you decide to give your loved one or child a huge plush toy and want to make a surprise, you can place it in a large bag and decorate it with a bow. It is not forbidden to use other ideas, for example, tying a lot of balloons to a gift.
For large household appliances, a regular cardboard box is suitable. You just need to cover it with colored paper so that it’s difficult to guess in advance what’s inside.
As for cars, bicycles, yachts, airplanes, there is no need to pack them at all. The hero of the occasion will be happy anyway. Instead of a large package, you can choose another option, for example, putting your car keys in a small box.
Unusual shaped packaging
Sometimes the question arises, how to pack a gift of a non-standard shape, what can it be wrapped in? The most convenient way for this is a bag made of colored fabric. Sometimes the gift is wrapped in film or tissue paper. It is especially convenient to pack fresh flowers in pots in film.
But you can make a paper bag like the one you use to sell bread or wrap sandwiches. At first glance, the paper bag seems inconspicuous and uninteresting. But everything changes, you just have to bring your decor ideas to life. What kind of decor it will be is up to you to decide, but in any case, the unusual packaging will arouse interest.
With a little practice, you can make a pyramid-shaped package. It's actually not that difficult. You need to draw a diagram on cardboard, cut it out and fold it.
Many people know that there is a way to wrap a gift in a ball, but how do you put objects in there? You are unlikely to be able to do this on your own. You need to contact special companies that deal with such packaging on a regular basis. There is a video on the Internet that shows how to put flowers or toys into a ball using a large plastic tank and a pump. The ball should have a wide neck. So, if you want, you can master this method.
Packaging of sweets
Sweets are a very common gift, so the question of how to beautifully pack a box of chocolates and how to present sweets correctly is of interest to many. The easiest option is to wrap it in thin gift paper. Often sweets are packaged in transparent film and bandaged satin ribbon. But you can do something more original.
Candies look great in a small basket. You can put several types of sweets, fruits, toys, an envelope with money, in general, anything in the basket.
Wrapped candies are poured into beautiful glass jars. It is advisable to choose different varieties sweets so that it would be interesting to dig into them and choose. Such a gift will be the most desirable for any sweet tooth, and the unusual packaging will delight the hero of the occasion.
If you have no idea how to wrap a gift, then seek help from stores that sell gift wrapping. There, a box of any shape will be wrapped according to all the rules. On your own, you can add some original element.
Of particular importance is the gender and age of the person to whom the gift is intended. For a girl, the packaging can be made in a more delicate style, decorated with lace and sparkles, but for a guy this option will not work. For him, a decoration in the form of a stylized tie glued to the top of a soldier, a model of a tank or a destroyer would be more acceptable.
In a gift, not only the content is important, but also its appearance. One of the popular types of holiday packaging is wrapping in mica or gift paper. There are many ways to wrap, so there are ones that anyone can handle!
An envelope for you!
Do you remember what the envelope looks like? On the reverse side it has four triangles that come together. How to use it? First, take a look at the item being presented: if its shape is square or rectangular, then you can prepare scissors and a ruler.
- On the thing you need to draw two diagonal lines connecting opposite corners. This can be done with a pencil, chalk or a piece of dry soap, so that the lines can then be easily erased. You now have four triangles.
- Place the item on the wrapper and draw an identical triangle on each side, only reflected upward.
- Then connect the vertices of the triangles with a line. It should look like a rhombus (if the shape resembles a square).
- Add 2-3 cm on both sides of the drawn figure and draw lines again. Cut off the excess.
- Fold one triangle over the item being packed. The blank will be slightly wider than the sides of the gift. First iron the fold line at the top, then along the sides. Fold the resulting triangular piece upward.
- Now grab the two side triangles. Fold the sheet towards the item being wrapped, iron the fold line. From the bottom end of the triangle, turn the edge diagonally outward, then fold it inward. Now your fold starts strictly in the corner. Ready. Do the same on the opposite side.
All that remains is to decorate the top part. Its production differs only in that diagonal bends must be made on both sides at once. Attach double-sided tape to the finished triangle-lid.
To decorate the packaging, use twine and stamps. Write the address and surname of the birthday person.
Updated classic
The classic method of wrapping is bad because it leaves a “raw” cut that needs to be hidden under the tape. How can you make sure that all the cuts look neat? It's worth changing the technology a little.
- Unfold the roll of gift mica and place the box with the gift in the middle. On both sides of it, set aside the value equal to height and the width of the box, and from the top and bottom edges - equal only to the height. Trim off the excess.
- Place the left side of the packing material over the box and secure it with a small piece of tape.
- Place the right half of the wrapper on the box as well, but do not secure it. Smooth the fold line with your fingers. Unfold the sheet: the fold strip should be clearly visible and divide the sheet into two unequal parts. Divide most of it in half and make marks with a pencil at the edges.
- Next, you need to bend the corners inward from the middle of the sheet height to the marks made. Secure the resulting corner with strips of tape and cover the gift with it.
- Now all that remains is to decorate the two sides of the package. Fold the top of the wrapping paper inward, forming neat “ears” in the form of triangles.
- Then fold the triangles over and secure with duct tape.
- All that remains is to slightly tuck the edge of the lower remaining part and also place it inside and glue it with tape. The same is done on the other side.
If desired, you can tie a ribbon or any other decoration on top.

Bulk packaging
You can pack an item beautifully not only in a box, but also without it. To do this, you should choose thicker types of wrapping paper. And the sequence of actions is as follows:
- Prepare a sheet approximately twice the size of the gift. Place the gift in a vertical orientation in the center.
- Wrap it with the left and right side of the wrapper. It is important not to push through the fold lines!
- Sew the bottom of the resulting bundle with thread, stepping back from the wrapped object and leaving about 1.5-2 cm of paper after the seam. You can sew a seam either by hand or using a sewing machine.
- Place the bundle on its side and press the side folds on its top edge. You now have the top edge perpendicular to the bottom, and the packaging itself has become voluminous.
- A seam should also be laid along the top edge.
- The final touch is decorating the cuts. They can be given an interesting shape using curly scissors or decorated with lace, sparkles, etc.
You can sew the edges of such a bundle not only with threads, but also with ribbons or braid.

For children
Children's packaging may differ from adult packaging. For example, you can make a cute dog or cat from craft paper:
- Place the gift on craft paper. Place rectangles with the width of the gift itself up and down from it. Their length should be equal to the height plus half the length of the gift.
- To the left and to the right, lay down strips with rounded ends, equal to the size of the rectangles already laid down.
- Draw two protrusions at the ends of the rectangles. These are the future animal ears and the “lock”. In the semicircular elements at the edge in the center, make slits into which the protrusions-ears will be inserted.
The template is ready, but first make eyes, a nose, a tongue, paws, a tail, ears from any available materials (not necessarily craft paper) and glue the parts to the reamer.
This way you can make almost any animal: fox, wolf, bunny and others.

Complex shape is not a hindrance
If the gift is placed in a round box, then this is not a problem:
- It is easy to measure the required width of the wrapper: cover the box with paper and cut off the excess.
- On a workpiece of the required width, you now need to determine the height. To do this, measure the radius of the bottom and lid (if the latter is larger), as well as the height of the box. Then mark on the wrapper first the radius of the bottom, then the height of the box and the radius of the lid.
- Place the gift on the sheet according to the marks, fold the edges over each other and stick a strip of adhesive tape in the center of the overlap.
- To decorate the bottom and top of the box you will need more patience: take one edge and press it to the center of the lid, moving in a clockwise direction, using your fingers to pick up the paper towards the center, forming neat folds. For convenience, you can periodically secure the paper collected in the center with tape.
- When the assemblies on the lid and bottom are ready, all that remains is to decorate them in the center. For the bottom, cut out a circle from the packaging material, and glue a bow to the lid.
If you want to make the lid removable, then pack it separately according to the same scheme. Don't forget to leave hem allowances on the inside of the piece.

Be sure to try to give the item a real gift look yourself. You will see that it is not only quite simple, but also exciting.