How to make a small chicken coop in the country. DIY chicken coop - Best tips for beginners! (66 photos). Location of the chicken coop in the country
Many owners raise poultry. The best option is chickens. They are undemanding to living conditions, but it is necessary to build a good chicken coop. For a small family, it is enough to have 10 laying hens. To do this, you will need to make a chicken coop with your own hands for 10 chickens. Drawings and detailed instructions will help you build a quality structure.
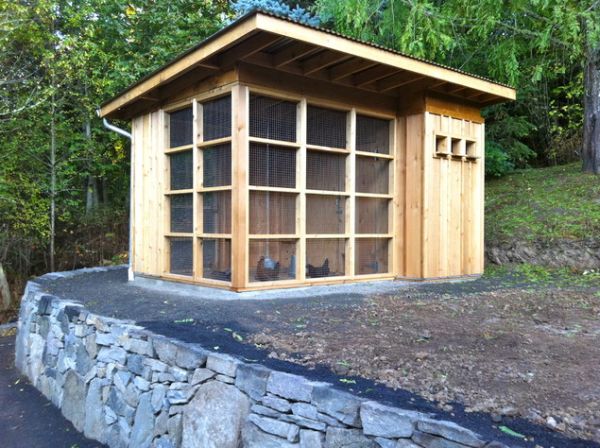
You can make a beautiful and spacious chicken coop yourself
Read in the article
How to make a chicken coop with your own hands for 10 chickens: drawings and requirements
To begin construction work, you should familiarize yourself with the basic requirements for such a structure:
- placement of the building. A rectangular chicken coop should be placed from east to west. Chickens lay eggs better if there is enough daylight, so windows should face south;
- When creating a warm chicken coop with your own hands, it is worth remembering that the room should not be hot, since at temperatures above 25 degrees the chickens will not lay eggs. But even in winter it is necessary to create warmth. In cold weather you will also need a structure. The temperature must be at least 12 degrees;
- it is better to locate the building away from noisy places;
- high humidity can cause poultry diseases, so ventilation is necessary;
- The dimensions of the room are selected taking into account the fact that two chickens can be accommodated per square meter. In cramped conditions, chickens lay eggs worse.
Helpful advice! When designing a poultry house, you need to take into account that over time the number of individuals may increase and more space will be required.

When arranging a room, it is worth equipping the windows with shutters made of, and for walking, provide an area under a tree or under.
chicken coop cage
Features of chicken coop design
Drawings and photos will help you create a competent project for a chicken coop with your own hands. It is important to choose the right size of the building, which depends on the planned number of birds. The type of structure depends on how many birds will live in it and on the types of materials.

When designing, it is worth planning to open the door inward, and the floor should be arranged with a slope towards the entrance. This will make the cleaning process easier. It is worth considering the interior design of the room. There must be a sufficient number of drinking bowls and perches. For such a structure it is worth considering heating, lighting, etc.
Features of installing the simplest chicken coop at the dacha with your own hands: stages of construction and photos
When deciding how to make a chicken coop with your own hands, you should familiarize yourself with the main stages of installation.
The table shows the main steps in constructing a simple poultry house.
| Image | Stages |
 | Construction (only for structures with large livestock) |
 | |
 | Selection and installation of flooring |
 | |
 |
You can build a chicken coop from scrap materials. To save money, you can use the room without construction or use a base on posts, for which leftovers or cobblestones will do. The floor can be made of adobe or earthen, and the roof is made of durable plastic, tin or remnants of slate.

Nuances of creating a foundation
For a do-it-yourself chicken coop for 20 chickens, a photo of which can be seen in this review, you will need a more durable one. Depending on its type: or columnar - you will need a concrete mixture, a composition of or.

The foundation is erected in accordance with certain rules:
- the area is cleared and the top layer of soil is removed, about 25-55 cm;
- Sand and gravel are used as a cushion;
- the formwork is made of boards, its width is 25 cm;
- rods are used for;
- Concrete grade M300 is used.

Construction of the building can begin after the concrete mass has hardened. It is worth considering that the size of the site should be equal to the dimensions of the future chicken coop.
To create a columnar base, you will need markings, which are done using metal rods and rope. Then, cabinets are installed around the perimeter, which are placed at a distance of a meter. In this case, the supports should protrude 25-30 cm from the ground. They are strengthened with cement mortar bricks.
Chicken coop walls
When building a chicken coop with your own hands for 10 chickens, you need to prepare drawings of the walls. Wood is in demand as a raw material for walls. They are used for cladding walls. In this case, the joints must be thermally insulated. In addition to boards, you can use plywood or clapboard. Adobe brick is considered a good material. The combination of straw and clay allows you to retain heat.

Installed according to the standard pattern. As insulation to separate the foundation and beams, roofing material is used, which is laid in two layers. Floor joists are also made of timber, which is laid edgewise. In this case, voids and cracks are sealed with remnants of timber and flax-jute fiber.

Roof, ceiling and floor of the building
To create a winter chicken coop with your own hands for 10-20 chickens, high-quality floors and roofing are of great importance.

The arrangement has some features:
- it is better to use a gable roof, which will protect against the accumulation of moisture and snow;
- coating material: roofing felt or slate;
- thermal insulation is performed using mineral wool or.
In a gable roof, you can build a small attic where you can store bedding for chickens and feed. After installing the ceiling beams, the ceiling covering is laid. In this case, boards are used, and expanded clay and coal slag are used for insulation.

When building a chicken coop you need to do well. If they freeze, the room will be cold. It is recommended to use thick boards for the floor. First, untreated boards are laid, then a layer of vapor barrier material is laid, and treated boards are placed on top.
Note! When arranging a pitched roof, it is necessary to ensure that the slope does not point towards the poultry walking area.

How to make ventilation for a chicken coop for 20 chickens with your own hands: drawings
Particular attention should be paid to a do-it-yourself chicken coop. The ventilation device is responsible for supplying fresh air. This is especially important in the cold season, since birds are rarely outdoors. A budget and simple option is natural ventilation, which consists of ventilating the building. In this case, the exhaust window should be small and located on the ceiling or above the door. This scheme has many disadvantages, since heat will leave the room along with the air masses. At the same time, heating will require a large amount of resources.
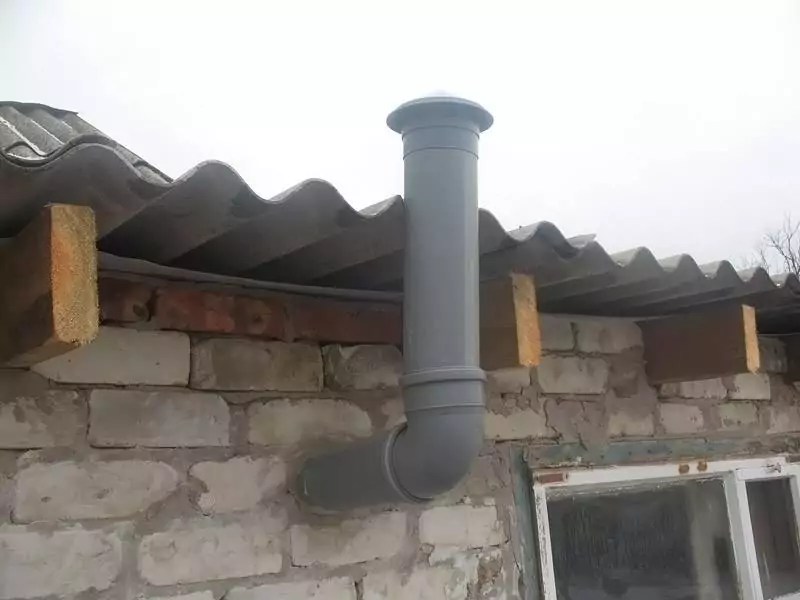
A more reliable option is an exhaust system. It makes sense to install it if there are at least 20 chickens in the chicken coop. You can build such a structure with your own hands:
- two holes are made for pipes; the entrance for air passage should be located away from the perches;
- Instead of a pipe, you can make special wooden boxes, but they need to be painted and;
- pipes for supplying fresh air are located at a distance of 35-40 cm from the roof, and the pipe for exhaust rises 1.5 meters above the roof;
- To protect against precipitation, the upper ends of the pipes are equipped with small umbrellas.

For uniform circulation, it is better to place pipes on opposite sides of the room. In this case, it is used, which is mounted in the window. You need to turn on such a system manually. There are also special sensors that allow you to control the humidity in the room.

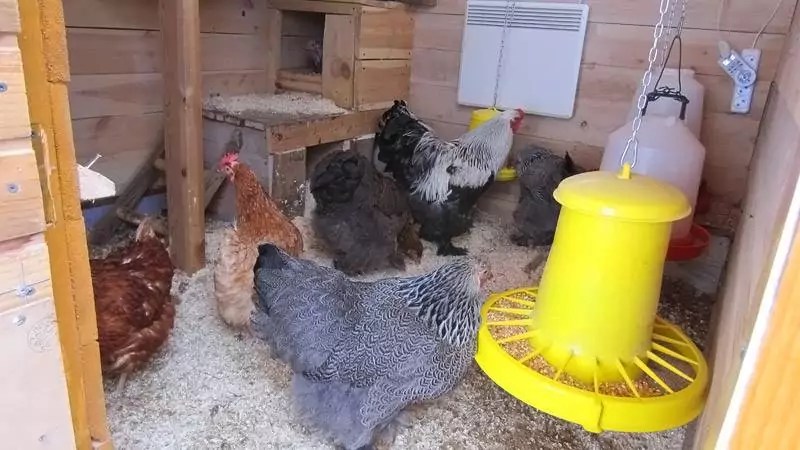
How to arrange a chicken coop inside?
After completion of the main work, the interior of the room is arranged. The construction of comfortable perches is of great importance. In this case, the length of the perches and their number are calculated. These elements are best made from . The perches are ground to a rounded shape so that the chickens do not get injured. Perches should be installed at a height of 65-75 cm, and 55-65 cm should remain between perches. It is recommended to place special pallets or trays under the perches. This will make the cleaning process easier. It is better to make the perches removable to make sanitization convenient.

It is worth equipping nests in the form of boxes, which should be darkened. They are installed in a separate place, and the drawers are covered from above. A separate entrance is recommended for changing bedding and collecting eggs.

Another important element is the feeders. They can be made of wood and installed on a small hill. Bedding is made of peat, straw or sawdust. They come in different depths. When soiled, deeper bedding is dug up. In addition, bedding is optional for the chicken coop in winter.

Lighting Features
Good food ensures the growth and physiological development of birds. You can create a well-equipped and lit chicken coop with your own hands for 10 chickens: drawings, detailed diagrams and photos will help you do this. High-quality lighting affects the following parameters:
- number, size, density and weight of eggs;
- chick development;
- digestibility of consumed feed;
- periods of egg laying and their duration.

When planning a lighting system, you need to know some features. Chickens do not see well in the dark, so in the evening, do not turn off all the lamps at once. When all the birds are settled on the perches, you need to turn off the remaining lamps.
For hatched chicks, lighting with a brightness of 35-45 lux is required. Then, as the bird grows, the light intensity gradually decreases to 6-8 lux. An adult bird will need a light of 10 lux.
A device for smooth switching on of the light is recommended, since if the light is turned off abruptly, the bird may become frightened. This is especially true for breeds that are bred to produce eggs. Chickens should also be accustomed to the dark from the third day of life, so that if the lights go out, the birds will not trample each other.
Helpful advice! If birds behave aggressively and pluck each other's feathers, then a reduced lighting intensity can solve this problem.

Heating
Before choosing, you need to take care of the insulation of the fences. There should be no drafts in the poultry house, so if the walls and roof are blown, they will not help.

It is worth insulating doors and windows, since most of the heat escapes through these openings. It is also worth building a deep litter. This design consists of a layer of slaked lime and 10 cm of shavings, sawdust and straw. Natural heat-insulating materials are also used: peat, foliage and even manure. Natural composting allows heat to be released.
If you approach the construction of a chicken coop responsibly, then this building can be made cozy and reliable. Using inexpensive materials, you can create a high-quality and well-equipped house for birds.
Every person who owns a dacha can receive double benefits. The fact is that it is not only a place for relaxation, but also serves to implement various types of activities. Some grow all kinds of crops there, others engage in livestock farming.
One popular activity is raising backyard chickens. This is not only the availability of chicken meat, but also the daily production of chicken eggs. Everyone knows how tasty, versatile and healthy they are. However, before you start doing this, it is important to build a chicken coop on your summer cottage.
Without it, you can forget about raising chickens. Ideally, build a solid structure in which the chickens will feel comfortable. From this article you will learn how to make a chicken coop in your country house with your own hands.
Choosing a place for construction
In order for you to have a productive and profitable chicken coop, it is important to take care of its correct location. This is necessary, as it affects the building itself and its design. We will look at the main principles that you need to take into account when choosing a place for a chicken coop in your country house:

Advice! If the chickens will spend the winter in a chicken coop, then make a vestibule in it. It will serve as an element of insulation, since cold air will not penetrate to the chickens. The vestibule also requires free space.

Taking all this into account, we recommend that you build a chicken coop with a reserve. After all, who knows how poultry farming will go for you. You may want to add more chickens to increase profitability. Now, knowing everything about placement, we will look at the step-by-step construction of a chicken coop. A wooden beam with a cross-section of 100×150 mm will be used for the work. The option is budget and simple, not requiring special skills.
Step 1 - laying the foundation of the chicken coop
So, at this stage you should already know the dimensions of the future chicken coop and its design. Ideally, make drawings on paper in order to navigate the work and know the exact dimensions and amount of material needed. Having the approximate weight of the chicken coop, you can choose the appropriate type of foundation. The basis of any building is the foundation. Therefore, you need to work hard to design it.
You have two optimal options for building a foundation for a chicken coop:
- Strip foundation.
- Columnar foundation.
The first option is more reliable and is chosen if the structure is made of brick and has a large mass. But, you will spend quite a lot of money, time and effort on installing this type of foundation. It is much more profitable to make a columnar foundation for a chicken coop. If your chicken coop is made of wood, then this is ideal. A columnar foundation will not only cost you less, but you will spend less time and effort on its construction. Plus, rats and other pests won't be able to get into the coop as easily. Brick is used as pillars, not necessarily new.
The foundation construction process is as follows:

Note! The space between the pillars and the ground must be filled with crushed stone. The same goes for the surface inside the chicken coop.
Step 2 - build the walls of the chicken coop
Setting up your chicken coop is still a work in progress, but you've already done a lot. If you look at the photo, you will see a finished foundation with laid logs.

Now the work consists of lining the foundation for the chicken coop and building its walls. So, the harness is made from timber. To protect it from the influence of water, lay several layers of roofing material on each column. Now you can install the first crowns on the finished posts. The ends of the beams are connected using the half-tree method. At this stage you can make the floor of the chicken coop. Using a 100x150 mm beam as a lag, lay it on edge. The recommended distance is about 50 cm. You can make the floor itself from OSB panels or edged boards.

When it comes to walls, you have several options for constructing them. You can further lay the second, third and subsequent rows of bars around the perimeter, connecting them with a tenon into a groove, just as they are built.

Another option is to make walls from OSB boards. How exactly to build the walls is up to you. When erecting walls, remember that at the end you need to install the top frame, strengthen the ceiling beams in order to build the roof of your chicken coop in the country.

Step 3 - roofing the chicken coop
Many people think that it is much better to build a pitched or flat roof for a chicken coop in the country. But this decision is short-sighted. It’s better to sweat a little, but make a gable roof, which will be much better in operation. You can store the necessary equipment and chicken feed in the attic. It's convenient and practical.
Installing a roof is quite a difficult task. You need to make rafters, fix them and strengthen them. After which the lathing is made, and the roof itself is sheathed with suitable material. To begin with, the ceiling beams are strengthened. The next step is installing the ceiling. You can make it from boards. The ceiling must be strong and durable. Ideally, insulate it using expanded clay or coal slag, poured onto the floor. To hide the insulation, cover it with the same boards or OSB boards.

Note! Ventilation in a chicken coop is simply irreplaceable. Natural ventilation can be done. To do this, you need to make two holes in the ceiling, in opposite places. Pipes will be inserted into them.
- slate;
- ondulin;
- corrugated sheeting;
- roofing felt

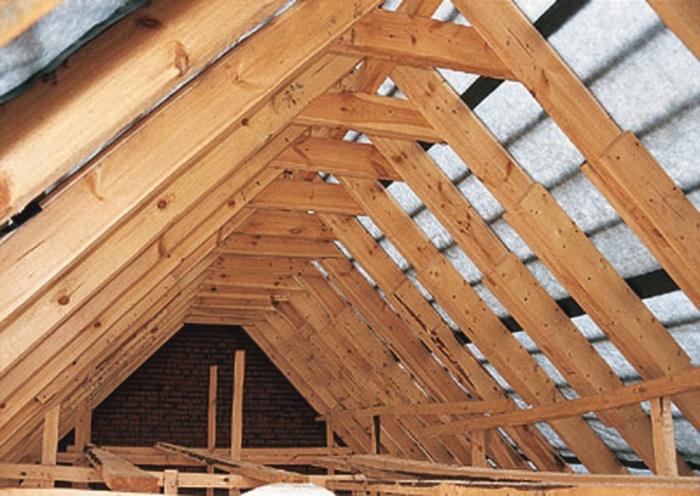
You can see more details about how to make a rafter system in this video.
Step 4 - insulate the floor of the chicken coop
It is not recommended to make a single floor for a chicken coop. At the stage of building the walls, you have already made the floor covering, but this is not enough. It was a subfloor. It is important that you use dry boards. Next, a layer of waterproofing is laid on them, and beams with a cross section of 100×100 mm are placed on it. In this case, the pitch of the beams depends on the width of your insulation.

When the bars are fixed, place a layer of insulation in the space between them. This can be mineral wool or glass wool, polystyrene foam and other materials. We cover everything with a layer of vapor barrier, and then install the finished floor. It can be made from edged boards or OSB boards.

Advice! Make vents in the floor of the chicken coop for ventilation. In winter, they need to be completely closed, and in summer, install a grill on them.
Let's sum it up

That's all, now you know how to make a chicken coop at your dacha. The design is quite simple and you can do it yourself. All that remains is to arrange the chicken coop by installing poles, making a perch, feeders, etc. Now you can safely start raising chickens in the country.
A good poultry house is a guarantee of excellent health and high productivity of your birds. Finding themselves in cramped conditions, dampness, cold and darkness, poultry will by no means be able to provide even the needs of the breeder’s family with meat and egg products, let alone bring him a stable income. this is why coop comfort is important. How to independently build and equip a chicken coop at the dacha, what needs to be taken into account during construction and how to insulate the structure for the winter - we will talk about all this later in the article.
How to choose a place to build a chicken coop at your dacha
Finding a good place for construction will help the summer resident-poultry farmer in the future to get rid of negative factors that affect the decrease in egg production of birds, defects in their development and diseases.
Important! To protect poultry from helminthiasis, feed the livestock with a fresh decoction of chamomile flowers or garden sorrel leaves for 3 days every month..
When choosing the right zone, it is important to focus on the following recommendations:
- Give preference to elevated and well-lit areas. This arrangement of the chicken coop guarantees an acceptable level of moisture inside the room, and also provides the light necessary for laying eggs. Moreover, water will never accumulate on the elevations during thaws and precipitation.
- Avoid swampy areas, lowlands and places with high dampness, since cold air masses and excessive moisture always accumulate in them. And these are not the best helpers when breeding chickens.
- For a poultry house, look for a remote, cozy corner in your yard, where pets will not be frightened by the sounds of a busy road or other residents of the farm yard. It is desirable that people and animals appear in this place extremely rarely.
- Try to ensure that the area chosen for the chicken coop corresponds to a rectangular shape, oriented from east to west. In this case, the windows in this design should be planned from the south, and the northern wall should be protected by tall bushes or leaning trees. Plants will provide the bird with shade in the sun and protection from the piercing cold wind in winter.
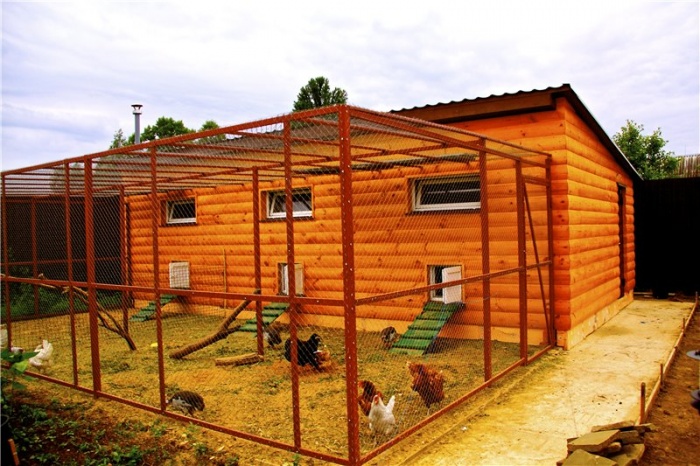
- Besides, It is recommended to provide a walking area near the bird house. It is fenced with a chain-link mesh or hedge, preventing living creatures from crossing the permitted boundaries.
Layout and dimensions
It is not advisable to build a room that is too large for raising chickens at the countryside. After all, in winter it will need to be heated and lit, and this will entail additional costs. In order for the future design to be practical and thoughtful, experienced poultry farmers advise initially doing the drawing work, designing all the details and nuances.
In order to determine the size of the poultry house, you need to understand how many birds it is designed for. If we are talking about one dozen birds, then 4 square meters will be enough, if 2–3, you need to expand to 10–12 square meters.  When calculating the required area, you should pay attention to the type of chicken breed you like. For example, meat hens require more space than egg hens, so experts advise that when designing the area of a poultry house, proceed from the fact that for each square meter there should be no more than 3 adult meat hens or 4 laying hens.
With a possible expansion of the livestock, a small reserve of space can be provided in advance, but it is important to take into account the costs of maintaining the premises. But in order to save money, it is not worth reducing the bird territory, since this is fraught with undesirable consequences.
Did you know? The behavior of chickens largely depends on the color of the lighting. For example, blue lamps have a calming effect, orange causes urges to reproduce, green stimulates the production of growth hormone, and red dampens the impulses of laying hens to cannibalism and pecking eggs.
Be sure to consider a walking area near the chicken house, the area of which is calculated based on the fact that each mature bird requires at least 2 square meters of space.  Therefore, for 30 birds you need to design an area of 20 to 50 square meters. m.
When the dimensions of the future chicken coop and aviary have been decided, you can move on to their internal layout. Experts advise having a lot of windows in the room on the south side, which will save on lighting. It is advisable that they have windows for ventilation.
But these openings must be placed in such a way as to exclude the possibility of drafts during ventilation.
In addition, inside the poultry house you need to design an area for rest and feeding. In the first, nests and perches are placed, and in the second, sawdust, feeders and lamps are hung for lighting. It is also important to provide a corner for keeping hens and young animals.
The drawings should be taken very seriously, having first thought through all the details of the future construction. The work done will allow you to prepare the necessary materials and also avoid mistakes.
How to build a chicken coop at your dacha yourself
Before you take up construction tools, you need to take into account the requirements for the future chicken coop. According to experienced chicken breeders, these include stable dryness, warmth and good lighting, regardless of the time of year.  Therefore, it is necessary to think in advance about the internal heating system and the method of external wall insulation (for example, using mineral wool, polystyrene foam or polystyrene), and also provide for the possibility of shading window frames in hot weather. And only then can construction begin.
Important! To minimize the risk of window glass breaking, experienced poultry farmers advise protecting them with bars or plywood shutters.
Selection and construction of the foundation
In order for the future structure to be durable, it must be erected on a concrete foundation. In addition, this solution will protect the bird house from the penetration of rats, mice and shrews. But such a neighborhood is extremely undesirable, since these small rodents are carriers of infections and helminths.
In practice, several options for creating a foundation are used, depending on the type of poultry kept:

Floor laying
Any foundation requires a durable heated floor. Concrete, clay and soil are absolutely not suitable for its construction. In such an environment, favorable conditions for dampness and cold will arise, which will harm the health of birds, so it is better to give preference to wooden boards.
Did you know? The owners of the longest chicken tails are Chinese Fen Huang breed roosters. Their tail feathers flutter to a record ten-meter length. In their homeland, such chickens are considered the personification of life wisdom, truth and good luck..
To lay a plank floor, initially dig a 20-centimeter recess. After that, fill it halfway with crushed stone, glass and brick fragments, and only then fill it with concrete mortar.
Some summer residents share their experience of protecting the poultry house from the penetration of unwanted guests from the ground using a galvanized mesh with small cells (no more than 12 mm) placed at the bottom of the pit. Both methods require an additional layer of boards.
You can put roofing felt or thick rubber on top as insulation. This variation will make cleaning the room easier and will withstand high-quality disinfection using chemical detergents.
Building walls
The material from which the walls of the chicken coop will be built is determined taking into account the time of its operation. That is, 25 mm boards are quite suitable for summer cottage structures. But for winter rooms you should choose brick, cinder block, shell rock or thick beams. Plan the height of the structure within 190 cm.  Even craftsmen with little experience in economic construction will be able to erect the walls of a chicken coop.
To do this you need:
- Cover the foundation with a sheet of roofing felt, which will prevent moisture.
- Lay out the first row of beams so that their ends meet in half.
- Lay beams with a section of 10 x 15 cm on top. In the future, as the height increases, every 50 cm it will be necessary to construct logs with the ribs down. In this case, a space is expected to form between the joining building materials, which will then need to be sealed with insulation. It will not be superfluous between each new beam.
- Lay out subsequent crowns of beams, attaching them to each other according to the “tenon and groove” principle.
- Make a fastening from dowels (wooden rods). They are driven into holes made in the beams by drilling. It is important that the rod completely pierces the material and enters the next beam.
- It is advisable to insulate the erected walls on both sides with glass wool, and additionally cover the outside with plastic or foam plastic.
Important! If you plan to heat the chicken coop with a wood stove or potbelly stove, be sure to provide a concrete floor underneath it, as well as in a circle with a radius of 1 meter.
Roofing device
A shelter on a chicken coop can be made of varying complexity, depending on your existing construction experience. If it is not there, it is better to prefer the most basic single-slope option. But under a gable roof, chickens will be more protected from the scorching sun in summer and from the cold in winter.  And this will already affect the economic factor of maintaining the premises during the heated period. In addition, many summer residents specially make gable roofs in order to store work equipment and other gardening utensils in the resulting space.
To build such a roof, you need:
- Prepare the rafters and install them at an angle of 35 degrees (if you want a higher room, you can adjust the position of the parts to 45 degrees), and then attach them to the constructed walls.
- Lay the ceiling out of boards, attaching it to the walls.
- Cover the chicken coop with any roofing material, attaching it to the rafters (slate, tiles, metal profiles).
Making the ceiling
If you want Choughs to lay all year round, you definitely need to insulate the ceiling. After all, according to the laws of physics, the heat generated inside the structure will constantly rise upward. To avoid its leakage, it is important to eliminate all cracks and holes in the plank ceiling.
To do this, it is necessary to make a double-sided flooring of glass wool or mineral wool (at least 10 cm), and then sew up both surfaces with sheets of plywood, chipboard or clapboard.  Some craftsmen recommend additionally covering the insulation on both sides with a vapor barrier film. This is done so that the material does not erode or become damp. In this case, the protection will need to be attached to the beams using a construction stapler. At the same time, make sure that its smooth side is turned inward.
Important! For stove heating, it is advisable to design an L-shaped chimney. This option will protect the bird’s home from increased moisture..
Doors and windows
The number of windows in the poultry house depends on its size. It is advisable to do them in the upper zone on the south side, which will provide better lighting of the room during the day.
The shapes of window frames can be chosen to your taste, but, according to construction canons, their dimensions cannot be less than ¼ of the floor area. The main thing is that the windows do not let the cold in. Therefore, they also need to be insulated. And to prevent birds from breaking the glass, immediately place protective bars on them.
Doors to the chicken coop are made not only for free access for birds, but also taking into account the maintenance needs of the premises. Don't forget that you will need to clean and disinfect it regularly. Therefore, you should not have any difficulties entering the structure.
Wood is ideal for such purposes. If desired, the doors can be equipped with an automated system so that they close at a certain time. 
Microclimate
To ensure that the laying of eggs in laying hens is not interrupted, it is important, regardless of the time of year and day, to provide the pets with dryness, warmth and 17 hours of daylight. And for this, the builder needs to pay attention to the thermal insulation of the walls, the heating system in the room, and also eliminate all factors affecting dampness. But let's talk about all this in order.
Ventilation
If good ventilation is not provided in the poultry house, the chickens will be at risk of dampness, which is a favorable environment for the proliferation of pathogenic microflora. Regular ventilation of the room will help solve the problem.
Professional builders draw the attention of beginners to several methods of ventilation in poultry houses:

Did you know? The largest chickens in the world are representatives of the rare Vietnamese breed Ga Dong Tao. There are about 300 of these fighting birds left. They are distinguished by an overly hypertrophied crest, massive build and very thick legs. Each limb of an adult is equal to the circumference of a child's arm.
Lighting
For high egg production, chickens need 14–17 hours of daylight. That is why, in addition to windows, additional lamps (LED, fluorescent, energy-saving or incandescent) must be provided in the poultry house. This solution will increase the egg productivity of laying hens by 30%.
It should be noted that in the warm season, when daylight lasts about 16 hours, there is no need for backlighting. It will be relevant exclusively from November to March.
At the same time, you should not pursue the goal of achieving record egg laying in black-billed whales by lighting the chicken coop around the clock. Constant light will only harm birds, because, regardless of the species, they need periodic darkness.
According to experts, it plays an important role in the processes of bone tissue formation and calcium absorption, which affects the strength of eggshells. The same applies to lamp power.  Experienced summer residents and chicken breeders advise limiting themselves to 1 60-watt lamp on an area of 8–10 square meters. If you prefer fluorescent ones, stop at a power of 40 watts, energy-saving - 15 watts.
Temperature
For feathered pets to function properly, it is important to maintain a stable temperature at +12...+20 °C. To this end, the summer resident needs to seal all the cracks in the room in advance and take care of its insulation, as well as eliminate the possibility of drafts.
However, do not forget that in the heat the bird may stop laying eggs altogether. That is why in the summer, ventilation must be running in an insulated room.
It is unacceptable for the temperature in the poultry house to exceed + 24 °C during the warm season, because this will not have the best effect on the quantity and quality of meat and egg products.
In regions with frosty, harsh winters, glass wool and polystyrene alone are not enough to maintain the desired temperature. There it makes sense to install additional heating devices or stoves. They should also be put into operation with the aim of maintaining humidity at a level of 50–60%.
Higher rates can trigger livestock mortality. 
Arrangement of the poultry house inside
For the full functioning of chickens in the chicken coop, it is important to provide perches, nests, feeders and drinkers. In this case, an excess of items will only disturb the pets. The main task of the breeder is to create comfort for residents using a minimum number of attributes.
Did you know? The carcasses of chickens of the French Bresse-Gali breed have the best taste, which since 1957 has been the only holder of the AOC quality mark. For the sake of this bird, the French annually organize a magnificent chicken show, where each producer is rewarded with a cash prize of 10 thousand euros.
Ideally, these are long poles with a diameter of 5–6 cm with a smooth, well-sanded surface. They are placed in the shaded area of the chicken coop opposite the front door. When installing a multi-tiered installation, you should make indents from the top row so that the choughs sitting on top do not stain the neighbors below with droppings.
Experienced poultry farmers recommend taking into account the characteristics of the breed of pets when constructing. For example, for large meat chickens, too high perches will not be available, so it is advisable to place them at a level of 70 cm from the floor, and for all other varieties a height of 1.2 m will be acceptable.
When making poles, it is important to provide a distance of about half a meter for each chicken. If it is necessary to install parallel perches, it is recommended to leave at least 40–50 cm between them. 
Nests
Their number depends on the number of livestock. It is advisable to build a nest for every 5 laying hens. Moreover, these attributes need to be installed not on the floor, but at a height of one and a half meters. A load-bearing wall is ideal for this.
You can use ready-made boxes as nests or make them yourself. The main thing is that the design corresponds to a height of 35 cm and a depth of 40–45 cm.
In a small chicken coop, it is advisable to combine the nests in a row, separating them with plywood partitions. It is important that the entrance hole is not wide and has a small threshold, which will prevent the eggs from rolling out.
To save space, you can make multi-tiered structures. In this case, the upper nests must be equipped with a sloping roof. This is done to prevent bird roosting.
Did you know? Little chickens demonstrate a complex of skills and reflexes available to a three-year-old child.
The inside of the nest is covered with hay or dry straw, and a dummy egg is placed to lure the hens. 
Feeders and drinkers
The range of farm products for equipping poultry houses today surprises even the most demanding customers with its richness. But it is much cheaper to build a drinking bowl and feeder yourself. However, the origin of these containers does not matter at all for birds. The main thing is their practicality and convenience.
Experts advise choosing wooden feeders for dry food, and metal or glass containers for wet mash. Lattice structures are ideal for fresh or dry herbs.
In addition, when choosing such utensils, you should take into account the shape of the containers. For example, rectangular flat trays with low sides are designed for feeding and watering chickens, since adults will climb inside and scatter the contents.
And trench-shaped structures with restrictive, removable gratings and special compartments for different types of food should be located outside the enclosures, providing access for pets to them. There are also variations of bunker feeders, which greatly facilitate the process of their maintenance (can be filled with a daily portion once).
For large poultry farms, the best option for drinkers is a nipple system. By the way, you can build it at home by drilling holes in a plastic bucket and equipping them with nipples.
In the chicken coop, feeders and drinkers are placed under lamps in a place away from the resting area. Depending on the mounting methods, they can be placed on the floor or suspended from a vertical support using brackets.  The main thing in choosing these containers is to comply with the following requirements:
- vessels for feeding and watering chickens must be made in such a way as to prevent birds from getting inside, scattering the contents and contaminating it with their paws;
- drinkers and feeders should be as easy to maintain as possible (after all, several times a day you will have to empty them of food residues, wash them and change the water as necessary);
- These containers are considered ideal if they are not cramped for pets (the dimensions are calculated, leaving each adult a distance of about 15 cm), they are light, their shape and dimensions do not interfere with regular washing and cleaning.
Did you know? Chickens, despite the prevailing stereotype about the limited capabilities of their brain, can remember about a hundred people, recognize their owner and orient themselves well in time.
Bath tray
What it will be does not matter to the chickens. The main thing is its availability, so in this case the breeder can use any volumetric container, taking into account the size of the birds. Ideally, a plastic tray 25–30 cm high is suitable. It should be filled with a mixture of sand, ash and fine granite screenings.
Winter insulation of the room
High-quality external insulation of the structure, including window frames and the attic, will help save on heating birds. In this case, the need for internal heating devices will be relevant only on severe frosty days.  To heat such rooms, many summer residents prefer the following options:
- Natural- involves the use of foam plastic (50 mm thick), mineral wool or glass wool. They are recommended to cover insulated surfaces on both sides. Also suitable for these purposes are fiberboard, chipboard, plastic, lining, boards, and plywood. The gaps in the windows and between the joint parts are treated with construction foam, and the board elements are impregnated with a special liquid to protect them from damage and aging. Also, many breeders try to warm their birds with a thick layer of bedding (straw from awnless cereal crops, sawdust, pine needles). On winter days, a layer of about 7–10 cm is recommended. Subsequently, the soiled layer is not thrown away, but sprinkled with a new one. During the process of physicochemical reactions, the decomposition of chicken manure is accompanied by the generation of heat, which helps to maintain the desired level of optimal temperature and disinfect the room. In addition, hay or straw is stored in the attic to save heat.
- Electric- carried out with the participation of infrared heaters, oil radiators or heat fans. Each of the units, to one degree or another, maintains the temperature regime of the room and combats excessive dampness. The only drawback of such heating is its costs. Many owners consider infrared heat lamps to be the most profitable of the listed methods of electric heating of a chicken coop, because during the heating process the room is also illuminated. In addition, such devices justify themselves with a high efficiency factor (98%). They heat not the air masses, but the objects underneath them. But for proper operation, it is important to place them at a distance of at least 0.5–1 m from the heated object. Also, do not forget about fire safety techniques.
- Gas- provide for the presence of gas installations. Beneficial only on large farms. To heat several dozen chickens at the dacha, it is not advisable to buy an expensive boiler. And the system requires constant monitoring,
- Wood-burning- carried out using an ordinary clay stove, potbelly stove or “buleryan”. Each of the devices justifies itself with good heat transfer and ease of operation. However, the installation of such structures requires special attention to compliance with fire safety rules.
- Water- provides for the installation of steam heating, but is relevant only in cases where the chicken coop is adjacent to a residential building. It is necessary to equip the premises with additional pipes. However, even experienced builders will be unable to deal with the upcoming work on their own, so it makes sense to turn to specialists for help.
Did you know? Hindus have long feared chicken because domesticated chickens were considered sacred animals. At the same time, every resident of India hunted their wild relatives.
Yard for walks
Each variety of poultry requires space to roam for full development. To protect the birds from other birds that carry infections, this area should be fenced with netting on the sides and top.  To prevent birds from digging and trying to get under the fence, it is recommended to deepen the mesh by 10–20 cm.
The size of the enclosure is calculated based on the number of feathered charges. The main thing is that the walking area does not restrict their physical activity.
It is advisable to pre-sow the allotted area with any grass suitable for grazing chickens (alfalfa, clover, sainfoin, goat's rue, amaranth, lawn mixture, knotweed, barley, mustard).
It is also important to leave an ash area inside where the black whales will bathe. In addition, an important detail of the walking yard is a canopy where the children can hide from the sun or from the rain. Drinking bowls also wouldn't hurt.
Some breeders plant this area on the north side with tall bushes, which will provide the chickens with shade and protection from the wind.
Even craftsmen with little experience in outbuildings will be able to make a homemade chicken coop. The main thing in this matter is to think through all the details, collect the necessary material and get to work.
For those who live in the country from early spring to late autumn, it makes sense to have laying hens and feast on homemade eggs. In dacha conditions, it is quite possible to make a simple but comfortable chicken coop.


Design Features
You can order a chicken coop from a carpenter, buy it ready-made, or make it yourself. There are many types of structures, from a small portable version to a large-scale structure. When designing a chicken coop, you should choose a warm but cool place. The house with nests and perches should be raised above the ground, this will help protect the birds from the night cold and dampness.
Mini-chicken coops for several birds can be easily moved to another place. They can be made in the form of a stretcher, put on wheels, or simply moved in parts. Large plots of land can afford large chicken coops with spacious walking areas. Sometimes bird houses are built on several floors.


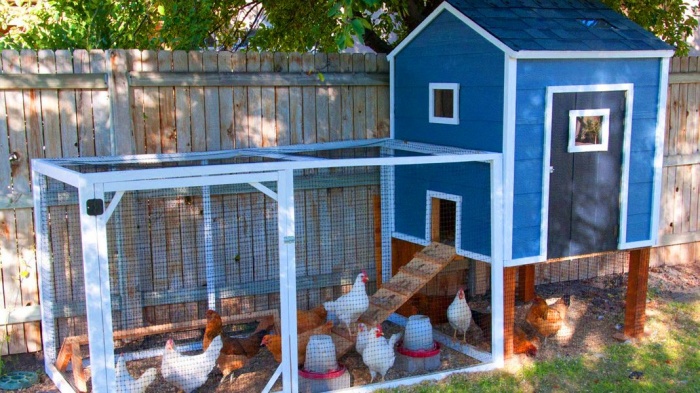
Free-range chickens lay eggs more happily. But anyone who dares to release them into the garden will be left without a harvest. The poultry owners found a way for the birds to get some exercise and preserve their vegetables. They build long corridors from the mesh into which birds can leave the coop and enter it from the other side.


With the summer option at your summer cottage, you can not complicate your life at all, make the simplest chicken coop, in the form of a triangle from several sheets of slate, and a small paddock covered with netting. Those who like complexity can build a beautiful poultry house with a string of houses, windows and flower beds. Or a mini-house for broilers, similar to a real rural hut.


How to build it yourself
Before you start building a chicken coop, you need to know how many birds will live in it; the size of the future building depends on this. It’s quite possible to make a poultry house in the country with your own hands, you just need to follow the step-by-step instructions.

Preparatory work
In any construction, time is needed for preparatory work. This includes: selection of location, project, materials, preparation of drawings and calculations.
Selecting a location
The bird's health and egg quality will depend on the bird's comfortable condition. A correctly chosen location can further affect the egg production of chickens. On a hot summer day, laying hens will feel uncomfortable in the sun. It is better to place them under a shady tree. In the morning, the slanting rays of the sun should warm and dry the chicken coop, which has cooled down overnight, and for this it should be placed on the southeast side of the trees.


It is better to choose a place for poultry away from the garden to eliminate the risk of chemicals entering the room when processing garden crops. Sewage, cesspool and compost pits should also not be located near the chicken coop and run to avoid infection. If you attach a chicken coop to a summer house building, it is easier to heat and it is easier to look after the birds. Construction cannot be carried out in a low-lying area, as precipitation from the land will flow to the chicken coop.
It is better to plant a hedge around the birds' walk to protect them from wind and drafts. The bird can equally suffer from heat, cold and wind, so all these factors should be excluded. To make it easier to control the birds and close them at night in time, the chicken coop should be visible from the most inhabited places in the country. When the chickens come to rest, you just need to close the door behind them.

Project
Construction should begin with the preparation of drawings and calculations. At this point, the construction site must be determined, a sketch of the chicken coop must be drawn up in relation to the terrain and cardinal directions. It is necessary to indicate nearby buildings and trees, consider the level of shading, wind rose, and eliminate the presence of drafts. You can draw up a building drawing yourself, taking into account the characteristics of your site, or borrow it from the Internet.
The construction plan should include space for perches, drinking bowls, feeders and bird walking. Ventilation and lighting are thought out and designated. If you are planning a winter chicken coop, you should consider the heating system. The size of the building is determined at the rate of two hens per square meter plus 30% of the additional area for nesting. But in practice, birds are housed in larger numbers than required by regulations.


Construction process
During the construction process, all work is carried out in stages, focusing on drawings and calculations. At the initial stage, the terrain is marked and the foundation is laid.


Foundation
For several laying hens, you can build a small portable chicken coop; it does not need a foundation. A larger project will require a foundation.
They come in three types.
- Columnar. It involves the installation of pillars and the construction of a building using frame technology.
- Pile. Piles are used as pillars, which are driven into unstable soils or on sloping terrain.
- Tape. The most reliable foundation, it is poured with concrete around the perimeter of the entire building.
Simple country options most often use a columnar base; it is cheaper and easier to implement.


Holes should be dug along the contour of the future chicken coop to the freezing depth. Make the recesses at a step frequency of two meters. The volume of the support will be about 20 cm and rise 40 cm above the ground surface. The formwork can be constructed from a rough board, 60-80 cm high. Next, reinforce it with reinforcement, insert supports and fill it with concrete. You can start work from any corner of the future building. Cover the poured foundation with polyethylene and leave for a week until dry.


Floor
When the foundation is strengthened, the base part is tied. To do this, four 20 cm thick beams are laid on the roofing felt, creating a box. Using metal corners, the beams are fastened together.
Boards placed on edge (joists) are attached to the frame using nails. The areas between them are filled with expanded clay. Then, in order to protect the bird from rodents, the surface is covered with a fine-mesh mesh with a half-meter overlap, which will subsequently rise to the walls. A rough board is laid on top.
When constructing the floor, it is better to make a slight slope towards the door to make it easier to maintain the chicken coop in the future. When working with wood, you should remember that all wooden elements must be treated with antifungal and fireproofing agents. They insulate the floor when there are already walls.


Walling
The construction of walls should begin with the installation of side posts. In order to make a pitched roof in the future, the difference between the front and rear pillars should be about half a meter. It is important to remember that the roof slope should not be in the direction of bird walking.
Then the top trim is made using boards, they are attached to the racks with nails. Before installing the sheathing, you should find out the dimensions of the insulation. Thermal insulation layers are laid in the gap between the supports.
In the area of the door, window, opening for birds to exit, transverse guides are installed. When the frame is ready, the floor and ceiling are covered with edged boards.


Roof
To cover the roof, you need to prepare rafters. To calculate their size, measure the distance between the front and rear posts and add another thirty centimeters to the roof overhang.
The rafters, set on edge, are mounted to the top frame of the building. The distances between the rafters are equal to the width of the thermal insulation. The rafters are covered with polyethylene, lathing is made and the roofing is installed.
To insulate the roof, thermal insulation slabs are laid between the rafters. In northern regions, several layers of insulation can be used. A few centimeters of space should be left between the lining material and the thermal insulation for free air circulation.


Wall cladding
The walls are sheathed after roofing work. To the outside of the frame, bars are mounted to which boards, plywood, OSB sheets are attached, or whatever it was planned to use to cover the chicken coop. Insulation is laid between the racks.
The chicken coop is then lined from the inside. The area of the ventilation holes should be left without covering.


Construction and finishing of a chicken coop
The floor should be made of warm materials, and cement, ceramic tiles, and brick are not suitable for it. Chickens are prone to rheumatism; if the floor is cold and damp, they sit on their feet and stop walking. Wood is the most suitable material for a chicken coop. In order not to spoil the wood flooring with chicken manure, the floor is covered with a thick layer of sand and sawdust.
The roof should not be built from materials that become very hot in the sun or make noise from rain and wind. Chickens lay eggs equally poorly both from fright and from overheating.


Ventilation
For solid chicken coops, you can install a ventilation duct under the roof. Small bird houses can get by with two openings with dampers on opposite walls.
The best option would be a hood equipped with a fan. To install such a system, two square holes should be made on opposite walls. One of them should be forty centimeters lower than the other. A special fan is inserted into the hole.


Lighting
Chickens cannot see well in the dark, if they are cold or scared, they begin to huddle in a corner and crush each other. In such conditions, it is convenient to have adjustable lighting with smooth switching off.
Perches and nests
It is more convenient to make perches removable, so they are easier to care for, and placed at different heights. A wooden ladder should be brought to the perch; it consists of a wide board with cross bars.
It is better to cover the nests with straw and change it periodically. Hay is less suitable because it rots quickly. Nests should be darkened; chickens do not like to lay eggs in bright light.


In the chicken coop you need to install several wooden perches at a distance of 30-50 cm from each other.

A dacha is a great place to relax, but it is also an excellent opportunity to change activities. It’s not for nothing that arranging a summer house and growing ornamental and garden plants are becoming a popular activity for city residents. However, today those who are planning to build a chicken coop in their dacha with their own hands do not surprise anyone. Moreover, thrifty owners choose solid buildings. If you build a poultry house slightly larger than a dog house, the birds will get sick or eat the food to no avail. Then you shouldn’t expect such desirable environmentally friendly eggs from them. Let's find out the secrets of good construction.
Finding out how to make a cost-effective chicken coop starts with allocating space for construction. Its design can largely depend on the location of the poultry house. There are basic principles that should be followed when making a choice:
- Location. The poultry house must be placed on a hill, because in the lowlands it will be more difficult for birds to walk: it is in such places that the moisture does not dry out longer, and the melting of the snow occurs with a delay.
- Building orientation. The chicken coop must be correctly oriented to the cardinal points. The rectangular building is located along its length from east to west. The ideal placement of the poultry house would be when its windows face south and the door faces east. Windows should let in as much light as possible during the day. The length of daylight hours significantly affects the egg production of chickens. However, in hot weather the windows should be shaded.
- Temperature. Both too high and too low temperatures are negative for chickens. Already at +25 C°, poultry productivity will drop by half, and if the temperature rises another 5 degrees, the chickens will stop laying eggs altogether. In case of heat, the windows of the chicken coop must be equipped with plywood shutters. In winter, the optimal temperature is +12 C°.
- Peace. Chickens should feel calm, so for the chicken coop you need to choose a place away from active recreation areas. Protecting your chicken coop with a hedge is a good idea.
- Square. The location should be selected taking into account the dimensions of the future building. There should be no more than two chickens per 1 m2 of chicken coop room. If chickens will live in the chicken coop during the winter, it is necessary to provide a vestibule as an element of insulation of the chicken coop so that cold air does not directly penetrate to the birds. For the vestibule, you also need to allocate space in the construction plan.
Experts recommend choosing a place with a reserve of space in case success in raising chickens prompts the owners to create, for example, a quail farm. After all, such a farm is an excellent source of not even additional income, but full-fledged income.

A chicken coop is often called a ramshackle barn, but if you take a businesslike look at this building, it can be made much more attractive, and then it will be easier to find a place for it

To be healthy, chickens must have room to roam, which is why this chicken coop with a vestibule is a well-deserved success.
What does it cost us to build a house for chickens?
Let's agree in advance that we choose four-edged timber 100x150 mm as the material for the construction of our chicken coop. This is a low-budget option and construction from such material does not require professional skills.
Stage #1 – selection and construction of the foundation
We choose the dimensions of the upcoming building. It is better to draw up the project so that you can accurately determine the need for materials. We will proceed from the approximate weight of the chicken coop when deciding on the foundation.

A chicken coop on a columnar foundation looks very secure, neat and compact, despite the fact that everything you need is provided in it
The best option for a relatively light chicken coop can be considered a columnar foundation. Why?
- Economic benefit. Cabinets made from old brick will be very cheap, and, if desired, you can even get by with ordinary stone. Cement, sand, gravel and a trowel are the main costs for such a foundation.
- Protection. It will be difficult for rats and ferrets to enter the room, and ventilation under the floor surface can prevent rotting of the wood.
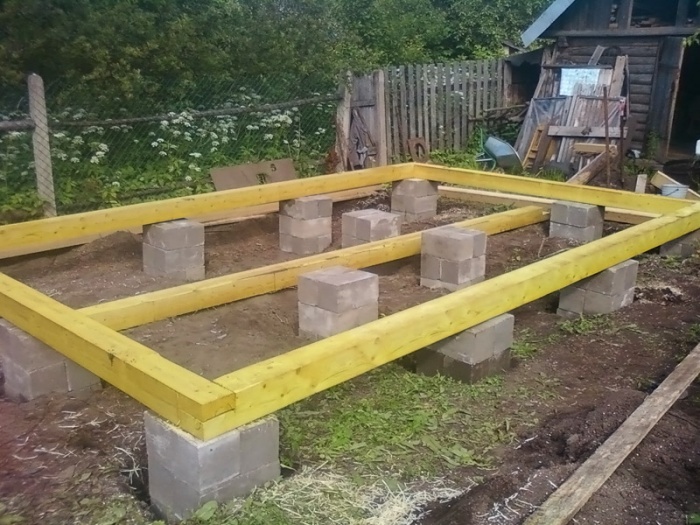
We will mark the foundation using thin but strong rope and metal rods. In full accordance with the project, we hammer rods around the perimeter of the building. We tie them with a rope, placing it near the surface of the earth. We check the accuracy of the markings made by measuring the distance diagonally with a regular tape measure.
We carefully remove the fertile layer of soil 15-20 cm inside the marking: it will be useful in the garden. Now we will make pedestals at the corners of the building and along its perimeter. The distance between them should be 0.8-1 m. We dig holes 60-70 cm deep and 50 cm wide (two bricks). Using a hydraulic level and ropes, we mark 20-25 cm above the ground - a guideline for erecting the pedestals.

A columnar foundation is most appropriate when building a chicken coop, since it is economically beneficial and the building on it will be protected from rotting and from predators
At the bottom of the pit, pour layers of sand and medium-grained gravel 10 cm thick. Place the first two bricks at the bottom of the pit, and put cement mortar on them, mixed at a ratio of 1:3. We place the next two bricks across the previous ones. So the cabinet should be laid out to the level marked with ropes. Cement mortar will help to level the cabinet exactly to the level.
In construction, there is a technological break of 5-7 days so that the solution has a chance to set. After this, the finished columns must be treated with a special protective mastic or simple bitumen. Coarse gravel should be poured between the bollards and the ground. They also cover the surface inside the perimeter of the building.
Stage #2 - erection of the walls of the building
For the process of laying timber, a standard technology has long been developed, which must be adhered to. A double layer of roofing material can be used as an insulator for the first crown from the foundation. The ends of the timber should be connected into half a tree. As floor joists we use 100x150mm timber, laid on edge. The optimal distance between the logs is 50 cm. We close the gaps with scraps of timber.

The walls of the building are erected by sequentially placing timber and connecting it at the corners of the building into a tongue-and-groove joint.
The second, third and subsequent crowns at the corners are connected using a tongue-and-groove system. Flax-jute fiber can be used as a sealant in locking joints and between crowns. If the timber from which the chicken coop is built has natural moisture, it is better to use wooden dowels to securely plant the crowns.
Their presence will protect the frame from distortion after shrinkage. You need to make holes for the dowels in the corners of the building and around the perimeter every meter or one and a half. They are made 2.5 beams deep and in a checkerboard pattern. The dowels should be driven into the wood “sunk” by about 7 cm. The minimum height of the walls being erected should be 1.8 m. Next, the ceiling beams must be strengthened, rafters installed and the roof laid.
Stage #3 – ceiling and roof of the chicken coop
You can make the roof of the chicken coop single-slope, but a gable design is the choice of far-sighted people. Feed and equipment need to be stored somewhere. Why not use a comfortable and dry attic space for this purpose?

Of course, it is better to make the roof of the building gable, then the food, equipment, and even the rowan fruits dried for the chickens for the winter will be safe
We strengthen the ceiling beams, lay the ceiling with any boards and insulate it. Expensive roll insulation can be replaced with expanded clay or coal slag. Before insulation, you need to take care of the ventilation of the room. To do this, you should knock together two wooden ventilation ducts. We fix them at opposite ends of the building. One end of the ventilation channel is located flush with the ceiling, and the second is approximately 40 cm below it. Tin dampers on ventilation pipes will help regulate the temperature in the room.
Stage #4 – laying and insulating the floor
Freezing and blowing of floors should be avoided. Therefore, double floors can be considered the best option. In this case, we will use a board 25 mm thick. The subfloor should be made of dry unedged boards. A layer of vapor barrier is laid on the boards, followed by 100x100mm bars. We fill the gaps between the bars with insulation, after which we lay the finished floor from edged boards.

If you can use any boards for the ceiling, then for the floor savings are only appropriate when laying the subfloor: the finishing floor should be made from a tongue-and-groove board
We equip the poultry house from the inside
Well, we figured out how to build a reliable and warm chicken coop, now we need to properly organize the room inside. If we talk about the necessary elements of the internal structure of a chicken coop, then the perch is just one of them.
When calculating perch requirements, you need to know that each bird will need at least 30 cm of perch. Knowing the number of feathered inhabitants of the chicken coop, we calculate the quantitative need for perches. It is better to make them from rectangular timber 40x60 mm. The perches need to be rounded, otherwise they will injure the birds. Perches should be placed at a distance of 50 cm from each other at a height of 60-80 cm from the floor, but not above each other. Trays placed under the roost will make cleaning the coop easier.

Properly organizing a chicken coop from the inside is no less important than ensuring its proper construction: chickens need perches, drinking bowls, feeders, and places for laying hens

Laying areas should be located in a part of the coop where the chickens can feel safe and secure.
Don’t forget that we built a chicken coop for laying hens, which means that we need to provide them with all the conditions for them to lay eggs. To do this, you can equip them with boxes with sawdust in a place where the chickens will feel peace and security.
Feeders and drinking bowls should be filled, clean and located on a hill. Cleanliness and order in the chicken coop can be ensured more easily if the floor is covered with sawdust or straw. The sloping floor will also make cleaning easier. For the winter, the chicken coop can be additionally insulated with mineral wool and polystyrene foam.
To learn how to build a chicken coop with your own hands using other methods, we suggest watching the following videos.