Decoupage of bottles: the best ideas, simple methods and modern styles (110 photos). Decoupage. Master classes for beginners step by step with photos: from napkins on a bottle, box, plate, chair, on wood, from wallpaper, photographs, eggshells Decoupage of bottles in different materials
Decoupage is a fascinating and uncomplicated activity that has many techniques and is accessible to even the youngest craftswomen. With its help, you can make exclusive interior items that will decorate not only your home, but also the exhibition halls of art galleries. In this review, we will look at how to perform with your own handsdecoupage for beginners step by step with photo. Don't worry that things won't work out, it's actually very simple. With the help of this technique, old furniture, dishes, shoes and many other things will find a new life in your home.
Products with decoupage are works of art
First of all, let's understand the definitions. Decoupage is gluing a design onto a surface. The picture can be placed on wood, leather, fabric, glass and almost any other product.
Reverse decoupage is the same process, but has only one feature - the picture is glued under the material. This can only be done on transparent surfaces: glass and plastic. Of course, in this case the picture is pasted face up.

For your information! If a plate is used for direct decoupage, then in the future it will only serve a decorative function. And when using the reverse technique, the dishes can be used as usual.
Tools and materials for work
| Materials and tools | Note |
| Using this technique you can decorate a book, dishes, flower pots, bottles, furniture, etc. In general, literally everything that is in your home. |
| Pictures can be used from special decoupage cards and napkins. In addition, for this purpose, craftswomen use drawings on fabric, old newspapers, and magazine clippings. |
| You can use regular nail scissors or a special tool that is sold in craft stores. The main thing is that the edges of the blades are very sharp. This is the only way to carefully cut out the desired image on a thin napkin. |
| You will need flat soft brushes. The pile in them should be tightly fixed. Lost lint can be a serious problem. It is better to have several brushes of different widths for smoothing and applying glue and varnish. |
| It is best to use regular household PVA. You can buy a specialized composition, but it will cost more. Among varnishes, it is better to give preference to acrylic. It does not emit toxic substances and is easy to use. |
| To decorate your work, you may need acrylic-based paints, sponges, primer, sandpaper, and craquelure. |


Decoupage kits
Basic Techniques
There are different ways to fix a drawing on a surface, let's look at them:
Method one
A simple technique of decoupage from napkins consists of placing it on an object and securing it with glue. After drying, the surface is varnished.

Method two
For reverse decoupling, a transparent base is used. The image is glued face down to the glass. After drying, fix with varnish.

Method three
Artistic composition. To make it, many images are used, which, when glued, are combined into one. To make the picture look like one whole, painting, shadows and accents are added.

Method four
This technique is called "decopatch". For it they use pictures from magazines, drawings on fabric. To get rid of clear boundaries, the edges of paper drawings are torn off. The surface is completely filled with images.

Method five
Creating a three-dimensional image. This is a technique that requires the talent of an artist. First, an image from a paper napkin is pasted on. And then painting is done on it with careful drawing of all the smallest details.
Decoupage bottles for beginners: step by step with photos and recommendations
- the simplest and most affordable material from which you can make an original gift. You can buy a bottle of wine or fill the container with your own homemade drink. Luxurious decoration will make an impression in any case.
We have already listed the materials and tools necessary for the work, so we will not dwell on this in detail. The only thing that needs to be added to the list is a windshield wiper. They pre-treat the bottle, which has been cleared of labels.
Important! It is better to work with a glass vessel while wearing gloves. Your fingerprints are unlikely to have artistic value, so it's best not to leave them.
Bottle decoupage sequence for beginners, step by step with photos:
| Illustration | Description of the stage |
Applying primer 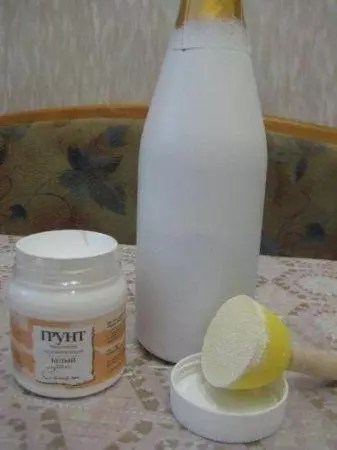 | For priming, you can use acrylic varnish or PVA. The soil should dry well. |
Making the background  | For the background you need to use white or light acrylic paint. You may need to apply two or even three coats to achieve a completely opaque surface. |
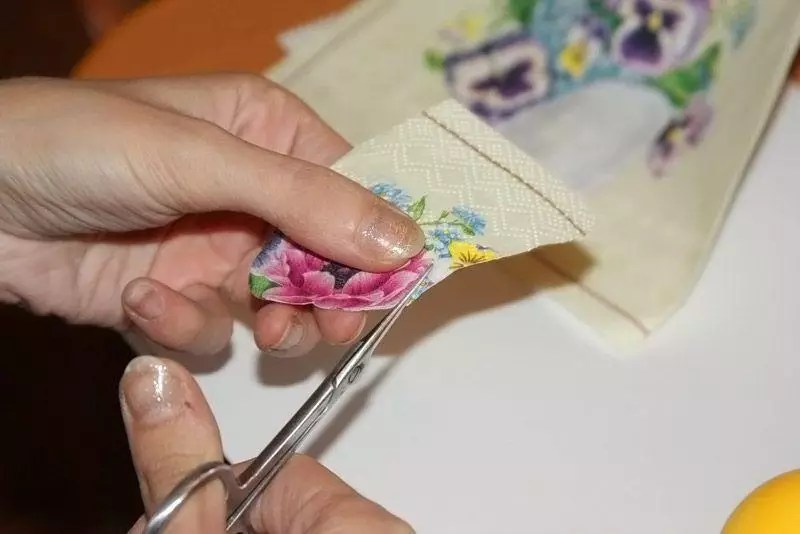
Applying images  | The design on the napkin is carefully cut out with scissors. If the background of the picture and the bottle matches, do without scissors and carefully tear off the napkins. To make the design on the print easier to apply, it should be soaked in a plate of water. |
We fix the drawing  | You need to apply varnish over the surface of the drawing. This can be done with a soft flat brush or a spray bottle. You should make sure that the picture is not covered with wrinkles. If necessary, it must be carefully straightened with a brush. |
Finishing  | After complete drying, you can carefully sand minor imperfections in the work. To highlight details, use a brush and dark paint. Once finishing is complete, apply a final coat of varnish. |
Another option for original design is decoupage of a bottle with tights. Master class on video:
Some tricks of decoupage on glass for beginners: step-by-step recommendations with photos of applying a design from napkins
The first experience of gluing a napkin can be unsuccessful: wrinkles and folds inevitably appear, which spoil the whole result. Some tips on how to avoid this:
- To apply a design to a convex surface, you can make “darts” on it. Cut the edges of the picture with scissors or even cut out triangular pieces. It is better to be careful with the last option; there is a risk of ruining the image if the angle of the cut is incorrectly calculated.
- You can apply glue to the surface, and then apply the design and straighten it with a brush. Another method would be just as good - apply glue over the design, straightening it at the same time.
- If the image is applied to an almost flat surface, you can pour glue into the center, apply a napkin and carefully disperse the composition, straightening the material over the surface.
- You can stick an image onto a perfectly flat sheet using an adhesive pencil.
- You can apply a design using a piece of polyethylene (a bag or a stationery file). The design is placed face down on polyethylene and moistened with water. Then a bag with a wet napkin is applied to the surface to be pasted. The package is removed, the napkin remains.

A simple master class on decoupage shoe boxes
The smooth surfaces of a cardboard shoe box are an excellent basis for decoration. This interior box will become a favorite place for household little things.
| Illustration | Description of the stage |
Surface preparation 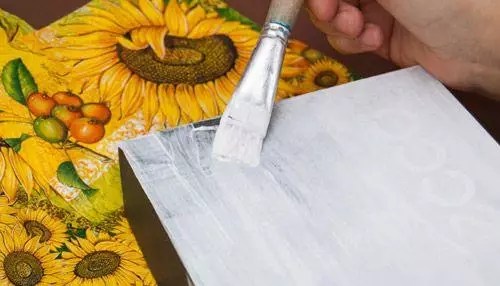  | The corners of the box need to be strengthened with pieces of masking adhesive tape, and then the surface should be primed with acrylic primer or paint. After drying, the primer should be lightly sanded with fine sandpaper. You may need to repeat the procedure if the layer does not lie flat enough. Then you need to paint the box with the color chosen for the background. |
Drawing 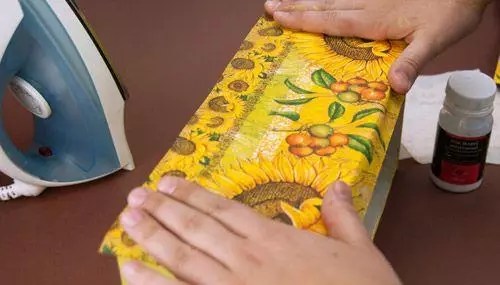  | The place for the drawing is covered with decoupage glue. After the layer has completely dried, a pattern is placed on top and smoothed with a hot iron through a sheet of paper. Afterwards the napkin is covered with a thin layer of varnish. A layer that is too thick will cause the design to become blistered. This procedure is repeated over the entire surface of the box. |
Decoration and finishing  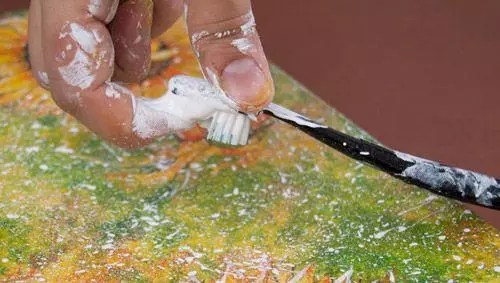 | Using a foam sponge, apply background paint and other shades to match the image. Small details are drawn with a brush. To add some casualness, you can squirt white paint on top using the bristles of a toothbrush. Afterwards the final varnish coating is applied. |
Decoupage of furniture in Provence style: master class on updating a chest of drawers
Having tried your hand at simple things, you can safely start decoupage with your own hands using napkins. In addition to the usual list of working materials, you will need wood putty. It is used to pre-level all the cracks, cracks and other irregularities on the surface of the chest of drawers, cleaned of old paint.
Sequence of decoupage of kitchen furniture with your own hands, photo and description:
| Image | Operation description |
Preparation  | The furniture must be thoroughly cleaned of all layers, and defects must be smoothed out with putty. After drying and sanding, all surfaces are coated with a primer and sanded with fine sandpaper. |
Preparing pictures 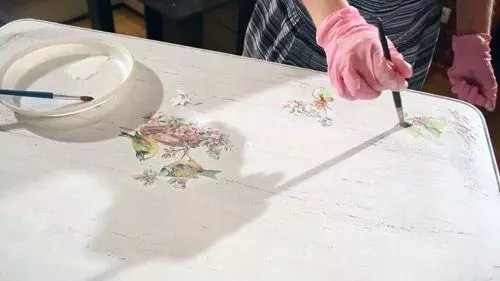 | The design on the napkins is carefully cut out or torn off by hand, and the bottom layer is removed. The picture is coated with glue and applied to the furniture. The application is carefully straightened with a brush. |
Finish coating 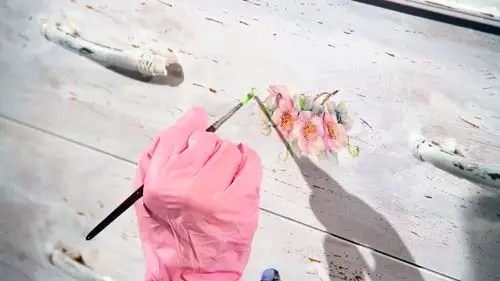 | No need to hurry. All drawings must dry. You need to varnish all the furniture, not just the place of decoration. For large areas it is convenient to do this with a spray bottle or spray can. This way the varnish will lay down in a thin layer. For the best effect, you need to apply 3-4 layers in succession, waiting for complete drying between treatments. |
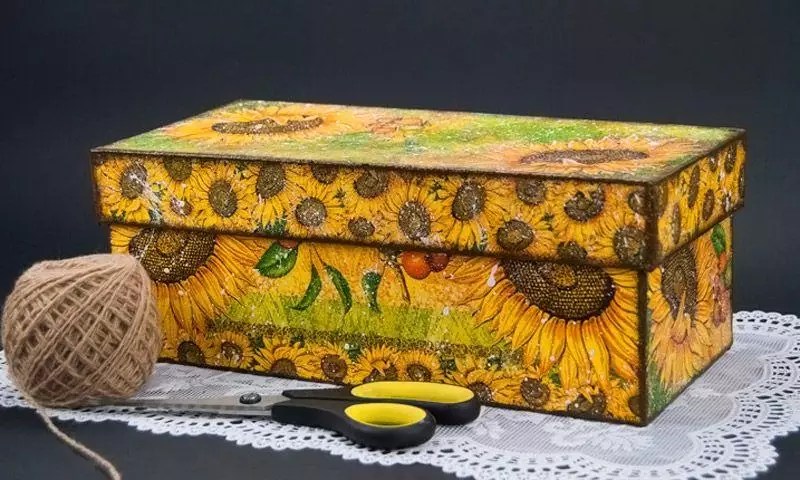
 | Result. |
Helpful advice! If you need to apply a design to a polished surface, the polishing is pre-treated with sandpaper until the shine disappears.
When decorating furniture with fabric, the process is practically no different from that described.

The article will tell you in detail what decoupage is for beginners - step by step with photos we will analyze the rules of use and how to decorate the room. The article is conventionally divided into three parts:
- The first section is devoted to an introduction to decoupage - what it is, how a beginner can enter the technique and what tools are needed in order to become a professional specialist in this field;
- The second is practical advice regarding techniques and use cases;
- The third section will help beginners decide on ideas that can be brought to life using the methodology.
What is decoupage?
Let's start with a definition. Decoupage is a decorative technique using a cut out (torn out) image, which is glued to the surface of the workpiece and then secured with varnish. It doesn’t sound that complicated, but there are a huge number of subtleties. Let's try to understand the features of the technology.
 With flowers
 Who is suitable for decoupage?
Decoupage is applique - most of us are familiar with such activities from kindergarten. The technique itself requires both attention and perseverance, so the ideal candidate for a decoupage artist would be a person who would like not only to do beautiful work, but also to have fun and escape from the everyday hustle and bustle.
Important: There are no health restrictions when practicing, but you need to remember that some substances used in gluing can cause allergies.
That is why it is necessary to carefully familiarize yourself with the composition of the mixtures before you sit down to work. Otherwise, decoupage is a great activity both for evening relaxation for adults and for children's entertainment.
Basics of decoupage for beginners - all the important points
The process should not be particularly difficult if you approach the matter progressively. The sequence of decoupage actions for beginners (step by step with photos) looks like this:
- Surface preparation (sanding, priming, etc.);
- Gluing the decoupage motif;
- Intermediate varnishing to protect the motif;
- Painting and other decorative techniques;
- Final varnishing.
 Decoupage example
 Each stage is important in its own way and has a number of its own characteristics. We want to tell you a few secrets that will simplify your work.
- When working with paint and primer, use small containers up to 250 ml, and not entire containers. This way you won’t bring in dust and debris and the substance will last longer.
- A coarse nail file is suitable for sanding surfaces - you can use it to process small details.
- When decorating glass, use pre-prepared primer for complex surfaces.
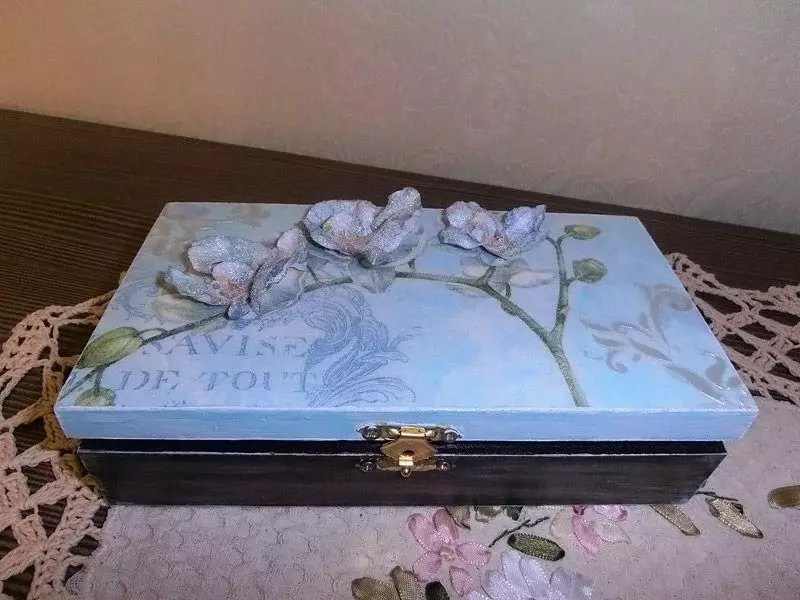
- When decorating boxes, check how the hinges open.
- When gluing napkins, use a file. Wet the napkin on it and then apply it to the surface.
- After you have glued the napkin, do not wipe off the remaining glue. Do this after the first coat of varnish.
 Furniture
 What you need for decoupage for beginners: list
To start creating your own product you don’t need to be a professional - the technique is suitable for a beginner. What is needed for decoupage? We will provide a list further in our material.
Let's decide on the materials. For classes you will need pictures:
- Ordinary paper napkins with a pattern;
- Pictures printed on very thin paper using a printer;
- Special paper.
Model name
 Tools for work
 - The object of decoration is almost any object, but it looks most beautiful on an untreated wood surface. Wooden cutting boards or trays will do.
- You will need scissors - small nail scissors with rounded ends are preferable.
- To glue the picture, buy decoupage glue. There are options for using both special glue and regular PVA.
- Varnish for coating. Buy varnishes with both matte and glossy effects. Some types of glue contain elements of varnish; additional use of varnish is not necessary for them.
- Don't forget about brushes. There are many options in stores, but synthetic ones work great, especially flat ones. You can also use special rollers, but they are more convenient for smoothing the napkin rather than applying glue.
Decoupage techniques – photo instructions and video master classes
Let's try to figure out what items are decoupaged and what comes out of it as a result.
Bottle decoupage for beginners: step by step with photos (17 stages)
One of the most common techniques is bottle decoupage for beginners. Step by step with 17 photos we will analyze this process further. What will it take to turn a bottle into something attractive?
 | 1. First, you need to prepare the surface of the future craft. For this, any empty glass bottle is selected. Remove the label and wipe it with alcohol. |
 | 2. Apply primer to the glass with a brush or roller. The soil is sold in a specialized store. |
|
3. Apply a layer of paint. Acrylic or water-based will do. |
 |
4. Place a sheet of napkin with a pattern in the water. At the same time, apply decoupage glue or PVA. |
 |
5. Remove two layers from the napkin and apply it to the surface of the bottle. Iron it with a roller so that there is no air. |
 |
6. After drying, apply a layer of varnish. |
 |
7. We will make decorative elements on the sides of the drawing using putty. To do this, first outline the contours of the picture with masking tape. |
 |
8. Apply acrylic putty over the entire surface. Next, use a match to make lines, imitating a stone. |
 |
9. Immediately remove the tape before the putty dries. |
 |
10. Dry the surface completely and sand it with sandpaper. |
 |
11. Take dark acrylic paint and apply it to the surface with a brush. |
 |
12. Cover everything with another layer of varnish. |
 |
13. Apply gold wax with your fingers to create an antique effect. |
 |
14. Apply moment crystal glue to the neck of the bottle. Next we apply the chain. |
 |
15. Paint the lid with bronze acrylic enamel. |
 |
16. Apply a layer of glue and then wrap several layers of twine. Next, we attach a decorative lock to it. |
 |
17. Wait for the composition to dry. The product is ready. |

Decoupage for beginners: step by step on wood (6 stages)
Decoupage for beginners on wood (step by step below) requires a special kind of adhesion of the surface to the application.
 | 1. Prepare the surface. First, we remove the previous paint from it (if any) and clean it. Afterwards we cover it with a layer of acrylic primer. After drying, apply another layer. |
 | 2. Take a three-layer napkin and separate two layers from it. After this we apply it to the surface. We will glue it onto yacht varnish. Apply the first layer. |
 | 3. Upon completion, decorate the top of the board. |
 | 4. Cover the board with a layer of varnish, then apply another 2-3 layers. After this, dry for 24 hours. |
 | 5. Rub linseed oil onto the other side of the board. |
 | 6. Let the product dry, the composition is ready. |
Decoupage on plastic: video instructions with comments
Here we need plastic - it is sold in any hobby store.
- We prepare the surface. To do this, wipe it with an alcohol solution and remove the label. Next, apply a layer of acrylic paint.
- Cut out the required design.
- The next step is to squeeze a drop of glue onto the resulting plastic form, after which a paper cutout is glued onto it. Cover the outside of the paper cutout with glue - this way it can be varnished (in such cases we recommend using a special glue varnish).
- Place the finished form in the oven. After frying, make a magnet from the plastic blank by attaching magnetic tape to its base with glue.
Decoupage for beginners from napkins: step-by-step instructions for beginners, 5 stages with photos, videos
 | 1. Take a piece of file and place the napkin face down on it. First, separate two layers from the napkin. |
 | 2. Pour some water onto a napkin and smooth the edges with a brush. |
 | 3. Apply the file to the surface and remove excess air bubbles with a brush. |
 | 4. Slowly tear the file off the surface, leaving a pattern on it. |
 | 5. Apply a layer of glue over the design with a brush. After this we cover it with a layer of varnish. |
You can see more clearly how decoupage is made from napkins in the video.
Decoupage cutting board for beginners - video instructions and comments
Using technology, they also decorate a wooden board. How to do it? We follow the instructions:
- First, the surface of the board will need to be primed. To do this, white acrylic paint is applied to it (this is done with a sponge, in two layers and allowed to dry).
- The required composition is cut out from the selected napkin. Only one layer is needed, so if the napkin has two layers, then you will have to part with one.
- We place the drawing on the surface and carefully cover it with a layer of glue (diluted in proportions 50/50). To prevent the napkin from being damaged, try to smooth out the resulting wrinkles (and they will certainly form) with light movements of the brush.
- Let the glue dry a little.
- It's time to cover the board with acrylic varnish (initially it will be white, but as it dries it will become transparent). It wouldn't hurt to coat the board with furniture varnish.
- Wait until the varnish dries and use the board for its intended purpose.
 On a cutting board
Video master class on fabric with comments
A few words about the technique of decoupage on fabric.
- The fabric is laid out on the surface so that there are no folds. The finished drawing is placed on the surface and leveled (with your hands and with a roller). The placement is indicated by a disappearing marker.
- PVA glue is applied to the area marked for the drawing, where it is expected to dry completely. If the glue is thick, dilute with warm water.
- If the drawing is transferred from a napkin, do not forget to remove the bottom layer. The top one needs to be applied to the place where the glue has already dried.
- The top of the napkin should be covered with wax paper and then ironed. Ironing is carried out from the middle to the edge, the procedure lasts no more than 5 minutes.
 On fabric
 Advice: A little advice - to prevent the work surface from being damaged by glue, place a plastic bag or a stationery file under the fabric.
Full version of the master class on video.
Decoupage from eggshells - video and useful tips
Interesting patterns can be made using ordinary eggshells. Let's see what comes of this.
 On the plate
 Use a plastic plate that has been pre-plastered and degreased.
- Apply glue to the surface of the plate so that the shells do not “float” in it.
- We take the shell, divide it into not too large pieces, and lay it out with the concave side inward.
- Use a toothpick to break the shells to the required size.
- It is necessary to make the shells the same color - to do this, paint over them in two layers (drying).
- When the surface is level, place the shells on the glue.
- After this, glue the napkin. We glue with light movements using a brush or a finger dipped in water so as not to tear the napkin.
- Let the product dry and then decorate the room with it.
Recently, the technique of direct and reverse decoupage has gained particular popularity among lovers of needlework. Its essence lies in gluing in a special way drawings and patterns cut from paper, leather, fabric or wood onto various surfaces. Using decoupage, craftswomen make amazingly beautiful, original crafts that can decorate the interior of your home or become a gift. How to master this technique? It is easy to make decoupage of bottles with tights, the master class of which is given below. Try yourself in this technique and you will get a lot of pleasant emotions!
Rules for decorating bottles using decoupage technique
Your children will be delighted if you allow them to participate with you in creating unique items with their own hands. These pleasant moments will remain in the kids’ memory and will bring you both a lot of joy. Various materials are suitable for crafts: fabric, women's tights, shells, seashells, toilet paper, napkins, lace, photographs and more.
Glue, primer, oil, paint, and varnish will help prepare the surface, fix it and give the necessary shape and background to the decoupage elements. Using this technology, you can decorate a bottle of champagne, wine, cognac, martini, a plastic or clay flower pot, a vase, or a glass jar. If you are going to make a craft for the first time using this technique, then in order to avoid some mistakes, familiarize yourself with several rules for performing decoupage.
Decorative products made using this technology should be as contrasting and bright as possible. It is important to choose a plain surface for gluing pictures and decorate it with bright, color-saturated elements. Any bottle is suitable to create an original interior decoration. When making this craft, consider the following recommendations:
- For decoupage, take a container of a simple shape, because it will be difficult to work with a non-standard one.
- If napkins are used in decoupage, then a design is first cut out of them, and then the top layer is separated and then glued.
- To glue fragments to the surface, it is best to use decoupage glue. However, regular PVA diluted with water will do instead.
- The drawings are glued to the surface of the object greased with glue and leveled to avoid the formation of folds.
- When the bottle processed using this technique dries, it is opened with a special varnish for decoupage.
- After finishing the work, the craft, if desired, is tinted with acrylic paint and decorated with ribbons, beads, shells, sparkles, and bows.
Step-by-step master classes on decoupage bottles with nylon tights
Before starting decoupage work, prepare the bottle. To do this, it is soaked in warm water and then cleaned of stickers, dirt, and glue residues. The washed glass surface is degreased with alcohol. This step must be done, because otherwise the layers applied to the glass will not last long. Next, acrylic varnish is used. They cover the surface or elements of the bottle.
DIY champagne bottle decoration “Lady in the Hat”
It’s easy to make the interior of your apartment more original with the help of unusual, stylish decor. A handmade craft in your home will look especially impressive and will arouse the admiration of family members and guests. To make your own decoupage of bottles with tights using the “Lady in a Hat” master class, you will need the following tools and materials:
- champagne bottle and cap;
- PVA glue;
- tights;
- scissors;
- glue "Titan";
- canning lid;
- peas;
- spray paint brown, golden color.
Craft manufacturing technology:
- Cut off the stockings from the tights.
- Soak the nylon parts with PVA glue.
- Place the stockings prepared in step 2 onto the glass container from bottom to top.
- Make a beautiful drapery on tights, placed on the container to be decorated, and dry.
- Take a canning lid. Put a small piece of stocking soaked in glue on it, tie the ends of the nylon fabric at the top of the wrapped element.
- Bend the edges of the cap up and dry.
- From the remains of the stocking, cut 6 strips, gather each on one side using a thread and a needle and form roses, soak them in glue, and dry.
- When all the blank elements have dried, you need to glue the “flowers” onto the cap and middle of the bottle with “Titanium”.
- Glue peas in the form of earrings and beads to the top of the glass container, as well as to the “neck” of the dress.
- Glue the champagne cap to the bottom of the “hat”.
- Paint all elements and visible parts of the bottle with brown and then golden paint.
Decorating a holiday bottle using tights and napkins
If you show your imagination and use the decoupage technique, then unnecessary things can easily turn into elegant and unusually beautiful decor. So, an ordinary glass bottle and nylon tights, napkins can easily be transformed into an exclusive stylish decoration for a table or interior, a stunning wedding or New Year’s gift, a gift for parents for the birth of a child or a loved one. The instructions below will help you make decoupage. To make it you need the following items:
- glass bottle;
- PVA glue;
- nylon tights;
- acrylic paint;
- napkins with an interesting floral pattern or lace motif;
- watercolor paints or spray paint.

Step by step instructions:
- Clean and treat the surface of the bottle with alcohol.
- Soak the stockings with glue.
- Place the stocking on the glass surface from below and give the material a relief, turn the top edge of the fabric a little for a voluminous look at the neck, and make the window where the picture will be glued even.
- Dry the product and cover it with acrylic paint. Dry.
- Cut out a design from a napkin using a stencil, separate the top layer and glue it onto the glass surface. Dry.
- Use an aerosol can to paint the surface of the glass container, except for the part with the picture. Dry.
- Decorate the bottle with decor (butterflies, beads, rhinestones).
How to decoupage a bottle from pleated tights
It’s easy to colorfully decorate any glass bottle using the full type decoupage technique. Any nylon tights are suitable for this. This material, dipped in glue, drapes beautifully on a glass container. What shape to give to the nylon depends on the ideas and imagination of the needlewoman. The surface decorated with this material can be painted in any color. Decoupage of bottles with tights according to the master class described below will help turn ordinary glass containers into a beautiful thing for decoration. To make it you need:
- tights;
- glue;
- dye.

Instructions:
- We prepare the glass container by washing and degreasing it.
- We cut off the stockings from the tights, soak them in glue, squeeze them out and lay them out on the bottle in folds.
- We dry the glued elements for several days and paint them with paint.
- We decorate with bright elements and varnish.
Video tutorial for beginners on decoupage on a bottle using tights
Anyone can make a beautiful decorative bottle from tights, because it is not difficult and very interesting. In order for a beginner to avoid possible mistakes when performing decoupage, it is necessary to first watch a master class on this technique from a real professional. In the video below you will see all the stages of creating an amazing decor using a bottle and ordinary women's tights. Be sure to try to do this craft yourself at home, so that later you can decorate your home with an exclusive item.
Decoupage translated from French means “cutting”. It means a technique that involves cutting out images from leather, wood, fabric, napkins, which are subsequently pasted for decoration on dishes, furniture, textiles and any other surface. We have already offered you master classes on, now we offer you to decorate the bottle.
One of the favorite objects of decoupage masters is a bottle. Absolutely any bottle is suitable for decoration: from olive oil, alcoholic beverages, etc.
Decorating bottles with napkins is a fascinating process that requires patience and perseverance when gluing the bottle.
What do you need to decoupage a bottle?
To create a masterpiece of “napkin technique” using bottles, you will need to prepare the following materials:
- glass bottle with a smooth surface without bulges;
- special cards for decoupage, magazine clippings, three-layer napkins;
- means for removing grease from glass surfaces (solvent, alcohol, acetone);
- acrylic paints for priming and painting the surface;
- PVA glue or decoupage glue;
- synthetic brushes of various thicknesses;
- acrylic lacquer;
- additional details for decoration: rhinestones, beads, stickers;
- craquelure varnish - to create an antique effect;
- nail scissors;
- masking tape;
- a small piece of foam rubber;
- disposable plates intended for diluting paint;
- rags;
- sandpaper.
Before making decoupage on a bottle, you need to prepare not only the necessary material for work, but also a work place so that you can decorate bottles with napkins for a long time and not feel tired. You need to do decoupage on a large table, on which it will be convenient to place the required tools and items. The room should be well lit and ventilated, since when decorating a bottle using the decoupage technique, special products are used that have a pungent odor.
DIY decoupage of bottles with napkins: master class for beginners
After the necessary material has been prepared, you can proceed directly to decorating the bottle:

In order to understand how to decorate a bottle with napkins, no special skills are required. It is enough to be careful when gluing the napkin to the bottle. Such a creative craft can serve not only as decoration, but also as a holiday gift. At the same time, you can decorate the bottle in accordance with the theme of the holiday, for example, for New Year, Family Day and any other holiday.
 |
 |
 |
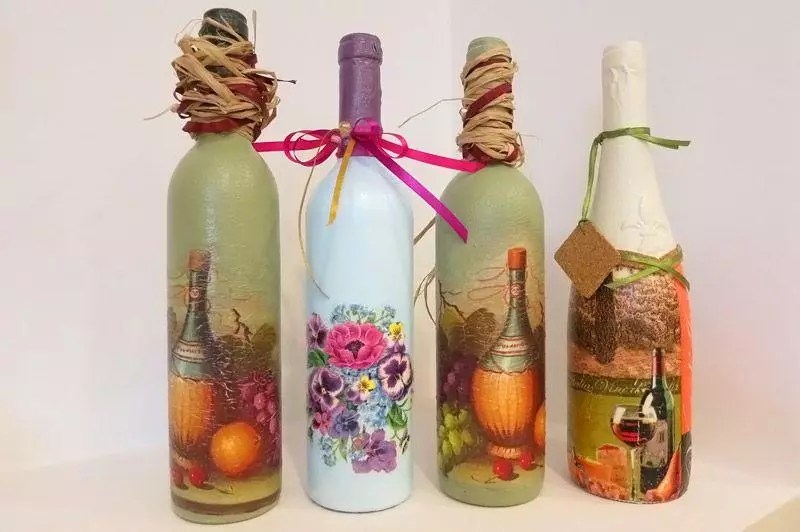
Using hand-made things to decorate your own home makes it possible to uniquely decorate the interior and add originality to the composition. One of these decorative elements can be bottles decorated using the decoupage technique.
Numerous photos of bottle decoupage clearly demonstrate that such things can be not only decorative accessories for the interior, but will also become a wonderful, unique gift for a variety of celebrations and holidays.

What is decoupage technique
The word decoupage came to us from France and translated means “cutting”. If we talk about the technique itself, it consists of gluing individual paper images onto different surfaces, essentially a simple appliqué.


Most often, images are selected from napkins; special decoupage cards or rice paper are also used; if desired, you can use clippings from magazines.

To create a unique interior decor, you can use ordinary bottles of interesting shapes. Decoupage of bottles with your own hands is a great opportunity to turn an ordinary thing into an original flower vase that you can give as a gift or decorate your home with.

For example, decoupage of a champagne bottle is often used to decorate a bottle that will stand on the wedding table of the newlyweds. Champagne is also decorated for the New Year or birthday.


Materials for decoupage creativity
Both beginners and experienced craftsmen can use the decoupage technique. To start creating, you need to purchase the necessary materials and equipment.

First of all, you need to choose a base - a bottle. It is better to choose a product with a smooth surface, without relief.

Next, a drawing is selected. To decoupage bottles with napkins, fragments of ordinary paper products are selected; it is also possible to use rice sheets, decoupage cards, magazine clippings or pictures from the Internet.

To degrease the surface and remove all grease stains, you need to stock up on any suitable liquid that will cope with this task.


After degreasing, the glass surface will need to be primed. For these purposes, acrylic paint of any color that is suitable for the composition is suitable.

To glue a piece of paper to a surface, you need an adhesive composition. This can be a special decoupage glue or regular PVA diluted with water in a 1 to 1 ratio.

Required attributes are brushes. It is advisable to use synthetic products from which hairs do not fall out during the process.

To decorate the product, you need a set of acrylic colored paints, and to fix the image, acrylic varnish. To give the bottle an aging effect, a craquelure varnish composition is used.

In addition to these materials, you also need small scissors, preferably manicure scissors, foam sponges, containers for paint and varnish, and sandpaper.

Step by step instructions
In order to create a beautiful decorative accessory the first time, you should use the bottle decoupage instructions for beginners.


Bottle preparation process. Any bottle should first be cleaned of all stickers and adhesive residue. To do this, soak the container in a soapy solution and then remove all fragments. Next, fat deposits are removed with a degreaser.


The next step is to separate the desired fragment of the drawing from the paper. For this it is better to use small nail scissors. If you use a napkin, you only need to take one top layer of paper.

If you use thicker magazine paper, then first the surface is varnished, dried, and then soaked in water for 20 minutes. Then the transparent pattern will separate from the base.

Now it's time to glue the paper design onto the bottle. To do this, a dry fragment is applied to the bottle and smoothed with a brush dipped in glue from the center to the edges, squeezing out air bubbles and smoothing out wrinkles. In this form, the bottle should dry well.

The work is secured by applying varnish to the entire surface of the bottle. It is better to apply the varnish in three layers.


To decorate and embellish the bottle at the final stage, you can use sparkles, rhinestones, beads, etc.

A detailed master class on how to decoupage a bottle will help everyone create a unique composition for decoration.

Photo of decoupage bottles


