Crafts for the home: DIY interior decor ideas using scrap materials. DIY crafts from scrap materials with descriptions. Crafts for the country house, for the home, for the garden, for the kitchen, for the playground. Simple DIY things from scrap materials.
Every home owner wants to feel as comfortable as possible in their home. This becomes the reason why there is a desire to decorate the interior not only beautifully, but also in an original way.
However, often the funds for this are not enough, because the services of professional designers, like beautiful things, are not cheap. Therefore in Lately An increasing number of homeowners prefer to decorate the interior of their home themselves using crafts from improvised materials that are inexpensive.
It is worth noting that the main advantage of such crafts is not the cheapness of the materials. The most attractive thing is that every item you create is unique. But it is the uniqueness of the design that attracts attention.

Products that were created with one’s own hands emanate a special energy. And thanks to this, an atmosphere of comfort and warmth appears in the house.

An important circumstance is that such structures can act not only as ordinary decorative elements. With their help, you can organize your space much more conveniently. After all, they can be used to store a variety of small items that are necessary for the household.
Do you think this is impossible because you need to have any special skills? No, even a child can handle this job of creating crafts.

Pay attention to the photo of crafts from improvised means, which is presented below. It shows an example of creating a key holder, which is not only a beautiful addition to the interior, but also serves as a small hanger for keys.

And the process of its creation is not complicated. Let's look at it in more detail.
Key hanger
Surely, many people are familiar with the situation when they have to raise the whole family to look for keys. After all, people often do not burden themselves with buying special small shelves for storing keys and other small things.

And since the key is a fairly small item, it is easy to lose it among larger things. To avoid having to constantly look for keys, many people keep them in their purses.

However, we can offer you a more interesting and original way storage And for this we will build a key holder.

Its main feature is that in appearance it will resemble a product decorated with brickwork.

We will tell you step by step how to make a craft in the form of a key holder from available materials. But first, let’s look at exactly what tools and materials will be needed to create it: a thick sheet of cardboard or plywood, thick napkins, hooks, glue, varnish, paints.

Stages of performing a key holder
At the first stage, you need to cut out the back wall of the future key holder. As a material, you can use either thick cardboard or a not too thick piece of plywood.

In the second stage, you should cut out small rectangles from cardboard that will imitate brick. Please note that they must be the same size.

In the third step, you must glue the cut out “bricks” to the base using glue. Remember that there should be a small gap between them. You should also not cover the entire surface of the product with them. After all, in the central part there should be a small sign with an inscription, and in the upper part there should be a picture.

Note!

At the fourth stage, you should start lubricating the bricks with glue. Do not skimp on the glue at this stage, because it is necessary so that you can place the crumpled napkin on top of it. It can also be covered with a small layer of glue on top for better impregnation.

Using a stick or the back of a brush, press the tissue into the gaps to create corners. Leave the product to dry.

Please note that any crafts made from improvised materials at home must be durable. Therefore, we strongly recommend not to skimp on binding materials.

At the fifth stage, the process of creating a visual resemblance to the natural one begins. brickwork. Once the panel is dry, coat it with paint. The seams must be painted with bronze paint.

At the sixth stage, you should coat the bricks with paint a second time. However, this time you need to use a dry brush. To do this, dip it in bronze masonry, wipe it on paper so that it becomes dry and then dip it again in the color with which you painted the bricks.

Note!

Remember that to achieve maximum similarity, you should only move the brush in one direction.

At the seventh stage, which is the final one, you should coat the finished product clear varnish and attach hooks on which the keys will hang.

Crafts for the garden
If you are the owner country house, then for you the decorating process is not limited only to the area of your home. Therefore, to improve the area around the house, you should use garden crafts from improvised means that will decorate any garden or vegetable garden.

To make them, you can use plastic bottles, hemp, tires and old Stuffed Toys. IN in this case it all depends on what set of tools and materials you have.

Crafts made from tires are extremely popular because they are quite simple to create, but at the same time they look original and interesting.
Note!


For example, you can create a real cup from tires, which will become a wonderful flower bed. To create it you will need one tire, a round board (the diameter of the board should be larger than the tire), paint, and a small piece of rubber.

The tire and board must be painted the color you like. If you have artistic skills, you can use them to decorate the product with beautiful images.
If you do not have such drawing skills, you can paint the design one color or polka dots. The handle of the cup should be secured with a large stapler. And now your product is ready.

We draw your attention to the fact that even children’s crafts made from improvised materials can become a worthy decoration for your garden. Use crafts your kids made from plastic bottles and cups. Despite their simplicity, they look quite original.

If they are small in size, use them to decorate the porch or window sills. This way, you can focus on them, and they will not get lost in a large area of the garden.

Photos of crafts from improvised means


What kind of homemade products can you find on personal plots. DIY garden decorations allow you to bring the most original ideas and new ideas to life. Cool crafts, park figurines, and artificial plants are made from natural and synthetic materials, and even from garbage. They decorate the cottage and give a great mood.
Anything goes - suitable materials for decorating the garden with your own hands
Thrifty owners get scared when they see prices for garden sculptures and other decorative items in the store. At the same time, a dacha without interesting details turns into an ordinary vegetable garden and does not evoke the full range of positive emotions. On an unformed summer cottage It’s boring not only for children, but also for adults.
It's worth spending a little time decorating your dacha with fun and useful crafts. To make them, you can use everything that is at hand - from to tin cans. Pebbles, twigs, wire, construction waste - from any illiquid property you can make things that will turn a plot of land into the most cozy corner on earth, with a strong personality.
DIY garden crafts from scrap materials - all new items
When starting to design a garden with your own hands, it is better to get acquainted with current landscape trends in advance. Materials are now being used that were not commercially available before. Gypsum gave way to polyurethane foam, and plywood to thin plastic.

Country crafts made from driftwood look very organic next to a pond:

If the site does not have its own snags, you can get hold of them in the nearest forest. There are sometimes amazing specimens that just beg to be processed. Even a simple winding branch can be a finished sculpture.

Natural wood with its branches and curves allows you to exercise your imagination. Everyone will see something different in it, and almost no modification will be required. It is enough to remove dirt, peeling bark and obviously unnecessary elements - and original craft made of wood is ready.
The finished wooden sculpture can be protected with varnish, wax or oil. This treatment is optional, but without it the wood will change color and crack over time.
With a set of chisels, a massive trunk can be covered with carvings or turned into a fairy-tale figurine. This method is good for old trees that are difficult to uproot. Human imagination and skillful hands transform a useless object into a work of art.

A mountain of different-sized knots that just look like trash can easily be turned into crafts. This conventional figure of a horse amazes with precisely captured movement and precise proportions, thanks to which it looks like it’s alive:

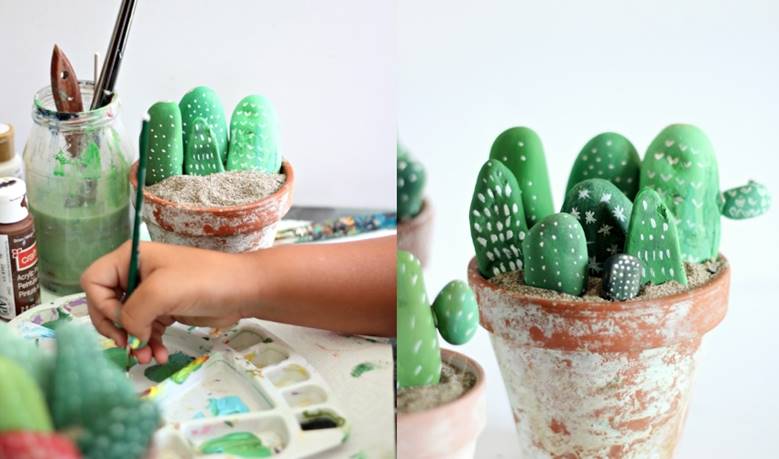
Painted stones
Stones in garden design are a classic that have been used for thousands of years. Current trend allows a departure from naturalness.
It is not necessary to preserve the original appearance of the minerals. They will look more interesting when decorated. Pebbles can be painted to look like cacti, snails, or an ancient castle.

How to paint a stone:
- Wash the mineral with a brush and detergent.
- Rinse, dry in the sun.
- Apply primer to the stone.
- Paint with acrylic paints.

The undoubted advantage of stone jewelry is durability. Even if they fade after a few seasons, the design can always be restored.
The photos below give you a lot of creative ideas. With their help, you can stylishly and inexpensively do everything for your dacha. Even the most spectacular products are made with my own hands without the help of professionals.


Based on the results of many experiments, it is clear that making unique and non-standard souvenirs with your own hands is a very exciting and interesting job. It promotes the development of flexible thinking, creative taste and aesthetic imagination.
Even small children can take part in such a cognitive process, because making crafts from improvised materials with their own hands takes a long time even for those who are not assiduous and not very obedient.

For production, any materials of natural and artificial origin are used. After all, available raw materials are always available and do not require any waste.

And masterpieces that are made from unnecessary or unsuitable materials are fully competitive with store-bought analogues, since they have no analogues. Such products will organically fit into any interior, which will add exquisite originality to it.

What crafts can be made from improvised materials?
- a variety of photo frames;
- coasters for hot cups;
- many different toys;
- decorations for every taste and color;
- key holders;
- original souvenirs using quilling technique;
- various candlesticks;
- skillful crafts for flower beds and garden plots;
- designer suits and dresses for matinees;
- design of a playground for children;
- graceful decorative flowers;
- interesting decorations;
- and many other various design masterpieces.


To make it easier to make souvenirs with your own hands, photos of crafts from improvised materials that can be found on the World Wide Web will help with this. There is no need to copy, you just need to understand the technique and do something of your own.

Using the same principle that postcards are made, it is possible to make a bright panel from paper and cardboard. But in this case, to make the souvenir look complete, you also need to think about a frame that can be made from various materials.

Instructions for crafts using improvised materials
Let's take a closer look at the example of crafts made from plastic bags - kite, which is what kids like so much. For manufacturing, you need to prepare:
- 2 polyethylene bags;
- 2 skewers;
- scotch;
- black marker;
- scissors;
- fishing line, which can be seen with strong threads.

The process of creating a masterpiece:
Straighten the bag and place skewers on it, as if in a cross, but the longitudinal one should be a third higher, from the middle. Now, using a marker, you need to draw lines that connect the ends of the skewers.

Then, it is advisable to cut out the resulting figure. The skewers are glued to the bag with tape.

From the second plastic bag, you need to cut a piece, 4-5 cm wide, of any length - for the tail of the snake. It is possible to make a tail from several short pieces of bags, first combining them with tape. After this, you should tie the tail to the lower half of the flying kite.


At the end, you need to make a hole in the place where the skewers intersect, and securely tie the fishing line there. Ready!

Step-by-step making of crafts for beginners
To make a craft - a goose made from Kinder eggs, you will need:
- yellow eggs from kinders;
- buttons: 1 for the nose, 1 for the tail and 2 for the eyes;
- ribbon;
- awl;
- elastic thread;
- glue.

The process of creating a masterpiece:
Using a preheated awl, all the eggs are pierced, one opposite hole at a time.

Then the elastic is threaded from the ponytail to the head. Next, you need to put on the nose button and thread the elastic in the opposite direction, through the other hole.

Since both ends of the thread appear in the tail, it is advisable to secure them using a button. Now you need to glue in the eyes and strengthen the button on the tail of the caterpillars. In this way it is possible to produce a whole family of similar caterpillars.


Master classes on crafts from improvised materials
For a cardboard Christmas tree you need to prepare:
- cardboard;
- glue;
- scotch;
- paints, markers, pencils;
- scissors;
- glitter, stickers, or something else - for decorations.

The process of creating a masterpiece:
The cardboard must be folded in half and cut where it bends. The halves that came out are folded in half again.


On one piece, on the opposite side of the fold, half of the Christmas tree is drawn.

The sheets are folded together and cut along the drawn line; This is how you get two identical Christmas trees. Then you need to secretly mark the centers of both Christmas trees.

On one Christmas tree, an incision is made from the top to the middle along the midline, and on the second, from bottom to middle. Now, it is advisable to insert the Christmas trees into the cuts, and you get one lush Christmas tree.


To make the Christmas tree more stable, tape is used to glue both halves together.

Pencils, felt-tip pens, glitter, paints, etc. are used to decorate the Christmas tree. At this stage, everything that only the imagination suggests is done.


Conclusion
Every parent who loves their child sooner or later thinks that it is useful for the child to do at least something with his own little hands.

After all, in the lives of children, gadgets take up more and more space, and real exciting activities are much more important. highest value. That’s why making crafts from scrap materials will be an ideal activity for kids and adults.

Photos of crafts from improvised means


What has not been invented in the world of design for a comfortable, stylish and at the same time original interior. Experienced craftsmen know how to surprise their customers. Do you think it’s impossible to do something like this? But in vain! We've got 80 luxury home ideas that are not unlike designer bells and whistles.
1. Beaded curtains
Instead of an ordinary door, lovely curtains made of beads and beads look much more interesting. It’s very easy to make these, you just need to buy a lot of beads.
In the process of work you will need: scissors, a base for the curtain (cord, fishing line), a cornice, large beads and the beads themselves.

Think over the pattern, then measure the fishing line, folding it in half. Leave some extra space to attach it to the bar and start weaving.

We decorate the bar and fasten the bead threads.

2. Decor on the wall in the form of a world map

Materials needed: twine, hammer, pen, stationery metal nails, a plain area on the wall, world map.


The finished panel can be decorated with anything - photographs, pictures, postcards and other things that you always want to look at.
3. Marine motifs: unusual clock on the wall
How to transform your home environment and maintain a romantic beach mood? We recommend making a watch from sea pebbles.

To work, prepare pebbles, clockwork, scissors, ruler, paints, marker, glue, cardboard and wrapping paper. 
We wrap the frame with paper (you can also use a nice thick fabric).

We paint the pebbles in different colour, draw a dial, mark the place for attaching the mechanism and attach a loop to it.

Glue the pebbles.

We install the mechanism and admire the unique masterpiece!

4. Magic lamp
Even an ordinary glass jar can shine without electricity. And it won’t be difficult to make such magic happen.

For a sparkling lantern, prepare a glass jar, a lot of glass balls, alcohol, cotton wool, fluorescent paint and a brush.

First, wipe the inside of the jar well with alcohol, and only then use a brush to make strokes and dots of paint. Let it dry completely. All that remains is to pour in glass balls - so the rays in the wonderful lamp will playfully echo.

5. Picket lamp

6. Paintings of flower buds
Everyone can do artistic crafts when they have flowers, paints and inspiration.


7. Felt rose basket for small items
Felt – comfortable material primarily for those who are just learning the basics of cutting and sewing. It is not necessary to skillfully sew and cut out, since such fabric does not require an overlocker. Simply cut and connect.

So, prepare: felt, ruler, knife, pins, thread, hexagon-shaped stencil.
 Transfer the shape and cut it out.

Gather the core with pins.  Attach the remaining petals.
 A wonderful basket in the shape of a rose is ready! It can have a lot of functions - from storing small items, to a newspaper rack and flower pots.

8. Natural composition of branches and fresh flowers
 Materials: wire, wire cutters, a beautiful ribbon, small branches up to 15 cm long (about 60 pieces), pruning shears and the best flowers.

Making a frame.

We twist our composition and secure it with the remaining wire.
 The final touch is decor. We wrap the branches with ribbon, place the flowers inside and place them in a glass flask. The result is incredible!
9. Decorate the walls with origami paper

10. Functional board organizer

11. Original shelf with jars

12. Gorgeous lampshade “Luminous lace”
 Materials: lace fabric (this could be a piece of an old curtain), a brush, PVA glue, an electric mechanism and an inflatable balloon.
First of all, cut the lace fragments.

We inflate the balloon, coat it with glue and overlap our lace circles. Let it dry for a day.

We pierce the ball with a needle, peel it off from the lace surface.

We make a hole in the opposite side for wiring. We install the electrical mechanism.

13. Bucket lampshades
This original lampshade imitates an old bucket, creating an antique effect. But in fact it is made of dense specific fabric.

14. Signs with messages

15. Colorful photo collage

16. Impressive photo wall

17. Creative pendant with photos

18. Letter of Memories

19. Exclusive vase made from a jar and nuts


20. Laconic cute vases on the wall

Materials: planks (preferably square), fasteners, leather tape, cute glass pots, screws, hammer, screwdriver and scissors.


21. Decorative clay pot


22. Transforming old shoes

23. An extraordinary panel - a new role for old-fashioned ties

24. Decorate the wall with children’s hats and elegant dresses

25. Vintage window frame cabinet

26. Not a standard place for skis
 27. “Ski” photo frame

28. Musical wall of guitars

29 ... and vinyl records

30. Headboard made from old pallets
Very simple idea to create a cozy interior identity. You can hang different things on pallets: mini garlands, ribbons, cute fabrics.

31. Cork mat
A great alternative to regular bathroom bedding! It is convenient, practical and beautiful. This rug repels moisture, and its natural color will harmoniously fit into almost any environment.

32. Old storage boxes

33. Picket fence for a hanger - an element of vintage decor

34. Retro idea: decorate the inside of furniture with beautiful wallpaper


35. Wallpaper on the doors

36. Wall frame - a place of honor for a luxurious wallpaper ornament
 37. Double function of one pattern
Support the theme of the wallpaper on the wall by wrapping books in it.

38. Update your table lamp by decorating the lampshade with some pretty wallpaper.

39. Nature in your home


40. Another role of an ordinary hanger

41. Hanger with clip as a holder for paintings, photographs and other decorative items

42. Office tablet for compositions on the wall

43. Artist's experiments

44. Bright chandelier with pompoms for a nursery

45. Lush paper balls for decoration

46. Garland in boho style

47. Cute braid for a Roman blind

48. Transforming the lampshade with lovely fringe

49. A fun interior detail – a garland of mini pom-poms by the window

50. Restoration of a high chair for a nursery
It’s easy to make a beautiful and stylish piece of furniture from an old chair with scuffs and scratches. Gather your paints, masking tape, and colored wool threads to make a cute pom-pom pillow for the high chair.


51. Snag as a hanger

52. A vintage chest is a great alternative to a coffee table.
 53. Original bedside table from a chest


54. A chest as an exhibit inside a glass box - a central piece of interior decor

55. Extravagant dressing table from a suitcase

56. Unusual minibar

57. “In limbo” – chests a la shelves


58. Storage cases

59. Adorable pet bed

60. Music wall

61. Cities and countries above the desktop

62. Note board

63. Instead of wallpaper, old newspapers

64. Precious bookmarks
IN modern world With computer technology, books have also acquired electronic format. But for some of us, the ritual of reading good old books in their original form still takes place. A luxurious bookmark will not only further emphasize its significance and value, but will also become a decorative highlight of your interior. This kind of thing is easy to do with your own hands.

Any decorations are suitable for decoration - beads, brooches, stones.

For work you will also need: wide colored ribbons (velvet or satin), scissors, thread, needles, wire cutters, glue and clips for decoration.

Think about it perfect combinations to your taste. 
Glue the ribbons well by folding them in half.

We decorate the ends with clips.

65. Serving decor – butterflies made from napkins

Add a romantic touch to your table decor by turning paper napkins in cute bright butterflies. You just need a thin wire, scissors and, of course, the napkins themselves.

Fold the napkin in half. 
We form triangles along diagonal lines.

On one side, we connect the ends of the triangle to the vertex.

Turn it over and bend the top to the base.

That's all! All that remains is to make the antennae from the wire.


66. Bird on canvas


68. Stylish decoration of plates

Materials needed: white plates, tape, special markers, water, cotton swabs and an oven. Cotton swabs with a glass of water will be needed to adjust the pattern.

Option N°1


Option N°2


The final touch is to secure the resulting drawings by placing our plates in the oven. For porcelain 220°C for 30 minutes, for ceramics – 160°C for the same 30 minutes.

69. Unusual cover for a vase
A vase made from a plastic bottle with a decorative cover made of multi-colored lightning bolts looks much more attractive!

Materials: 12 zippers (20-25 cm), plastic bottle, thread, knife.

Sew along the length of the zipper.


Sew the two edges together (you can do this by hand).

Let's try it on.

Cut off the top of the bottle.

We trim the flowers and enjoy the composition! 

78. Family organizer: making a menu
 79. Luxurious basket “Pink Heart”
80. Romantic decor – heart made of branches

Such great ideas handmade crafts and other things for the home - what you need when the usual interior is no longer inspiring, and you can’t afford to radically change the decor.
In this article we will tell you how to create crafts for your home with your own hands. Decor made from scrap materials gives your home a unique look and helps old things regain their new life.
A craft starts with an idea. It shows individuality. You can make a craft for your home yourself. It is not necessary to have a designer's education. In creativity, it is important to be careful. This is the only way the crafts turn out to be of high quality and beautiful.
What to use for crafts?
DIY home decor from scrap materials enriches the interior. The kitchen is the place that brings the whole family together. In this room you can paint the walls, hang photos, decorate furniture, kitchen aprons, etc. If you don’t have a design education, you can use stencils. An empty wall is decorated with a panel or painting on a kitchen theme.
It is better to decorate the living room with the whole family. Ideas bring people together. We offer as an option to cut out the first letter of the family surname from thick cardboard and decorate it with paper flowers, pom-poms, and beads. The letter is framed like a photo and hung on the wall. Various words are assembled from such letters: love, family, home.
Decorating in the form of vases helps to transform the interior. Old bottles are used for decoration. The elements are wrapped with twine and decorated with flowers. To create room decor use sofa cushions, covers for which you can make yourself. Such things give comfort.
The bedroom is a place of relaxation. There is no need to overload it with decorations. A few elements will be enough. The wall of the room is decorated with family photos, and a homemade patchwork blanket is placed on the bed. The design of bedside rugs should be made in the same style. An original solution is to use fabric birds, which are hung above the bed by satin ribbons.
The bathroom is a place of cleanliness and self-care. You can decorate it with shells and pebbles. A lot of things and accessories are stored in this room, so you can make homemade panel organizers. Wicker baskets screwed to the wall at the bottom can be used as storage shelves. Original towel hooks can be made from various materials: wood knots, wrenches. The main thing is not to stand out from the overall design of the room.
The design of the nursery is determined by its size. To create the interior of a children's room, bright things should be used. It is decorated with homemade toys, photos, bedspreads, wall paintings, and unusual lamps.
On the Internet you can find various ideas for your own interior using scrap materials. For inspiration, you just need to look around. DIY interior crafts from scrap materials can be created from:
- paper and cardboard;
- fabric scraps;
- colored threads and beads;
- unnecessary CDs;
- coins;
- satin or nylon ribbons;
- bottle caps;
- any elements made of plastic, wood, glass, etc.
Tip: you can also use larger things for crafts, for example, cabinets, wall mirrors, chests of drawers, tables.
Practical crafts
If you don’t like various trinkets, then you can make practical interior items with your own hands from scrap materials.
Shelving from an old staircase
Sometimes there isn't enough shelving at home. So why not make it yourself? This will be a truly practical craft. The rack is made from an unnecessary ladder. In addition to the ladder, you will need boards, paint, a jigsaw, a brush, sandpaper and glue.
Stages of work:
- prepare the frame of the structure: cut the stairs into equal parts and fasten them in the form of two pyramids;
- cut shelves from boards;
- attach the shelves to the frame with glue;
- polish the structure and its elements;
- paint the shelving.
On such a rack you can place books, original baskets, flowerpots with flowers, A4 size paintings and other beautiful do-it-yourself things for the home and interior using improvised materials.
We invite you to create another practical craft for your home - a table from unnecessary wooden boxes. Vegetables and fruits are often stored in such boxes. For this craft you will need 4 of these boxes, nails and a hammer.
Place the boxes on lateral surface open side out and connect them together into a square. Fasten the elements with nails. It is possible to decorate the open space of the drawers with additional shelves. At the end of the work you need to paint the table.
Pallet spice rack
We invite you to create a unique spice rack from an old pallet. To do this, clean the tray with sandpaper. Use a jigsaw to saw off unnecessary elements. You can make additional shelves. The result is a panel with a pocket that is suitable for any interior. Containers with oil, wine bottles, and spices are placed in this pocket. The shelf is painted in the color of the interior.
Crafts for interior decor
A house is a reflection of its owner. It’s nice to come visit a creative person and look at the embodied ideas and unique style. We offer you some tips for interior decor and creating crafts.
Mirror frame
An interior decor item made from scrap materials can be a wall mirror decorated with an unusual frame. It is easy to make from a regular newspaper or magazine. Colored sheets are cut into equal squares measuring 10x10 cm and rolled into tubes of equal thickness. These tubes are glued along the perimeter of the frame parallel to each other. The result is beautiful design mirrors The tubes need to be secured not only with glue, but with varnish.
Plastic lampshade
To make a plastic lampshade, you will need several sets of plastic spoons, an empty 5-liter plastic container, and glue. The neck of the container is cut off. The handles of the spoons are cut off to form petals. Using glue, the original petals are fixed to the surface of the container in the form of scales. The plastic lampshade is ready.
Fabric jewelry
The interior of a home made from scrap materials will become more lively if you use the remains of bright fabric. You can make various crafts from them, for example, fabric flowers. Using a stencil, circles d = 20 cm are cut out. A spiral is drawn on the circles, which is cut along the entire length. The spiral is twisted from the bottom, gluing it so that the bud does not fall apart. After drying, the petals are straightened. Unusual do-it-yourself decor from improvised materials for your apartment is ready. Several fabric colors are combined into a composition, panels, paintings are made, shelves, walls, etc. are decorated with them.
Candlestick made from old beads
If you have old beads, do not rush to throw them away. They are disassembled into beads to make a hand-made candlestick. You need to attach an unnecessary CD to the base of the candlestick. Glue beads in rows along the edge of its circumference to form a cup. If you put a shaped candle in this glass, it will turn into a beautiful candlestick. This decorative element has a big plus. Thanks to the beads, it shimmers beautifully when the candle is lit.
Festive garland on the window
On New Year or any other holiday, the windows of the house are decorated with garlands. It is not necessary to hang bright lights; we recommend that you make an unusual curtain from scrap materials. To create a garland you will need thick colored cardboard, thick thread, a needle, and scissors. Using a stencil, cut circles d = 10 cm. The circles are strung on threads of the required length. The threads are connected together into a curtain and secured to the window frame.
Jewelry hanger
There can never be too many DIY crafts. A woman's dressing table can be decorated with a homemade jewelry hanger made from scrap materials. It's easy to do. To realize the idea, you will need a picture frame, a small piece of plywood, paint, small hooks, and a jigsaw. Saw off the plywood to the size of the baguette, paint it with paint. Mark the places where the hooks are attached and secure them. With this decorative element you can store your jewelry in an original way.
Canvas box
We suggest you make a box from plastic canvas. Canvas is a material for embroidery and crafts. It has the dimensions of an A4 sheet. The canvas has a varying number of perforations. To work, you will need the workpiece itself, threads, a needle, a piece of fabric and scissors. You can embroider with cross stitch or satin stitch on canvas. Make the details of the future box from canvas and decorate them with your favorite embroidery method. Connect the parts with thread and a needle. The canvas box is ready, it needs to be stored on the shelf. Without a doubt, it will become the main decoration of the interior of your home.
Braided rug
The tapestry technique allows you to create a rug at home with your own hands from any available materials. For example, they cut old clothes into strips. This option is called a “grandmother’s” rug. For crafts, you should choose a durable material and draw the thread by hand.
Prepare cardboard 500x500 mm. Sew it with thread. Having secured the first thread, begin weaving the tapestry. Once you've finished the last circle, turn the rug inside out and sew some rope around the perimeter to cover the ends of the threads.
Pots made from bags
From scrap materials that are sometimes accumulated at home, flowerpots are made for indoor flower. For DIY crafts you will need paper bags, wooden skewers, scissors, rope, glue gun, container (for example, you can use a mayonnaise jar).
From paper bags, make blanks in the form of ribbons measuring 70x300 mm. Using skewers, make tubes from the blanks. Secure the corners with glue. Wrap the sides of the container in a paper bag. Turn it upside down. Attach 8 tubes to the base. Return the future flowerpot to its normal position. Fold the tubes up, pressing them tightly against the walls of the pots. It remains to braid the main tubes with the remaining ones in a checkerboard pattern. The pot is pierced at the top, a rope is threaded through the holes and the pot is hung on the wall of the room.
Fabric hanger
Hangers are always needed in the household. We suggest you make several of them. For crafts you will need:
- wire hangers;
- satin ribbons in contrasting colors;
- piece of fabric;
- scissors;
- needle and thread;
- glue;
- padding polyester
Draw the outline of the hanger on a piece of fabric. Leaving a small gap, cut out 2 blanks. Sew the pieces together to make a cover. Wrap the hanger hook with satin ribbon, securing it with glue. Place the fabric cover on the hanger. Fill the internal space with padding polyester. Sew up the hole. From contrasting satin ribbon make a bow and secure it at the base of the hook. The fabric hanger is ready. You can hang delicate items on it.
Mirror frame
There is always a mirror in the house. Most often it is located in the hallway, bathroom or bedroom. The decorating ideas are endless. The mirror can be beautifully decorated with newspaper tubes, broken shards of porcelain or tiles, colored glass, shells, buttons, beads, hemp, etc. To fix the elements, you must use transparent silicone glue.
Decoupage
Do-it-yourself room design from scrap materials can be made using decoupage technique. We suggest you decorate a small mirror in a wooden frame:
- Clean the frame with sandpaper.
- Cover the prepared surface of the decorative element acrylic paint white.
- After the paint has dried, apply a layer of decoupage glue to the surface.
- Cut a decoupage card to the size of the frame and glue it to the surface.
- Apply the next layer of decoupage varnish.
- Sand the edges of the frame with sandpaper and cover with craquelure. The paint will dry out and crack.
- Apply a contrasting shade of paint to the cracked surface.
- You can highlight the borders of the frame and put blots on its surface.
- Cover the frame with glossy varnish.
Decor made from plastic spoons
For crafts, it is better to use a round mirror. Cut off the handles from the plastic spoons, leaving the scoops. Glue them in several rows around the entire perimeter of the mirror. Spray paint the decor. Instead of spoons, you can take buttons, beads, shells, clothespins.
Ring decor
DIY decor using improvised materials can be inexpensive. From plastic pipes cut rings of the same width. Finish their edges. Take a nylon cover. This will be the base of the structure. Attach the first row of rings to the lid. Attach the second and subsequent rows to the already glued rings. At the end of the work, we recommend that you decorate the decor with sequins. Secure the mirror in the center.
Rope decor
To implement the idea you will need hemp rope. Cut out the base from cardboard. It must be larger than the mirror itself. Place a mirror in the center of the base. Apply clear silicone adhesive to the base. Fix the hemp turn by turn. The result is a mirror that can be used to create a marine-style room interior.
Decor on glass
Do-it-yourself home decor from scrap materials includes painting. To work, you will need stained glass paints, glass contour, glitter, alcohol, cotton swabs, toothpicks and silicone glue. Before starting work, decide on the design. Transfer it to the mirror using carbon paper. Trace the design along the glass. Remove irregularities with alcohol. After the outline has dried, color the pattern. stained glass paints, distributing them with a toothpick. The paints should dry for about 3 days. After this, the decor is complemented with glass beads or glitter.
Framing with beads
Beads are used to decorate the mirror. Mark the future frame using masking tape. Apply silicone glue to the resulting border. Pour the beads onto the paper and spread it over the glue strip. Carefully remove the tape and let the work dry thoroughly.
Decorate walls using simple materials
The atmosphere of the interior can be changed by paying Special attention wall decoration. To do this, you only need rollers, paints and color. It is not necessary to paint the surface of all walls. Sometimes it is enough to highlight part of it. They decorate the walls in different ways: with paintings, with the help of panels, photos, natural materials, baguettes, paper butterflies, interesting hooks and other improvised materials.
Stencil decor
This method of wall decor is considered the simplest. Stencils are made by hand from thick paper, whatman paper or plastic. Patterns can be found on the Internet. The stencil is pressed tightly against the wall and spray paint is applied.
Tip: apply paint in a thin layer so as not to smear the pattern and avoid smudges!
