When time is running out: how to quickly make a shed from boards without a foundation with your own hands. How and from what to build a frame shed with your own hands How to make a wooden shed from old material
When settling in a summer cottage, the first thing they do is build a utility block from various materials and different sizes. In many cases, this is just a change house or temporary shelter until a permanent structure is built, but some people strive to create amenities almost like in an apartment.
Options for utility room - choose for your needs
Building a utility block with your own hands after purchasing a plot is the next task for its owner. Why do it on your own, because you can buy a change house or order construction? There are several reasons why many people prefer to build themselves. Firstly, the financial issue: after purchasing a plot, not everyone will have the money to purchase a utility unit or pay for construction by contractors.
Secondly, many cabins available for sale often cause dissatisfaction with those who bought them because their service life is too short. And thirdly, if you have construction experience and leftover material, you can build a utility block yourself, not of a standard type, but based on your needs. A commercially built cabin will last a long time, and the experience gained during its construction will be useful in the future.
Having bought several acres, summer residents strive to immediately build a reliable utility unit for various purposes:
- as housing until the house is built, in order to later remodel it for other needs;
- outbuilding for equipment and other property;
- as a dressing room, pantry, bathroom, summer kitchen;
- as sheds for rabbits, poultry, and livestock.
The utility block is a universal room; everyone can adapt it to their needs. If the owners spend a lot of time working on the land at their summer cottage, then they will think about a rest room, about a bed in it to spend the night. A small compact structure can look like a simple barn or a house from a fairy tale. It all depends on the needs, capabilities, and priorities of the owner.
Materials and projects - what and what to build from
Construction begins with the foundation and ends with the roof. There is no particular choice in materials here. The foundation is made strip or columnar. For tape you need sand, cement, crushed stone or concrete blocks. Columnar is made of brick or stone. Recently, asbestos-cement pipes have been used, which are filled with concrete. The utility block is usually covered with inexpensive material: slate or corrugated sheeting.
The construction of walls often confronts a summer resident with the problem of choosing a material. One should proceed from several factors: cost, labor intensity, thermal protection, if they are going to live in the utility block in the winter. Cheap material will save money, and lightweight material (panels, aerated concrete) will allow you to build a cheaper foundation. Large blocks, panels, sip panels, boards, and corrugated wall sheeting will significantly speed up construction.
To build a utility block, one of the simplest schemes is increasingly used - frame.
Having sorted out the material, we decide on the purpose and, accordingly, the dimensions, and make drawings. The smallest storage shed, which can also serve as a temporary shelter, has dimensions of 3.5 x 2.5 m. If we expect to have a warehouse, a room separated by a partition, or a corner for cooking in the utility unit, we will need dimensions of 4.5 x 3.0 m. In both cases, it is impossible to find a place for a bathroom; you will have to install a toilet and shower in the yard. A 6×3 utility block will allow you to place everything you need for living with minimal amenities.

Frame project 6×3 – how much material is needed
Let's look at how to build a 6x3 m utility block, how much and what material will be needed. We focus on one option, because it is impossible to consider all the diversity. If the dimensions of your frame structure differ, it is easy to calculate the amount of material by increasing or decreasing it.
When starting construction, we make sure to draw a drawing as best we can, and based on it, we draw up a list of materials. You shouldn’t rush into this; it’s better to think it through carefully until you find the ideal option.
You will need bars 100×100 mm:
- for lower and upper frames 6 m long - 6 pieces, three-meter ones - 8;
- for vertical supports – 2.4 m – 11 pieces;
- 2 pieces of 6.6 m each for rafters;
- plus horizontal bars on doors and windows.

Boards needed:
- 20 pieces 25×150 mm for the floor, the same number for the ceiling or replace with another material (plywood, fiberboard, etc.);
- for the sheathing – 7 pcs. 25×100 6 m long;
- for windshields the same 2 pieces, but 3.6 m long;
- for fastening rafters – 50×100×3600 – 6 pieces.
If we are making a metal frame for a building, we focus on the length of the lumber. We calculate the amount of material for the foundation and covering based on the size of the building. If the foundation is strip, you will need quite a lot of sand, cement, and crushed stone. The columnar one will cost much less; for a frame utility block it is a good option.
We begin construction - foundation and lower trim
We make a columnar foundation from asbestos-cement pipes with a diameter of 150 mm. First, we mark the place for the foundation: remove the turf and a layer of earth to the depth of a spade bayonet. Fill it with 10 cm of sand and tamp it down well. At the place where the pipes are installed, we dig holes 1.2 m deep, fill the bottom with sand, and tamp them. We place pipes of the required length into the holes.
Using a building level, we check the verticality, horizontality and correct location around the perimeter of the building. We fix the position by filling the space between the poles and the ground with sand. We fill the pipes inside with concrete or cement-sand mortar. First, fill it to a third of the length, lift it slightly so that the solution goes into the hole and forms a solid base at the bottom. We fill the pipes to the top, compacting the concrete so that cavities do not form. In the center of each pipe we place an anchor to secure the frame frame.
While the foundation takes several weeks to gain strength, we prepare the frame. We make a rectangle from 10x10 cm beams, fastening the corners into half a tree, fixing it with nails and self-tapping screws. To strengthen the frame, we install logs across it inside. We treat the wood for the frame, as well as for the entire structure, with antiseptics or twice hot drying oil. At the top of each column we lay roofing material for waterproofing. Place the frame on the anchors and tap lightly to mark the locations for the holes. We drill holes, install the lower trim on the foundation, securing it with nuts on the anchors.
Continuation of work - erecting a frame, assembling rafters and roofing
We begin assembling the frame from the ends, fastening the building materials to the lower frame using metal corners. To strengthen the fixation, you can install diagonal struts from beams or temporarily fasten them with a board using self-tapping screws. We assemble the front part of the frame, installing the vertical posts, then the rear. The distance between the posts is 1.8 m. We strengthen the frame with diagonal struts made of beams.

Don’t forget about windows and doors, creating openings in the places where they are installed. The size of the doorway is 2x0.85 m. We install crossbars for the windows: the lower horizontal at a height of 80 cm from the frame, the upper - 1 m from the bottom. If we plan to arrange several sections inside, we install partitions. We finally fasten the frame racks at the top with beams.
We make the roof depending on the method of assembling the frame. If the building has front and back sides of different heights, we install rafters on the longitudinal beams of the walls and attach the sheathing to them. If the walls are the same height, we assemble the rafters on the ground, and then install the finished ones on top. We create the necessary slope by raising the front part by 50 cm. But you should keep in mind that one person will not be able to lift them, so if there is no assistant, we assemble them at the top.
We cover the roof, lay the floor, sheathe the walls
Immediately after assembling the frame, we cover the roof. The list of available roofing materials is large, so we make the sheathing for large sheets sparse, and for rolled material - continuous. Before laying the floor, it is advisable to insulate the subfloor: fill the openings between the pillars with any material, fasten them with cement mortar, and fill the inside with expanded clay. We lay the floor from the boards along the joists.
We cover the walls, starting from the front wall, going from bottom to top. The material can be different: boards, lining, siding, corrugated sheets, etc. We insulate with glass wool; it is not advisable to use polystyrene foam - mice adore it. We sheathe the walls from the inside, make partitions, install windows, hang doors - the utility block is ready and will undoubtedly become a decoration of the land plot.
Anyone who has at least once directly dealt with construction issues and delved into all the details knows very well that the stage of erecting the foundation of any structure is the most expensive. But that's not all. In some situations, installing a foundation is either impossible, or undesirable, or unjustified from an economic point of view.
For example, in a small garden plot, where there is a high risk of damage to part of the root system of vegetation and it is difficult to carry out excavation work, given the density of plantings. In such cases, the best option is to erect a temporary lightweight structure directly on the ground. Let's figure out how to make a shed from boards without a foundation in your country house or local area with your own hands.
On many thematic sites, in addition to the advantages of this engineering solution (high speed of construction, reduced costs), significant disadvantages are also noted - the fragility of the structure and the low level of thermal insulation.
The author himself is a summer resident with extensive experience, and categorically disagrees with this. The reasoning is quite clear. Firstly, if the installation is done correctly, the shed will last for many years. Secondly, the quality of insulation is also a controversial issue, since such buildings are intended mainly for storing household equipment and improvised materials, therefore, the microclimate inside them does not play a special role.
And making a bedding under the bottom of the barn, for example, from expanded clay, is not difficult. Well, it’s not difficult to determine how and what exactly to additionally cover the inside of the house to increase the temperature.
How to make a shed is probably not the most important thing that interests the reader. Moreover, the building material has already been determined - board. But “without a foundation” and “with your own hands” is somewhat unusual, although quite simple. This is what the author will focus on, based on personal experience in the construction of such a structure.
All areas are different, and that says it all. But you still have to take something into account.
- The segment of the territory on which the plank shed is supposed to be built should not be at risk of flooding. Since it has no foundation, excessive soil moisture will lead to rapid destruction of the building. Therefore, for construction you should select (if possible) the highest “patch” on the site.
- It is advisable that the barn be exposed to the sun most of the day. In this case, there is a guarantee that even if water accumulates near it, it will quickly evaporate, and the earth will dry out well. And moisture ingress is inevitable, especially if irrigation is done not by soil, but by sprinkling. By the way, many summer residents practice exactly this technique, fortunately, there are many inexpensive plastic “turntables” on sale.
- When choosing a location, you should also take into account the perspective. Summer residents who not only know what crop rotation is, but also practice this growing technology, understand what we are talking about. When changing the order of planting garden crops or redeveloping a plot, the barn should not be a hindrance to the gardener.

How to make a shed base
Still, any building, including a barn, by definition must have one. The reader has two simple options to choose from. High speed of installation and minimum costs for the shed are guaranteed.
Option #1
An often mentioned way to build a shed is on pallets. It is unlikely that such a technology deserves attention, given that such a base (made of wood) will rot quite quickly. With an expectation of 1 - 2 years, this is a good option, but this is more suitable for temporary structures that are installed on sites, for example, by builders and installers. This is not the best solution for the private sector.
Option No. 2
On supports. Someone will object that this is already a columnar type foundation. This is not entirely true - there are similarities, but small. The fundamental difference is in the depth of installation of the supports. For a small-sized wooden shed, they are dug in 50±10 cm. This is quite enough for the base to withstand a not so significant load.

After installing the posts, they are aligned on all planes, securely fixed in place, after which they are tied. The supporting frame is the foundation on which the shed will be built. It turns out that you won’t have to do any excavation work on the site (except for digging 4-6 holes) or preparing concrete mortar in large volumes. In fact, the barn is made without a foundation.
The advantage of this solution is not only the speed of construction of the foundation and the minimal cost of materials. Since timber, that is, wood, is used for strapping, it will not be difficult to install the frame posts on it with your own hands. Yes, and the barn can be slightly raised above the ground, even the structure can be leveled if the site is downhill.
Calculator for calculating the quantity and volume of lumber
What to consider during construction
It is advisable to start work directly when all preparatory measures have been completed. Since the supports (you can use fragments of timber or logs) will be in the ground, you should choose a method for processing them to protect them from rotting. The concept of “do-it-yourself” often implies that the owner makes do with improvised materials and not purchased materials and means.
The author recommends thorough (at least 2 times) impregnation with waste engine oil. Additionally, it is advisable to coat all edges of the blanks used as posts (except for the top cut) with tar (molten, of course). There is virtually no financial investment, and the durability of the foundation is ensured.
A barn built using this technology has been standing on the author’s property for 12 years now. And there are not even indirect signs that repairs need to be done. By the way, the timber used for strapping should also be impregnated with mining.
Procedure for installing the base of the shed
Nothing complicated for those who are familiar with the technology of foundation construction.
- Marking the area for the barn.
- Digging holes. You need to try to ensure that their diameter is only slightly larger than the cross-section of the support.
- Bottom seal. It is advisable to load a little clay (but always oily) into each hole, and then compact this layer. It will protect the hole from penetration of liquid into it from below. Considering that the tree for the supports is coated with tar, this will be enough. The specificity of this method of constructing a shed excludes the possibility of using other insulating materials (film, roofing felt), since they cannot be correctly laid (and straightened) in small holes.
- Next is a layer of river sand or ASG.
- Installation of supports and alignment of each vertically and horizontally.
- Loading small gravel, broken bricks, etc. into the holes, compacting this mass.
- Filling holes with cement mortar. It must be made of a sufficiently liquid consistency so that it penetrates as deeply as possible.

Drawing of a barn made of boards without a foundation
After hardening of the artificial stone obtained in this way, you can tie the posts under the barn, that is, mount the support frame.
This technology is more suitable for areas that are uneven. Or if for some reason the shed needs to be raised higher above the ground.
Option #3
On the "sleepers". If the space allocated for the shed is fairly level, then this is the most convenient way to quickly build a shed. It is used (a log is not suitable in this case), which is laid horizontally. In order to make a small shed, 2 blanks arranged in parallel are enough. Under a larger structure (in width), it is advisable to mount a third one, the location for which is selected in the center.

Timber processing is carried out only by impregnation. Since the products placed on the ground are also the foundation on which the frame of the shed will be erected, the tree should not be coated with tar.
- Tracing the territory consists of marking the contour of the barn along the perimeter and determining the places where it is necessary to dig shallow (10 cm is enough) trenches. Timber will be laid in them.
- Preparation is identical to the method described above - soil compaction, clay, and so on.
- The bottom of each mini-trench is lined with P/E film, since the wood was not protected with tar. It makes no sense to use such a popular waterproofing material among summer residents as roofing felt. Within 3 years it will rot and the fungus will begin to destroy the wood.
- After laying the beam, it should be fixed to prevent horizontal displacement. There are two ways. An easier one is to drive pieces of reinforcement into the sides of the products, at the end parts. If a massive beam is chosen, and the barn is large in size, then 2–3 (depending on the length) through holes are drilled in each workpiece along the center line. Pins are also driven into them.
- The final stage is fastening the timber. All workpieces are connected with staples, metal plates, and corners. That's all - the strength and immobility of the base is ensured.
By the way, it is not necessary to dig trenches. You need to focus on your capabilities and local conditions. It is enough to fill the area with fine gravel, compact this layer well, and then lay the support beam on it.

There are a number of other methods for building a shed without a foundation. What they have in common is the presence of a supporting frame. The difference is in the columns on which it is installed.
There are also several options - reinforced concrete products, metal supports with plates, bricks and so on. The author did not consider other technologies for only one reason - the complexity of the connections. The supporting frame is made of wood, the posts are made of other materials. You can articulate it with your own hands, but why complicate your life by looking for a hammer drill, concrete drills, large metal drills or anything else.

How to build a shed
No detailed explanations are required for this stage of work. The technology of frame construction has long been known and is described in detail on many sites, in every detail. In principle, the author has nothing to add. The photographs clearly explain everything.
Frame installation
For a light shed, a beam with a side of 10 or even 5 cm (depending on the dimensions) is enough. For example, do this.

Installation of trusses (front and rear)
If the front pillars are made higher, then you can do without them. In this case, the roof will be pitched. It's easier to build.

Covering the frame with boards
Do it yourself - nothing complicated.
You just need to take into account that nails often go sideways and can also split the wood. It is better to fix all elements with self-tapping screws or self-tapping screws, with preliminary drilling of the channels.

The reader will determine for himself how to cover the roof and cover the shed outside and inside. You can do this.

If you show your imagination, an originally designed barn will become a real decoration of your summer cottage.
In suburban areas, most new owners first install a small “temporary structure”. And the capital construction of a barn at the dacha with your own hands can be carried out even after the construction of the dacha itself. That's the right decision. A “temporary building” can serve as shelter from bad weather and a place to relax after work. But first of all, this simple building serves as a storage place for country equipment and tools.
Shed made from scrap materials
 A temporary structure for storing the same garden tools and other materials is simply necessary. In any case, this will be a frame option for building a barn in the country. The frame itself is made from a wooden block, or less often from a profile. A “temporary shed” is built from inexpensive material, most often it is a do-it-yourself slab barn, which does not require large investments and time for construction.
 A lightweight foundation can also be made for temporary construction. Usually it is enough to install it on posts. If the construction of a shed at the dacha will take place on reliable soil from which water drains well, then the foundation can be made as follows.
How to make a foundation for a small shed in the country:
- Mark an area that will be 1 m larger than the building.
- Dig a pit to 30 cm depth.
- Fill the pit with a cushion of sand and gravel.
- Pour water over the “backfill” and compact it.
- Make a sheathing from timber and lay it on a pillow.
The sheathing is a frame made from a wooden beam impregnated with an antiseptic, which will serve both as a foundation and as joists for the floor of the future garden shed.
What type of foundation to install
 No matter how easy the construction is planned, it is still better to make a reliable foundation. If you install a good-quality shed directly on the soil, the wooden foundation will rot very quickly.
If you are concerned about the task of how to build a wooden shed, and are deciding which foundation to choose for it, then we hasten to inform you that traditional types of foundations are used here: block, pile and monolithic type.
Block base
This option has its pros and cons. The positive aspects of building a block-type foundation include: the speed of installation and the affordable cost of the blocks. The disadvantages include the fact that the blocks are not recommended to be installed on soils prone to heaving. Heavy blocks settle on difficult soil, and over time the structure warps.
Pile or column foundations
 The best choice if you decide to build a utility block for your dacha with your own hands. Steel pipes can be used as piles. The pipe is driven into the ground up to 1.5 meters. The distance between the piles is also 1.5 m; if the planned width is larger, it is recommended to install intermediate supports (columns). A building 1.5x4 m will require only 8 pillars.
Monolithic foundation
 The most reliable type of base. For example, if you are building a large brick shed with your own hands, then you can build a monolith yourself. The depth of the pit is up to 30 cm, while the sand and gravel cushion will be 15-20 cm, and the slab itself will be 10-15 cm.
The advantages of a monolithic base also include speed of installation. One or two days are enough to fill. Another advantage of the monolith: it can also serve as a floor, which can also be additionally covered.
Installing a monolithic slab for the foundation or a strip base is not entirely rational. Exception: if you plan to build a heavy building, with thick, insulated walls, or if you are planning to build a metal shed for your summer cottage with your own hands.
 An affordable and acceptable option for a column-pile foundation. A timber base is also suitable for a lightweight structure. It all depends on the material and size of the shed at the dacha. For a lightweight construction, a base made of timber, which is laid almost on the ground, is also suitable.
Why build a utility block at the dacha?
The choice of material for building a shed depends on financial capabilities, personal preferences and the overall design of the site.
Brick
 Not everyone can build brick walls on their own. For an experienced craftsman, it is not a problem to build four walls one or even two bricks thick. If you choose a brick for construction, then experience is required. And if you take into account that the average cost of one brick is 15 rubles and multiply it by the number of pieces to get the required cubic capacity, you get an impressive amount. Add to this the cost of crushed stone, sand and cement, and we will see that brick is not the most profitable material for building a utility block on a summer cottage.
The construction of brick walls requires the laying of a solid foundation, which will additionally result in monetary costs and an increase in the construction period.
Wood
A wooden structure is one of the most profitable options, especially for practical site owners who are asking the question: “What to build a shed from cheaply?”
 A frame made of timber is quickly constructed, which will only need to be covered with suitable material: boards, chipboards, MDF, siding. The advantages of frame construction also include the speed of work, which can be carried out by one person, without the involvement of specialists.
Wood requires care, even if it has been treated with antiseptics. Every year you need to inspect the building for rotting, treat open areas with special means, and repaint it.
Polymer materials
 With the development of industry, polymers are used in various industries, including construction. The material is widely used in the construction of industrial greenhouses, as it is resistant to humidity and ultraviolet rays. This option can be classified as an inexpensive project for building a shed, and a lightweight one at that.
The frame can also be made of plastic pipes, which are covered with polystyrene or polyvinyl chloride tiles. In this case, the result will be a completely environmentally friendly project. There is another budget-friendly way to build a shed from in your country house.
Profiled sheet
 Sheets of corrugated sheets can be used to cover any household buildings. The frame is built from a profile, a metal corner, a pipe, and wooden blocks are also used. A barn made from corrugated sheets is considered inexpensive to build, but there is a significant drawback. Without additional covering materials, the room will have high humidity. Condensation on iron collects during temperature changes and in cold (winter) times.
Blocks
Made from lightweight concrete, cement blocks have high technical characteristics that simultaneously combine wood and brick.
Building blocks include the following materials:

There are construction cement blocks based on expanded clay, and blocks containing sawdust are also produced.
Compared to its large size, the material is very light, which does not require equipment for lifting and moving on the site. The blocks can be laid independently. The premises are used as a utility block for tools, equipment and other inventory, and for other needs. The room is warm, and some summer residents get chickens or even small livestock for the summer season. The barn is quite suitable for raising such a farm, or combining it with other country buildings: a garage, a summer kitchen and a shower.
Walls made of foam blocks are erected quickly; you don’t have to be an experienced craftsman to make such a shed.
How to build walls from foam blocks
 Even such a simple construction requires adherence to technological nuances. When building walls, masons use a plumb line and a level. Strictly horizontal and vertical position of masonry is the main criterion for the quality of work of all masons.
Before starting masonry, the foundation is coated with a layer of mastic, on which roofing felt is applied on top. As experts advise, each row should be connected with metal mortgages, which are necessary for the strength and stability of the wall.
Step-by-step laying of blocks:
- The sand-cement mortar is mixed.
- Corners are being built.
- The masonry works like brickwork - the connection of two blocks is closed at the top with one piece.
- A cord is pulled between the corners around the perimeter.
- When laying, use a trowel and a rubber mallet.
 A separate issue is being considered - how to cover the roof. The choice of roofing material is huge. However, it is worth thinking about this in advance in order to focus on the fasteners in the walls, which should be installed on the basis of the selected roofing material.
When the building is provided with a pitched roof, then one of the walls of the barn should be slightly higher to make it more convenient to make a roof slope. Experts advise building a gable roof. A gable roof looks more attractive, but the main thing is that such a roof will not retain snow, which is especially important in cold regions. In addition, there will be a spacious space where you can store all the tools and material until the next season.
The article discusses current construction methods, as well as the most popular materials that are used for the construction of country sheds. The choice of construction method depends on the preferences of the reader.
Construction of a frame workshop shed - video
The presence of such an outbuilding as a country shed is necessary on any plot of land. This design will serve as an excellent place to store garden tools, tools, various building materials and, possibly, household supplies for the winter.
Let's try to figure out how to build a shed with your own hands, what materials to choose for construction, how to decide on the type of structure to be built and calculate its dimensions.

Deciding on a place
The outbuilding for your dacha will serve you for many years, so choosing a place for its construction must be approached with all responsibility.


The territory selected for construction must meet two criteria; it must provide:
- ease of use of the shed;
- maintaining the aesthetic appearance of the site.

In order to accurately select a place for construction, first draw up a project of all the elements of the summer cottage and a drawing of the barn for the summer house.

It is the resulting diagrams that will help you decide on the territory that has the area necessary for the construction and is as convenient as possible from the point of view of using the utility room.

You can place the barn behind a residential building, this will allow you to hide the building from prying eyes; some gardeners, on the contrary, place an outbuilding in the center of the dacha plot, decorating it in a very interesting way, resulting in not only a room for storing things, but also an original decoration for the dacha territories.
Construction materials
For self-construction of a country shed on a site, the following building materials are most often used:
- not edged board;
- brick;
- beam;
- foam blocks.

The first option is the most economical of all presented. The main advantages of building an economy class building from unedged boards are low cost and quick installation.

For such a structure it is not necessary to have a foundation; it can be placed on wide bars or pallets. The construction of this shed usually takes one to two days, but the service life of such a building will be short.


A country barn made of brick, in addition to its aesthetic appearance, is characterized by high strength and durability. When building a utility block from this material, it is necessary to install a strong strip foundation, insulate the walls, roof and floor covering.

As for financial costs, you will have to spend a decent amount on a brick barn, but as a result you will get a beautiful structure that will serve you for several decades.

In addition, such a structure can be used not only for storing country equipment, but also food, preparations, and used as a garden house or workshop.

A barn made of timber or foam blocks is the most popular and frequently encountered option, where there is an optimal price-quality ratio.

By spending a relatively small amount of money, you will get a fairly reliable and wear-resistant structure that will perform all the functions assigned to it in your dacha.

In order to decide which material to use for construction, additionally study the characteristics of this or that raw material, evaluate your financial capabilities, look at numerous photos of garden sheds made from various materials to decide which one best suits your tastes and overall design territories.

Main stages of construction
Building a country shed with your own hands, regardless of the type of materials chosen, will consist of several main stages:


Creation of a barn project with a detailed indication of all design features and dimensions.

Preparing a site for the construction of a structure, which includes not only choosing a site for construction, but also removing debris, interfering bushes, and removing the top layer of soil (at least 0.5 meters).

Foundation construction. Having poured the foundation for the construction of a shed, leave it to completely harden for 2 - 3 days, be sure to keep in mind that in hot weather the fresh foundation simply needs to be sprayed with water to prevent it from cracking.

Laying waterproofing materials on top of the finished foundation.

Direct construction of a building from selected materials, for example, if it is foam blocks or bricks, then a solution is prepared to connect the elements together and the masonry process begins. Laying foam blocks or bricks begins from the corners of the building, after which the walls are erected.

If the building material is wood, poles are dug into the corners of the future barn, the structure is tied with bars using a building level, after which the structure is sheathed with boards. Don't forget to leave openings in the walls for window and door openings.

Construction of the roof. The roof can be covered using any popular materials: metal tiles, slate, etc. Think carefully about the design of this element; whether it is a pitched or gable roof is up to you to decide.


Installation of windows and doors
Interior decoration of the room: flooring, insulation, wall cladding, if necessary, etc.

Exterior decoration of the building. This stage of work cannot be called mandatory, but to give the shed originality and aesthetics, you can use your imagination.

Building a shed on a summer cottage will not cause any difficulties, which is why summer residents so often resort to building this outbuilding on their own.

Having decided to acquire a new multifunctional room on your site, do not put it off, carefully understand the design process, prepare all the necessary materials and tools, and get to work.

Photo of a barn for a summer residence


The optimal room for storing household equipment and many other necessary things is a country shed. In addition, this utility room is often used as a home workshop. But, despite the simplicity of the design, you will have to make a lot of effort - choosing the right material and construction technology so that the result satisfies your wishes is not easy. If you don’t have the experience or time, then instead of a high-quality outbuilding you’ll end up with a hut on chicken legs. But nevertheless, the pressing question remains: what is cheaper to build a shed from, and is it worth saving?

However, fans of non-standard solutions may also like chicken legs Source ursa-tm.ru
Types of modern sheds depending on their purpose
Before you order the construction of a shed, you need to decide what it is needed for. Depending on the purpose of use, utility units can be divided into the following categories:
Building for storing gardening equipment. Most often, it is designed as one small room with an area of 6–12 square meters. m.
Multifunctional barn, which includes storage for things, a gazebo, and a cellar.
Poultry house, pigsty, rabbitry.

Mini poultry house from the designer: such a chicken coop will not spoil the overall appearance of the site, but, most importantly, the laying hens will be comfortable here Source nashimirukami.ru
A cellar barn consisting of 2 parts: one for household supplies, the second for things.
A utility unit for household items, for example, garden and home furniture, a collapsible swimming pool, etc.
The utility room is a gazebo, which can be glazed. In summer it is used as a living-dining room, in cold weather - as a closet.
Barn with terrace. Often such a project, with common sense, turns into a bathhouse with a guest room.
Summer kitchen-dining room with pantry. Here you can place or attach a barbecue.

The gazebo-dining room is a great place to relax with family or friends Source pinterest.com
To ensure that the building does not create disharmony and fits into the landscape, you should not neglect the design. It’s both pleasing to the eye and not embarrassing in front of guests, and most importantly, it’s comfortable. Most often, minimalist, country, and high-tech styles are chosen for utility units.
Choosing the optimal location for the shed
The concept of “optimal place” is quite subjective, since each owner or hostess has his own opinion on this matter. However, when choosing a site for the construction of a utility block, it is worth considering the following points:
it is necessary to provide convenient access to the contents (for example, so as not to carry a walk-behind tractor or lawn mower across the entire area);
it is advisable to place it in a place that is less suitable for growing garden crops;
think about where it will be possible to place a swimming pool, sauna, veranda and other buildings if they are next to the barn.

Do not neglect the rules for locating buildings in the private sector - a dissatisfied neighbor may sue, then the barn will have to be demolished Source slide-share.ru
Materials for construction
It doesn’t matter whether you are planning to build a small shed in the country or a spacious outbuilding, the choice of material and technology primarily depends on the purpose of use. From the list below you can understand what to build a shed from inexpensively:
Foam blocks
Bricks
OSB boards

A simple and inexpensive option for a summer house is a wooden shed Source bankfs.ru
Wooden frame
Metal carcass
Container utility unit
To build a frame type, corrugated sheeting, polycarbonate and even straw can be used as walls.

The cost of building a thatched barn is minimal. But in terms of thermal characteristics it surpasses even brick utility blocks Source notperfect.ru
On our website you can find contacts of construction companies that offer small-scale construction services. You can communicate directly with representatives by visiting the “Low-Rise Country” exhibition of houses.
Choosing the optimal barn layout according to the drawings
Prefabricated barn made of timber. The laconic geometry and neat appearance will allow the building to fit well into the surrounding environment. The compact frame is suitable for storing tools and garden equipment.

Standard option - rectangular building Source domicomfort.ru

To better retain heat, you can arrange a vestibule Source bankfs.ru
A shed made of timber is often used for showers and toilets, as well as for other purposes. First of all, because this design, compared to a gable roof, is cheaper and easier to build. The advantage of a pitched roof is effective ventilation.

The rafters for building a pitched roof will require 2 times less than for a gable roof Source yurlkink.ru

Economical bathroom option for a summer cottage Source domicomfort.ru
A garage made of foam blocks for a small car (motorcycle, moped), with a small utility room. A reliable structure will protect well not only from precipitation, but also from temperature changes, humidity and uninvited guests. A simple shed made of foam blocks for storing equipment and as a workshop is also possible.

Despite the lightness of foam blocks, such a structure requires a foundation Source: plotnikov-pub.ru

Simple functional project Source bankfs.ru
A simple functional project that allows you to store tools, equipment, workpieces and other supplies, as well as maintain a small poultry house.

Another universal option: for walls you can use timber, brick, foam blocks Source nemasterok.ru
Spacious barn 6x3 m without partitions. Thanks to the simplicity of the project and easy-to-install material (fibreboard), the building can be erected in 1-2 days.

Spacious building of simple design Source pinterest.ru

Sheathing installation Source idn37.ru

This design is easy to expand Source pinterest.com
Comparison of prices for various construction options, taking into account their quality
The cheapest segment of utility rooms, where prices vary from 11,000 to 30,000 rubles, is represented by frame buildings of a small area. So, economy class usually assumes a bare box measuring 1x1 m (2x1.5 or 2x2 m). Lining is used as cladding; the roof is covered with ondulin or roofing felt.
Frame sheds costing from 30,000 to 70,000 are in the middle price category. They differ from inexpensive buildings in size (for example, 3 × 3 or 6 × 2 m) and cladding material.
The price of expensive frame-type utility rooms can reach 160,000 rubles. For example, a barn measuring 5x4 m costs on average about 85,000–95,000 rubles, 4x7 m – 133,000 rubles, with partitions – 155,000 rubles.
To the cost of the box, prices for components such as roof overhangs, insulation, steps, etc. will be added separately, as well as payment for the work.
For example, the price for a utility block 3x4 m based on a metal frame in the basic configuration, including frame, walls, roof with waterproofing, door, is 113,000 rubles. The cost with installation is about 156,000 rubles. Here we must add the cost of the window with installation - 16,700 rubles, insulation - 16,500 rubles, interior finishing with corrugated sheets - 32,400 rubles, drainage - 7,800 rubles.
Such a building can serve as both a utility room and a house for children Source houzz.de
Container blocks cost between 40,000 and 65,000 rubles, depending on the size and configuration. Typical dimensions: 2.4 × 2.4 × 2.4 m, as well as 2.4 × 2.4 × 4.0 m and 2.4 × 2.4 × 5.8 m. Basic equipment includes hardboard interior trim, floors Chipboard, thermal insulation and wooden windows.
Prices for buildings made of foam blocks start from approximately 100,000 rubles (4 × 2 m), 150,000 (3 × 4 m), 340,000 (6 × 4 m).
Video description
About the choice of materials and design of the shed, watch the video:
Construction stages
Frames are considered one of the most popular utility rooms. Their construction takes a minimum of time and is carried out according to the standard scheme:
Base assembly
After the earth has been compacted so that the soil shrinks as much as possible, a sand and crushed stone cushion is prepared, and the perimeter of the building is marked.
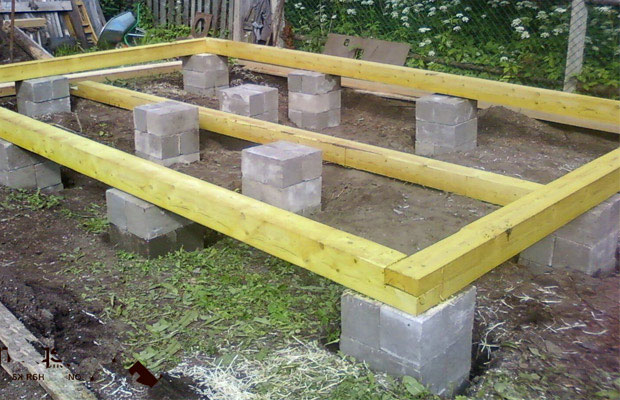
Concrete blocks are installed at the corners and in the middle of the long sides.
A wooden frame or metal frame is assembled on the blocks.
Floor logs are assembled, a heat-insulating layer and a floor covering, for example, linoleum, are laid.

Frame of a shed with a pitched roof Source bankfs.ru
Walling
Support pillars are placed at the corners, and racks are placed around the perimeter.
Door and window frames are installed.
External and internal cladding is being carried out.
Construction of a pitched roof
The frame racks are connected to the frame frame.
A waterproofing layer is laid, then the sheathing is attached.
The sheathing is covered with roofing felt or soft roofing.
They install corrugated sheets, or, as an option, metal tiles.
After all installation work is completed, they move on to the interior decoration of the room.

Gable frame on a columnar foundation Source sami-stroim.ru
As a result, about the economic feasibility of building a turnkey barn
If you have no experience in construction work or simply don’t have enough time to build a shed, then a turnkey service is what you need. When signing the contract, your only task will be to choose a suitable design, and the rest will be done by the construction company’s specialists. This means that you don’t have to worry about where to get tools, how and when to purchase building materials, look for workers and make sure they do their job correctly.
Construction company specialists will prepare a standard or custom project and build a country shed. In addition, they will be able to complete the interior decoration and equip it with shelves and shelving. As a result, within a few days you get a good-quality building with a conveniently organized space.
Video description
For examples of beautiful outbuilding projects, watch the video:
Conclusion
Having figured out how much it costs to build a shed, you can come to the conclusion that the costs of high-quality construction for a suburban area can hardly be called cheap, but if the work is done professionally, the investment will more than pay off. A convenient utility room will serve not only the owner himself, but also his grandchildren.