DIY 6x8 frame house step by step. Creating a frame house with your own hands. Correct corners of a frame house
Technologies. When building a low-rise frame house, it is possible to use the most modern building materials and the latest achievements in industries quite effectively.
The need for the construction of such houses has recently grown very much, so many people decide to start building a frame house on their own. Because the technology for its construction is not too complicated.
When planning to build a good home for your family, firstly, determine its purpose. You need to clearly know what time of year the family will live in it, all year round or only in the spring-summer season. The method of insulating it will depend on this choice. Initially, a frame house is an elementary simple structure consisting of vertical posts and a certain number of horizontal strappings, which must be carefully and efficiently constructed. During the construction process, all detected voids are filled with special materials with low thermal conductivity. And then, when facing internal and external walls, different building materials are used.
Based on this, we conclude that the appropriate type of insulation will directly depend on the operating time of the house and the weather conditions under which the frame house will be built. Or are used as insulation - these are universal materials.
Work on the foundation
As a rule, a frame house is built no higher than 2 floors. Moreover, it is worth noting that the second floor is of the attic type. Therefore, there is no point in building deep foundations for such houses. The best way for this would be to build a prefabricated one from reinforced concrete blocks.
 When making the final calculation of the number and width of wall sections, you must take into account all possible mechanical loads on the floor of the building. Beams are usually installed in increments of 30 cm to 60 cm. The width of the boards is selected in accordance with the finishing material. When covering, a distance (20-30 cm) is required due to the plasticity of this material and its inability to withstand minor loads. Moreover, if you cover it with chipboard sheets, the distance can be increased to 35-60 cm.
When installing windows () when building a frame house with your own hands, it is necessary to comply with precise building codes. Firstly, the window area should occupy 18% of the total wall area. Secondly, in a house where you plan to live only in the spring and summer, frames with single glazing will be sufficient. When living all year round, use frames with double, or better yet, triple glazing.
The final stage of construction is the construction and installation of the frame. In addition to external beauty, the roof plays the role of distributing significant external loads. Here are the main elements of a load-bearing roof - rafters and rafter legs, they are divided into hanging and layered, diagonal connections, ridge girder. At With When building a frame house with your own hands, sooner or later you will think about roofing material. Currently, the construction markets offer a wide range of necessary materials.
Options for a technology popular among developers differ in the choice of construction materials, construction method and type of insulation. It combines reliability, durability, speed of construction, and absence of shrinkage. The assembly instructions will help you master the science of private house building.
Without a project - blindfolded
What does a finished frame house project provide:
- Floor plans and drawings of components and structures;
- Complete list of quantities and sizes of materials;
- Calculation of costs for components and work;
- Timely supply of utilities;
- Reduced overhead and transportation costs;
- Elimination of the purchase of excess materials;
- Planning the expenditure of personal funds according to the estimate.
Site preparation
A thrifty owner will remove weeds from the future construction site of a frame house in advance, organize covered storage areas for material, and a room where power tools will remain overnight. Plans and prepares convenient entrances for vehicles. You will need a temporary toilet, a shelter for resting and eating.
Laying the foundation
 Linking a project to a location involves familiarizing yourself with hydrogeological surveys in the area - this will give an idea of the required type of foundation.
The total weight of the building, the layout, the nature of the terrain, the type of soil and the depth of groundwater will determine the thickness and depth of the foundation. Important: concrete foundations need reliable waterproofing and, at a minimum, a gravel-sand drainage layer for drainage. Embedded elements with threaded anchors are pre-installed into the concrete.
- On weak, floodable soils, by the way, you will need a screw pile foundation, which can be installed mechanically in one daylight;
- Frosty swelling will be tamed by a reinforced columnar foundation with an upper reinforced concrete grillage raised above the ground;
- The tape, made together with a single cast slab, will support the weight of a multi-ton monolithic frame house.
Selection of building material
In terms of frequency of use, the usual pine board is in the lead. LSTK (light steel thin-walled structures) and monolithic houses are less common. Traditional technology and the LSTC method are similar. The instructions will cover common issues for them.
Bottom trim and floor joists

The frame of the lower frame is made not only from timber, but also from boards assembled into a package and placed on edge - warping of the material is less felt. Each board is nailed individually. The joints are spread along the entire length. A jute tape is laid between each pair of boards. Important: use dried, antiseptic planed material. The connections of the supporting structure are made with nails. Points of contact with concrete are laid with two layers of roofing felt.  Frame elements of a frame house are fastened with log joints and complemented by reinforced metal corners and supports. Horizontality is checked by level if it is not possible to use a level. A large washer is placed under the nut. The joists are suspended on open supports of suitable size. They are connected to each other by crossbars. The preferred fixation to the frame is studs. For ease of installation of the wall frame, a temporary subfloor is laid.
Accelerated wall installation
An increase in the pace of construction is possible if you purchase a complete house kit - the component parts do not require processing or adjustment. Second option  – this is the consolidation of assembly units. To do this, an exact copy of the wall element is drawn on the subfloor, restrictive bosses are attached, and the first block is assembled. Control of dimensions and diagonals is the most thorough! The value should be calculated so that the weight does not exceed 100 kg when working with two people.
The step along the axes of the vertical posts is 60 cm. In order not to lose the geometry of the fragment, it is covered on top with OSB (oriented strand board) 9–12 mm thick. In this case, braces are not installed; the necessary spatial rigidity is provided by OSB and reinforced corners (optional). Sheet covering materials are fastened with self-tapping screws, with a distance of 10–12 mm from the edge of the sheet. The gap between the sheets is 3 mm. Window and door openings are cut along the contour after hemming. Don't miss strengthening the openings with headers and additional racks.
Installation begins from the corner along the jute tape. Verticality and stability will be ensured by struts. The next block is also a corner block - they will hold each other. The conductor also carries out the assembly of interior partitions. It will also be useful for installing modules on the second floor. The connecting overlaps of two modular elements along the plane are laid with jute to avoid the appearance of cold bridges, and are tightened with pins.
The corners of the external walls are designed as a warm corner. This is more reliable than timber in retaining heat. The strength characteristics are the same. It is advisable to orient the OSB outward for subsequent ease of filling and protecting the insulation from precipitation during installation.
The walls of the first floor of a frame house are covered around the perimeter with boards 50 mm thick. This ensures that the weight of the superstructures is evenly absorbed and improves the connection between the corners. The joints are arranged exactly along the axis of the vertical posts, not coinciding with the underlying posts one step at a time. The ceiling is an exact copy of the floor of the first floor. The axes of the joists and vertical pillars of the walls of the second floor (if it is arranged) coincide. Assembly according to the rules implies distribution of weight precisely along the axes.
Roof
Mostly, the roof of a frame house is gabled according to its configuration: a simple structure with a slope of 35–45 degrees has less windage and does not accumulate snow mass. The power frame duplicates the axes of the structures located below. Roofing work begins when the frame gains rigidity due to the main walls, partitions, interfloor ceilings and sewn-in gables sheathed on one side with OSB.
Insulation according to the rules
Significant parameters for choosing insulation:
- Air permeability – the ability to remove condensate from the dew point;
- Thermal conductivity level;
- Durability;
- Density.
 The above requirements are met by penoizol and basalt wool. The pitch of the posts and logs of a frame house is initially adjusted to the slab mineral wool materials: they are clamped in width during installation. An additional safety net against sagging is fixation at several points with mushroom holders. Each subsequent layer is laid overlapping the joints of the previous one.
Thermal insulation is installed under a covered roof. The instructions for insulating walls, ceilings and roofs are identical. In interior partitions, basalt wool functions only as a sound absorber. External structures not only hold, but also protect the insulation from getting wet and weathering.
 A vapor barrier membrane is installed on the inside of the wall. The orientation of the sides is marked on the packaging. Purpose: to prevent moisture from entering the heat insulator from inside the house. The reverse process is possible. The film strips are overlapped with double-sided tape. The places where the staplers are attached are taped with adhesive tape.
A hydro-windproofing film is installed on the outside. It protects stone wool from precipitation and gusts of wind. To effectively dry the insulation, a ventilated façade is installed: vertical slats under the exterior finish maintain a continuous flow of air, not allowing moisture to linger in bad weather, and drawing vapors from the thickness of the mineral wool in dry weather.
Conclusion
The instructions presented to your attention are not a dogma, but an unobtrusive guide to the basic points of bringing to life the idea of building your own frame housing. Strict adherence to traditions or reckless immersion in high-tech avant-garde is your right choice. Creativity is never wrong. Be brave, you can do it!
The technology for constructing quickly erected buildings is very popular. This topic is constantly discussed on construction forums and causes a lot of controversy. The pros and cons of frame houses will help you form a general idea of the method and become familiar with the stages of construction.
Based on the experience of European countries, there is no doubt that frame-panel houses will soon become leaders in low-rise construction. Compared to traditional construction systems, the technology has its advantages, the main one being cost-effectiveness. The financial aspect is one of the stimulating factors for acquiring your own home. Cost of 1 sq. m less than one and a half times foam concrete blocks, 2.4 times less brick walls, 1.4 times less timber.
The frame-panel constructor is assembled by the efforts of 4 people in 1.5 months. According to this principle, it is permissible to build an object of any complexity up to 3 floors. In addition, building a frame house with your own hands will allow you to save on the foundation, equipment, and a team of workers.
The disadvantages include:
- Moisture absorption.
- Risk of fire.
- Poor ventilation.
- Sensitivity to vibration.
- Fragility.
There is a misconception that only brick, panel or wooden walls retain heat well. However, according to current thermal protection standards, modern buildings in some regions do not meet standard requirements. Canadian houses with 150 mm walls have a thermal protection coefficient equivalent to double block masonry and are quite suitable for living. In cold weather, when the heating is turned off, the rooms remain at normal temperature for a long time.
Temporary or permanent residence is determined by the thickness of the frame house. If housing is planned for seasonal stay, there is no need to purchase expensive insulation. Accordingly, the thickness of the walls will be slightly less. For a comfortable microclimate, a substrate of 10-15 cm is sufficient. If we are talking about permanent housing, the material is laid in a thick layer - more than 15 cm. Ultimately, the wall turns out to be 20 cm without taking into account the outer and inner cladding.
How to correctly calculate the thickness of a frame house
For this purpose, there is a special table with indicators for each region. Insert into the formula:
- insulation thickness parameters;
- thermal conductivity coefficient of the material;
- calculate the parameter.
You can carry out the calculations yourself using our construction calculators.
When ordering a house kit from a factory, calculations are performed on site and the customer is offered slabs with an increased safety margin. Many people believe that if they are thick, there is no need to lay insulation. This is a misconception - without a high-quality substrate, heating costs increase significantly. The walls of the frame building should resemble a layer cake. Thanks to the air cushion between them, the house remains warm even in frosty weather.

A frame house is built with your own hands using Finnish or Canadian technologies. The process algorithm is the same and consists of several stages:
- Purchases of materials.
- Filling the base.
- Bottom frame of the foundation.
- Construction of walls, roofs.
- Installation of windows and doors.
- Wall cladding and insulation.
- Interior finishing.
To avoid heat loss and ensure good ventilation, it is important to adhere to adapted technology when constructing a facility.
How to build a frame house: pouring the foundation
The prefabricated structure is lightweight, so there is no point in building a powerful base. Depending on the type of soil and number of storeys of the building, choose between:
- columnar;
How to make strapping and joists
Next, the transverse joists are installed. Boards with a cross-section of 150 x 50 mm, turned on their sides, are nailed to the end and bottom beam on the left and right in increments of 40 cm with 9 cm oblique nails. If they are long, but a transverse beam is laid, jumpers 45 cm long are stuffed on top.

Flooring
After installing the sheathing, a waterproofing film is laid between the cells, and insulation is placed on it. Budget option - polystyrene foam from 15 kg/m3 with a thickness of 150 mm. The insulation is cut with a hacksaw and laid in 2 layers. The material is distributed so that the edges of the second row of sheets do not coincide with the first, otherwise the sheets will move. To fix the foam at the bottom of the grate, a 50 x 50 mm cutting beam is stuffed around the perimeter. The seams are covered with polyurethane foam.

The material is covered with a vapor barrier membrane, then a flooring is constructed. For the subfloor, choose plywood, tongue-and-groove boards or cheap OSB-3 boards. The canvas is laid across the grate. For reliability, the sheets are laid in a checkerboard pattern or perpendicular to the joists.

The flooring is secured to the joists with 50 mm self-tapping screws or rough nails. First, glue is applied to the back of the sheets, then nailed every 15 cm along the edge and in increments of 30 cm in the middle. A gap of 3 mm is left between the segments on all sides.
Now to build walls you need a frame: wood or steel. A popular solution is oak timber, larch or other wood with a dense structure. Such designs are one third cheaper than their metal counterparts. Before installation begins, they are planed and treated with impregnations to prevent fire, rot, and pests.
Installation of vertical racks
How to build a frame house so that you can live in it for a long time without repairs? Follow the sequence of stages and take into account all construction nuances. First of all, this concerns the fastening of parts. When constructing the frame, the corner posts are first installed. If dowels are chosen for the connection, step back from the edges up to 10 cm, make holes in the end that are 1 cm longer than the length of the dowel, and attach the timber vertically.


Now choose the method of attaching the intermediate longitudinal struts. The first is fixation to the harness with partial or complete cutting, or connection with galvanized corners. The second method is simpler and more reliable, although it increases the cost of the project.

The principle of installing the upper bars is similar to the installation of the lower trim. Horizontal structures are joined at the corners with vertical posts, connected with 2 nails and corners.

How to build walls
How to make a frame house: first assemble the spans on the ground, then lift them up or assemble them on site? Usually they are already ready-made attached to the lower base. The first span is nailed to the floor and supported by jibs, the second is connected to the rack of the first, and so on around the perimeter.
Regardless of the principle of connecting the racks, they are strengthened with temporary jibs. This strengthens the lower frame until permanent supports are installed, giving the frame rigidity and resistance to wind loads. After installation of all structures:
- the skeleton is measured with a plumb line and level;
- temporary supports are removed;
- 2 strips are screwed to each support at the top and bottom.
Windows, doors
Door and window openings are installed in places according to the design. First, the racks are fixed on the sides of the niches, then the lintels at the top and bottom. The internal partitions are mounted in the same way as the frame, tied with boards for rigidity.

Ceiling
The process consists of several stages:
- Grooves for beams are cut into the timber.
- Transverse structures are inserted into the openings, nailed, and steel corners are screwed.
- Inside, supports are installed along the partitions and connected to the upper and lower beams.
- A ceiling panel made of tongue-and-groove boards is laid.
- A vapor barrier layer is laid, insulation and a waterproofing membrane are placed on top.
- Constructing a subfloor.
Roof
For the device choose: attic, multi-gable, single-pitched or multi-pitched roof with a slope of 10°. To calculate rafters and step sheathing, use construction tables or ours.
- The rafters are assembled from timber below. To do this, 2 boards are spliced together at the top at an angle, then lifted into place.
- First, rafter pairs are installed on gables with an overhang of 400-500 mm.
- The slope of the slope is adjusted, the structures are mounted to the upper frame.
- The remaining parts of the system are installed in increments of 700 mm.
- Then they are integrated with a ridge beam, which serves as a support for the upper rafters, and are attached to the floor of the paws.
- They build a continuous or thin sheathing with a cross-section of 25 x 30 cm, and fix it to the rafters with side counters. The pitch of the beams is the same as that of the rafters.
A vapor barrier membrane is stapled to the inside of the rafter legs. The joints are sealed with tape, the space between the beams is filled with thermal insulation boards, then with diffuse film. At the final stage, the roof is laid. The process algorithm is clearly presented in the picture.

Wall insulation
Choose a protective material with a thickness of 50 mm: polystyrene foam, mineral wool or polystyrene foam.
- Lay mats between the vertical posts of the frame. With double flooring, the joints of the canvases should not coincide. To protect against moisture, waterproofing is laid on the outside.
- Then the sheathing is filled with thin slats corresponding to the thickness of the insulation. This will ensure air movement.
- From the side of the rooms, the vapor barrier is stretched and fixed with a stapler. The walls are lined with thick plywood, gypsum fiber sheets or clapboard. The base for finishing with plasterboard is ready.
- The outside walls are sheathed with finishing materials: block house, siding, eurolining.
All that remains is to decorate the inside of the house and celebrate the housewarming. There are a great many nuances in the construction of prefabricated frame-panel houses. Experience and knowledge will come along the way.
Full video on how to build a frame house
Our step by step instructions We will divide the construction of a frame house into several stages:
It is worth noting that each stage of building a frame house deserves a separate article, in addition to everything, if you describe all possible options for foundations, roofs, etc., you can get a whole book. In this regard, to improve readability, some steps in construction are described in detail in separate articles, but here - only what concerns the features specifically frame house.
Step No. 1: Preparatory work for the construction of a frame house
Preparatory work for the construction of any house is the same and includes:
- Site preparation
- House marking
Site preparation
First, you need to clear the area of vegetation, if not all, then at least the place where the house will be built. This will greatly facilitate the marking and allow you to make it more accurately.
If the construction site has a large slope, then, depending on the type of foundation and desire, it can be pre-leveled using special equipment.
Attention! Do not neglect this procedure, spending 1-2 hours on clearing, in the future you will make your work much easier, and measurements in the grass may be subject to a large error.
House marking
 Marking is a very important stage, because the layout and evenness of the corners of the walls depends on it. If the marking is inaccurate, it will be very difficult to correct this error in the next stages.
Marking the foundation of a frame house, as well as any other, as a rule, includes preliminary placement of pegs (all external walls are marked), as well as marking all internal walls.
If you want to learn how to correctly mark the foundation for a house with your own hands, and so that all the walls and corners are level and correspond to the project, I advise you to read my article about this. Given the large amount of information, it had to be submitted separately.
Step No. 2: Do-it-yourself foundation for a frame house
The great advantage of a frame house is that almost any type of foundation is suitable for its construction. The only limitation is the type of soil on the site and your capabilities.
It is worth saying that laying the foundation for a frame house with your own hands deserves separate topics of discussion and is included in separate articles. Moreover, there are several types of suitable foundations, and it’s up to you to decide which one to choose.
Here I will tell you in a nutshell about suitable foundations for a frame house, and in what cases each of them is used, and also give links to their detailed description.
 The most common type of foundation for a frame house is a pile-screw foundation. This is practically the simplest and cheapest option for such a house, especially since installing a pile-screw foundation is not difficult even with your own hands.
Such a foundation is suitable for almost any soil, except rocky ones. Particularly suitable for swampy soils, where compact soils are located deep and other types require huge costs.
In general, all the pros and cons of pile-screw foundations are discussed in another topic that will help you decide on the choice of support for your home.
Shallow strip foundation
 Shallow strip foundations are also used quite often for construction. This is due to the relatively low cost of laying it, as well as the possibility of using concrete floors in the house.
Such a foundation, due to its relative fragility, requires strict adherence to laying technology.
As a rule, a shallow strip foundation is used in good soils, and is strictly contraindicated in soils with very high groundwater levels and swampy soils.
Slab foundation for a frame house
 Recently, slab foundations have become increasingly popular for building a frame house with your own hands. Despite its considerable cost, it has obvious advantages, such as versatility, reliability, durability, and it can also be used as a subfloor in the house and not spend money on it separately.
Often, instead of a classic monolithic slab, a slab foundation with stiffeners is used. This allows you to save a little on laying, and also strengthens the entire structure as a whole.
Step No. 3: Installing the floor of a frame house with your own hands
The floors in a frame house are not much different from the floors of other types of houses and can be wooden or concrete. The choice depends entirely on the type of foundation, capabilities and desires. 
In this step-by-step instructions, we will look in detail only at the wooden floor, concrete - in a nutshell, since it is used less often, and it is not possible to fit everything into one article.
Concrete floor installation
 It is worth noting that a concrete floor in a frame house is installed in cases of a slab foundation or a strip foundation. With a slab, everything is clear - the slab itself will be the floor of the first floor.
But if the foundation is strip, the concrete floor is made of lightweight concrete, such as expanded clay concrete, for example.
Wooden floor installation
Let's look at the construction of a wooden floor using the example of a pile-screw foundation. For the tape, in principle, everything is done in exactly the same way, with the exception of the lower trim, which can be made of thinner timber. But first things first.
Tying the foundation of a frame house
The installation of a wooden floor begins with tying the foundation. As a rule, the piping is made from timber 150x150 or 150x200, depending on the thickness of the wall and the distance between the piles. The greater the distance, the thicker the timber should be to avoid sagging. 
The strapping is necessary, firstly, in order to give rigidity to the foundation, secondly, to evenly distribute the load on the foundation, and thirdly, it will serve as a support for the future floor of the frame house.
In order to easily carry out the tying process with your own hands, we will divide it into several stages:
- The timber is laid out along the perimeter of the foundation, the length of the walls and diagonals are checked. At this stage, the final and accurate marking of the walls is carried out, according to the project. By the way, don’t forget about waterproofing, which we put under the harness in the form of roofing felt.

- The next step is to outline the joining points of the timber; they should be located on the pile, since these will be the weakest points that should not “hang”. This applies to houses whose walls are longer than the length of the purchased beams.

- The timber is joined with an overlap of 20-30cm, as shown in the photo. To do this, so-called “locks” are cut out from the end.

- The corners fit almost exactly the same way. This is clearly visible in the photo.

- The beam is attached to the foundation using bolts or studs. To do this, it is necessary to drill holes both in the head of the foundation and in the beam itself. For ease of further installation, protruding parts - bolt heads or nuts with studs - must be deepened. The joints are additionally punched with nails measuring 150 mm or 200 mm, depending on the size of the timber.

- Once the perimeter is ready, we move on to the final step - tying the foundation under the internal walls of the frame house. This beam, to the already installed external one, is attached in the same way. For reinforcement, you can additionally use fastening metal corners.

When the piping of the foundation of the frame house is ready, we proceed to the next stage of our instructions - the construction of the floor frame.
Floor frame in the house
It is worth noting that already at this stage it is advisable to provide for all communications entering the house, such as water and sewerage. Electricity and gas can be supplied later, but if you plan everything in advance, there will be much fewer problems later.
The next step is to install the joists on top of the trim. If the distance between the supports is about 4 meters, then it would be better to use timber measuring 100x200mm or 100x150mm. You can use a 50x200mm or 50x150mm board, sewing them together in twos. 
If the distance is less than 3 meters, you can use a board measuring 50x150mm or better 50x200mm.
Installation of logs is a simple stage in assembling a frame house, but there are some nuances that must be covered in these instructions:

Do-it-yourself waterproofing and insulation of the floor of a frame house

It is worth noting that waterproofing, as well as vapor barrier, must be installed with an overlap, according to the instructions for the material, while preventing moisture from entering the insulation, both from the outside and from the inside. And the insulation itself is laid tightly, without gaps.
So we have looked at the instructions for installing the floor of a frame house, now it’s time to start working on the walls.
Step No. 4: Construction of the walls of a frame house
Our next step instructions I will be installing the walls myself. Just like with the floor, we will fasten all the boards and beams with nails and (or) mounting metal corners; some fastenings can be made with studs.
It is worth noting that almost the entire frame is assembled from boards measuring 50x150mm or 50x200mm, depending on the required wall thickness and the required insulation thickness. 
Some people think that it would be better to install timber in the corners of a frame house, but this is not entirely correct, and I’ll tell you why a little later, during the installation process.
So, let's start assembling the frame of the walls of the future house.
For better understanding and assimilation, we will divide our instructions for installing the walls of a frame house into several stages:
- Assembling the walls of a frame house. Windows and doors
- Installation and fastening of walls vertically on site
Assembling the walls of a frame house with your own hands. Windows and doors
We will assemble the walls on the already finished floor of the frame house; this is the most convenient option. But we must take into account that in this case, it is necessary that all dimensions be accurate so that the walls do not turn out to be longer or shorter than the already installed floor.
To make it clear what I'm talking about, first look at sectional wall of a frame house , and then I will tell you everything in order.

Now let’s look at step by step how to assemble all the walls of a frame house with your own hands:
- First of all, we need to decide on the ceiling height in the house. Let's assume that the height of the rough ceiling will be 280cm. This means that the vertical posts of the frame walls should be 280-15 = 265cm. The diagram shows where the 15 cm came from.

- The distance between the racks, as a rule, is selected based on the width of the insulation sheet, as a rule, its width is 60 cm. If the insulation is on a cotton basis, then the distance is made less by 2 cm, for a tighter contact.

- The top and bottom boards of the wall are laid out on the floor and the places where the vertical posts will be nailed are marked. Then the racks themselves are laid out and pierced with 120-150mm nails. You can additionally fasten them with corners.

- It is worth noting that each wall will be smaller in wall thickness than the length of the floor. This is clearly visible in the diagram.

- If the length of the wall is greater than the length of the board, then the wall is assembled from several parts. This is also done in cases where there are few helpers, because the entire assembled wall will have a lot of weight.

- As a rule, to add rigidity to the entire structure, jumpers are mounted between the racks. There are no strict rules on the number and frequency of installation, it all depends on the length and height of the walls, but usually they are installed one or two per space between the racks. The second option is better and is visible in the photo; in the case when they are made one at a time, they are mounted in a checkerboard pattern (one at the bottom, the next at the top). This can be done later, when the walls are installed. Most often, jumpers are made with the expectation that they will serve as a joint for plywood or osb boards, depending on further work.

- Window and door openings in the wall of a frame house are arranged as shown in the diagram.

- This is what it looks like “live”.

The most common mistake when assembling the walls of a frame house is that many people forget to take into account the thickness of the board when calculating, thus the wall is not as long as we would like.
Putting the walls in place


It is worth noting that when assembling walls, it is necessary to use a cord, pulling it from one corner to another, otherwise the corners will be even, but the walls will not.
Top trim and structural reinforcement
So, the frame of the walls has been assembled, now you need to make the top frame from the same board as the walls.
The top trim is necessary, first of all, for stronger adhesion of the corners, and will also give unity to all parts of the frame walls and distribute the load between them. 
To do this, it is necessary to pierce the board with 120-150mm nails over the walls, along the entire perimeter, including the internal load-bearing ones, so that all joints are covered with an overlap of at least 25-30 cm. Except for the corners, where the overlap will be equal to the thickness of the wall. 
The next step in our instructions will be to strengthen the entire structure as a whole. There are several options, the most common is reinforcement using plywood or OSB board. 
As a rule, having pierced one side along the entire perimeter (internal or external) with sheets of OSB boards, the frame of the house already becomes very rigid.
Internal partitions of a frame house
The construction of internal partitions is almost no different from the construction of external walls, except that they have more lenient requirements in terms of thickness and insulation. 
- Internal partitions, unlike external walls, can be made thinner. Everything will depend on preferences and comfort in terms of sound insulation.
- The insulation inside the partitions will serve primarily as a sound-absorbing material rather than as thermal insulation.
- Internal partitions can be insulated without waterproofing and vapor barrier materials.
These are all the main differences between internal walls and external ones, otherwise they are arranged in exactly the same way.
Step No. 5: Roof of a frame house
The roof of a frame house is practically no different from the roof of other houses, be it concrete, brick or any other. I’ll even say more that installing a roof for a frame house will be less labor-intensive than, for example, for a block or brick house, because its fastening to the walls will be much simpler. 
It is worth noting that building a roof is a very responsible process, but if you do not have a complex house layout, then you can easily do it yourself.
Building the roof of any house, including a frame one, is a very large topic with many nuances. Firstly, there are many types of roofs, and it is not possible to describe everything in detail in one article. Well, secondly, in order not to confuse you, I will probably move this topic to a separate article.
Step No. 6: Insulating the frame house
Now we have come to the final stage of building a frame house - its insulation. Everything needs to be insulated - floor, walls and ceiling.
You can read more about insulating a frame house with your own hands in another step-by-step instruction; here we will discuss only general points.
When choosing insulation for the walls of a frame house, it is necessary to take into account not only the characteristics of the insulation itself, but also the characteristics of wood, with which not all types of insulation will interact well.
Here is a short instruction on how to insulate a frame house with your own hands:
- Outside, over the OSB sheets, a special waterproofing membrane is stretched. Which side should be in the instructions for it.
- From the inside of the house, between the studs, insulation is laid in several layers, depending on the requirements for the house and the thickness of the wall. Each layer is laid overlapping the joint of the previous one to avoid cold bridges.
- Floor insulation occurs in the same way.
- It is better to insulate the ceiling from the attic by first filling a vapor barrier film from below onto the ceiling beams and hemming them with boards or plywood.
- After laying the insulation, it is necessary to fill a vapor barrier film over it; it will protect the insulation from moisture from the inside.
- Depending on the needs and further finishing work, sheathing material is placed on the walls on top of the film - boards or slats, but most often - OSB sheets, on top of which, in the future, finishing is carried out.
As you have already seen, there was a lot of text. But, I believe, all stages of construction were described in detail here DIY frame house, despite the fact that some points were included in separate topics, but this is only for your convenience.
I hope that by following these step-by-step instructions, you will be able to acquire a warm, cozy and reliable home without much difficulty and at minimal cost.
Or without it, anyone can do it with their own hands, from a summer house intended for seasonal living to a permanent cottage. Especially when it comes to . They are a complex construction set for adults, and high-quality assembly can only be done if there are accurate and detailed instructions. Such documents in individual low-rise construction are drawings of frame houses.
Drawing of a frame house indicating all dimensions
This is not just an official document, without which it is difficult to obtain a building permit from the regulatory administrative and land authorities, but a real guarantee that the chosen type of house is fully adapted to the specific climatic conditions, land plot, and meets the client’s expectations and requirements.
This is a voluminous package of papers that contains comprehensive information about the progress of work, the procedure for installing structures, and detailed instructions for performing certain actions. Even the cost of the house will not come as a surprise to you, since the project documentation contains a detailed estimate that takes into account all the materials needed to assemble the frame.
Frame house drawings are a voluminous document containing more than 100 pages with detailed plans, diagrams and detailed instructions.

An example of one page of a frame drawing
Conventionally, all documentation can be divided into several parts, which make navigation through the document simpler and more convenient.
Detailed instructions for installing a frame house with your own hands
It can be read by both professionals and private builders who do not have special education or extensive experience. But still, to achieve a high-quality result, it’s worth understanding the topic at least a little. The entire specification is presented here, the sequence of work is indicated, and the approximate time frame required to complete each stage of construction.
How to perform steam, moisture and wind protection, which GOSTs and SNiPs apply in a given situation, on what principle window and door structures are selected - all this is present in the attached instructions. There are also general recommendations regarding the construction of the whole thing, with or without an attic.

Project of a one-story frame house with an attic
Detailed instructions for the construction of each individual element should be found in the thematic blocks.
Foundation Construction Guide
Here you can find working drawings and components necessary for arranging the foundation. The detailed instructions for arranging the foundation will contain not only the required dimensions and depth, but also information on how to correctly install the foundation formwork with minimal time and money.
Read also
Projects and layout of a one-story house 6x6
Calculation of the amount of reinforcement, its type, methods of knitting, with an included assembly diagram containing vents and anchors. Data on how the lower frame is attached to the foundation should also be present in this section and answer the question in detail.
Guide to assembling a frame house
The most voluminous part of the documentation, as it contains information on performing the main part of the work.
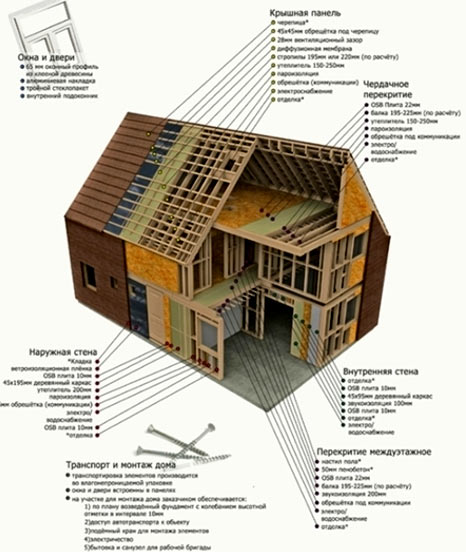
Diagram of a frame house
The drawings show the diagrams for fastening and assembling rafters, installing the support board and adjusting the top frame of the house. If this is the case, then a detailed design for the arrangement of the latter is attached. And also - on the correct installation of walls, assembly of corner structures both inside and outside the house, installation of internal partitions, load-bearing and decorative.
Detailed plans for the placement of walls are also present in the document; they offer either a standard design of the space or a design project for the layout, agreed with the customer.
The arrangement of the porch is also included in this part of the project documentation. The general design is provided, fencing, and lifting are developed. During construction with a building area of 6 x 6 or more, the working documentation is completed with all the necessary elements, including window structures.

Layout of a frame house with an attic 6 x 9
For seasonal buildings, single-chamber double-glazed windows are most often used to reduce the cost of construction, and for permanent buildings, double-chamber plastic windows are used.
Using the same scheme, it is possible to build a panel house. A classic frame is assembled on site; its base is a separately exposed frame made of timber, which is sewn up after the installation of the skeleton is completed. The assembly technology is slightly different. The main beacons are placed on the finished foundation and fasteners are installed.

The process of erecting a frame cottage on a foundation
And the panels - the elements of the walls - are assembled on a horizontal surface, and then they are lifted and installed on the foundation, secured in the required position.
Depending on the project, the thickness of the walls is selected, from 170 mm to 270 mm. This provides the necessary level of thermal insulation and prevents unnecessary waste of building material. Mineral wool is used as insulation, plasterboard is used for interior decoration, and osb boards are used for exterior decoration. The roof is made of metal tiles. But any can be changed according to the wishes of the client.
Guidelines for laying and installing utilities
Electricity, gas pipeline, sewerage, water supply - all these are integral attributes of a modern comfortable private home. Not only the comfortable operating conditions of the facility, but also the reliability and safety of the entire structure will depend on the timeliness and correctness of the installation work performed.
Read also
Photos of house layouts
How many sockets and switches will need to be placed in the future house, where is it best to place them, what kind of automation is needed for the smooth and safe functioning of the house, as well as how to properly install electrics in the kitchen and bathrooms - answers to all these questions can be found in this section . In addition to general recommendations, detailed work plans and diagrams for electrical installation and connection are required.
The same principles apply to the arrangement of plumbing, water supply, sewerage, and ventilation.

Laying utilities in the frame
Smart projects try to place all communication routes and junctions as close to each other as possible, so that they can be hidden in a special box and not spoil the interior of the room, and also not “eat up” the necessary space. The procedure for laying networks, as well as methods for connecting and wiring them, are presented in the installation manual for utility networks.
Frame house estimate
The biggest danger when starting to build your own one-story house, be it a 6 x 6 country house or a more serious structure, is to incorrectly calculate the construction budget and not take into account all the necessary materials. At best, the process will drag on indefinitely; at worst, it will freeze and it will become impossible to continue work.
To avoid such a situation when building a house with your own hands, you need to order design documentation from professionals.  In addition to detailed diagrams and drawings, each project is completed with a detailed estimate. Such a document indicates how much and what material will be needed at each stage of construction in meters, pieces, packages, kilograms, as well as the price range.
With phased construction, you don’t have to spend money on purchasing material for the whole house at once. It will be possible to gradually purchase the volume that is required right now.
This is convenient from the point of view of delivery, unloading and storage. This procedure is especially relevant for those who are engaged in construction on garden plots. In a limited space, it is possible to build a 6 x 8 or 6 x 9 house, but it is almost impossible to arrange all the building materials at once, and even protect them from precipitation.