How to knit sea knots. Main sea knots. Knitting patterns for sea knots - Straight knot
The history of the use of knots goes back many millennia. According to scientists, even cavemen used simple knots in your everyday life. The ancestors of complex types of knots are sailors. With the advent of sailing ships, the need arose for convenient and reliable knots to secure the mast, sails and other gear. Not only the speed of the ship, but also the life of the entire crew depended on the quality of the unit. Therefore, sea knots are very different from ordinary ones. They are not only reliable, they are easy to tie and just as easy to untie, which is not possible with regular knots.
The classification of knots came to us from England. Usually the British divide sea knots into 3 types:
- Knot – needed to increase the diameter of a rope or weave something.
- Hitch - attach a rope to various objects (masts, yards, anchors).
- Bend – connect ropes of different diameters into one.
There are about five hundred descriptions of sea knots, but only a few dozen are currently in use, as motor ships are replacing sailing ships. The ability to tie sea knots will be useful not only for yachtsmen, but also for tourists and fishermen. By gradually mastering the diagrams with pictures below, you will quickly learn how to do this.
Straight knot
Although this unit is one of the most ancient, it is not particularly reliable. Its disadvantages are frequent displacements on the rope, it is not easy to untie after heavy loads and getting wet, and with such a knot the strength of the rope decreases. Used for easy gripping on light pulls and splicing two ends of the cable. More complex knots are knitted on its basis. Despite the fact that the knot is very simple, it has its own nuances. The free ends should be on one side of the rope. If they are located on different sides, then such a knot is considered incorrect and is called not a simple one, but a thief’s one.
How to tie a straight knot:
- A regular knot is tied.
- We make a loop from one fixed end of the end rope.
- We wrap the free end around the outside of the loop and bring it inside.
- We tighten it. The result is the correct node. For greater security, another regular knot is tied on top.
Gazebo knot (Bowline)
In yachting, this unit is used more often than others. Initially, it was used to tie a gazebo - a device with which sailors climbed onto the mast of a ship. That's why it got its name. This knot has no disadvantages; it is easy to tie and untie. You can use it to tie ropes of different diameters and materials and not be afraid that it will come undone. It is most often used when mooring a ship or in cases where you need to make a loop or tie something.
How to tie a gazebo knot:
- We make a regular loop.
- We insert the free end inside the loop and braid it diagonally around the fixed end.
- We pass it back inside the loop.
- We tighten the ends of the rope. To make the knot strong, it is very important to tighten the ends tightly.
Figure eight knot
By appearance looks like the number 8, so the name speaks for itself. The knot is simple, but very important. More complex knots are knitted on its basis. The advantage of the figure eight knot is that it will never move or unravel under stress. Also, when the cable gets wet, it can be easily tied and untied. Used as a stopper at the end of the cable and as a securing knot. You can use it to make handles for a wooden bucket or secure strings on musical instruments.
How to knit a figure eight:
- We make a regular loop.
- We rotate our loop 360 degrees and thread the free end inside the loop.
- We tighten it.
How to knit a figure eight stitch:
- Fold the free end in half to make a loop.
- Make a second loop near the double end.
- Rotate the second loop 360 degrees.
- We pass the first loop inside the second.
- We tighten it.
Noose knot
This knot is a self-tightening loop. Its advantages are simplicity and speed of knitting, reliability and easy untying. Suitable for tying to objects with a flat surface.
How to knit a noose:
- Make a loop at the end of the rope.
- Make a second loop to make a bow.
- We wrap the free end of the rope 3-4 times around.
- We insert the end from the back into the second loop.
- We tighten it.
Bloody Knot
In ancient times, such knots were tied on a cat - a whip with nine or more ends. The cat was used as an instrument of torture and to maintain discipline on the ship - the blow was very painful, the lacerations did not heal for a long time. This is why the knot got its bloody name.
How to tie a bloody knot:
- The free end of the rope is wrapped twice around the stationary one.
- We tighten it.
Flat knot
Used when you need to tie the ends of a rope of different diameters or from different materials. Withstands heavy loads and wetness well. But this is not the simplest knot; it is easy to tie it incorrectly. The most important nuance when knitting a flat knot is that the ends of the ropes must be parallel to each other.
How to knit a flat knot:
- Make a loop from the thick end of the rope.
- The thin end is inserted inside the thick one.
- Make two turns over the thick end.
- We tighten it.
Clove hitch
Initially, this knot was used to fasten ropes - thin ropes from which ladders for cables were made. It is one of the most reliable tightening fasteners. Its peculiarity is that greater reliability is possible only under load. Also, its reliability is affected by the surface on which it is tied. A big plus of a knotted knot is the ability to tie it with one hand. Used to fasten ropes to objects with a smooth and even surface - logs, masts. On objects with edges, the bleaching knot will not be as effective.
How to knit a bleached knot:
- The free end of the rope is wrapped around the object.
- An overlap is made.
- We thread the end into the resulting loop.
- We tighten it.
Second method (knitting with half bayonets):
- Let's make a loop. The long end of the rope is on top.
- We throw a loop over the object.
- We make a loop at the lower end of the rope and throw it on top of the object.
- We tighten it.
Anchor knot or fishing bayonet
It has been used for thousands of years to attach a rope to an anchor. This knot is also used to tie the ends of the cable to any mounting hole. It is a reliable and easy to untie knot.
How to tie an anchor knot:
- We pass the end of the rope two times through the loop of the anchor or other fastening hole.
- We throw the free end of the rope over the fixed end and pass it through the resulting loop.
- We tighten both loops.
- We make a regular knot on top for reliability.
Stopper knot
Used in cases where it is necessary to increase the diameter of the cable.
How to tie a stopper knot:
- We fold the stop rope in half.
- We attach it to the main one.
- We wrap the free end of the locking rope around the main and second ends of the locking rope 5-7 times.
- The fixed end that we wrapped is returned to the loop of the stop rope.
- Tighten both ends.
Clew knot
Such a knot used to be used to tie sheets - gear for controlling the sail. Currently, it is used for tying ropes of different diameters. Not suitable for knitting synthetic ropes as they are slippery.
How to tie a clew knot:
- We make a loop from a thick rope.
- We bring a thin rope inward, go around the loop and wind it under itself.
- We tighten it.
Any sea knot must be tied tightly and reliably, because safety largely depends on this, and at the same time, so that at any time it can be easily untied if necessary.
What beginners should consider before training
It is often difficult for beginners to understand the terminology that is used when explaining the basics of tying sea knots, so it is worth initially learning a few basic definitions: 1) root end - the fixed end of the cable;
2) the running end is free, i.e. the loose end from which all movements begin when knitting any of the knots.
In English terminology for maritime knots there is the following classification:
1) knot - knots that are characterized as interlacing or connecting the running end with the root;
2) bend - knots that are characterized as intertwining the running ends of two cables to combine into one;
3) hitch - knots that are characterized as attaching the running end to some object.
It is important for beginners in maritime affairs to master the basic types of knots that are most often used in practice, and on the basis of which it is easy to understand the principle of the formation of other varieties.
Main maritime nodes
Arbor knot/bowline- one of the most important maritime knots, which every sailor should master first. It contains elements of various marine knots, which makes it an almost universal knot, which is used for insurance, mooring, and for attaching the cable to the hook. Tying two cables with this sea knot is considered the most reliable. A significant advantage is that it can be used for cables of any diameter and made of any material. It knits easily, does not slip along the rope, is easy to untie, but at the same time it never comes undone and is especially reliable. Because of such versatility, the gazebo knot is often called the king of sea knots.
How to tie a bower knot:
1) create a loop from top to bottom;
2) pull the running end through the formed loop;
3) then pass the running end behind the main one and thread it through the loop again, after which the running end should end up in another loop;
4) tighten tightly.
Although the arbor knot is quite strong, untying it will also not be a problem, you just need to slightly move the loop of the running end in relation to the slightly weakened root end.
Eight- a typical classic sea knot, named after its shape. It is the basis of many knots and is commonly used as a stopper and securing knot. The main advantage of the figure eight is the ease of tying and untying, even when the cable gets wet.
How to tie a figure eight knot:
1) wrap the running end around the main end, and then pull it over it, thereby forming a loop;
2) pass the running end into the resulting loop, first bringing it behind you;
3) tighten tightly.
Straight knot- one of the oldest sea knots, which the ancient Greeks called Herculean knots. Its main purpose is to connect two cables of the same diameter. The straight knot is often used, but is far from the most reliable sea knot. Its main drawback is that it slips along the cable and becomes too tight under heavy loads or when wet, so in such cases it is better not to use it.
Tie a straight knot It’s quite simple: one running end is in one direction, the other in the other (if in one direction, you’ll get an unreliable so-called “woman’s” knot), and to untie you just need to pull the running and main ends in different directions.
A simple half bayonet and its more complex variations
Simple half bayonet- a widespread simple, non-tightening sea knot, which underlies more complex variations of this kind. To obtain it, you need to circle the running end around the object to which the cable will be attached, and then circle it around the root end and pass it through the resulting loop. Then the running end is attached to the main end. This unit is highly reliable and can withstand strong traction perfectly.
- a more complex version of a simple half-bayonet, which is formed from two such identical knots. Its main purpose is to secure mooring lines on piers and tow. Such a knot is formed by no more than three half-bayonets. A larger number will not in any way affect the strength and reliability of the knot, as eloquently evidenced by the English proverb, which states that three half-bayonets are enough even for a royal yacht.
Simple bayonet with hose- a sea knot, similar to a simple bayonet, with only one additional hose around the object to which the cable is attached. It is also used for mooring, especially during long stays, since it is more reliable than anything else.
Fishing bayonet/anchor knot- one of the oldest and most reliable units, which is used for attaching a cable to an anchor, as well as for all work with cables under the influence of strong traction. It is in many ways similar to a simple bayonet with a hose, only the first half-bayonet passes inside the hose, covering the fastening item.
It is important to develop such good skills in tying sea knots that even with your eyes closed you can easily tie the knot required in a particular situation, and practice in this matter is one of the main conditions for successfully mastering this art.
This article presents about 80 diagrams of various maritime knots! Knowledge of which will further increase your level of survival and will be useful in a wide variety of situations!
A modern person usually uses no more than 5 nodes (and they usually know even less) and this amount is usually enough. But in extreme conditions, such knowledge may not be enough to ensure reliable, convenient fastening! And a person can spend much more effort and time on inventing a hub “bicycle”, making irrational use of an already scarce resource!
We recommend saving the maritime knots presented here in the form of a diagram (images), somewhere in an easily accessible place (for example, in a phone you carry with you), and most importantly, using them in practice for more reliable memorization, so that in a critical situation you do not have the question: how to make the loop tighten? Or vice versa -
didn't it drag on? How to securely tie two ends of a rope? How to make a reliable knot, but to quickly untie it? Etc.


Every day, each of us is faced with such a concept as a knot. This word is associated with the process of tying a man's tie or a woman's scarf, or sports laces. At home, in nature, in the country, as well as during hunting and fishing this concept simply irreplaceable.
Scope and types
Marine knots are widely used in different areas activities. They are indispensable for tying boats and light anchors, for lifting cargo, for fastening cables, for harnesses and gazebos, as well as for lowering various objects from a height, for attaching several poles when building a hut or wigwam.
This fastening method is in demand when traveling, during construction activities, fishing, tourist trip and in the navy.
As practice shows, the following types of sea knots are often used when fishing:
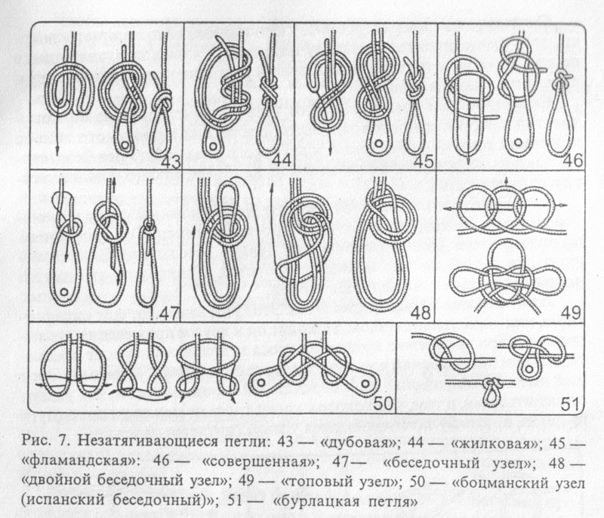
Flemish loop

With its help, the wobbler is attached to the ring on the front of the blade and the leash of the board.
Mother-in-law

The knot helps secure carabiners and swivels.
Fisherman's Loop

Formed for a leash when it needs to be connected to the main line. Common name: loop-to-loop
To secure the hooks, use the following types of knitting fasteners:
Slip-on loop

Strength more than 90%. Used for spatula hooks.
Brand

Strength more than 90%.
Marine knots used as a connecting element of the fishing line:
Eight

It is a loop with which the wobbler is tied and attached. Used on the ends of fishing tackle tackle to prevent the rigging elements from falling out and flying off the line.
"Double Fisherman"

Used as a connection for lines of unequal diameters.
Stopper

The unit is designed for a sliding float.
Rope knots:
Bowline

Designed to tie a loose loop. The main application is anchor rope.
Mooring

Apply when the ship is stopped at the berth.
Straight

Used for fastening and connecting cables of equal diameter. When sufficiently strong loads are applied to the connected cables, this type of knot is capable of tightening tightly. To prevent such contraction, a wooden plank is used.
Reef

It is necessary when attaching the pins of ship covers., as well as when connecting the running ends of the cables.
Flat knot

Used when connecting cables of different diameters.
Simple bayonet

The knot is necessary for securing mooring ropes to the berths.

Used in situations where it is necessary to tie ropes, where one of them contains a thimble.
Kalmyk

This type of fastening is widely used when it is necessary to supply the necessary tools, buckets and various items on the mast, overboard, at the time of carrying out the necessary work.

This method is used to secure the safety cable, clasping the belt of a person who is performing work on the mast or overboard.
How to knit correctly?

- To properly tie a particular knot, you must first learn the main types of common sea knots.
- Become familiar with basic concepts such as running end and main end.
- Study the pattern for tying a particular knot.
- Constant training. Inexperienced people who rarely tie knots often forget the technique of tying them, so only through practice can one learn how to form a knot.
- Knitting knots is individual in nature because the same knot can be tied in a variety of ways.
To make a knot correctly, you need to know it and be able to quickly knit it - two main rules. It doesn’t matter how a particular node was formed; the most important thing is the result.
Let's consider the step-by-step knitting of a stop knot used when fishing with a sliding float:
- We choose a thread whose length should be at least 25 cm. It is not recommended to use fishing line for fishing; an ordinary thick thread is best.
- Fold the thread in half and place it next to the fishing line. The distance does not have to be equal. It is imperative that the length of one side should not exceed 5 cm.
- Then we wrap the longest end of the thread around the fishing line and the small end.
- We make up to 5 turns, and then thread the long end into the resulting loop.
- .Smoothly, without sharp emphasis tighten the thread and get a knot. Before finally tightening the knot, it is recommended to wet it. Then tighten thoroughly. Advice: When creating such a knot, you cannot use fishing line. This will damage the second line.
- Once you have finished tightening the knot, remove the excess thread, leaving a few inches of extra space on each side.
Marine knots are of great practical importance. With their help, it is possible to perform a variety of actions aimed at strengthening structures, it becomes possible to connect and link several elements, to ensure and guarantee reliability and safety when carrying out various types of work.
To tie a sea knot correctly, first of all, you need to remember that the fixed end of the rope is called the main end, and the movable end is called the running end. There are several simple examples of knitting that are useful both at home and during outdoor activities.
It is also called a gazebo and is classified as a fundamental node. It contains elements of several schemes, which gives it universal properties: the fastening allows mooring, securing sailors, and fixing the rope to the hook. The bowline is very reliable, it can be used with almost all cables, regardless of material and thickness. The gazebo is quickly tied and easily untied (but not spontaneously), it does not slip, and is highly reliable when used in marine conditions.
Sea knot tying pattern for beginners:
- Form a loop from top to bottom.
- Pass the running end through it from bottom to top.
- Pass the chassis behind the main one and pass it through the loop again.
- When the running end is enclosed in the small loop formed, the rope must be tightened tightly.
To untie the bowline, just move the loop slightly in the direction from the running end to the root end.
Knitting a figure eight sea knot
This is a typical modification, which got its name due to its characteristic shape. The figure eight is usually used to form a stopper or stable fastening. The main advantage is that it is easy to deal with, even if the rope gets wet.

How to knit a sea knot:
- Circle the running end of the main one, pull the first one from above so that you get a loop.
- Pierce the resulting loop with the running end so that you can then pull it behind you.
- Tighten.
A beautiful knot with the rounded outlines of a figure eight is formed.
Knitting pattern for a straight sea knot
One of the oldest modifications, in Ancient Greece the knot was called the Hercules knot. With its help, you can firmly connect two ropes having approximately the same diameter. But the scheme cannot be called reliable: under heavy loads, the joint will be overly stretched, and it will often slide along the cable. It is not recommended for use in critical situations or when activities involving immersion in water are planned.

Classical technique:
- Take 2 running ends of the cables, one should cover the second.
- The other end forms an open loop.
- It is necessary to stretch the rope into this loop so that the first end is also braided.
- Tighten both ropes.
There is a subtype of the direct knot - the reef knot, which is distinguished by its ability to quickly untie.
Half bayonet and bayonet
The half-bayonet is not tightened; to perform it, the running end is wrapped around the object on which it is planned to fasten the cable, the main one is circled and passed through the formed loop. Next, both ends are fastened together. The node is able to withstand heavy weight, is reliable.

Using a bayonet, the mooring ends are fixed and towing is performed. It is based on 3 half-bayonets - this quantity is enough for any purpose. It cannot be assumed that 4 or 5 half-bayonets are stronger; the effect when used will be the same.
How to tie a sea knot with a fisherman's bayonet

This variation has ancient roots; it has survived to this day due to the fact that it allows the rope to be fixed as firmly as possible on the anchor, and is suitable for all types of manipulations under conditions of strong traction. Initially, you need to secure the cable to the object using additional hose, then you can begin to form half-bayonets. The first of them must capture the barrier encircling the base.

If the ends of the rope are not visible, outwardly this knot cannot be distinguished from a straight one. It got its name due to the fact that this similarity was actively used on ships in order to identify the theft of sailors’ personal property and provisions. The connection is used mainly for domestic purposes, since when tensioned, the knot can spontaneously come undone.
Procedure:
- The running end of the first rope is folded into a loop.
- The second cable is threaded into this loop in such a way as to capture the root and running ends, and is pulled out in the opposite direction.
- Tighten both double ends.
Orientation cords are often attached in this way.
How to tie a woman's and mother-in-law's knot: a simple diagram
The variations are extremely similar: these are two erroneous ways of forming a thief's knot. The names “woman’s” and “mother-in-law” are based on everyday specificity of use - they are widely used to connect ropes, but do not take into account the unreliability and even some danger of sliding fastenings.

Knitting a sea knot is not difficult: two running ends are passed through each other in different directions and duplicate this action in a mirror image.
Professional sailors and adherents of an active lifestyle demonstrate the woman’s knot only in educational purposes, since its use in field conditions is fraught with injury and property damage.
The mother-in-law's knot differs from the woman's knot in that here the ends of the cable come from the finished combination in a diagonal direction. The modification was first used in European countries in shipping, but was later replaced by more practical and strong knitting options that do not have the ability to unravel spontaneously. Now, in practice, it can only be found in subsidiary farming as an auxiliary link for packaging raw materials and food products.
To perform the mother-in-law knot you should:
- Form a partial loop from the running end of one rope.
- Pass the second end into the loop from top to bottom, go around the first rope and bring it out.
Even if you tighten it tightly, there is a high probability that with further tension the ligament will open.
Types and methods of performing a noose knot
The noose knot can be performed in straight, flat, and fisherman variations. In the first case, a strong connection is formed, increasing strength when wet.

Knitting pattern:
- Form an open loop on the rope: give it the shape of the letter “s” and begin to form turns that are placed as closely as possible in relation to each other.
- Pass the running end into the lower eyelet remaining after winding the rope.
- Tighten.
The carbine noose has a narrow scope of use - it is popular among professional climbers. Here the running end is secured to the carabiner with an 8-shaped connection; the remaining part of the rope, if necessary, can be passed through the carabiner to cover a support, say, a tree.
The noose on the support is knitted as follows: the rope covers the support, enters the loop and wraps around it 3 times, then passes into a small loop. Even if the rope is wet, a stable connection is formed that can be used without support.
All maritime knots, despite the characteristic name of the category, have become widespread in Everyday life. Thieves', mother-in-law's and woman's - a quick way to tighten the neck of a bag; a noose, with a skillful approach, helps in working with loads and sports. All variations of bayonets allow you to quickly fix the rope on a stationary support. It must be remembered that the strength of the connection depends not only on the skill of tying, but also on the strength of the rope.