Remote connection with a computer. How to get into someone else's computer: the simplest methods. What to do if remote desktop does not work
Remote access (DA) in Windows XP - 10 is the ability to connect to any computer connected to the global network if the remote connection is correctly configured on both machines. The use of UD is necessary in cases of provision of various services for servicing user computers by system administrators, support workers, or ordinary users who need help from friends. Today we will look at this concept in more detail and learn how to connect to any computer connected to the network to carry out certain actions on it.
Remote access to a PC based on Windows XP is organized using a pre-installed utility - Remote Desktop or Remote Desktop. And here such details as the provider, the type of network used, the hardware configuration and the physical location of the computer are completely unimportant. The main thing is access to the network. Wireless Internet is sufficient for remote access.
Remote desktop is an indispensable feature for people who work on different machines, storing different data on each of them. To launch it, you just need to open the program on each computer with Windows XP or 10, connect to another and log in with your own login and management data.
Remote access is implemented using RDP - Remote Access Protocol. Microsoft borrowed this technology, which is now common to various computer and mobile platforms, from one of the acquired companies. Features of RDP for XP:
- support for 32-bit color depth;
- encryption of information with a 128-bit key with verification of hashes of transmitted packets;
- transmitting sound from computer to computer;
- working with remote and local printers;
- open access for applications to parallel, local and serial ports;
- data exchange via buffer.
The latest version of RDP, positioned as the 7th, has the following features:
- forms-based authentication of entered data during desktop connection;
- only works with applications that use a certificate from a trusted developer;
- virtual desktop connectivity via an advanced virtualization host;
- desktop management through an intermediary;
- updated protection mechanism, correct setting which will provide reliable connection without loss or possibility of data interception;
- bidirectional data transfer from computer to computer;
- working with multiple monitors in Windows XP;
- Stream high-quality video with Flash and Silverlight elements if configured to support these features.
In addition to having a program for remote access via RDP, the following conditions must be met: using Windows XP Professional and the presence of an account with a password, which prevents unauthorized access to the PC.
Remote access settings on XP are carried out within a few minutes; after connecting, it becomes possible to gain full control and perform remote control of the computer.
We create an account with a complex password from which we will manage the PC.
For greater security, create an account with limited rights to minimize damage to the system during a successful unauthorized access attempt.
- Go to the “Control Panel” and click on “Accounts...”.
- Select the item responsible for creating a new user account.

- Set the account name and click “Next”.

- We indicate the user's permissions and click the central button.

- Click “Change account”.

- Select the one you just created and click “Create password”.

- Enter the password twice and click “Create...”.

Let's look at how to establish a connection with a computer running Windows XP.
- Call “Properties” of the “My Computer” directory and go to “Remote Sessions”.
- Allow remote access and click “Select remote users”.

- Add users and click “OK”.
To connect to a computer running Windows XP, follow these steps.
- Launch the application as in the screenshot.

- We set the following data: the name of the PC you are connecting to and the account that has permission to do so.

- Click “Connect”.
- In the next window, set a password and click “OK”.

- We wait for authentication to complete and get to work.
Let's look at the differences between RDP Windows 10 and XP.
Connecting via RDP involves controlling one computer running Windows 10 over another located on the same subnet. To connect via RDP, you need to know the IP of the target device. It can be easily recognized by going to the “Control Panel” of Windows 10. Next, we go to the center that manages networks. In the section with an active connection, click on the connection icon. In the window that appears, click “Details”.

A window will open from which you can obtain IP information.
Setting up a connection to the desktop in Windows 10 is done in the system properties window.
- Call the “My Computer” context menu and go to the “Remote Access” tab in Windows 10.
- We set the parameters as in the screenshot, save them and reboot Windows 10.

To establish access to a PC on your home network, enter “Connect to remote” in the search engine.

Launch the utility.
Enter the IP of the target computer that is managed by Windows 10.

Click "Connect". In a few seconds you will have to go through authorization and wait for the desktop of the target PC, after which you can work on the remote machine as if it were your own.
To connect to a PC located anywhere in the world and take temporary control of it, use one of the following freely available utilities: Radmin, TeamViewer or Ammy Admin.
Connecting to the desktop via RDP in any of them is carried out using methods similar to those discussed in the article, so we will not describe the programs in detail.
(Visited 9,334 times, 5 visits today)
29.08.2016
Today, almost every device has access to the global network. This is very convenient and opens up huge opportunities that some people don’t even know about. Professionals use many of the features of operating systems and software, but the average user may not be aware that you can control your home computer from a distance.
A feature such as remote access will be useful to everyone. Wherever you are: on the road or at work, at home or while traveling, you can always connect to the computer you need. This function may be needed in thousands of cases, here are some of them:
- If you need to connect to your home computer while at work in order to send yourself forgotten documents or vice versa;
- Helping a friend with a broken program or setting it up;
- Connecting to use a remote machine. Often necessary when there is a need to work under different operating systems;
- While servicing large local network, connecting to client computers to update or install software;
- Connect to the server to make settings changes;
- By using software, connecting to any part of multi-peer networks or organizing access to files via the Internet;
- Conducting conferences and presentations.
As you can see, there are many solutions and opportunities that remote access to a computer opens up. Among the unnamed little things, you can also add the functions of photographing the screen or rebooting and turning off the computer from a distance.
How to organize remote computer control
To do this, you need to prepare the system in advance. The fact is that this service is disabled by default for security reasons and because most users do not use it. Depending on the purposes for which you need remote access to your computer, there are several options for setting it up:
- By installing the specialized program AeroAdmin, Radmin or Team Viewer;
- Using standard OS Windows tools (remote access service).
In order to organize remote control of a computer, you need to understand that two systems are needed to connect. One of them must be configured as a server, and the second must have a client program or service running to organize the connection.
Remote access using AeroAdmin
AeroAdmin main functions:
- Connects to computers behind NAT
- Built-in support messages
- Transferring files
- Voice chat
- Contact book
- Uncontrolled access
- Total AES + RSA encryption
- Two-factor authentication.
- Unlimited parallel sessions
Connection is possible using a unique computer ID (in in this case it doesn’t matter whether the computers are on the same local network or different ones), or directly by IP address.
AeroAdmin provides 2-factor authentication. In addition to manual acceptance mode, incoming connections can be accepted by ID and password, which is a big plus for security. AeroAdmin also blocks attempts to guess a password or computer ID.
AeroAdmin is ideal for spontaneous and regular technical support, as it allows you to connect with a minimum number of steps. Very similar in functionality and appearance on Team Viewer, but is completely free for both corporate users and individuals. persons in the starting functionality.
Remote access to a computer using standard Windows tools
In order to be able to connect to a computer running the Windows operating system, you must perform the following steps:
- First, you need to check whether the service required for the remote connection function is enabled. To do this, go to the Start menu and select Control Panel. In the panel that opens, look for the “Administration” item, and in it “Services”.

Find “Remote Desktop Services” in the list.

This service must be set to Enabled or Automatic. If the status is “Disabled”, you need to go to the service settings and change the status. After this, you should restart your computer and proceed to the next step.
- After making sure that the service is running and there are no problems with the server, you need to allow remote connection in the settings. To do this, open the “Control Panel” again and look for the “System” setting in it.
In the menu on the right you need to find the item “Setting up remote access”.

Now you should select one of the items shown in the figure below.

The choice depends on the version of the operating system with which you are going to connect to your computer. If you are unsure, or the version is lower than 7, be sure to choose option 1. However, for security reasons, it is recommended to use the second one.
- It is very important not to forget to assign users who are allowed to remotely control the computer. The administrator is given this right by default. But you need to remember that remote access is allowed only to users with a password. If a password is not set, the Windows operating system will not allow the connection.
That's all! The system is configured and ready to provide access to the remote user.
To connect from another computer to a pre-prepared server, you do not need to install anything. To connect, you only need to start the service described in Point 1. The client program for organizing the connection is available in OS Windows by default.
To launch it, you need to open the “Start” menu, select “All Programs” and find “Accessories” among them. From the standard programs, select the one we need: “Remote Desktop Connection”.
Now we have a client program ready for connection. There are a lot of settings in it. Using them, you can adjust the quality of the display on your screen: worsening it in case of a bad signal, as well as to save traffic, or vice versa, improving it to get a brighter and clearer picture.

The main thing that is needed to connect is to enter the “Computer name” or its IP address, as well as identification data. If the network address and user name were entered correctly, then the next step is authorization on the remote computer (entering the connection password for the selected user name).
Remote computer control using Team Viewer
Team Viewer is a specialized program for organizing remote access networks. Among its advantages among analogues, including Windows tools, it is worth noting the software’s ability to connect to absolutely any networks behind any protections and firewalls. Some administrators of large networks block the ability to install Team Viewer due to its capabilities.
For this program to work, you will need to install it on both sides. That is, client programs on one computer and server programs on another. What is especially interesting is that the software can be used absolutely free for personal and home use.
In order to be able to connect remotely, you must do the following:
- Download the server and client from the official website.
![]()
- Installing the program is simple and intuitive. But to use it, you need to register. Registration does not oblige you to anything. But in this way, Team Viewer will record the number of connections and frequency of use of the program in order to be able to block you if you have violated the license agreement and are using the software for commercial purposes.
After installing the server, you need to configure it. There are many connection settings:
- Ability to limit connection speed;
- Selecting the ports and Team Viewer servers to use;
- The ability to hide the program or close its reconfiguration with a password;
- Selecting graphic and sound parameters;
- And the most important thing is to enter your username and password.
To connect via Team Viewer, there is no need to have a dedicated IP address, as is the case with standard Windows tools, because the connection occurs using a special code that is generated by the server. This is very convenient, especially for those who do not have a static or white address. In addition to this code, you will need a password, which is also generated.

Among the advantages of the program it is worth noting:
- The ability to connect to the server from absolutely any device using a client for Android, Mac and Linux;
- Establishing a secure connection from anywhere in the world without installing a client using a regular Web browser;
- Excellent operating speed without any brakes at any distance, thanks to intermediate servers;
- High functionality, including the organization of a secure VPN tunnel.
Remote access to a computer using Radmin
The Radmin program is a kind of simplified analogue of Team Viewer. It is easy to set up and control. According to the developers, there should be nothing superfluous in a program that provides remote access to a computer. Its installation is simple and accessible to every user. It is provided as a demo version for 30 days, after which it requires registration.

Among similar programs, Radmin is distinguished by its high speed and low requirements. In the background, it is practically invisible and does not display any unnecessary messages when connected. For monitoring a remote screen, this is perhaps the best software that has no analogues.
In addition, I would like to note the level of security. By remotely managing your computer using Radmin, you don't have to worry about problems with unauthorized connections.

Also, speaking about the advantages of software, do not forget about stability. Both server and client software can work 24 hours a day without failures or problems.
RESULT
Remote computer access is an excellent way to work with clients and servers, and everyone can choose the connection method that suits them best to achieve their goals. Any of them is useful for its functionality and will become indispensable for both work and home use.
Sometimes a situation arises when you urgently need to use a computer that is located at a great distance from you. For example, in order to fix something on a friend’s computer or copy documents that you forgot on your home computer. Now, thanks to the Internet, this is quite possible, moreover, it is very easy to do. In this article we will talk about how to connect to another computer via the Internet and get full access to all resources on it.
To connect to another computer via the Internet, you can use the Remote Desktop feature. This feature is included in the Windows operating system, but it requires quite complex configuration and has a number of limitations. Therefore, we will look at the connection process using .
TeamViewer is completely free for non-commercial use. You can download it from the official website teamviewer.com.
Prepare the computer to which you will connect via the Internet
First of all, you need to prepare the computer to which you plan to connect via the Internet. Download and install TeamViewer.
The installation process is as simple as possible. After launching the installer, a window will appear in which you need to enable the “Install to manage this computer” and “Personal/non-commercial use” functions.
Next you need to click on the “Accept - Complete” button. After this, TeamViewer will install and launch immediately. When you first launch the program, you will be asked to set up uncontrolled access to your computer.

At the first stage of setting up access, we need to enter the computer name and password. Enter this data and click on the “Next” button.

You will then be prompted to create an account. You can skip this step; creating an account is not necessary. Select “I don’t want to create an account” and click on the “Next” button.

That's it, setting up uncontrolled access is complete. In the last window you will see the ID (computer identification number).

This ID is used as a login to connect to the computer. Copy it or write it down in a safe place.
Connecting to another computer via the Internet
So, after you have prepared one of the computers for connection (installed and configured TeamViewer), you can start working with the main computer from which we will connect.
We launch the TeamViewer program installer on the computer from which we will . In the installer window, you need to select the “Install” and “Personal/Non-Commercial Use” options

After this, TeamViewer will install, launch and be immediately ready to use. You no longer need to configure anything on the computer from which you will connect.
In order to connect to another computer via the Internet, you need to enter the “Partner ID” (the computer ID that we received after setting up uncontrolled access) and click on the “Connect” button.
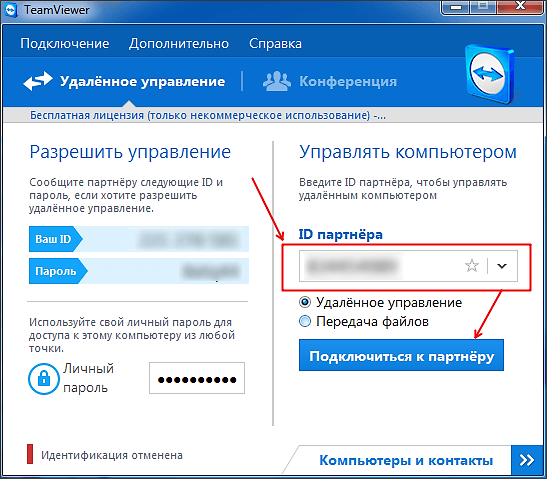
After this, the program will ask for a password.

Enter the password that we specified when setting up uncontrolled access and click on the “Login” button. That's it, after that you will see the desktop of another computer to which you connected via the Internet.
From time to time, all categories of users need to remotely connect to a particular computer. Today we will look at several methods for performing this operation.
Basically, the solution to the problem posed today is provided by specialized software, both paid and free. In some cases, the built-in Windows toolkit can be useful. Let's consider everything possible options in order.
Method 1: TeamViewer
TeamViewer is a free (for non-commercial use) tool that provides the user with full set functions for remote administration. In addition, using this program you can set up remote access to your computer in a few clicks. But before you connect, you will need to download the program, and this will need to be done not only on our PC, but also on the one to which we will connect.
- Run the executable after downloading. Three options are available – use with installation; install only the client part and use without installation. If the program is running on a computer that you plan to control remotely, you can select the second option “Install to then control this computer remotely”. In this case, TeamViewer will install the module for connection. If the launch is planned on a PC from which other devices will be controlled, both the first and third options are suitable. For single use, the option is also suitable "Personal/Non-Commercial Use". Once you have set the options you want, click "Accept - complete".
- Next, the main program window will open, where we will be interested in two fields - "Your ID" And "Password". This data will be used to connect to the computer.
- As soon as the program is launched on the client computer, you can begin connecting. To do this in the field "Partner ID" you must enter the corresponding number (ID) and press the button "Connect to partner". The program will then ask you to enter a password (displayed in the field "Password"). Next, a connection will be established with the remote PC.
- Once the connection is established, the machine's desktop will appear.


TeamWeaver is one of the most popular and convenient solutions for remote work. The picture is spoiled only by rare connection bugs.
Method 2: TightVNC
Another option for remotely connecting to a PC would be to use the TightVNC application, which is also capable of solving the task posed today.
- Download the program installation package and install it on both target computers. During the process, you will be asked to set passwords for connection and access to administrative options - we recommend setting both.
- After installing the components, move on to the application configuration. The first step is to configure the server part, that is, the one installed on the computer to which we will connect. Find the application icon in the system tray, right-click on it and select the option "Configuration".
- First of all, check if all the items on the tab are checked "Server"– these options are responsible for the functionality of the connection.

Advanced users would also do well to visit the section "Access Control", in which you can specify the range of IP addresses from which the connection to this computer will be made. Click the button "Add", then enter the address or address pool in the dialog box, then click "OK".
- Next, you will need to find out the IP address of the server machine. You can learn how to do this from the article at the link below.

- To connect, open the TightVNC Viewer program on the client machine - this can be done through the application folder in the menu "Start".
- In field "Remote Host" Enter the address of the target PC.

In addition to IP, in some cases it may be necessary to additionally enter the connection port if a value other than the default is used. In this case, the input scheme changes slightly - IP and port are entered through a colon:
*address*:*port*
Both values should be entered without asterisks.
- Check that the required data is entered correctly, then press "Connect". If a password has been set for the connection, you will be required to enter it.
- Wait until the connection is established. If everything is done correctly, the desktop of the remote computer will appear in front of you, with which you can already work.


As you can see, there is nothing complicated - TightVNC is very easy to manage and configure, and is also completely free.
Method 3: Litemanager
Another application through which you can organize a remote connection to another computer is Litemanager.
- Unlike the previous solution, Lightmanager has separate installers for server and client options. You should start the installation from the first one - move the file "Litemanager Pro"– Server on the machine you want to connect to and start it. During the process, a window will appear confirming the automatic configuration of the Windows Firewall - make sure that the required box is checked.

At the end of the installation, you will be prompted to set a password for the connection, as well as allow the connection via ID. The latter resembles a similar solution from TeamViewer.
- Now you should install the client version on the main computer. This procedure does not imply the presence of any specific nuances and is performed in the same way as with any other Windows application.
- To establish a connection, make sure that the Litemanager server is running on the target machine. By default it is turned off - you can launch the application through the file of the same name in the program folder in the menu "Start".

After launch, the server will need to be configured. To do this, open the system tray, find the Litemanager icon, right-click on it and select the option "Settings for LM Server".

Click on the button "Server Settings" and select an option "Safety".

- To start the server, use the tray icon again, but this time just left-click on it. A small window will appear with the ID value, remember it or write it down. You can also set a PIN code here to protect against unwanted connections. Click "Connect" to start the server.
- The client version can be launched from a shortcut on the “Desktop”. In the application window, double-click the left mouse button on the element "Add new connection".

In the pop-up window, enter the ID and PIN value, if you set one in the previous step, and click "OK".

You will need to enter the password specified in the server settings in the previous step.
- Using the menu "Modes" located on the right side of the client manager, select the desired connection option - for example, "View", then double-click the left button on the connected connection.

Now you can view the contents of the remote computer's screen.


Lightmanager is a slightly more complex solution than those discussed above, but it provides good security settings and general functionality for working with a remote machine.
Method 4: AnyDesk
An excellent alternative to all the previously mentioned programs is AnyDesk. You don't even need to install it on your computer to use it.

Method 5: System remedy
In Windows 7 and later, Microsoft has built in a feature for remote access to other machines on the same local network. Its use is carried out in two stages - setup and connection itself.
Settings
First, let's configure the computer to which we will connect. The process is to set a static IP for this machine, as well as enable the remote access feature.
- Take advantage "Search" to find and open "Control Panel".
- Toggle icon display in "Large", then open the item "Network and Sharing Center"».
- Find the link that corresponds to the Internet connection adapter and left-click on it.
- Next, open "Intelligence".

Copy values from positions "IPv4 Address", "Default Gateway", "DNS servers", we will need them for the next step. - Close "Intelligence" and click on the button "Properties".

Find an item in the list "Internet Protocol Network v4", highlight it and click "Properties". - Switch to manual address entry and enter the values obtained in the connection information in the previous step in the appropriate fields.
- Now you need to enable the remote access function. On Windows 10 you will need to open "Options"(the most convenient combination is Win+I), then select "System".

In the system settings we find the item "Remote Desktop" and activate the switch.

You will need to confirm the operation.
- On Windows 7 and older, open "Control Panel", points "System" – “Setting up remote access” and check the box “Allow connections from computers running any version of Remote Desktop...”.


Remote connection
After all the preparations, you can proceed to establishing the connection.

Conclusion
We looked at several ways to remotely connect to another computer. Finally, we would like to remind you - be careful when using the proposed solutions, as there is a risk of losing personal information.
Remote computer access via the Internet will allow you to control your PC, even if it is located thousands of kilometers from your location.
The technology works on the principle of assigning a unique identifier to the user on the global network.
Using this data, a connection to remote control is made.
The function can be configured both using system functions of the Windows operating system and using additional programs(their use is usually free).
Notice! In order to access a remote computer through another PC, the remote PC must be turned on and have an Internet connection. Also, the function or program that allows for a remote connection must be enabled on both devices. In the operating room Windows system There is a built-in ability to set up a remote connection between two PCs.
Using the Internet ID feature in Windows
The Windows operating system has a built-in ability to set up a remote connection between two PCs.
The function is called Internet ID, it allows you to quickly connect to the desired Host.
In this case, all additional NAT network protocols are ignored by devices. This allows for a fast and uninterrupted connection.
Please note that the speed of the remote connection directly depends on the quality of the Internet connection.
Assigning a unique identification number on the network can significantly simplify the connection process. Using this feature, computers no longer need to configure the reverse connection process each time.
Also, the Internet ID function is quite easy to use and even an ordinary user can configure its operation.
How does Internet ID work? The connection of two computers occurs through a connection to a single Host. The interface is displayed using the NAT protocol or a standard firewall.
Follow the instructions below to set up remote access to your PC yourself using the Internet ID option:
- First, you need to obtain an identifier with which two computers can establish a connection. The procedure for issuing an identifier is carried out by the host free of charge;
- Some builds of Windows may not have a previously installed utility. You can download it from the link http://db.repairdll.org/internetidadmin.exe/ru-download-50.html.
- Install the tool on both computers and get started;
- After installation, a host icon will appear on the desktop toolbar. Right-click on it and select connection settings;
- Then in the new window, click on the appropriate button to obtain an Internet ID. This procedure must be done on the computer from which another PC will be controlled;
- After a few seconds, a window will appear with a text field in which an identifier will be indicated that allows remote connection of two PCs. Remember it, because without specifying the identifier on another PC, you will not be able to set up a connection;
- Now you need to perform several actions on the client personal computer (to which you will connect). Run the installed utility, select the operating mode as “Client”;
- Click on the button to create a new connection and in the window that opens, specify the name of the connection and the identifier itself. You can choose any name, and the Internet ID must match the one issued on the first PC. Click on the OK key;
- Next, the connection properties will open. Select the connection mode via ID as shown in the figure below and enter it again in the corresponding text field;
Now wait a few seconds and wait for the connection to complete. In subsequent attempts to gain remote access to another PC, you will need to enter only the identifier on the administrator’s side, and on the client’s side, select the previously created connection template.
In addition to the proposed method for setting up remote access, you can use special programs that are even easier to set up.
TeamViewer program
TeamViewer is one of the most popular applications for creating a connection and working with remote access to a computer.
The program is also available on operating systems Android, IOS, MacOS, Windows and others.
This cross-platform functionality will allow you to access your computer even from your phone. You can download the application for the desired OS using the link to official page developer https://www.teamviewer.com/ru/download/windows/.
main feature utilities: the user does not need to deal with the client and server parts of the program separately. You just need to install the program on both computers and set up the connection in a few mouse clicks.
After the first startup, the application window displays your personal computer ID and access password.
To connect to another computer, just enter its ID in the Partner ID field and click the Connect button.
TeamViewer benefits:
- Availability of several modes of operation of two computers at once: remote access, file and folder transfer mode, VPN;
- During the connection, you can open a chat window, this will allow two users to communicate in real time, without being distracted by other messengers;
- To ensure full-scale system administration of another PC, you can enable the option of 24/7 remote access. In inactive mode, the function consumes few resources and does not load personal computers;
- Speed and stable connection. Thanks to the availability of quality hosts, users do not face the problem of access failure (this only happens in case of poor connection to global network Internet);
- Please note that TeamViewer cannot be used for commercial purposes. The developer has built into the program a utility for determining a commercial connection. If it is detected, access to the PC will be immediately blocked.
If you want to use modules for corporate connection, you will need to buy a paid version of the application.
Ammy admin
This program allows you to access the function of remote control of another PC. The functionality is very similar to the Team Viewer described above.
Available operating modes include the ability to view and remotely control another user's personal computer or laptop.
The program can be used without installing it on two devices. All you need to do is open the portable version on your computer. The utility is not intended for use in commercial organizations and in enterprises.
You can download Ammy admin on the developer’s official website at http://www.ammyy.com/ru/.
To get started, launch Ammy admin on both computers. Then enter the server computer ID on the client computer. Click on the “Connect” button. The connection diagram is also shown in Figure 8.
This application is more suitable for organizing a one-time connection than for long-term and regular work. Among the advantages over other similar software are a simplified connection process, an intuitive interface and high speed.
Among the disadvantages of the application, it can be noted that it is not available on mobile devices and tablets. There is also no mode for transferring folders and files.
Use of the program is limited to fifteen hours per month. This feature is designed to eliminate the possibility of commercial use.
Lite Manager
This utility has a user-friendly interface and a large range of options. The application has two parts: for separate installation on the server side and client side.
Unlike previous utilities, using LiteManager will be more appropriate for more advanced users who need to organize regular access to a remote computer.
Also, unlike TeamViewer and Ammy admin, unique identificator for a server PC it is assigned only once (at the first start). It will not change in the future. This will allow you to quickly remember it and not have problems entering it on the client side in the future.
Users also have the opportunity to independently set their online ID.
The program itself is paid, however, if you do not need to use it for commercial purposes, you can download the LiteManager Free version. It is free and its operation is limited only by a filter that determines a possible commercial connection.
The application provides a large number of modes for connecting two PCs, namely:
- Remote access;
- Data transfer;
- Chat mode;
- Ability to access the registers of two PCs;
- Task Manager.
The program also offers a real-time screen recording function, inventory options, and installation of programs on a client PC using a server. Among the disadvantages of the program is its absence on mobile operating systems.
RAdmin
This software is one of the first programs whose developers were able to organize uninterrupted remote access to a PC via the Internet.
The main advantage of the utility is the organization of network security and protection against unauthorized copying of data by an attacker.
All transmission channels are protected by cryptographic algorithms.
The application also has very good speed. The first connection occurs in a matter of seconds. You also have the opportunity to access the BIOS of a remote computer.
The utility cannot configure a connection without specifying the IP address of the server PC, that is, connecting by ID is impossible.
All modern applications for working with remote access are different fast work and convenient user interface.
Choose the appropriate connection method based on whether it will be regular or one-time.
Thematic videos: