Replacing fluorescent lamps with LED lamps. Office LED lights
Modern led lamps and LED lamps to illuminate the space. They are similar to similar fluorescent lamps in their dimensions and external features. However, all the usual fluorescent lamps have been replaced by LEDs, which are economical and durable. To those who want buy LED lights , it would be useful to know their only drawback - high cost. Fortunately, it pays for itself in the first year of operation, because... consumption of LED bulbs is at least 2.5 times less than that of fluorescent lamps and 7 times less than incandescent light bulbs.
Domestic production has successfully mastered productionLED lamps. Using LED light bulbs, there is no need for subsequent disposal of used light sources. There is absolutely no need to buy the entire lamp to replace it. It is enough to buy l ed lamp. The LED lamp is combined with the old lamp body, but do not forget that this light source is connected directly, i.e. at 220 Volt. This approach does not require the specialist to undergo thorough training. All operations are performed according to the instructions supplied with the LED lamps.
T8 LED lamps look like fluorescent lamps, only made of transparent plastic with a getinaks strip (aluminum ruler), having LEDs and a driver. LED lamps are connected to a network with 220-volt voltage.
The LED tube has a length of 600, 1200, 1500 mm. Its power ranges from 9 to 25 W. LED lamp with base G13 can create cool and warm light shades depending on the light temperature, which ranges from 3000 to 5000 Kelvin. 3000K are yellow tones, more familiar to human eyes at home, like an Ilyich light bulb. But if you need daylight, for example for an office space, then it is equal to solar, which is 5200K. If you buy LED lamps,it is possible to save about 65% of consumed electricity. LED led lamp and LED light bulb. As a result, there will be an increase in lighting brightness due to greater luminous flux lamp or their quantity.
Procedure for replacing old lamps with LED lamps
Dismantling the lamp
Before planning a lighting upgrade, the wiring must be disconnected. The flow of current is blocked by a switch, and the absence of a phase on the terminal block is checked using the indicator. The switch must de-energize the phase wire, but in practical terms there are deviations from this condition. When a phase is detected, it is located and switched off circuit breaker. Next, it’s time to disconnect the supply wiring from the block. Its exposed areas are wrapped in insulation. In a standard situation, the neutral and phase cables are connected together with the grounding cable. It has a yellow-green tint and is held by a screw on the lamp in an area that has been cleared of dye. The grounding wire must also be removed by loosening the screw fastening. Its insulation is not required. If there are many lamps in the room, you can turn on the lights to make work easier. Light fixtures are removed from the ceiling or wall by unscrewing the screws.An Armstrong type luminaire is removed from the ceiling by pressing it up, after which it must be turned diagonally.
Removing unnecessary elements from the lamp
Fluorescent lamps are removed. They are taken by hand in the area of the base part and turned in any direction by 90°. This way the lamps can be easily dismantled. Avoid damaging the integrity of the light sources during dismantling. They are saturated with mercury vapor.
The conductors of old cartridges are also secured with screws. The new ones provide a different method of fixation. The wire should be removed by rotating it clockwise and in the opposite direction while simultaneously pulling it out. If there is no need for a socket, the wires are shortened with wire cutters.
Place of LEDs in an electrical circuit
Fastening and connecting the base for an LED lamp
G13 socket sockets are characterized by three types. They differ in the variations of installation and wiring of the voltage supply wires. G13 is understood as pin mode lamp connection maintaining a distance between pins of 13 mm.
Since LED lamps only need one cable connected to the socket, it is allowed not to remove the latter, but to confine the wires to the terminals of the block. One of them is usually shorter than the other. It can also be shortened and wrapped with insulation. If there is a lighting device that supports the presence of several light sources, the wires from one line of sockets are connected to the corresponding place on the block. From the other - by analogy.
Modern G13 lamp base
If the light source has more than two sockets, a jumper is removed from the unoccupied terminal. This connection algorithm is not ideal. When one lamp is removed from the current-fed socket, the others go out. Turning them off is due to the transfer of voltage between the pins thanks to a jumper. It is diverted to adjacent cartridges. Holding the wire with a screw, you need to pull it. This operation will allow you to check that the cable is in the terminal.
Wired connection to the upgraded G13 sockets is made using a screwless method. For example, in the case of a t8 g13 lamp, 1 cm of conductive insulation is removed, and the cable enters the socket from below, where a special hole is provided. The clamping devices are connected not only to each other, but also to the element through which the current flows to the lamp pins.
After upgrading the lamp with an installed t8 g13 lamp, it is time to place it in the required place and supply voltage.


Replacing fluorescent lamps with Led. Example
Replacing lamps in old lamps is preceded by performing a calculation. If there is a ceiling LED tube light source T 8 with a power of 10 W, installing it in the required quantity in standard sockets will lead to an eightfold increase in lighting brightness compared to incandescent lamps. In numerical terms, the luminous flux power will correspond to 160 W when using 10-watt lamps T 8 R - standard.
The dimensions of the light fixture allow it to be supplemented with four sockets for future placement of a larger number of LED ceiling elements. If 4 lamps start working, the total power will be 40 W. LEDs that produce a white luminous flux, taking into account the design of the existing lamp, will be rotated due to a special mechanism and concentrate the illumination at a specific point. In this situation, it is realistic to replace three 100-watt incandescent lamps.
Conversion of the lamp to ceiling LED elements is carried out by dismantling the cartridge, in the case of its Soviet origin. Modern design cartridges are installed. Their fastening is carried out through holes drilled along one line, having a diameter of 4 mm. They should be placed at a distance of 25 mm from each other. If the diameter of the old holes is exceeded, it is necessary to provide additional fixation of the cartridge latches with silicone. The LED ceiling light is lightweight. In this regard, there is no need to install pressure springs.
Improvements to the cartridge design marked G13 made it possible to rotate the lamps along the axis both clockwise and counterclockwise. The rotation angle reaches 35°. The central part of the light flux is oriented in the desired direction.
The indicated value corresponds to that given in the relevant regulatory document regulating natural and artificial lighting in production premises SNiP 23-05-95 (Natural and artificial lighting). When the LED lamp is turned on, the illumination of the space will increase to 720 lux. This is more than enough for design offices and engineering staff, where the value is 500 lux.
By replacing outdated lamps, you will experience real savings. In any case, you will have to weigh the pros and cons yourself before making such a decision. Because everything depends on the specific situation. Statistics on the efficiency of LED light sources are gradually accumulating. And it testifies in favor of their use, this is another reason
Light bulbs – Consumables, which, depending on the quality of production and operating conditions, have a certain “lifetime”. This “life” ends the moment when, after turning on the lamp again, you are still standing in a dark or partially lit room. Sometimes you come across lamps that are so complex in design that replacing them becomes a whole undertaking. This is especially true for built-in LED and halogen devices with non-standard models.
In this article we will look at the types of sockets found in everyday life, as well as ways to remove various light bulbs from any lamp and replace them with new ones. Separately, it is worth considering the issue of replacing them in suspended ceiling. We will also find out how to change a halogen lamp.
Types of socles
A socket is a thread or other type of connector with which a light bulb is attached to a socket or lamp. The base contains contacts that, when interacting with the contacts of the lamp, conduct current.
The following types of bases are found in everyday life:
- E27 is the most common type; it is screwed into almost all chandeliers and floor lamps. It has the form of a thread with a diameter of 27 mm.
- E14 is the second most common base, thread with a diameter of 14 mm. It is available in low-power models that are installed in floor lamps, bedside lamps, and wall decorative lamps.
- The picture below in the second row shows the bases of tubular fluorescent lamps found in long ceiling and wall lamps.
- In the third row you can see which are built into the ceiling lamp.

How to unscrew a light bulb with your own hands
Each type of luminaire and lamp has its own own instructions for replacement, however, the first steps are the same for all cases.
- Completely de-energize your home at the panel or meter. In this case, there is no need to worry about electric shock.
- To access tall chandeliers and spotlights on suspended ceiling Find a stable stepladder or stool. When working with such fragile parts, you need to be sure of where you stand.
- We carefully stand on a stool (or remain on the floor if the light bulb can be reached without effort), working only with the switch off with dry hands.
- Further steps to replace lamps depend on their type. If these are threaded sockets, then with one hand we grasp the light bulb itself (attention, it may still be hot), and with the other we hold on to the socket. Using gentle movements, we begin to unscrew it counterclockwise. Do not squeeze the glass too hard - remember, it is thin. When unscrewing a halogen lamp, remove it only with clean and soft gloves.
- If the light bulb cannot be unscrewed, you need to try to loosen it, then it will give in.
- If it burns out because it burst, then unscrewing it will be quite difficult. How to change a broken light bulb in this case? There is nothing to grab hold of - only sharp shards of glass stick out from the cartridge. A regular potato will help you. Cut it in half, carefully place the cut on the protruding fragments, and then use gentle movements counterclockwise.

- Even if the fragments do not stick out, but the base is firmly lodged in the socket, it can be unscrewed using a regular plastic bottle. Using a match or lighter, melt the neck of the bottle a little, and while the plastic is hot, insert it into the empty base. Wait a minute for the plastic inside to harden, then unscrew the rest. The E14 base can be removed using a wine stopper. This method is not suitable for replacing light bulbs in a suspended ceiling lamp.
- Long tubular fluorescent lamps have own way fixation. To remove, grasp the body of the lamp with both hands and carefully rotate it along its axis in any direction. During the process, several characteristic clicks will be heard along the edges of the lamp - this is how it should be, these are the fasteners clicking. After turning approximately 45 degrees, the lamp contacts will appear along the edges of the mount, and it can be easily pulled out of the grooves.

- How to change a light bulb in a spotlight? With built-in lamps the situation is a little more complicated. The lamps are secured in them using special springs made of hardened metal. To interact with them, there are special levers on the body; by pressing them, you will release the light bulb from the mount, and it can be removed. The main thing is not to overdo it with pressing the levers - they are quite fragile, they are very easy to break. In addition, if you suddenly release the light bulb, it may slip out and fall to the floor, which will lead to the formation of a large number of dangerous fragments and damage to the floor covering - do not The best way replacing a lamp in a suspended ceiling.
- If you can't find any levers, but you can grasp the device with your hands, try gently turning it 90 degrees counterclockwise. How to remove spotlight? There are fasteners that, after turning the light bulb and making a quiet click, allow you to remove it. After removing the lamp, set it aside in a safe place.

How to install a new one
Installation is usually the exact opposite of removal in technology.
- Threaded versions are screwed into the cartridge clockwise until it reaches a sensitive stop. Do not screw too hard to avoid breaking the light bulb or cracking the socket. Halogen lamps are also replaced.
- Long lamps are inserted with contacts into the slots from which the old lamp was removed. After this, the lamp is rotated by hand along its axis 90 degrees until a characteristic click is heard.
- Light bulbs in ceiling and other built-in lamps are usually simply inserted back until the spring clicks; you do not need to press any levers for this. Using similar mechanisms, spotlights are replaced.
- After installation, make sure that the lamp is securely fastened in its socket and does not dangle in it; this is especially important when replacing it in a spotlight.
- Try turning on LED or other installed lamp– be sure to turn away from her, and give the command “light” to everyone present so that they don’t look either. Take care of your eyes when turning on new lamps - there have been cases when they, defective, burst the first time they were turned on.
Conclusion
Despite the abundance of models that can be found in everyday life, you can replace them all with your own hands. The main thing is to follow safety precautions both when removing the old lamp and when screwing it in. Be careful not to squeeze the glass or handle thin and fragile parts of lamps and halogen lamps– the damage caused may be dangerous to your health.
At one time, fluorescent lamps were considered a real breakthrough - they could be seen in schools, hospitals, kindergartens, other institutions, and even in some apartments. But in Lately attitudes towards them became ambiguous. On the one hand, they are characterized by low consumption electrical energy, long service life and high luminous efficiency. But all these positive qualities pale in comparison to their main drawback - fluorescent lamps contain a bulb filled with mercury.
With the invention of LED lamps, there was no longer any need to expose oneself to mortal danger, especially since such lamps are much superior to fluorescent lamps in their characteristics.
But when we first think about replacing obsolete fluorescent lamps, we are faced with the question: how to do this with the least material costs, because the cost of LED lamps is quite high, and a complete replacement will cost us a tidy sum. It is much easier to replace only the lamps, especially since it is quite simple to do if you know some of the features. So, let's consider in order how to connect LED lamp instead of fluorescent on its own.
Introduction
The LED lamp manufacturer has long made our lives easier by releasing tubular LED lamps suitable for the G13 base. All that remains is to slightly remake the old lamp. To do this, it is necessary to remove all unnecessary components from the connection diagram.
Let's see how to connect an LED lamp instead of a fluorescent lamp in the diagram of a standard raster lamp with four fluorescent tubes, which is most often found - with a ballast and a starter.
Fluorescent lamp connection diagram
LDS lamps have additional equipment that is necessary for their operation. LED lamps do not require these additions: everything necessary for their normal functioning is already built into the housing. Therefore, before connecting an LED lamp instead of a fluorescent one, it is necessary to dismantle everything unnecessary and power the lamp contacts directly.

Both categories of lamps are connected according to the same circuit: the green conductor is connected to the neutral wire, and the red conductor is connected to the phase. Below, the diagram shows how to correctly connect an LED lamp instead of a fluorescent one.
LED lamp connection diagram
This is quite easy to do - you need to connect a phase to one side of the lamp, and a zero to the other. 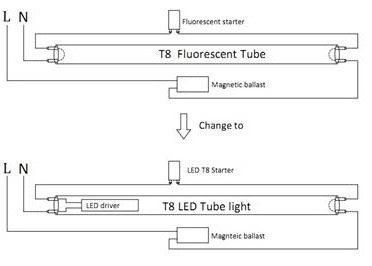 There is no need to observe polarity, since the power comes from alternating current. The wire itself can be connected to any of the contact pins, because each pair of contacts on one side of the LED lamp is closed to each other.
Remaking a raster fluorescent lamp
Before connecting the LED lamp, you need to cut off all the wires coming from the G13 sockets. After this, it is enough to connect the cable on one side to the phase terminals, and on the other to the zero terminals.
Types of LED lamps
On sale it is very rare to find LED lamps made in Ukraine with contact pins phase And zero are on one side. Before connecting such lamps, you must first check the connection sides indicated on the lamp. The installation process itself will be the same as in the case of lamps with double-sided contacts.
How to use crystals correctly
Such lamps require additional equipment to connect chips:
- Dimmer;
- stabilizing transformer 12 V or 24 V.
Any of these stabilizing devices can be assembled independently. But for this you need to have certain knowledge and enough time.

Typically, additional stabilizing devices are required to connect LEDs, LED elements and LED strips. LED lamps usually have built-in stabilizers.
In this article we will not consider methods for assembling stabilizing devices for connection, since it is quite difficult to learn this on your own. If you do not have any knowledge of electrical engineering, then be sure to study the packaging before purchasing - it usually indicates whether it is required for connection optional equipment, and which one exactly.
Illuminated switches
Such switches are very convenient to use, but are often not compatible with modern lamps. They are best suited for incandescent lamps. The downside is that the LED bulb can sometimes flash in the dark, which is not very convenient, especially in the bedroom.
This happens due to the fact that the design of such lamps includes a rectifier that converts AC voltage to permanent. To smooth out ripples, a capacitor is built into the rectifier, which tends to accumulate charge during operation of the lamp. 
Therefore, when an LED bulb is connected to a backlit switch, it dims and sometimes flickers even when unplugged. There are several ways to fix this:
- remove the backlight from the switch;
- check that the wiring is installed correctly;
- connect an incandescent lamp in parallel so that the current does not pass through the rectifier, but through the filament;
- connect a shunt resistor in parallel so that the capacitor does not accumulate charge;
- use an LED lamp specifically designed for this purpose, but it should be taken into account that such lamps take a long time to light up and have a higher cost.
Let's sum it up
As you can see, before connecting an LED lamp instead of a fluorescent one, you do not need to completely change the lamps or have much knowledge. You can do this quite easily yourself at minimal cost, carefully following the instructions. 
After these simple modifications, you will have modern, low-energy luminaires that have a long service life and, most importantly, are safe.
Important!
We should not forget that fluorescent lamps cannot simply be thrown away, as they contain mercury. Be sure to dispose of them properly. Almost all major cities There are companies involved in the disposal of hazardous waste, many of them will be ready to accept lamps absolutely free of charge.
- There are no white LEDs. They are obtained by spraying blue with a special substance - phosphor.
- Blue LEDs reduce the body's production of melatonin, the lack of which does not allow a person to fully relax.
- The blue color of LEDs negatively affects some food products, such as milk, changing its taste even through opaque packaging.
- LED pulsation reduces the population of animals and birds in the city.
Instructions
Before starting work, make sure that the lamp power is turned off. Remove the transparent decorative cover, then remove lamp from the cartridges holding it. This can be done in two ways, depending on the cartridges used. In the first case lamp you need to turn it a little around the axis, its contacts will come out of the terminals, and the lamp will be in your hands. In the second case, you need to press lamp along the axis all the way to the right or left. The spring-loaded socket will allow it to move slightly, while the lamp contacts on the other side will come out of the socket.
Do not rush to throw away the extinguished lamp, it may still be operational. Use a tester to check both lamp filaments for breaks. A faulty lamp usually has one filament intact (its resistance is about 10 ohms), the second is burnt out. If both threads are intact, the cause of the malfunction is most likely the starter - a small round aluminum “cup” inserted into a special cartridge. Return lamp replace the starter with a known good one, then apply power. If the lamp lights up, the fault has been found and corrected.
If the lamp still does not light, then the inductor, capacitor or electronic control unit may be faulty. A faulty choke should be replaced; it cannot be repaired (although radio amateurs sometimes rewind burned out choke). You can try to repair the electronic control unit by checking its parts with a tester.
If the removed lamp is intact, but has darkened near the bases, this indicates that its service life is nearing the end. In the event that the fluorescent lamp Sveta blinks, it should be replaced as it has exhausted its service life.
Any fluorescent lamp is a complex device that has many structural elements and a large number of contacts. There is often a need to replace the lamp in such a lamp.
Instructions
Please note that removing the fluorescent lamp from the cartridge must be done with great care. IN otherwise You can easily damage the base or break the glass of the lamp. Such lamps contain mercury vapor, which is very toxic. They can inflict great harm to the human body. A feature of the operation of such lamps is the presence in the switching circuit of auxiliary equipment - a choke and a starter. If the lamp does not ignite, then you must first check the serviceability of the electrical network, as well as individual elements of the lamp switching circuit.
Luminescent lamp must be used under normal conditions. There must be uninterrupted voltage in the supply network and favorable ambient temperature. It is worth noting that the nature of the gas discharge largely depends on the magnitude of the gas pressure, as well as in which the discharge occurs. If the temperature drops, the vapor pressure in the lamp will drop. Because of this, the ignition and combustion process will deteriorate. The fluorescent lamp can only be used at temperatures between 20 and 25°C. Even if the electrical network and all its elements are working properly, the lamp may not light up. The reason may be temperature environment. Such lamps usually do not light up immediately, but after several activations of the starter. Full ignition usually occurs within 15 seconds. If during this time the lamp does not light up, then it is worth looking for the reason, which can be either in the lamp itself or in individual elements of the switching circuit.
Fluorescent lamps are more economical and consume much less electricity than incandescent lamps, which are more familiar to us. Now, in the struggle for energy saving all over the world, the varieties of fluorescent lamps are increasing every day. Figure 2-65 shows several examples of fluorescent lamps, or as they are also called - fluorescent lamps, housekeepers or energy-saving lamps.
A typical fluorescent lamp includes a ballast resistor. At its core, a ballast resistor is a transformer that raises the voltage at the moment of starting the lamp from 120 - 220 volts to 300 volts, and after starting, lowers the voltage to the values necessary for the lamp to operate.
All fluorescent lamps are tubular in shape, possibly curved or straight; each end of the tube has a cathode and an anode. The inner surface of the tubes is coated with a luminescent (self-luminous) composition. The tubes are filled with argon gas and mercury vapor, an example is shown in Figure 2-66. The tubes are white - daylight and colored.

REPLACEMENT OR INSTALLATION OF DAYLIGHT LAMPS
If your fluorescent lamp is old, then you need to replace it with a new lamp. More modern designs of fluorescent lamps are also more efficient and are supplied assembled ready for mounting on the ceiling or walls, as well as in other designated installation locations. Most often, the base of the lamp is attached to the ceiling box using screws or a threaded tube, if there is one on the ceiling box (Fig. 2-67), such lamps can be attached to the ceiling through quick installation.

When choosing fluorescent lamps, you will be faced with a large selection of these products; we show several lamps in Figure 2-68. Most often, the starter is attached to the base and protected by a plastic casing. Lamps are always sold assembled, with wires, so all you have to do is connect the luminaire wires to the wiring. Do not confuse the wires by color, connect strictly color to color, but if your wiring does not have the appropriate wire color, then connect according to the instructions, first checking where your phase and zero are. In Figure 2-69 we will look at a typical fluorescent light fixture wiring diagram.


A fluorescent luminaire with preheating includes a starter - a round element installed at one end of the luminaire (Fig. 2-70. In case of some malfunctions, it is necessary to replace the starter; to replace the starter, you need to turn it in the base counterclockwise, and after removing the old starter, put a new one in its place by turning it clockwise in the base. In such lamps, fluorescent tubes with two pins at the ends are installed.

Instantaneous fluorescent lamps have a ballast resistor that provides high voltage necessary for ionization of the gas in the tube. Immediately after the glow appears, the voltage is reduced to the required operating voltage. Instant-on lamps are increasingly replacing lamps with a starter.
Although fluorescent lamps and are more reliable than incandescent lamps, but they also break. Below in Table 2-3 we will look at the most common faults, as well as ways to eliminate them.
Table 2-3. Using this table you can find faults and solutions.
| problem | cause of malfunction | solution |
| the lamp does not light up | Lamp burnt out (end blackened) |
Change the lamp |
| Poor contact in the socket | ||
| Faulty starter or starting device | Change the starter | |
| Lamp not connected correctly | Check the connection diagram, it should be identical to the one drawn on the ballast | |
| Line voltage below operating voltage | Call the utility or other service provider | |
| Damage to the ballast resistor | ||
| Lamp flashing | Poor contact on lamp pins |
Clean the contact on the lamp pins |
| Air temperature below operating temperature | Heat the air in the room to 10 degrees or higher | |
| Faulty starter | Change the starter | |
| Lamp faulty | Change the lamp | |
| Faulty ballast resistor | Change the ballast resistor | |
| Wrong lamp installed | Install a lamp suitable for this device | |
| The ballast is humming | The wrong ballast resistor is installed |
Change the ballast resistor |
| Ballast resistor is faulty | Change the ballast resistor | |
| The ballast resistor is poorly secured | Tighten the ballast resistor mounting bolts |