How to make a metal detector yourself drawings. Metal detector with metal discrimination. Simple metal detectors from ready-made electrical appliances
Metal detectors or metal detectors are a diverse family of measuring instruments, the operation of which is based on differences in the electromagnetic radiation of objects.
Using a metal detector
Professional highly sensitive metal detectors are used in the daily work of various inspection points; they are used to conduct search and investigative activities of police and rescue services.

A huge army of amateur treasure hunters around the world practice long and leisurely hikes with metal detectors. Sometimes such entertainment brings income and even fame.

Nowadays, an industry of detector (recognition) devices has already been established for all occasions, differing not only in operating principles, but also in a wide range of prices and technical characteristics.
Simple magnetic detectors
The operating principle of the simplest metal detector is based on electromagnetic induction - the device contains an electromagnetic coil, which, due to oscillations and distortions of its field, detects nearby electrically conductive and iron-magnetic materials, creating an audio or visual signal.

The first experience of assembling a metal detector at home can be the beginning of a serious hobby: new design solutions and even inventions in this field of applied radio electronics are not excluded even at the amateur level.

The diagram shows the structure of a simple low-frequency magnetic detector.

Hundreds of different designs are used in the production of metal detectors. In order to implement one of them yourself, you will need to make a printed circuit board with your own hands, purchase the necessary coils, transistors, resistors, capacitors, etc., and assemble the device.

Metal detector made from improvised means
Another option is to assemble a metal detector from available materials; it is more suitable for humanists and novice technicians with a passion for finding treasures and lost artifacts.

During operation of such a homemade device, electromagnetic waves emitted by the calculator are caught on the AM band of the receiver.

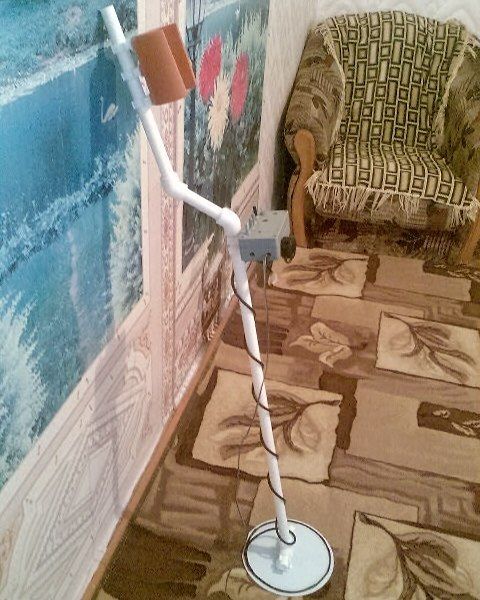
An indicator of the location of an object in this device is the rotation of the electromagnetic field during re-emission, which changes the parameters of the sound signal. A photo of such a do-it-yourself metal detector can be found on the Internet and at the end of our material.

To use such a prefabricated version, you do not need a detailed diagram or assembly instructions, but compliance with certain requirements for the two main components of a homemade detector, namely a properly working calculator and a radio receiver.

Both devices must be from the cheapest category, the receiver must have an AM band and a magnetic antenna, and the calculator must emit pulsed radio interference during operation.

To work on the model, you will also need a suitable sized plastic box with an opening lid, like a book, which will become the body of the finder.

An old CD box is ideal for these purposes. To attach the parts you will need double-sided tape.

Metal detector assembly
- Securing the instruments inside the case: a strip of tape is attached to the back of the instruments, then the calculator is placed at the base of the box, the receiver is on the inside of the lid.
- Setting up the receiver: you need to turn on the receiver at maximum volume and select the upper position of the AM range, free from radio broadcasts and interference.
- Adjusting the calculator: when the calculator is turned on, the receiver should respond with a sharp noise, hum or wheezing; if this does not happen, you need to adjust the range.
- Fixing the position: we begin to smoothly close the box until the sound disappears or becomes more uniform and fix the box doors in this position, using a cube of foam plastic, rubber bands, etc.
- The metal detector is ready. If there is a product with electromagnetic radiation nearby, the receiver will sound an alarm.
By combining elements of other radio devices in a simple detector, you can observe the operating principle of metal detectors in action and enjoy your first search expedition.
Note!


Such a detector, assembled at home, can be tested to search for coins or metal construction debris lying in the surface layer of the earth in almost any area, on any open ground.

Photos of do-it-yourself metal detectors


Note!


Note!


Metal detectors are used to search for metal in the soil at a certain depth. This device can be assembled independently at home, having at least minimal experience in this matter, or following the clear instructions in the instructions. The main thing is the desire and availability of the necessary tools.
Detailed instructions for the Terminator 3 metal detector with your own hands
This type of design is designed to search for coins. The process of assembling it is completely simple. However, experience in assembling such a tool is still necessary. The Terminator is able to detect an object even if the target of capture is minimal.
To begin, you should prepare the necessary equipment, namely:
- a multimeter that measures speed.
- LC meter
- Oscilloscope.
Next, you need to find a diagram broken down into nodes. Now you can make a printed circuit board into which jumpers, resistors, panels for microcircuits and other parts should be soldered in order. The next step is to clean the board with alcohol.. It is definitely worth checking for defects. You can check whether the board is in working condition as follows:
- Turn on the power.
- Turn down the sensitivity control until no sound is heard from the speaker.
- Touch the sensor connector with your fingers.
- When turned on, the LED should blink and then go out.
If all actions occurred, then everything was done correctly. Now you can make a coil. It is necessary to prepare a winding enamel wire with a diameter of 0.4 mm, which must be folded in half. A circle is drawn on a sheet of plywood with a diameter of 200 mm and 100 mm. Now you need to drive nails in a circle, the distance between them should be 1 cm.
Next, you can move on to winding the turns. At 200 mm you should make 30 of them, and at 100 - 48. Then the first coil should be soaked in varnish; when it dries, you can wrap it with thread. The thread can be removed, and by soldering the middle, you get a solid winding of 60 turns. Afterwards, the coil must be wrapped quite tightly with electrical tape.. And a 1 cm foil is placed on top, this will be a screen, and more electrical tape is wound on top of it. The ends should come out.
On the second coil it is also necessary to solder the middle. In order to start the generator, you need to connect the first coil to the board. The second coil should be wrapped with a wire of 20 turns, then we connect it to the board. Now you need to connect the oscilloscope minus to minus to the board, and the plus is connected to the coil. Be sure to look at what frequency it will be when you turn it on and remember it or write it down on paper.
Now the coils need to be placed in a special mold so that they can then be filled with resin. Next, the oscilloscope is connected to the board, with the negative pole, the amplitude should reach zero. The coils in the mold are filled with resin to approximately half the depth. When everything is ready, the metal discrimination scale is adjusted.
Parts list for the Terminator 3 metal detector
As parts for the trio metal detector you will need:
If you have these parts, you can assemble the Terminator Pro metal detector yourself.
Circuit diagram of a metal detector with metal discrimination
 You can make a metal detector with metal discrimination yourself using the circuit for the Chance pulse device. The process of making a coil is quite simple.
The diagram itself can be found on the Internet. But still, experience in assembling such devices will be useful. Assembling the metal detector should begin with the board.
After the board is manufactured, the microcontroller needs to be flashed. And at the end of the work, we connect the metal detection device to the power supply.
Homemade equipment can be made without complex microcircuits, but using a simple transistor generator. The metal detector will be non-discriminatory. It will detect objects in the ground to a depth of 20 centimeters, and in dry sand - to a depth of 30 centimeters. In this device, the transmitting and receiving coils operate simultaneously.
Terminator 3 metal detector coil
 To begin with, you should take winding enamel with a diameter of 0.4 mm. Fold it so that there are two ends and two beginnings. Next, you should wind from two reels at a time.
Now we need to make transmitting and receiving coils; for this, two circles of 200 mm and 100 mm are drawn on a plywood sheet. Nails are driven in along these circles, the distance between them should be 1 cm. 30 turns of enamel wire are wound onto a large mandrel. Then you should apply varnish to the coil and wrap it with thread, then remove it from the winding and solder the middle. This creates one middle wire and two outer wires.
The resulting coil should be wrapped with electrical tape and a piece of foil should be placed on top, and foil again on top. The ends of the windings should go outside.
Now it’s time to move on to the receiving coil. 48 turns are already wound here. To start the generator, you need to connect the transmitting coil to the board. The middle wire is connected to the negative. And the middle terminal of the take-up coil is not used. The transmitting coil requires a compensating coil, on which 20 turns are wound.
 We connect the oscilloscope to the board like this: a probe with a minus to the minus of the board, and a plus probe to the coil. Be sure to measure the frequency of the coils and write it down.
After connecting the coils according to the diagram, they must be placed in a special container and filled with resin. The oscilloscope now sets the division time (10 ms and 1 volt per cell). Now you should reduce the amplitude to zero. We wind the turns until the volt value reaches zero. We make a compensating loop at the coil, which will be outside.
The mold should be filled halfway with resin. When everything hardens, you need to connect the oscilloscope and bend the loop inward. Then twist it until the amplitude value becomes minimal. Afterwards, you need to glue the loop, check the balance, and now you can fill the second half of the container with resin. The reel is ready for use.
Before you begin the repair, you should prepare the following tools:
- Stationery knife;
- Incandescent lamp;
- A container for glue, preferably flat;
- Special or epoxy resin;
- Medium and fine sandpaper;
- Small spatula.
 First of all, you need to dry the coil using an incandescent lamp. And use a utility knife to widen the cracks on it. Squeeze the glue onto a flat surface and mix with a spatula. Apply this substance to the coil. In places of cracks, you can apply more resin. Now you should wait until it all hardens thoroughly. And then sand it, using first medium and then fine sandpaper. This procedure will help smooth out all the unevenness. In this fairly simple way, you can revive the oldest coil from a metal detecting device.
Printed circuit board for the Terminator 3 device
 A printed circuit board for this type of equipment can be made and configured independently. The board diagram for Terminator 3 is available on the Internet. Once it is found, you can begin manufacturing the printed circuit board. After that, jumpers, SMD resistors and panels for microcircuits are soldered into it. The capacitors on the board must have high thermal stability.
DIY metal detector sensor
Before starting work, it is necessary to prepare a device that will accurately measure capacitance and inductance. Now you should take the housing for the reel and make PCB inserts into the ears. Pieces of fabric are used for compaction. The upper surface of the ears should be sanded. The fabric must be impregnated with epoxy resin. When everything is dry, you should sand everything and insert a sealed lead-in, thus making grounding. Next you need to apply a special Dragon varnish.
Now windings are made, which are tied with threads. All windings are placed in a coil and capacitors are glued. Everything can be connected and configured. A housing is required for pouring. Mandatory: there should be no metal nearby. After pouring, the epoxy should be sanded and dried thoroughly. The sensor is suitable for the Terminator 3 and Terminator 4 metal detectors, which are the most popular models of devices.
Metal detector Terminator 3: reviews
Many people consider this model of device popular. The positive qualities include:
- Finding objects made of non-ferrous metal.
- No false positives.
And the following are identified as negative features:
- Rusty iron is detected rather poorly.
- You may lose some of your finds.
The search depth of the device is higher than that of other similar models. Basically this is 30 centimeters using the example of a coin.
Metal detector Sokha 3: diagram and description
 The metal detector has an operating frequency of 5 to 17 kHz. Its power supply is 12 Volts. Its ground balance is manual.
The circuit of this device is not entirely simple, since it contains two microcontrollers. The diagram can be found on the Internet. The device itself has good characteristics. However, due to the lack of detailed assembly information, difficulties may arise in the manufacture of the device.
Finding artifacts underground is a fairly popular activity. For some, this is a profession, others are simply interested in archaeology. There are numerous groups of treasure hunters: both romantics and pragmatic treasure hunters. All these people are united by one passion: searching for metal objects hidden at various depths.
Just because you have an accurate map showing where the treasure is buried, or plans for fighting during the war, this does not guarantee success. You can shovel tons of soil, and the desired item will calmly lie a couple of meters from the active search site.
To search for gold and less valuable metals, you will need a metal detector that you can make yourself.
Important information: The use of such devices is not prohibited by law. However, there are penalties for the consequences of such a search regarding excavations, as well as the recovery of discovered objects.
We won’t go into details; that’s the topic of another article. Simply put: if you find a gold ring on the beach, or a handful of Soviet coins in the forest, there will be no problems associated with the use of electronic search tools.
But for recovered bronze spoons that are 100 years old or older, you can get a real sentence or a large fine.
Nevertheless, devices for searching for metal objects in the depths of the earth are freely sold, and those who want to save money can make a metal detector with their own hands at home.
How the device works
Unlike ground detectors, which work using waves of different frequencies or ultrasound, a metal detector (either factory-made or home-made) works with inductance.

The coil emits an electromagnetic field, which is then analyzed by the receiver. If any object that conducts electric current or has ferromagnetic properties is in the coverage area, the field format is distorted. More precisely, under the influence of the active field of the coil, the object forms its own. This event is recorded by the receiver, and an alert is generated: the instrument needle moves, a tone sounds, and indicator lights light up.
Knowing the operating method, you can calculate the electrical circuit and create a powerful metal detector with your own hands. The complexity of the design depends only on the availability of the element base and your desire. Let's look at several popular options for assembling a homemade metal detector:
The so-called "butterfly"
This nickname was received due to the characteristic shape of the platform on which the inductors are located.

The arrangement of the elements is related to the operating principle. The circuit is made in the form of two generators operating at the same frequency. When identical coils are connected to them, an induction balance is created. As soon as a foreign object with electrical conductivity gets into the electromagnetic field, the balance of the field is destroyed.
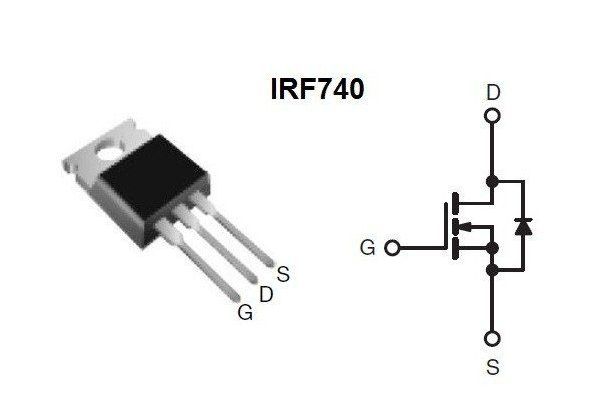
Generators are implemented on NE555 chips. The illustration shows a typical diagram of such a device.

The coil for the metal detector (there are two of them, in the diagram: L1 and L2) is made by hand from wire with a cross section of 0.5–0.7 mm². The ideal option is a transformer winding copper core in varnish insulation (removed from any unnecessary transformer). The characteristics do not have to be maintained with pinpoint precision, under one condition: the coils must be identical.
Approximate parameters: diameter 190 mm, each coil has exactly 30 turns. The assembled product must be monolithic. To do this, the turns are grabbed with a mounting thread and filled with transformer varnish. If this is not done, vibration of the turns will throw the circuit off balance.
Electrical diagram
There are two manufacturing options:
- given the small number of elements, you can assemble it on a breadboard by connecting the legs of the parts using conductors;
- For accuracy and reliability, it is better to etch the board according to the proposed drawing.

Any “snot-based” soldering can fail in the field, and you will be offended for wasting your time.
Just like a transistor metal detector, the NE555 device needs fine tuning before use. The diagram shows three variable resistors:
- R1 is designed to adjust the frequency of the generator and achieve that same balance;
- R2 coarsely adjusts sensitivity;
- Using resistor R3, you can set the sensitivity with an accuracy of 1 cm.
Information: This scheme cannot discriminate against metals. The seeker only makes it clear that the object exists. And by the tone of the signal (based on your experience) you can determine the approximate volume and depth of the deposit.
The power supply is quite universal: 9–12 volts. You can select a battery from an uninterruptible power supply, or assemble a power supply from AAA batteries. A good option is 18650 batteries (they are also used for vaping).
Butterfly setting
The principle of operation is described above, so let’s just look at the technology. We set all resistors to the middle position, and ensure that the synchronization of the generators is disrupted. To do this, we fold the coils in a figure eight and move them relative to each other until the squeaking turns into crackling. This is a synchronization failure.

We fix the rings and rotate the resistor R1 until a steady crackling sound appears at even intervals.
By bringing metal objects to the place where the coils overlap (this is the search point), achieve a steady squeak. The sensitivity is adjusted by resistor R2.
All that remains is adjustment with resistor R3, which is used rather to correct the voltage drop in the power source.
Mechanical part
A do-it-yourself metal detector rod is made from a lightweight plastic pipe or wood. The use of aluminum is undesirable as it will interfere with operation. The circuit and controls can be hidden in a sealed housing (for example, a junction box for wiring).

The butterfly finder is ready to go.
Pirate
Another popular pulse model for beginner treasure hunters is the “Pirate” metal detector. It is also easy to make with your own hands, detailed instructions in two versions:

It is advisable to bring the power supply closer to 12 volts, since the quality of operation depends on the voltage. Printed circuit boards have already been tested, both options are shown in the illustration.

The coil (in this case one) is made from the same 0.5 mm transformer wire. The optimal diameter is 20 mm, the number of turns is 25. Since we are making the “Pirate” metal detector with our own hands, the external design fades into the background. Any materials that you were ready to throw away will do.

It is better to make the handle detachable for ease of transportation. We remember that the use of metals is unacceptable.

Sensitivity is adjusted by two variable resistors in real time while searching. No fine tuning of the generator is required.
And if you manage to properly seal the case, you can start searching for “treasures” in the beach surf, and even at the bottom of the reservoir.

It is more difficult to make an underwater metal detector with your own hands, but it will give you an undeniable advantage over your competitors.
Improved performance
You can make a deep metal detector with your own hands from a ready-made “Pirate” without additional costs. There are two ways to do this:
- Increasing the diameter of the inductor. At the same time, downward permeability increases significantly, but sensitivity to small objects decreases.
- Reducing the number of coil turns while simultaneously adjusting the circuit. To do this, you will have to sacrifice one coil for experiments. We remove (and cut off) turn after turn until we see that the sensitivity begins to decrease. We remember the number of turns at maximum parameters, and make a new coil for this circuit. Then we change the resistor R7 to a variable one, with similar power parameters. After conducting several experiments with sensitivity, we fix the resistance and change the variable to a constant resistor.
The Pirate metal detector can be assembled using the popular Arduino controller.

It is more convenient to use such a device, but there will still be no discrimination of metals.
Having figured out how to make a metal detector with your own hands for amateur tasks, we will briefly examine several serious models.
DIY metal detector Clone PI W
In essence, this is a cheaper version of the professional finder Clone PI-AVR, only instead of an LCD display, a line of LEDs is used. This is not as convenient, but still allows you to control the depth of artifacts.
The best option for the price is the CD4066 chip and ATmega8 microcontroller.

Of course, there is also a printed circuit board layout for this solution, only the control buttons are placed on a separate panel.

Programming ATmega8 is a topic for a separate article; if you have worked with such controllers, no difficulties will arise.
The powerful Clone PI W metal detector, made by yourself, allows you to find metal no more than a meter deep, although without discrimination.
Seeker "Chance"
A similar circuit on the ATmega8 controller is called “Chance”. The principle of operation is similar, only the possibility of screening out (partial discrimination) of ferrous metals has become possible.

A printed circuit board design has also been worked out, which can be successfully replaced with a classic “breadboard” for Arduino

DIY Terminator 3
If you need a homemade metal detector with metal discrimination, pay attention to this model. The scheme is quite complicated, but your efforts pay off with the coins you find, which may turn out to be gold.

The peculiarity of the “Terminator” is the separation of the receiving and transmitting coils. A 200 mm ring is made to emit the signal. 30 turns of wire are laid for it, then it is cut, as a result we get 2 half-coils with a total capacity of 60 turns (see diagram).
The receiving coil is located inside, 48 turns with a diameter of 100 mm.
The adjustment is made using an oscilloscope; after achieving optimal amplitude results, the windings are fixed in the housing by pouring epoxy resin.

Then an experimental hands-on adjustment of the discrimination switch is performed. For this, real objects made of various metals are used, and their type is marked on the mode switch (after verification).
Radio amateurs are working on an improved version of Terminator 4, but there is no practical copy yet.
Simple metal detectors from ready-made electrical appliances

Bottom line
Regardless of the complexity of the design, making a homemade metal detector will require a lot of time and effort from you. Therefore, out of curiosity, such devices are not made. But for professional use, this is an excellent alternative to factory copies.
Video on the topic
Even the most serious and respectable citizens feel a slight excitement when they hear the word “treasure”. We literally walk through treasures, of which there are immeasurably many in our land.
But how can you look under the soil layer to know exactly where to dig?
Professional treasure hunters use expensive equipment, the purchase of which can pay for itself after one successful find. Archaeologists, builders, geologists, members of exploration societies use equipment provided by the organization in which they work.
But what about novice treasure hunters on a budget? You can make a metal detector at home with your own hands.
To understand the subject, consider the design and operating principle of the device
Popular metal detectors operate using the properties of electromagnetic induction. Main components:
- transmitter – generator of electromagnetic oscillations
- transmitting coil, receiving coil (in some models the coils are combined for compactness)
- electromagnetic wave receiver
- decoder that separates the useful signal from the general background
- signaling device (indicator).

The generator, using a transmitting coil, creates an electromagnetic field (EMF) around it with specified characteristics. The receiver scans the environment and compares field performance with reference values. If there are no changes, nothing happens in the circuit.
- When any conductor (any metal) enters the field of action, the basic EMF induces Foucault currents in it. These eddy currents create the object's own electromagnetic field. The receiver detects the distortion of the basic EMF and gives a signal to the indicator (audio or visual alert).
- If the object being examined is not metallic, but has ferromagnetic properties, it will shield the underlying EMF, also causing distortion.
Important! There is a misconception that the soil in which searches are carried out should not be electrically conductive.
This is wrong. The main thing is that the electromagnetic or ferromagnetic properties of the environment and the search objects are different from each other.
That is, against the background of certain characteristics of the EMF generated by the search environment, the field of individual objects will stand out.
As a child, did you want to have a device that could be used to find metal objects and even treasure? Most children want to have such a unit. Fortunately, it exists. This is a conventional metal detector that allows you to detect various metals under a layer of soil and in other places. The principle is that it finds a material that differs in its magnetic or electrical properties from its environment. It is noteworthy that you can find not only metal objects and not only in the ground.
The metal detector is used by geologists, security services, the military, criminologists and construction workers. This is a very useful thing in the household. Is it possible to make a metal detector with your own hands? Yes, and this article will help you with this.
How does a metal detector work and what does it consist of?
In order to make such a device at home with your own hands, you need to understand the principle of its operation. How is it able to detect metal and signal it? It's all about electromagnetic induction. Metal detectors have their own circuit, consisting of:
- Transmitter of electromagnetic wave oscillations.
- Receiver.
- A special signal transmitting coil.
- Coil that receives the signal.
- Display devices.
- Discriminator (useful signal selection circuit).
Some operating units can be combined schematically and structurally. For example, both the receiver and the transmitter can operate on the same coil. Part of the receiver will immediately emit a positive signal and so on.
Now let’s take a closer look at the operating principle of the metal detector. Thanks to the coil, an EMF (electromagnetic field) of a certain structure begins to be created in the medium. In the case when an object that conducts electricity is within the range of this field, Foucault or eddy currents appear in it. They create the object’s own EMF. Now the original structure of the coil begins to become distorted. And when an object located in the ground does not conduct electricity, but has ferromagnetic properties, then due to shielding, the structure of the coil is also distorted. In both the first and second cases, the metal detector picks up the electromagnetic field from the object and converts it into a signal (acoustic or optical). You hear a certain sound and can see the signal on the screen.

Note! In general, for a metal detector to work, it is not necessary that the body conduct current; the ground does not. It is important that the magnetic and electrical properties of bodies differ.
This is how a metal detector system works. The principle is simple and effective. Now, let's take a closer look at how to make a metal detector with your own hands. The first thing you need is to prepare all the tools and materials.
Metal detector components
So, if you want to make a device, then you cannot do without special devices. This is still an electronic device that needs to be assembled from various components. What will be required? The set is as follows:
You can see other components in the diagram below.
Additionally, you will need a plastic box to mount the electronic circuit. Also prepare a plastic pipe to create a rod with a coil attached to it. Now you can get to work.
Assembling a metal detector with your own hands: creating a printed circuit board
The most difficult stage of work is the electronics. Everything here is subtle and complex. Therefore, it is rational to start with creating a working printed circuit board. There are only a few options for different boards. It all depends on the radioelements used to create it. There are boards operating on the NE555 chip and on transistors. Below you can see what these boards look like.
We assemble a metal detector with our own hands: installing electronic elements on the board
Further work will also not be easy. All electronic elements of the metal detector will have to be soldered and installed as shown in the diagram. In the photo you can see the capacitors. They are film-like and have high thermal stability. Due to them, the operation of the metal detector will be much more stable. This indicator is very useful, especially during the autumn period of using the device. After all, it gets quite cool outside then.
All that remains is to do the soldering. We will not describe the process itself, since the soldering technology should be known to everyone. To clearly understand how to perform all the work on the electronic part of the metal detector, we suggest that you additionally familiarize yourself with this video:
Assembling a metal detector with your own hands: power supply
In order for the device to receive current, you need to provide a power source of 9-12 V. It is worth noting that the metal detector consumes electricity quite voraciously. This is not surprising, since the device is quite powerful. If you think that one “Krona” (battery) will be enough, then this is not so. He won't work for long. You will need two or even three batteries connected in parallel. Alternatively, use one powerful battery. It will be cheaper since it can take a long time to discharge and charge.

Assembling a metal detector with your own hands: coil
Since we are making a pulsed metal detector, careful and precise assembly of the coil is not required. The normal diameter of the coil will be 19-20 cm. To do this, you will have to wind 25 turns. Once you have made the coil, wrap the top well with insulating tape. To increase the depth of detection of objects by the coil, wind the diameter of the send about 26-27 cm. In this case, you need to reduce the number of turns to 21-23. In this case, a wire Ø 0.5 mm is used.
Once you have wound the coil, you will need to mount it on the hard body of the metal detector. It is important that there is no metal on the body. Think and look for any case that will fit in size. The housing will perform a protective function. The coil will be protected from impacts on the ground during searches.
To make a tap from the coil, solder two wires Ø 0.5-0.75 mm to it. It is recommended to use 2 wires twisted together.

Assembling a metal detector with your own hands: setting up the device
When assembling a metal detector according to the diagram, you do not need to configure it. It already has maximum sensitivity. To fine-tune the metal detector, adjust the variable resistor R13 by twisting it slightly. Do this until you hear occasional clicks. In the case when this is achieved at the extreme position of the resistor, change the rating of the R12 device. Such a variable resistor should configure the metal detector to operate optimally in the middle position.
There is a special oscilloscope that allows you to measure the gate frequency of resistor T2. The pulse length should be 130-150 μs, and the optimal operating frequency should be 120-150 Hz.
To start the metal detector search process, you need to turn it on and wait about 20 seconds. Then it will stabilize. Now twist resistor R13 to adjust it. That's all, you can start your search using a simple metal detector.
Let's sum it up
Such detailed instructions will help you learn how to make a metal detector yourself. It is simple but fully capable of finding metal objects. More complex models of metal detectors require more effort and time.