How to change spotlights in a suspended ceiling. How to change a burnt out lamp
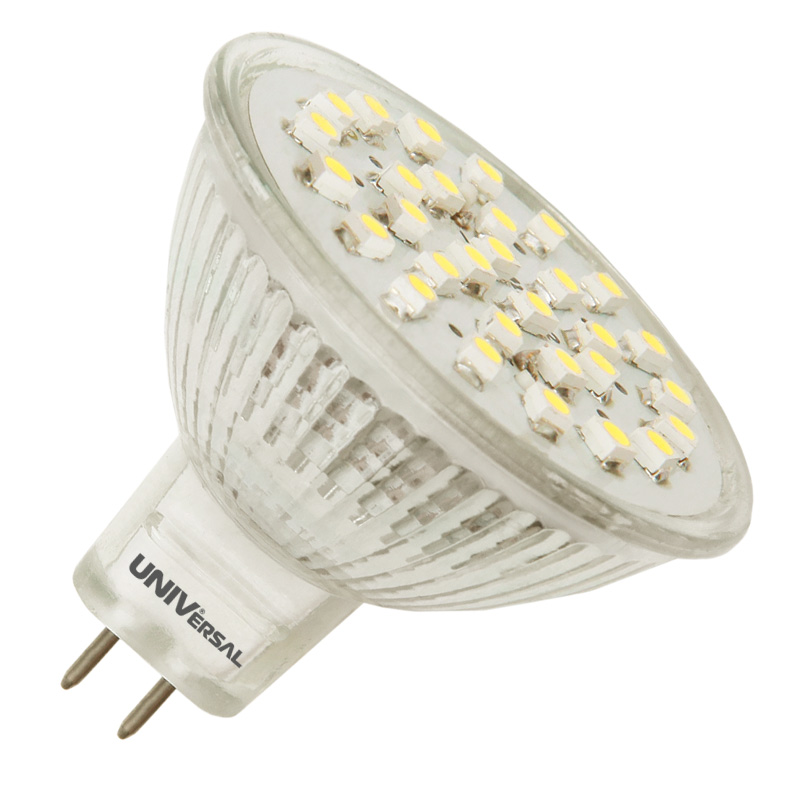
With the advent of cheap LED lamps glasses, the question of replacing them arises more and more often. To replace, you must first know the type of base. The figure below shows examples LED type: E-27, E-14, GU-10, GU-5.3, G-9, G-4, GX53.
When replacing a light bulb, you need to pay attention to what type of lamp was installed in the spotlight. There are several types of spotlights:
- LED lamp MR-16 is used in luminaires DL-11;
- LED lamp minion E-14, used in recessed spotlights of the R-63 brand;
- luminaires GX-53 closed type.
Let's look at examples of how to change an LED light bulb in spotlights.
Always turn off the mains power before replacing!
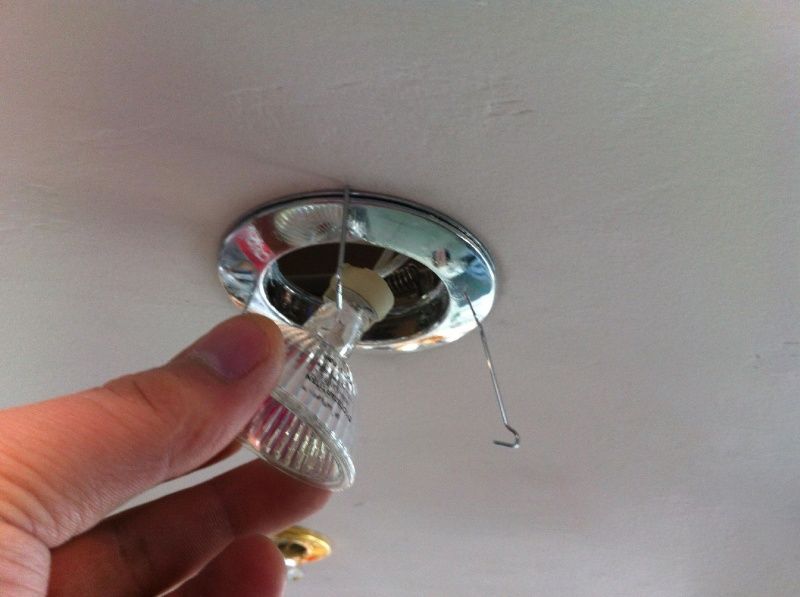
Replacing a GU5.3 or GU10 LED Bulb
Such a base is often secured with a retaining ring. They are secured in the socket with two conductive pins until they click (GU5.3) or by turning 90 degrees (GU10). Replacing them is quite simple using the following instructions.
- Turn off the network power;
- Before replacing, check the power of the lamp being replaced. It must correspond to the burnt-out power. If you install a more powerful lamp, you can damage the controller or transformer, if installed. When installed, they are calculated for a certain power indicator of the connected load;
- remove the retaining ring, which is located along the diameter of the body. Pull it gently and the light bulb will easily come out of the spotlight. If the ring has two tendrils sticking out inward, just squeeze them;
- remove the light bulb from the socket, holding the base with your other hand, install a new one;
- return the retaining ring to the groove.
Replacing E-14 and E-27 lamps
For this type, replacement is even easier. You need to unscrew the old light bulb counterclockwise and screw in the new one clockwise, while de-energizing the room in advance. It is necessary to screw in all the way, without applying any force.
Pay attention to the base. E-27 is a well-known standard, the diameter is the same as that of a regular incandescent light bulb. E-14 – base with a smaller diameter. If in doubt, take the burned out light bulb with you when purchasing.

Closed type GX53
They are often called a pill. These are some of the easiest lamps to operate and replace. The easiest way to change them is:
- Turn off the network power;
- We take hold of the lamp and turn it counterclockwise until it stops. The rotation angle is no more than 10-20 degrees and it will freely fall out of the grooves;
- insert a new tablet into the grooves and turn clockwise until it stops. Ready.
These miniature light bulbs are similar in design, they differ in size, but their installation principle is the same. Due to their low weight, they are attached only to the socket with the base. Additional fastenings are usually not provided. Let's look at how to replace such a light bulb in a spotlight.
- De-energize the lamp by turning off the mains power;
- if there is a decorative light diffuser, remove it;
- We take the body of the light bulb and pull it out with a slight force;
- install a new one by inserting the pins into the socket. If you have a halogen, when installing, handle it only with gloves or a cloth.

Replacing light in furniture lighting
Any spotlights on furniture and kitchen equipment are replaced in 99% of cases using one of the above methods. The whole difficulty of replacement lies in dismantling the decorative lamp diffuser.
Strict requirements for the appearance of the lamp force designers to hide the fastenings as much as possible and you need to use your imagination to understand how to remove this or that lamp.
Precautionary measures
- When replacing, always turn off the mains power;
- Before replacing, try to wait until the lamp has completely cooled down (read:);
- Twist light bulbs in glass housings with extreme care. Over time, under the influence of temperature changes, the material loses its strength. Take special care of your eyes;
- If there is insufficient contact between the conductor and the socket, under the influence of high temperatures, the light bulb body may “stick” to the base. In this case, it is better to disconnect the cartridge itself from the wiring and continue dismantling below.
Traditionally, a lighting device consists of a light source - incandescent, LED, fluorescent, and a lamp that serves as a decorative frame and reflector if necessary. The functionality of the device equally depends on the condition and nature of both modules.
Lighting
In any case, a suspended ceiling consists of a frame and a facing board - plasterboard, cellulose, plastic, Armstrong mineral board, for example, metal and others. The lighting device is mounted only in a cell formed by a frame; mounting to a lathing or facing material is impossible, with rare exceptions. The device is fixed to the base ceiling, and not to suspended ceiling, only the lighting part remains visible.
The exception is ceiling suspended structures - chandeliers, for example.

Based on the method of placement in the cell, there are 2 types of lamps.
- Modular - is a block with light bulbs and a transparent top part, which in size matches the dimensions of the suspended ceiling cell. The module creates uniform diffused lighting, which is ideal for service premises - office, retail, and so on.
- Spotlights are compact, powerful lighting fixtures with one bulb. With their help, both diffuse and directional lighting is created. Most point models also allow free mounting, which means the ability to direct the light flux as desired. In this case, a hole is made in the Armstrong ceiling slab for the device.
Types of light bulbs
- Incandescent light bulb - has the highest luminous power, is not very durable and heats up noticeably. However, its size, shape and power vary within very wide limits, so changing it is not difficult. In addition, it tolerates voltage fluctuations well and is not too sensitive to moisture: it can be used in the bathroom either in a regular chandelier or in an Armstrong suspended ceiling module.
- Metal halide - has excellent light output and much better color rendering, can generate excellent daylight, and does not affect the shades at all. The durability of the device is higher, but the sensitivity to voltage drops, especially in the acoustic range, is high.

Before changing such a light bulb, you need to accurately determine its type. Devices are produced for a variety of purposes, including operation in a specific position.
- Luminescent - today are considered the best in terms of light output, that is, with strong luminous flux, consume a minimum of electricity and also practically do not heat up.

Can be installed without restrictions in any type of lamp, including on a suspended ceiling. This is the most economical type of lighting, but is also sensitive to voltage changes and moisture: they are not used in the bathroom. In the photo there is a spotlight.
- LED lamps have all the above advantages and are free from all the disadvantages: they are slightly inferior in light output to fluorescent lamps, withstand weather conditions well, are extremely durable, do not heat up and are completely safe. Can be used both in the bathroom and outdoors. There is only one thing - the cost.
Replacing an LED fixture is as easy as replacing a regular fixture.

How to change a light bulb
There are 3 ways to attach the light source. Depending on this, as well as on the type of light bulb, replacement is carried out using different methods.
Before work, the lighting must be turned off on the panel and a stable base must be prepared. You can change the lamp only after the housing of the lighting fixture has completely cooled: there is a very high risk of damage to the glass part, which could result in injury to the worker.
- The standard mount involves installation in a cartridge. The easiest way to change it is to carefully unscrew the bulb and replace it with a new one - the same or a different power. Screwing is done until it stops.
- Two-pin fastening - in this case, as a rule, we are talking about a metal halide model, which is held in place by 2 metal guides. To change the light bulb, first unlock the locking ring: holding the lamp with your hand, bend the wire ring with the other. Then take out the light bulb and fix the new one - a characteristic click should be heard. After installation, the retaining ring is secured back.

There is no need to disassemble the suspended ceiling for this; the device is not even removed from the cell.
- A special cartridge is typical for fluorescent and LED devices. First of all, remove the fixing ring, remove the glass from the transparent part of the device, and then unscrew the light bulb. The special chuck requires an additional 90 degree rotation.

To change an LED or fluorescent model, you should wear cotton gloves or protect your hands in some other way: greasy stains on the quartz glass of the bulb sharply reduce the service life.
In the lighting panel, replacement of any device is carried out only after its complete dismantling. The module is detached from the wires and removed from the ceiling frame.
The video discusses in detail all replacement methods.
Its sophistication and attractive appearance The ceiling can be obtained not only thanks to various unique shapes and colors, but multi-colored illumination on it will look no less impressive. The most popular option is spotlights. They are installed in a certain quantity on the ceiling: usually more than a couple of pieces. To add beauty and install lamps, you need to know how to mount them correctly.
Types of light bulbs used
Today, the construction market offers a wide range of luminescent products, including various shapes and decor.
The most popular are:
- Halogen lamps for suspended ceilings. They produce a powerful glow and are the most convenient option for installation in a suspended ceiling. The only drawback is that the installation process is somewhat more complicated than a conventional incandescent lamp. Advice. Because common cause If lighting fixtures malfunction due to sudden changes in voltage, the correct option would be to install voltage stabilizers that prevent the lamps from burning out.
- Regular incandescent lamps. Their installation is not particularly difficult, and there are no particular problems in operation.
- LED lamps are the most common option. They consume electricity economically and are ideal for installation in Spotlights For stretch ceiling.
In order to correctly install the lamp, you need to know about the types of its possible mounting:
- Traditional carving. This is a standard type of fastening, with which hardly anyone will have problems.
- The next type includes lamps that are mounted on two special pins that regulate the direction of the lamp and fix it. If you decide to replace a burnt-out lamp, do not be afraid to apply pressure while unscrewing it. At the same time, if you did something incorrectly, the proper click will not follow.
- The last but not least common type is the mount, which locks into place when the lamp is rotated 90 degrees.
Note. Special fasteners can tell you how to unscrew a light bulb from a stretch ceiling. For example, if there is a cone in the suspended ceiling, it may be a sign of a halogen element. When replacing such a lamp, you do not need to screw it in; just attach it to the pins.
Replacing the LED lamp
When working with lighting devices, the first thing you need to do is turn off the power to the apartment. To do this, turn off the required element in the power supply branch. Do this with due care and caution, following safety rules. It is also better to take a chair and any other stand with which it will be convenient for you to do your work.
Be careful with the stretch ceiling fabric; any sudden movement can damage it.
Now proceed to directly replacing the lamp:
- To begin, unlock the lamp in the mounting system. A special fixing ring is responsible for this. Be careful, the ring can easily slip out of your hand.
- Next, slowly unscrew the old lamp. Inspect it and select a new lamp with the appropriate characteristics: size and power.
- After replacing the lamp, return the retaining ring to its place and secure it in proper condition.
Here are some tips on how to remove a light bulb from:
- If the ceiling requires the installation of LED lamps, but you definitely don’t have enough power, use a little trick: instead of the usual, standard yellow color, buy white. With this simple replacement you will increase the brightness of the lightening without affecting the power consumed.
- To achieve a harmonious effect of transmitting light into the suspended ceiling of one room, it is better to mount lamps of the same model. This way you will get an aesthetic and attractive appearance. If for any reason you cannot find the lamp you need, replace everything in the room. To do this, always purchase a couple more light bulbs so that you can quickly replace them at the right time.
- To make the lamp last longer, do not screw it into the lamp with your bare hands. Use gloves or a dry cloth.
- By the way, do not forget that a suspended ceiling will not withstand an overly powerful lamp. It is better to purchase it with a power of no more than 35 W to avoid possible damage to the material.
Ceiling lamp design

Almost all suspended ceiling lamps have the same structure:
- the main element is the housing, it holds the wires and houses the cartridge;
- special clamps are also used to ensure that the housing is securely fixed to the surface;
- this entire structure is protected by a glass or plastic cover;
- The last part is a clamp that secures the entire structure.
Tips on how to replace a halogen light bulb on a suspended ceiling
If your room has halogen lamps, replacing them will require a little more effort. They have many advantages. The lamps do not blind a person’s eyes and provide a soft, pleasant light that we easily perceive. As a rule, halogen lamps last no more than 5 years, but this is much longer than that of a conventional lamp.

When replacing a halogen lamp, first turn off the electricity. Then you need to carefully remove the mount that holds the lamp itself. Now that you see the socket, unscrew the light bulb from it, replace it with a new model, and then return the mount to its place and secure it firmly.
Thus, replacing any lamp, be it a halogen or LED model, is quite simple. The only problem that may arise is the lack of a suitable lamp. After all, on one ceiling, all lighting fixtures must be combined. Therefore, do not forget to buy a couple of extra lamps so that you can easily change the burnt one.
Bulbs for suspended ceilings are often used in spotlights. Some people install the structure themselves and then have an idea of how to change a halogen light bulb in a suspended ceiling and any others. This is not important. But if you ordered the installation of a ceiling from a company and did not do it yourself, then you may not know how to replace a lamp in a suspended ceiling.
On our website you can see photos and videos of installation various designs in suspension systems. Below will be given step-by-step instruction to do this job.
Lamps used
There are four types of light bulbs most often used in suspended ceilings.

- Halogen lamps, which can be installed with a minimum ceiling gap in relation to the base. They produce quite bright lighting. Replacing such an element is a little more difficult than an incandescent lamp and you must be extremely careful. The service life of such a lamp greatly depends on correct installation. We experience frequent changes in lighting supply, which negatively affect the operation of incandescent appliances. Therefore, it is better to use voltage stabilizers on the branch;

- Some use lamps with traditional incandescent lamps. These elements are well known to everyone and replacing them is not difficult. However, they are not suitable for all suspended ceilings, as they get very hot;

- Fluorescent lamps, despite the fact that their price is quite high, they are very popular because they consume very little electrical energy. Moreover, their luminosity is much higher than the above-mentioned analogues. Disadvantages include slow start-up (hot-start lamps), a limited number of on-off cycles, and the content of mercury vapor, which complicates disposal.
- for suspended ceilings the most economical and durable. The luminosity of such devices is often higher than that of fluorescent ones. Their service life can reach 72,000 hours, which is incredibly long. In comparison, a regular incandescent lamp has a lifespan of 1000 hours.
When replacing lighting fixtures, you should know the following.
Two types of base are used mainly for spot lighting:
- With traditional right-hand thread. It is used for a standard cartridge. And everyone knows how to make such a replacement;

- There are lamps that are attached with two pins(base G with all sorts of modifications). They serve as guides and are fixed after a characteristic click. When replacing, do not press with force. If you get into the groove, then snapping will happen easily. Therefore, do not try to press, just pull it out and try again, perhaps the element did not fit into the groove;
Let's get started replacing the lamp

First you need to turn off the power supply to the branch. Don't forget about safety precautions. To do this, just make sure that the switch is in the “off” position.
After this, we find a comfortable support so that we can perform work at height. Use a stepladder or regular stool.

Advice! When carrying out work on suspension and tension systems, you should do the work extremely carefully. If it is a suspended ceiling, then the fabric can be easily damaged. If the suspended rack system, and even with a mirror coating, then any careless movement can damage the coating.
- If there is an incandescent lamp in the ceiling, then you need to grab the bulb and turn it counterclockwise, that is, the lamp is held by the base.
- For LED, halogen and fluorescent lamps another mount.

- When removing, first of all you should unlock the light bulb in the housing. There is a locking ring for this purpose. When doing this work, hold this part; the ring itself is springy and can easily slip out of your hand.
- For other designs, the ring is threaded and unscrews in a counterclockwise direction.
- The lamp is now free. It won't fall because it's hanging on the wires. Pull it out and disconnect the connection by simply pulling it to the sides.
- Having taken out the lamp, you can see its rating and select a replacement.
- Install the lamp in the reverse order.
To ensure that the lamp not only works for a long time, but also looks beautiful in the ceiling, it is enough to follow a few simple rules:

- If you didn't have enough lighting in the room. Then you can use two methods to correct the situation. The first is to choose a lamp of higher power, and the second is to replace it with a more energy-efficient option - LED.

- If you were simply uncomfortable working, then try taking a daylight llama with a light temperature of 4000K. This type of lighting is more conducive to the work environment.
- Use the same model for suspended ceiling lamps, otherwise they will not look very good together. If this is not on sale, then it is better to replace all the lamps in the room, unless of course this is too expensive.
- If you place a halogen lamp without a reflector, for example, in a chandelier, then remember that you cannot handle it with your bare hands. The fact is that their bulb is covered with a special coating, which degrades upon contact with fats - such a lamp will not last long. Use the cloth or cellophane included in the kit.

Now you know how to replace light bulbs for a suspended ceiling. The matter is simple, but not without certain subtleties. Let your home be bright and cozy.
Instructions
Correctly choose a new lamp to purchase to replace the burnt one. A lamp with a mirror can have a socket of type MR-11 (GU4) or MR-16 (GU5.3), and lamps of types G4 and G5.3 differ from similar lamps with the letter U in the designation by the absence of a mirror. Do not install a lamp in a lamp that it is not designed for.
The most convenient are halogen bulbs equipped with built-in conical mirrors and protective glass. To replace a lamp of this type, turn off the power to the lamp, wait until it cools down (even if the lamp being replaced is burned out and has long cooled down, neighboring lamps can heat up its body), then remove, if necessary, the parts covering the lamp, and then pull it out of the socket . There is no need to unscrew it, since pins are used instead of a threaded base. Insert the new lamp into the socket with its pins, make sure it is held firmly, reassemble the lamp in the reverse order and turn it on.
Some halogen light bulbs are equipped with conical mirrors, but do not have protective glass. They require more careful handling. When replacing, keep this light bulb only by the reflector, without touching the bulb at all. If you do touch the flask, degrease it with alcohol (do not use other substances!), wait until completely dry(this may take half an hour) and only then turn it on. If you do not degrease the flask, it will burst, and if you do not wait for the alcohol to dry after degreasing, it will catch fire. Otherwise, the method for replacing a lamp of this type is similar to that described above.
Lamps without conical mirrors at all are the most inconvenient. Get one like this light bulb from the package without touching it with your fingers - only through a layer of fabric. Install it in the same way. If during the installation process you touched the lamp bulb with your finger at least once, degrease it and wait for the alcohol to dry, as indicated above.
Today, halogen lamps are a new version of conventional incandescent lamps. Their advantage is bright light, the ability to create lighting effects and excellent color rendition. Such lighting takes its rightful place in modern homes. But how to replace burnt out halogen lamps?
Instructions
Only replace halogen lamps while wearing clean cotton gloves. Sometimes such gloves are included in the set of lamps. If you don't have gloves, use a dry cloth.
Buy a transformer for such lamps with the ability to connect a dimer to it and the presence of special protection against overloads and short circuits. This is necessary, since halogen lamps are very sensitive to poor voltage.
Install a smooth release device - this will increase the service life of the lamps. And besides, you will get a beautiful and comfortable effect of gradual increase in light.
Please note that by increasing the voltage by just 20V, the brightness of a halogen lamp doubles, but its service life is significantly reduced. But when switched on in series, when the voltage is halved, the amount of light will also decrease, but the life of the lamp will increase thousands of times. Therefore, for emergency lighting, use a serial connection or connect it in series with a diode.
Before attaching halogen light bulbs to suspended ceilings, make good ventilation. Because these lamps produce a large amount of heat when operating. And if it is not removed, the light bulbs will fail much more often.
For interior decoration, spotlights with halogen lamps are often used. Halogen lamp has a small glass flask filled with a mixture of an inert gas with iodine or bromine, in which an incandescent filament is placed. The halogen mixture allows you to achieve much greater illumination at the same power than the use of conventional incandescent lamps. The difficulty of replacing a halogen light bulb in a luminaire depends on the design of the luminaire itself. In the most common luminaires, the halogen bulb is held on a spring-loaded ring along the inner diameter of the luminaire.

Instructions
Turn off the light or the corresponding group of lights on the panel. Install a reliable support at the required level (stepladder, table, chair) so that you can freely reach the place where the lamp needs to be replaced.
Carefully remove the outer ring of the lamp with the spring holder. Remove the burnt out light bulb from a pin cartridge.
Compare the new one by markings light bulb with the old one - it should be identical. Keep a new one light bulb napkin or dry cloth. If you take the lamp by hand, grease marks will certainly remain on the bulb, which can lead to crystallization of the quartz of the bulb and reduce the life of the lamp.
Insert the new lamp into the pin, push it inside the lamp to the desired level, and secure it with a spring-holder compressed by the antennae. The lamp must be firmly held by the three protrusions of the lamp. Adjust it if necessary. Reinstall the light ring.
note
Many halogen lamps have reflectors, which also affects the amount of light in the room. In addition, halogen bulbs can produce a directional beam of light scattering.
When installing halogen spotlights, you should be prepared for certain costs. However, they all pay for themselves due to the longevity of halogen lamps. 220 volt lamps last up to 2000 hours, 12 volts up to 4000 hours. However, 12-volt halogen bulbs require the installation of an expensive transformer.
Halogen light bulbs are inserted into the body of lamps, which are made of metal, brass, glass, and plastic. In addition, lamps can be coated with polished or matte bronze, chrome, and brass. Due to their small size, halogen light bulbs do not require bulky fixtures like conventional incandescent lamps, which minimizes the loss of ceiling height.
Sources:
- how to change light bulbs in a hood
First, let’s figure out what a halogen lamp is, or how people might hear it called “halogen,” and what its advantages are. Halogen lamp is a sealed tube-shaped quartz glass capsule filled with gas mixture(iodine or bromine). Thanks to quartz, the lamp can withstand more high temperatures, which increases its light output by 1.5-2 times compared to incandescent lamps. The gas slows down the evaporation of the filament, which increases the life of the lamp compared to conventional ones. So, if you need bright and accurate light, then this article is for you.

Instructions
If you are connecting 12 Volt lamps, you need to select a transformer. The transformer must have an input voltage of 220 Volts and an output voltage of 12-10 Volts. The power is selected based on the number of connected lamps. For example, if you need to connect 3 lamps of 50 Watt each, then the transformer must be designed for a power of at least 150 Watt. You should also not take too much power from the transformer, since its dimensions and price directly depend on this. Choose a transformer from a good company; this is something you should not skimp on.
If you have chosen lamp 220 Volts, then connect it using terminals directly to the power source alternating current through the switch. The polarity of the connection does not matter.
So, you should get the following connection diagram:
For 12 V lamps: power source – switch (set to zero, not to phase) – transformer – parallel connection of lamps.
For 220 V lamps: power source - switch (set to zero, not to phase) - parallel connection of lamps.
Video on the topic
Today, halogen, or as they are called “halogen”, lamps considered the most perfect light source. Their light is similar to sunlight, and the light output in such lamps is 1.5-2.5 times greater. At the same time, the undeniable advantage is the variety of shapes, a large range of colors, and a longer service life, in contrast to conventional incandescent lamps. However, their most important difference is the gas with halogen impurities that fills the lamps inside.

Instructions
Remove from dashboard panels decorative plastic cover. Removing it follows the same principle. Just below it, above the left and right edges, you will see two screws that hold the dashboard in place. You will need to unscrew them. Then lower the car's steering wheel as low as possible so that you can work without additional interference. Then again unscrew a couple more screws, which are located in the upper part of the lining.
Begin detaching the cover with a gentle rocking motion immediately after unscrewing the screws. In addition to the screws, the pad is also held in place by special fasteners, so when detaching it you will need to exert maximum effort and skill. Next, disconnect the wires from the hazard warning lights, clock, mirrors, fog light switch, adjustment backlight and the rest of the headlights. Only after these steps will you be able to completely detach the cover.
Remove the instrument panel with extreme care. First unscrew the four screws that hold it in place. To avoid damaging the wires, they will need to be disconnected on one side. Next, unfold the dashboard and remove the sockets from it that contain the burnt out bulbs. In order to remove cartridges from the instrument panel panels, you will need to turn them clockwise. After removing them, replace the burnt out bulbs and then reassemble the dashboard in reverse order.
When disassembling the panel, it is better to wear rubber gloves so that you do not stain your hands with accumulated dust.
Sources:
- Replacing light bulbs in the dashboard of VAZ 2114 and 2115
Insert into the chandelier socket light bulb– what could be simpler? However, incorrectly replacing a light bulb can cause a lot of problems, so the installation procedure must be strictly followed, as well as safety precautions when working with electrical appliances.

You will need
- - bulb;
- - pliers;
- - rubberized gloves.
Instructions
Before replacing a broken light bulb, turn off the electrical panel on the landing and put on rubberized gloves designed for safe work with electrical appliances.
If the chandelier in which the bulb has burned out is a closed type and is equipped with a lampshade, loosen the top clamp, unscrew the bulbs, and remove the lampshade. Often it is not immediately possible to unscrew light bulb, if it stood long enough in the cartridge, it could stick to it from the heat.
In this case, be prepared for the fact that the base will remain in the socket and you will have to carefully unscrew it using pliers. If there is a glass bulb left in the socket, which most often happens in conventional incandescent lamps, try unscrewing the burnt light bulb, wrapping the flask in a cloth to prevent cuts and abrasions.
Proceed carefully, do not forget that if you twist the wiring in the chandelier, when you turn on the electricity, a short circuit, which will entail a complete blackout of the apartment and the failure of complex household appliances connected to the network. This will not happen if you have a reliable circuit breaker system installed on your electrical panel. They will immediately work and cut off power to the apartment.
New light bulb insert into the cartridge after completion of removal work old light bulb. When screwing, fix the cartridge with one hand, insert and screw into it with the other light bulb.
Turn on the electrical panel and switch. When you turn on the installed light bulb for the first time, do not look at it; there are situations when the light bulb shatters into small pieces, which can lead to eye injury.
If a newly installed light bulb does not work, and when you bought it, it was checked and everything was in perfect order, this may mean that you have shaken light bulb during transportation or there are problems with the wiring. Find the cause and troubleshoot.
Today it is difficult to imagine life without modern conveniences. Heat, energy, electricity, the Internet - what would happen to humanity if it were deprived of all these benefits of civilization? One of the most important inventions is the incandescent lamp. There is still debate about who exactly invented it. If you ask Americans, they will confidently answer: Thomas Edison. If you ask a resident of Russia, he may object: Alexander Nikolaevich Lodygin. So, who is right after all?

Predecessors to the inventors of the light bulb
Even in ancient times, people made attempts to create devices for lighting dark rooms at night or rooms that were underground. It is known that even in the Mediterranean and in Ancient Egypt They used olive oil, placing it in a clay vessel with cotton wicks. And, for example, residents of the Caspian Sea coast used oil in such vessels.
In the Middle Ages, candles were invented, which replaced clay vessels. The candles contained beef lard and beeswax. For many centuries, outstanding geniuses worked on the invention of the first kerosene lamp. Among them was Leonardo da Vinci himself.
Inventors of the light bulb
Despite the best efforts of various inventors, a safe and mass-produced lighting design did not appear until the mid-19th century. Due to the rapid development of technological progress, a quarter of a century later the first electric light bulb was created.
The first electric candle, which later turned into a light bulb, was invented by Pavel Nikolaevich Yablochkov. At first, street lighting was produced using his device. However, such candles were not economical enough, and therefore unprofitable.
One electric candle cost 20 kopecks, and they had to be changed every 1.5 hours.
Later, lanterns were created that could change the candle independently. Despite the uneconomical and fragility of the electric candle, this invention made a significant contribution to the development of the lighting industry. At that time, this technology was used in theaters and shops, hotels and restaurants.
During the period 1840-1860. Many inventors tried to create an incandescent lamp, but over the years, none of the attempts was successful. They were already ready to give up on this idea. However, in 1873 a real breakthrough occurred in this area. Alexander Nikolaevich Lodygin invented a light bulb that passed all tests. The first lamps burned for about 30 minutes, no longer. Then, in order to increase the life of the light bulb, they came up with the idea of pumping air out of the glass bulb. In 1873, the first two lamps of A.N. lit up on the streets of St. Petersburg. Lodygina caught fire.
In addition, the invention of the incandescent lamp is attributed to Thomas Edison, an American inventor. He created a lamp that had the ability to burn for hundreds of hours without losing its energy. It must be said that T. Edison knew about Lodygin’s experiments and the shortcomings of his invention, and therefore he decided to create a more reliable light bulb.
To invent such a lamp, Edison conducted 6,000 experiments.
In the final design of his lamp, he used a carbon filament, which was made from strong bamboo hair. When conducting his experiments, T. Edison tested almost all varieties of bamboo. The main thing that was done by this inventor was the opening of the production of electric light bulbs, which made it possible to put this technology on stream.
Summing up
The first patented incandescent lamp and the electric lamp in use today are separated by about 100 years of constant improvements by various inventors from different countries peace. Each of them made their own invaluable contribution to the history of the invention of the light bulb. This means that it will not be possible to unequivocally answer the question of who invented it.
People have always strived for light, looking for ways to extend daylight hours. The invention of the light bulb as it exists today took centuries. The evolution from cave-illuminating fire to torch, from wicks dipped in oil to candles, from kerosene lamps to modern electric light bulbs has become a powerful impetus for the development of humanity.

Why did the light bulb need to be invented?
People don't sleep so much that they fall asleep as soon as it gets dark. Therefore, already in ancient times, the ancient Egyptians had to invent something like a light bulb to illuminate their home. Then more than one century passed until the first electrical invention that illuminated space appeared.
Initially, olive oil was used for lighting in Ancient Egypt, which was poured into special clay vessels with a cotton wick. On the coast of the Caspian Sea, oil was used instead of olive oil, of which there was a lot there. However, this invention could illuminate the room with great difficulty, and the search continued.
From wick to kerosene lamp
Later, closer to the Middle Ages, candles appeared. They were made from beeswax or melted animal fat.
Both candles and kerosene lamps turned out to be far from safe. They led to numerous fires, so further searches for an analogue of the modern light bulb were carried out along the path of creating a safe device that provides light.
In New England, until 1820, pork fat was used to make candles. But the light from it no longer met the growing needs of man. At this time, accumulated knowledge was already transmitted through books. Lighted rooms have become very necessary.
The great Leonardo da Vinci did not remain aloof from the problem; he also spent years inventing a lighting device. It was a kerosene lamp.
Invention of the first light bulb
The first light bulb appeared only in the 19th century. It was invented by Pavel Nikolaevich Yablochkov. This Russian electrical engineer also invented the first electric candle for street lighting. In 1873, light came to the streets of St. Petersburg. This was real progress, because lighting began to enter people's lives. In the evening it became more convenient to walk the streets, you could visit theaters or shops. But electric candles had one big disadvantage: they only lasted for an hour and a half, then they had to be replaced with a new one.
From 1840 to 1870, attempts were made in all countries of the world to create a light bulb that could burn for a very long time. Failure followed failure, and only in 1873 the goal was achieved by the Russian engineer Alexander Nikolaevich Lodygin.
The light bulb was invented by Lodygin in a form close to its modern analogue.
During those same years, the American scientist Thomas Edison conducted his experiments. In 1879, he managed to create a charcoal thread from bamboo. Edison made 6000 experiments with different types bamboo before the light bulb was invented, which could shine for many hours.
The Englishman Joseph Swan in 1878 proposed the shape of a glass bulb with a carbon filament inside for a light bulb. At the same time, the industrial production of light bulbs began.
From the first light bulb to the modern one
The further history of the evolution of the light bulb is the search for the possibility of extending its operating time. In the 90s of the 19th century, A. N. Lodygin improved his light bulb by making an incandescent filament in the shape of a tungsten spiral
When choosing halogen lamps for a car, you need to focus on the lamp power and the required temperature. There are 3-in-1 halogen lamps that can significantly improve the quality of night driving.

Today you can no longer find vacuum incandescent lamps for car headlights on sale. They were replaced by halogen incandescent lamps with an increased service life of filaments and, accordingly, increased power.
Lamps with enhanced luminous efficiency and improved visual comfort
When choosing halogen lamps, first of all you need to decide on the required temperature, because it is this that determines the quality of the lamps' glow. Eg, car lamps with enhanced luminous efficiency, they have standard power, allowing the headlights not to overheat. Such light sources should be chosen by older drivers and those with impaired vision. However, here great importance has a headlight design, because it happens that it reduces the power declared by the manufacturer.
Halogen lamps with improved visual comfort improve the quality of night driving. It is recommended that car enthusiasts who prefer high-brightness white color choose such lamps for their car. They improve a person's concentration behind the wheel when driving at night, allowing them to better see signs and road markings.
All-weather and off-road lamps
Today, the market for halogen lamps also includes all-weather lamps that produce yellow light. It has been proven that such light is more visible in foggy and rainy conditions, and it also provides more contrasting lighting in poor visibility conditions. Racing tracks have their own halogen lamps with high filament power. They are recommended for drivers to choose for off-road driving. This type of lamp has several versions, in particular, you can purchase lamps for night driving.
The concept of the lamp has not changed over the past hundred years. Currently, you can choose halogen lamps for your car from a huge range of modifications with a wide variety of features. You can increase the safety of the driver and his passengers, especially at night, with the help of 3-in-1 halogen lamps, which combine the properties of three types of light sources. The light from these lamps is distributed into three zones with white - front light, yellow light on the left and daylight with a blue tint on the right. White light allows you to illuminate the road surface 10-20 m ahead, the yellowish light on the left will not blind drivers driving in the oncoming lane, and daylight on the right can provide good illumination road signs and roadside.
If you know the principle of fixing a lamp in suspended structures, you can easily replace it. There are three types of lamp mounting, the most difficult of which is the pin type.
There are three types of lamp mounting: traditional (with a right-hand thread for standard sockets for conventional incandescent lamps), two-pin (the lamp is held using two metal guides, which, after a characteristic click, fix it in the desired position), using a special socket (in it for full To fix the lamp, you need to turn it 90*).
The easiest way is to replace the lamp that is in the socket. To do this, you need to turn it counterclockwise. But first, the lamp must be inspected: if it is energy-saving, you should not put strong pressure on it, you need to work extremely carefully and slowly. If the lamp on the suspended ceiling looks like a flat surface with some kind of cone inside it, then it is a halogen element. It is usually secured with two pins and is more difficult to replace.
Before starting work, you need to turn off the power not in the room, but in the panel. Then you need to ensure safety: prepare a surface on which you will have to stand. It must be stable and of sufficient size. Replacing a lamp in suspended structures requires extreme care and leisurely movements, since carelessness can damage the finish or mirror coating (for slatted systems).
With a pin mount, work begins with unlocking the lamp fixing mechanism. For this purpose, a special ring is provided, which is made of thin but elastic metal wire. Holding the lamp body, you need to bend the spring ring and unlock the lamp. After which it should be removed and replaced, after making sure that the new one corresponds to the burnt-out power. You can also use another method: use a flat object (for example, a screwdriver with a thin blade) to pry the body of the lamp and remove it. After this you will need to remove the lamp itself.
A variety of things are made from mercerized cotton: bed linen, clothing, including children's clothing, backpacks, bags and even toys. Items made from this material are more expensive than items made from regular cotton, but they also have many advantages that are highly valued even by demanding customers.

How is mercerized cotton made?
Mercerized cotton is ordinary cotton fabric that has undergone special processing, due to which the material acquires special properties - high strength, abrasion resistance, and softness. First, take cotton threads and soak them in an alkaline solution, after which they are thoroughly washed. This procedure helps to increase the service life of the material, makes it more susceptible to dyes, allows you to achieve more durable and uniform coloring, as well as special color intensity.
Next, the cotton is bleached or dyed, neutralizing the hydrogen index, i.e. completely ridding the material of alkali residues. There are several various types coloring of such threads, and professionals choose those options that are most appropriate in a particular situation.
Lastly, the threads are processed using gas burners. This stage is necessary for the material to become smoother, pleasant to the touch, and shiny. The villi are removed during gas scorching.
What are the benefits of mercerized cotton
Mercerized cotton differs from ordinary cotton in its smoothness, softness, and slight shine, thanks to which this material is even confused with silk. It is very pleasant to the touch, so it is excellent even for making underwear. Even small children can wear things made from this material, because it does not cause allergies or irritation, does not chafe the skin, and perfectly removes moisture and allows air to pass through.
Mercerized cotton is a very durable and at the same time low-maintenance fabric. This material can be painted in a variety of shades. Colored mercerized cotton does not fade when washed, and does not fade when exposed to sunlight. It can maintain thread strength and color brightness for a long time, so items made from it are usually used for several years. The strength of the material is especially important when it comes to choosing socks: such products, made of mercerized cotton, will be comfortable, pleasant to the touch, and at the same time quite reliable and durable.
Unlike regular cotton, mercerized material is stain resistant. It hardly wrinkles, which is also a very important advantage. When washing, the fabric does not deform or shrink, and you can iron it with a simple iron without steaming or other additional modes.
note
Beware of burns and exposure of flammable objects to the heat from the lamp.