DIY decorative tree: step-by-step instructions for making topiary with photos and videos. Decorative tree: flat and relief images, shelf tree Large tree with your own hands
People have been decorating their homes with their own hands since ancient times. At first, craftsmen used the gifts of nature for this, then they learned to make things from metal, and in the era of the development of the chemical industry, many synthetic materials appeared, which are successfully used in modern design.


Of course, it is stupid to refuse the conveniences that have appeared with the development of industry and new technologies in the production of furniture and decorative items, but I really want to revive the house, create a special atmosphere of comfort and peace in any room with the help of natural materials! And the best material for this at all times has been and remains His Majesty wood.
Real masters create magnificent carved panels, exclusive solid wood furniture, and amazing paintings in the marquetry style. To implement the most daring ideas in the interior, you need skill, artistic taste, special tools, knowledge and skills. But anyone can make simple decorations with their own hands.


Beautiful wood decor
The easiest way to use wood is to abandon plastic frames, install wooden doors, and purchase furniture made from solid wood. This material has the ability to breathe. Wooden frames on the windows will help maintain a pleasant living atmosphere in the room.
A furniture set made of natural wood can give any apartment a feeling of good quality, prosperity, and act as an independent home decoration. True, not everyone can afford such luxury. However, even a few items can change the look of a modern apartment. They look very advantageous in any interior:
a coffee table, the surface of which is decorated using marquetry techniques or cuttings of valuable wood;
a chair hollowed out of solid wood;
wooden stands for house plants;
open shelves.

Option for decorating the design with wood

Modern DIY wood decor

DIY wood decor idea
Therefore, if it is not possible to furnish your home with expensive furniture, it is enough to purchase one or two products, or decorate existing furniture using decorative wood for the interior with your own hands.
When it comes to doors, there are many options. In order to isolate rooms, you can install:
Solid doors made of natural boards;
Canvas composed of slats;
Doors with glazing;
Sliding doors;
Screen doors in the common room, folding like an accordion.
The last two options can significantly save space in small rooms. You can make such doors yourself, or order them from an experienced craftsman.

DIY wood decoration

Beautiful wood decor
Do-it-yourself wood in the interior: advantages
Since wood is one of the natural materials, it has many advantages for making various items with your own hands:
Environmental Safety. Can be used in the interior of any room without harm to health. In addition, according to popular belief, wood has the ability to heal - for example, aspen dies relieve inflammation, and oak dies give strength to a weakened body.
It’s practically free: it’s literally lying under our feet - snags and dried tree branches that can be found in the nearest forest will be used. Summer residents most often burn waste resulting from cleaning and thinning the garden. Or you can not burn all these pieces of wood, but make beautiful accessories out of them that can add individuality to your interior, giving it its own soul.
The ability to create wood decor with your own hands. Nature is unique, and you will not find two absolutely identical branches. Therefore, when working with natural materials, you create unique things every time that will give your home its own special style and appeal. In addition, there will be a reason to brag to your friends about your imagination and skillful hands.

Option for decorating the design with wood

Modern DIY wood decor

DIY wood decor idea
Home decorations made from wood slices
Anyone who knows how to hold a hammer and other simple tools in their hands can process wood with their own hands for the interior in order to obtain a suitable material. The wood can be cleared of bark in advance, or left in its original form - it all depends on what types of wood you have and where you are going to stick the wooden dies.
Here are just a few ideas where regular wood cuts can be useful in the interior:
finishing the walls with sections of logs;
furniture manufacturing;
decoration of individual pieces of furniture with wooden dies of various diameters.

DIY wood decoration

Beautiful wood decor
DIY wood decor for walls
If you decide to use wood to decorate the walls, you can do it in two ways:
cover the surface of one or all walls in the room with wooden dies;
select a separate section of the wall and decorate it in the form of a panel.
The first option is not suitable for every room - it will fit better into the interior of a veranda, corridors, country-style kitchen or home bathhouse. But to decorate a separate section of the wall, you can show all your imagination. It can be:
Kitchen apron or panel above the work area. Beautiful saw cuts are obtained from different types of wood - apple, pear, plum, cherry, walnut, ash, where each has its own unique color. All you have to do is sand the surfaces of the dies well and cover the bright canvas with a protective layer of colorless varnish.
In the interior of a children's room, beautiful panels made of wooden saw cuts, made in the form of stylized butterflies, flowers or an entire fairy-tale landscape, are appropriate.
To decorate the walls of a spacious corridor, you can take wooden driftwood found in the forest, treated by time and nature. If you make cuts from them, leaving one side untouched, then you will have strange flowers on one of the walls, each of which will be unique in its natural beauty.

Option for decorating the design with wood

Modern DIY wood decor

DIY wood decor idea
Transforming furniture
To decorate a wooden interior with your own hands, you can use pieces of old furniture that you already have. Decorated with dies of different types of wood, it will acquire a second life and fit perfectly into the interior.
The main rule that should be followed is that all work must be carried out without haste, very carefully, in order to obtain the desired effect:
Select branches of the desired tree species of small diameter;
Dry them well, remove the bark if necessary;
Cut dies of equal thickness using a jigsaw or grinder;
Sand the cut surfaces with sandpaper on both sides;
Prepare the furniture that you are going to transform: clean it of old paint, varnish, level the surfaces with sandpaper;
Attach the cuts with wood glue - wood glue or PVA.
Let it dry thoroughly, then coat the treated surfaces with clear varnish.
This way you can decorate a chest of drawers, an old wardrobe, a table and other pieces of furniture.

DIY wood decoration

Beautiful wood decor
Decor items
In addition to the techniques already listed, you can make other decorative items from wood with your own hands. Amateur photographs or small pictures placed in frames made from thin twigs look original in the interior of the office. You just need to cut 3-4 thin branches, slightly longer than the size of the photograph, and tie them around the perimeter at the joints with a regular rope or twine.
Using the same principle, you can make a pencil stand:
Cut off the top of a plastic bottle or tin can to create a cup where you can put pencils.
Cut thin branches so that their length is slightly greater than the height of the resulting glass;
Glue them on using a glue gun and tie a few turns of twine or string around the top.

Option for decorating the design with wood

Modern DIY wood decor

DIY wood decor idea
With a little imagination and ingenuity, you can make a phone stand using twigs, a plastic bottle or a juice can. And if you work a little, you can, using suitable solid cuts, hollow out an iPhone docking station or an original candlestick.
Saw cuts of a suitable diameter can be used to make your own:
original coasters for cups in the form of topographical symbols;
from a bottle of an unusual shape of an original vessel, covering its surface with wooden dies;
hot stands, the basis for which can be a plywood sheet of any shape.

DIY wood decoration

Beautiful wood decor
A wine bottle covered with a wooden cut can be used as a base for a lamp in an eco-friendly interior. It is suitable for a lampshade made of ordinary cotton rope, which needs to be wound on a ready-made metal or wooden frame.
We have offered you just a few ideas for DIY wood decorations for your interior. There are many more options for how to make wooden decorations and beautiful accessories with your own hands using other gifts of nature. It all depends on the overall design, your imagination and the materials at hand.
Topiary (“tree of happiness”, “European tree”) is a small decorative tree that decorates interiors and exteriors, and is also often used for. Topiaries are good because they look very beautiful, and you can make them with your own hands in literally 1 evening from scrap materials.
- This means that you can make several decorations at once, for example, one pair for the New Year's table setting, another for the Easter table, and a couple more for the mantelpiece.
In this material you will find 1 basic instruction on how to make a topiary with your own hands for beginners, as well as 3 step-by-step master classes in addition to it and 45 photo ideas for inspiration.
Basic instructions for beginners
Topiaries of even the most complex designs are made according to approximately the same principle. Having mastered the basic manufacturing technology, you can create a wide variety of topiaries, changing only the materials for decoration.
So, to make a mini-tree with your own hands, you will need to create it:
- Crown;
- Trunk;
- The base of the tree.
Step 1: Design Planning
Topiary can be different not only in design, but also in service life. Before you start work, think about why you need a “tree of happiness” and where will it live? The purpose and future location of the topiary will determine its style, color scheme and even the materials for its creation.
If you want to make topiary for, then materials that are not too durable can be used - paper, napkins, sweets, fresh flowers, fruits. If you want to make topiary as a gift or for interior decoration, then it is better to use more reliable decor - pine cones, artificial flowers, coffee beans, ribbons, organza, etc.
In the following selection of photos you can get ideas for designing themed and festive topiaries.

Sweet topiaries made from candies for a children's party

Halloween decoration with candies in a pot

Halloween decorations made from pumpkin seeds, ribbons and candy in tea cans

Easter trees made from eggs, artificial flowers, satin ribbons and moss

Christmas topiary made of artificial holly leaves and berries, pine cones and ribbons with a branch trunk

Candy tree for the holiday table

Topiary for a festive table setting made of artificial flowers, natural branches, dry moss and satin ribbons


And here is a selection of photo examples of the design of exclusively interior topiary (scroll through!).


Step 2. Preparing materials
To make your own topiary you will need:
- Foam ball with a diameter of 8-12 cm(available at many office supply and art stores) or a floral foam ball (available at gardening and flower shops).

If desired, you can make a ball yourself from polystyrene foam, the same floral foam, polyurethane foam, papier-mâché, etc. However, the base of the crown can be not only in the shape of a ball, but also in the form of a heart, star, number, letter, animal figure, etc. etc.
- Decor for the crown - depending on your idea, use flowers, satin ribbons, organza, coffee beans, banknotes, etc.
- Trunk - it can be made from a dry and clean branch, a simple pencil or any other stick. In addition, the trunk and pot can be replaced by a tall candlestick.
- Decor for the trunk– the barrel can at least be coated with matte varnish or painted. And at the most, wrap it with one or two ribbons.
- Flower pots – it’s most convenient to pour the mixture into a clay pot, but any cute cups, mugs, vintage buckets, etc. will also work.
- Fixing mixture– the best choice for making topiary with your own hands is a mixture of alabaster, as it hardens quickly, hardly cracks and is cheap. You can also use cement-sand mortar, gypsum or putty. However, not only binding mixtures can fix a tree in a pot, but also the same polystyrene foam, floral foam or stones.
- Everything for mixing the mixture– container, water, stick, etc.
- Decor for masking the fixing mixture– to create an imitation of soil cover, it is best to use natural materials: dry moss, small pebbles, expanded clay, sisal fiber. Artificial moss and rocks will also work. Pots of “edible” topiary can be filled with candies and jelly beans.
- Glue gun and several glue sticks- if necessary, it can be replaced with glue like “Moment”, but it is best not to do this, since glue in a gun is more convenient, and most importantly, it allows you to remove random “cobwebs”.
- Scissors or cutter.
- Tailor's pins with a very small head(optional, used in addition to or instead of glue, for example, for fastening beads).
- Side cutters or nippers for trimming the trunk or any decorative elements.
At the preparatory stage, divide the decorative parts for the crown into groups - for example, large, medium and small. This will make it more convenient for you to alternate the decor and distribute it evenly across the ball.
Step 3: Creating a crown
First, you need to apply markings to the ball - mark the place for attaching the barrel and mark a boundary around it, beyond which you do not need to go for some time when gluing the decor. Thanks to this technique, in the future you can easily fix the barrel in the ball without spoiling the decor.

As soon as the glue warms up, start shaping the ball in the following order: “trying on” the part without glue – applying glue to the desired place – fixing the part. Remember that you need to act quickly so that the glue does not have time to absorb into the foam. That is why it is better to apply and try on the decor first.

Here are a few more nuances:
- You need to stick the decor onto the ball starting from large elements and ending with small ones. For example, if you are making topiary from artificial flowers, then glue the largest buds onto the ball first, then the medium ones, and only then the small flowers and additional beads.
- Some decor can be secured to the ball using tailor's pins and nails. But it is best to combine carnations with glue.
- If some parts have bases made of wire (for example, the same artificial flowers), then you need to leave about 2 cm from their “tails”. Then you can not only glue the decor, but also stick it into the ball.
- To make the white base ball less noticeable in the gaps between the glued parts, it can be painted to match the decor.
Now we need to work with the barrel. As already mentioned, making it with your own hands is not at all difficult from a branch, pencil or any stick.
If you use a branch, then you don’t have to paint it, but just coat it with matte varnish so that the natural beauty of the tree is visible. If you use a wooden stick, then it can only be slightly tinted, artificially aged, etc. If you want to mask the surface of the trunk completely, then you can wrap satin ribbons, fabric, paper, rope around it, or completely paint it.
How long should it be? Since the trunk goes deep into both the pot and the ball, its length can be calculated using the following formula:
- Trunk length = 1/3 of the ball diameter + height of the pot + desired length of the trunk between the crown and the pot.
To attach the barrel, you need to use an awl and a knife to make a hole in the ball with a depth of about 2-3 cm (depending on its size) at the marking site. When the hole is ready, fill its bottom with hot glue and push the crown onto the trunk until it stops. Then continue holding the barrel and gradually fill the hole with glue around the barrel.

- Keep in mind that the hot glue will melt the foam and make the hole deeper. To prevent the trunk from going deeper into the crown by more than 1/3 of its diameter, small pieces of paper can be placed between the layers of glue.
As soon as the barrel is fixed in the ball, disguise the attachment point with decor.
Step 5. Preparing the binding mixture and fixing the tree in the pot
The time has come to “plant” the resulting tree in a pot. To do this you need:
- Place a mark about 2.5 cm from the edge of the pot - the mixture will be poured to this level. If there is a hole at the bottom of the pot, you need to close it with tape or hot glue.

- Dilute the mixture according to the manufacturer's instructions and fill the pot with it.
- Level and secure the topiary in the pot, holding its trunk until the mixture hardens.
- Leave the mixture overnight or a day until completely dry.

Hint: As already noted, it is best to use alabaster as a binder mixture. To fill 1 medium pot, you need to dilute approximately 1 kg of alabaster with 600 ml of water. The mixture is kneaded for about 1-2 minutes until the consistency of thick sour cream, and then quickly poured into the pot and the topiary is fixed in it for 2-3 minutes.
Hooray! The topiary is almost ready, all that remains is to create an imitation of soil in the pot and disguise the fixing mixture. If you are using sisal fiber (see photo), shells, artificial grass or moss, they need to be secured with a small amount of glue.

Master class 1. Corrugated paper topiary
Topiary with paper flowers is especially suitable for decorating a holiday table or festive interior design. For example, this rose topiary was made for Valentine's Day.

Materials:
- Base ball with a diameter of 12 cm;
- Corrugated (creped paper) of medium density (in the master class we use corrugated paper in the form of a tape, but you can use regular rolls);
- Floral foam bars and/or any fixing mixture (see basic instructions);
- A flowerpot or flowerpot for the base of a topiary;
- The trunk is about 30 cm long;
- Dry moss for pot decoration;
- Ribbon for trunk decoration;
- Glue gun.
Step 1. Cut the corrugated paper into strips 60 cm long and approximately 4.5-5 cm wide. If the paper is too thick and stiff, knead the strips a little to make them more flexible.
Step 2. Now you need to roll the resulting ribbons into rosebuds. This is done very simply, just a couple of workouts are enough and the principle becomes clear. Take one of the resulting paper strips and fold it 1/3 as shown in the photo below.

Then fold one end of the ribbon diagonally at a 45-degree angle and begin rolling it into a log. After three turns you will have the core of the bud. Now wrap the free end to the outside, and continue to roll the core of the rose - voila, you have the first petal.


Step 4. Once the crown is completely covered with roses, attach the trunk to it (see Basic instructions). In this master class, the barrel was pre-painted white with spray paint.


Step 6. Place dry moss on the “soil” and glue it in some places with thermal glue. Finally, tie a bow on the trunk.

The following selection of photos presents other topiary design ideas that you can make with your own hands using this master class, not only from corrugated paper, but also from satin ribbons, silk paper, etc.


By the way, you can make not only roses from paper, but also lush peonies or hydrangeas. Methods for making such flowers are easy to find on the Internet.
All photos from the article
What can you use to make a decorative tree on the wall? In this article we will get acquainted with several ideas for decorating living rooms using stylized images and relief figures of trees on the walls. In addition, we learn that decor can be made not only beautiful, but also functional. So, let's go.

Design principles
Let's start with a short excursion into theory.
It’s useful to know if you want to use the decor of a room to adjust its visual perception:
- A tall tree silhouette image with a small width will make your ceiling appear taller, but will visually reduce the horizontal size of the wall.
- Wide and spreading decorative weeping trees or an image of a low grove the width of the entire wall will provide the opposite effect: the wall will appear wider and lower.
- The predominance of light colors in the background will make the room as a whole more spacious.
- The opposite is also true: a light pattern on a dark background will make the room appear more compact.
However: dark walls with a light ceiling dramatically increase the apparent height of the room.
Flat images
The simplest scenario is a one-color pattern applied to the wall. You can get it in several ways.
Dye
Even if you are completely deprived of artistic talent, transferring the silhouette of an existing image to the wall will not be a problem.
Here are a couple of the most obvious solutions:
- Divide the printed picture of a tree into squares of the same size.. Draw the same number of squares on a constant scale across the entire wall. Transfer the outline from the sheet to the wall, filling square by square.
- Use the simplest projector - a lamp with a reflector - to project a silhouette onto the wall.. Fix the sketch of the silhouette with tape on a vertically installed glass.
How to make the contours of a single-color drawing as clear as possible? It's as easy as pie: use masking tape. First, cover the outside of the image with it and paint over it; then repeat the operation, protecting the dried one with tape.

Outline pictures
Instead of dye, you can use ready-made paper and vinyl applications. They are sold with an adhesive layer already applied; Simply peel off the protective glossy paper and the drawing can be glued to the wall.
Note: rough coatings with low adhesion (including water-based paint and lime) must first be primed with acrylic penetrating primer.
In particularly advanced cases, PVA glue is applied to the back surface of the application.

Relief images
Of course, they look much more convincing than flat ones; however, creating a relief picture with your own hands will be noticeably more difficult. What could serve as material for it?
Textured plaster
This is the name of a plaster composition with the addition of large mineral grains, which, when rubbed, leave deep scratches in it, imitating the natural unevenness of various natural surfaces.
The acrylic mass (a more durable cement composition should not be used indoors) is applied inside the contour transferred to the wall and limited with masking tape with a spatula; texture is imparted to the plaster by parallel or chaotic movements of the trowel. Then the edges are cleaned with a knife.
After forming the relief silhouette, the dried coating can be painted with any water-soluble paints; As an option, you can pre-mix the acrylic mass with the pigment.
A more complex option is to form a full-fledged complex three-dimensional image using a narrow spatula and knife.
Do-it-yourself topiary is becoming increasingly popular among decorators, interior designers and simple needlewomen.
Initially, topiary was a garden with decorative trimmed plants and sculptures created from artistically trimmed trees. The art of topiary has a long history. Thus, even in Ancient Egypt and Persia, the ability to give geometric shapes to bushes and trees was valued. And the most famous example of a topiary garden is the Hanging Gardens of Babylon in Babylon - one of the Seven Wonders of the World.
And now topiary (or European tree) is the name for small original trees, for the production of which natural and artificial materials are used. Topiary is decorative in nature, and what it will be made of depends only on the author’s imagination. And the size of topiary can be from 10-15 centimeters to half a meter.

Small topiary made of paper flowers

Large topiary made of artificial flowers (Author - Anna Assonova)
Topiary can be a wonderful gift for a wedding or housewarming.

What is topiary made from?
So, if you decide to make a topiary with your own hands, then you should know that the tree consists of several elements:
- the basis
- trunk
- crown
- pot or stand
Moreover, for each of these elements there are different forms and materials.
Topiary base
The base can be of different shapes. Most often, a ball is used when making topiary.

Ball-shaped topiary
But there are topiaries in the shape of a heart, as well as in the form of various figures. Experienced needlewomen create blanks in the form of numbers (if the tree is intended as a gift for a birthday or memorable date), as well as in the form of letters.

Topiary - heart
As a basis for a ball or heart, you can use a foam blank, polyurethane foam or a papier-mâché ball. Figured bases are thick wire, polystyrene foam or cardboard.

Base for topiary - foam ball
topiary trunk
The trunk can be a thick wire wrapped in twine, floral tape or covered with plastic.

You can also use an ordinary wooden branch (to be safe, it is better to peel it from the bark and cover it with stain and varnish).

A short, straight trunk is made from several sushi sticks or wooden skewers joined together.

Topiary crown
The topiary crown is a huge space for imagination. You can use absolutely anything: paper (paper napkins, cut out flowers, corrugated paper, quilling paper or folded origami - kusudama), flowers made of cold porcelain or polymer clay, satin and nylon ribbons, felt or cotton, buttons and beads, coffee, shells , dried leaves and other natural materials, and much, much more.


Topiary using the Kanzashi technique from remnants of fabric (author - Tatyana Babikova)


Topiary made of corrugated paper and natural materials

Topiary made of corrugated paper and organza (author - Tatyana Kovaleva)


Topiary made from natural materials (leaves, apples, acorns)


Topiary of flowers (origami - kusudama)
Topiary stand
Depending on the idea and size of the tree, the stand can be an ordinary flower pot, an iron bucket (painted or decorated using the decoupage technique), a beautiful flat stone or a shell. You can decorate the stand with fabric or lace. Or maybe it will be a cute cup? You decide.

Shell topiary stand

The topiary stand is decorated with fabric and cinnamon sticks

Topiary stands (from left to right): flower pot, crocheted jar, fabric covered bowl

Ceramic mug topiary stand
Preparing the necessary materials
Before you start working on your topiary, carefully consider the idea and all the materials you will use. The idea will depend on the purpose of the tree and the hobbies of its future owner. Gather materials. Attach the crown elements to the workpiece. Decide what decorative elements you will take.


Beads of different sizes and decorative dragonflies were used as topiary decor.

Beads, braid, sisal and decorative watering can were used as topiary decor.
Making a trunk
The next step will be preparing the barrel. As already mentioned, depending on the material, it must be wrapped with twine or varnished.
We attach the base of the tree to one end of the trunk. The ball can simply be inserted, and it is better to secure some kind of shaped base with glue.
The other end of the barrel is inserted into the prepared vessel. It is usually secured with polystyrene foam, which is then filled with alabaster or cement.

The topiary trunk is glued to the foam
At first it will be difficult to guess the consistency: if the solution is too liquid, it will take a very long time to dry. And if you make it thick, it will not fill all the empty space between the pot and the foam.
Experienced needlewomen advise achieving the consistency of store-bought sour cream: not very liquid, but sliding off a spoon and easily changing shape.
Pour the solution into the prepared mold, level the top and leave until completely dry.
Decorating the crown
While the base is drying, you can make crown elements: leaves, flowers.
Let me remind you once again that they must be fastened after the base has completely dried.
Depending on the base material, flowers can be attached with hot glue, or they can be stuck in using small skewers or wire.
Decorative trees created with your own hands will allow you to decorate your cottage or apartment. Once you remember how to make a bonsai, you can easily create one too.
DIY decorative tree - master class

Such a poplar tree can be placed outdoors; it is not afraid of bright rays of the sun and precipitation.
To make it, prepare:
- green plastic bottle;
- thick and thin wire;
- candle;
- scissors;
- a needle;
- cement or gypsum;
- glue;
- pot;
- matches;
- green and gray threads.

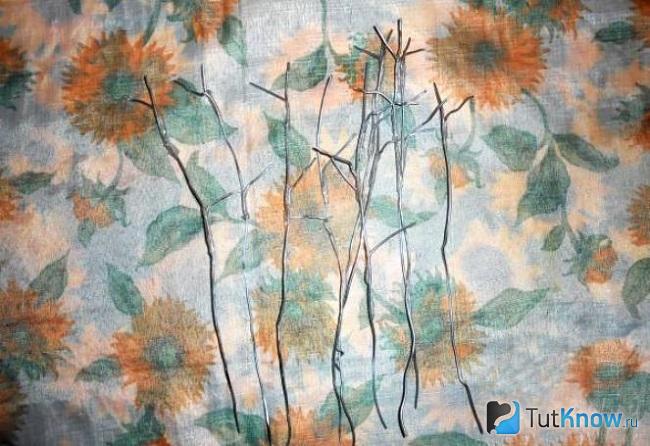
Dilute cement or gypsum, pour the solution into a pot, and place a tree trunk with curved ends in the container. While the mass hardens, the poplar tree needs to acquire branches. To make leaves for them, cut different sized squares and cut out leaves from them. After heating the needle over the flame, make a hole in the upper part.

Insert a thin wire here, fold it in half, twist it. Connect three branches into one, make several such preparations.

To make a decorative tree with your own hands, connect several blanks consisting of three branches.

Cover the wire parts with gray thread and secure the ends with glue. Leave the lower part of the branch free; it will need to be attached to the trunk.

Use the same technique to complete the entire tree, wrapping its trunk with gray thread.

To make grass, cut green threads of the same size and fold them in half. Lubricate the bends with glue, attach the workpieces to a plaster or cement base.

This is how wonderful the poplar tree turned out. If you want to make a whole mini-garden, then check out the second master class.
How to make a homemade apple tree with your own hands?

This decorative tree is suitable for indoor spaces, as its flowers are made of yarn.
To make it, take:
- wire;
- green and brown fabric;
- cardboard;
- pencil;
- scissors;
- wire cutters;
- scotch;
- glue;
- pot;
- gypsum or cement;
- hook;
- brown and red threads.

Armed with tape, use it to attach three small ones to one large branch. Form several such blanks.
At the next stage, the branches need to be wrapped in fabric. Fleece or velvet looks especially beautiful, use these fabrics.
From the selected brown material you need to cut strips, their width is 2 cm. Wrap them around the newly created branch blanks, leave 3 cm free at the bottom. Secure the ends of the fabrics with glue.

Use this technique to design several blanks. Now they need to be collected into a single tree. To do this, you need to cut a strip 3 cm wide from the fabric, wrap it around the fabric and connected branches. Also secure the ends of the material with glue.

To make the decorative tree further, you need to install it in the chosen container. If it does not have a narrow neck, pour gypsum or cement mortar into the container to fix the plant. Straighten the branches and you can start decorating them.

Now you need to cut the green fabric into leaves of different sizes. To prevent their edges from spreading, pour these blanks over the flame, without bringing them too close to it.

Glue the leaves onto the branches, and you can start creating fruits. We will make them from pompoms. Cut out two circles with a diameter of 3 cm from cardboard. Draw a smaller circle inside and cut it out. You will get two cardboard rings like this.

Connect them into one piece, wind a red thread around it, helping yourself with a crochet hook. The yarn should completely cover the workpiece. Now you need to cut it along the outer edge, lay a brown thread, and use it to tighten the resulting pompom.

Cut out leaves from green fabric and glue them onto a brown thread.

Hang the prepared fruits on the branches. You can decorate the pot as you wish.
If you still want to make a decorative tree for the street, then the following option will suit us.
DIY Christmas tree
To create it, you will need a small set of necessary things, these are:
- thin and thick wire;
- green wool threads;
- gypsum;
- lighter;
- candle;
- glue;
- scissors;
- green plastic bottles;
- cotton wool;
- capacity;
- Christmas decorations;
- artificial snow.

While the plaster hardens, make twigs to create an elegant Christmas tree. Cut off the neck and bottom of a green plastic bottle with your own hands. Using scissors, the rest of this container needs to be chopped into equal strips. Their long edges must be cut into a fringe.

Using a heated needle on a flame, make a small hole in the corner of this plastic piece. Insert a thin wire here, fold it in half and twist it. Do the same with the rest of the blanks.

Now, starting from this corner, roll the wire. To ensure that the turns of plastic are fastened together, periodically bring the whole side of the workpiece to the candle flame.

It is not necessary to cover the entire branch with such needles, but only its upper part. Do the same with the rest of the details.

You can melt the needles over a candle flame or leave them in their original form. The blanks should be of different sizes.

The crown of the decorative tree will be the shortest. Attach it here using the free end of the wire.

Then there are slightly larger branches.

Gradually assemble the entire tree, then wrap green thread around its trunk, securing the ends with glue.

If you are making a Christmas tree for the New Year or in the middle of summer you want to remember this holiday, then decorate the pot with artificial snow, you can replace it with ordinary cotton wool. Leave the Christmas tree as is or decorate it with toys.

This decorative tree looks great at any time of the year. If you still have green plastic bottles left, maybe you can make a second Christmas tree with your own hands using a different principle.
This is how it will turn out.

Take:
- dense polyethylene or green oilcloth;
- satin ribbon;
- Styrofoam;
- tree branch;
- suitable container;
- glue gun;
- alabaster;
- wire;
- beads.

In total you will need about 20-25 of these tapes. To turn these parts into twigs, wind each one onto a piece of wire.

Roll the cardboard into a cone and secure the sheet in this position using a stapler, straighten the edges with scissors. Spread glue on one side of the branch and attach it to the back of the top of the cardboard cone.

If the fixation of the branch is weak, then first wrap its end with threads, lubricate them with glue and attach to the cone.
Here's how the Christmas tree is made. Place it in a suitable container with your own hands, pour alabaster or other quick-drying solution into it. Hold in this position for some time so that the mass sets. You can lean it against a vertical support to free your hands.
When the Christmas tree is fixed, cover the surface of the solution with pieces of foam plastic, which will become snowdrifts by gluing this material.
The container can be decorated, for example, with twine. It is also fixed with glue.
In order for a decorative tree to acquire needles, take blanks made of film and wire. Wrapping them around the cone, fix the turns with glue.

When the entire surface of the cardboard is decorated in this way, you need to decorate the Christmas tree. To do this, cut strips from a thin satin ribbon and tie them in the form of bows. To prevent the ends of these objects from fraying, scorch them over a flame.

Wrap the Christmas tree with gold thread from top to bottom in a spiral, and glue bows. You can decorate the pot with beads and rejoice at what a beautiful DIY Christmas tree it turned out to be.

If you want to get acquainted with another method that will tell you how to make a decorative coniferous tree with your own hands, then the third master class in this section is for you.

Very soon you will have a tree like this. Making it with your own hands is quite simple. The main thing is to have a simple set of materials and equipment, which consists of:
- green plastic bottle with a volume of 2 liters;
- tape;
- album sheet;
- scissors

From the remaining part of the container you need to cut 9 blanks:
- three pieces will measure 4 by 6 cm;
- the next three pieces are 7 by 8 cm;
- three more blanks 5.5 by 8 cm.

Now cut each such detail on one side into strips in the form of a fringe. Their width is 4 mm, do not reach the top by about 1 cm.

Now you need to twist all these strips using the blunt side of the blade. Press it firmly against the plastic and move it down and up several times.

Now these “cilia” need to be attached to the trunk.

Attach the largest ones downwards using tape; the smallest ones should be at the top.

Roll one smaller piece into a fountain shape and insert it into the upper part of the paper cone.
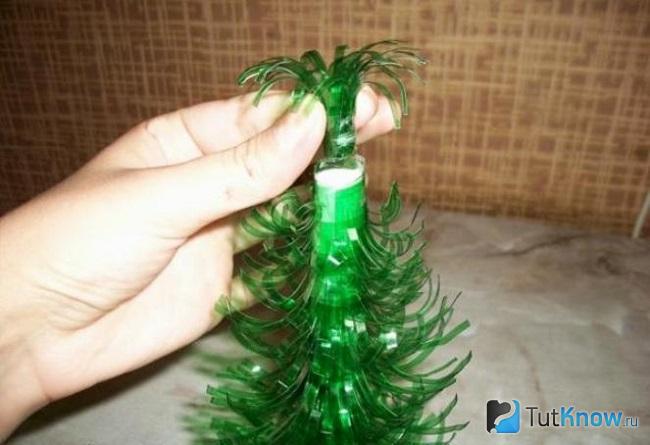
If you want to make a tree for the street, then use plastic instead of cardboard. This is such a wonderful Christmas tree, created with your own hands.

How to make a bonsai?
Such a decorative tree can also be made from the most unexpected materials.

To create such a craft you will need:
- tracing paper;
- pencil;
- wire;
- support for flowers;
- Styrofoam;
- aluminium foil;
- dye;
- tassels;
- green paper;
- scissors;
- hot glue or liquid nails;
- newspapers;
- gypsum;
- textile;
- PVA glue.

By twisting these two ends of the wire at the top, you will form a trunk. And bend it several times in different directions. Make branches from wire and screw them to the base of the tree.

You will make smaller branches from thin wire, also screwing it into place.

Now wrap the foil tightly around the tree and its thicker branches. Then cover this blank with brown paint. Use a dry brush to go over it to make the bark look as realistic as possible.

Cut leaves from green fabric and attach a piece of wire to each using liquid nails or hot glue. Now it will be easy to attach the leaves to the branches. If desired, cover the sheets with green paint.

To secure the decorative tree in the container, pour alabaster or plaster into it. You can put this solution only on the bottom of the pan, and place crumpled newspapers on top. They are also covered with a small amount of plaster. You can decorate the surface of the pot with green-colored shavings or cover it with paint of that shade.
Here's how to make a bonsai using old buttons. Such an original tree will become an interesting decoration for the room.

Twist the wire pieces.
For creativity you will need only three items:
- wire;
- coil;
- buttons.
Instead of buttons, you can use small denomination coins. Using a thin drill bit, holes are made in them and then strung onto branches.

These are the decorative trees you can make with your own hands. If you want to see the process of making such products, then we suggest you sit comfortably in an armchair or on a chair to watch the video.
If you are interested in the process of creating a bansai, then check it out again. But the manufacturing idea is a little different, as you will see now.