Master class on making a scratching post. DIY scratching post for cats: detailed instructions for making a DIY cardboard scratching post
Sharpening a cat's claws is a natural instinct: in this way, the furry predator cleans them of the keratinized layer and marks the territory. If street dwellers, as a rule, use trees for this purpose, then for pets the function of “sharpening” is forced to perform the upholstery of chairs and sofas, wallpaper, carpets and other home furnishings. Instead of scolding your pet for ruining scratched things, you just need to buy him a scratching post, or even better, do it yourself, saving a significant amount of money.
In this article we will tell you in detail how to make different models of this cat accessory yourself from scrap materials.


Pros and cons of a homemade scratching post
Probably the main disadvantage of a DIY scratching post is the time you have to spend on creating it. You may also need to purchase some materials and tools if they are not found in the house. But in return you will receive environmentally friendly and the most suitable household item for your pet. And, of course, you will save your family budget.
Scratching posts in pet stores - even the most primitive in design - are not cheap. In addition, your four-legged pet may not like the purchased “sharpener” and he simply will not use it. For example, a cat may be put off by the smell of a store-bought accessory, especially if synthetic dyes were used in its production. The result is wasted money and the continued problem of damage to furniture and walls.
Knowing the tastes of your pet, you can take them into account as much as possible when making your own scratching post.


Some owners, wanting to save money, buy used cat paraphernalia. However, this is even worse. Firstly, they will smell like other animals, which increases the likelihood that your pet will not accept the fluff. And, secondly, it is unknown how healthy the previous users of the scratching post were (their owners may not tell about this), which means there is a risk of infection of a furry family member.
Another advantage of a homemade scratcher, especially for creative people, is the opportunity to show imagination and choose or come up with the design of the accessory yourself, taking into account, of course, the taste preferences of your four-legged pet. You can, for example, get creative and make a scratching post in the shape of a cat, fish or other animate and inanimate objects.
Such an accessory will not only delight your pet with the opportunity to “get a manicure” comfortably and with pleasure, but will also become an original decoration for the room.


Selecting size and shape
Regarding the size of the scratching post, there are certain standards in this regard: the larger the pet, the larger the scraper should be. The parameters of the product directly depend on the size of the cat. This is especially important for wall models, so that the cat does not scratch the wallpaper while sharpening its claws. The width of the claw blade in this case should be equal to the width of the animal’s outstretched paws. You can calculate the length of the scratching post by adding 5-10 cm to the length of the cat itself (excluding the tail).
For Maine Coons, the height of the vertical nail bed should not exceed 100 cm, especially if there is a bed on top. This is necessary in order to remove excess load from the front paws when jumping. For a kitten, make a scratching post “for growth”, focusing on its approximate future size as an adult.
If the living space allows, then it is better to supplement the nail sharpener with a bed and a house, one or more.


The variety of scratching post models is simply amazing. There are 2 main types of scratchers: floor and wall (or hanging). There are many variations within each type. Thus, floor scratching posts can be flat (located horizontally or at an angle), in the shape of a column, equipped with additional beds, stairs, bridges and houses. The more cats there are in the house, the more elements the scratcher should consist of.
And almost all designs can be made with your own hands from available materials. The main thing is your desire and willingness to spend a certain amount of time on your pet.

Required materials and tools
A cat's sense of smell is much more subtle and sensitive than a human's. Therefore, when making such an important and necessary attribute of a cat’s life as a scratching post, you need to use only natural materials that do not have a pronounced odor. Yes, this would be perfect:
- tree;
- jute, linen or sisal ropes;
- leg-split;
- sackcloth;
- hemp;
- pressed or corrugated cardboard;
- carpet


But artificial materials can cause allergies and cause serious harm to the cat’s health. For example, you should not make a scratching post from a plastic pipe - plastic has an unpleasant odor and is allergenic.
Another important advantage of products made from natural fibers is that they remove static electricity well.
The surface of the scratching post should be made rough and durable, but not too hard. The process of scratching should give the cat pleasure and relax it, and not bring unpleasant, and even more so, painful sensations to the animal, and cause broken claws. The cat's claws should penetrate several millimeters deep into the fabric, tearing the fibers of which it is composed, but without clinging to them. From this point of view, the best solution is sisal rope.


Try not to use nails and metal staples to connect the parts of the nail clipper, or fix them tightly and thoroughly so that your pet does not get hurt when cleaning its claws. It is advisable to place the fastening parts from the reverse side of the product.
The material for the scratching post also depends on the size of the animal. If the cat is small, then it is better to give preference to models made of cardboard or corrugated cardboard - If the coating is too hard, the baby may damage his claws. However, large representatives of the cat family have stronger and harder claws, so it is worth making cloth for them from stronger and more durable materials. For a large cat, natural wood is suitable.
Only it is better to choose a tree that does not smell strongly and without knots, having first cleared it of bark.


And, of course, be guided by the tastes of your cat. Look at what your pet is sharpening its claws on now. Try to use the same or similar material when making homemade scratches. If he prefers doors, then a piece of wood will do. If he “does a manicure” on rugs, then carpet will be the best choice; scratches the furniture upholstery - choose jute or sisal rope for covering (the latter is the most reliable and durable material, although the most expensive).


To create a scratching post you may need the following tools:
- threads;
- glue;
- scotch;
- compass;
- screws;
- stapler;
- stationery knife;
- drill;
- hammer and others.
Each model will have its own set of tools.

How to make a hanging model?
Wall-mounted (or hanging) scratching posts have many advantages over floor-mounted ones.
- They are stable, there is no risk that a playful cat will be able to turn over such a sharpener, since it is tightly secured in a certain place in the house. The wall-mounted scratcher is perfect for active, playful and large pets.
- It does not take up much space, so this type is the best solution for small apartments.
- Thanks to the vertical position of the hanging scratching posts, wool will not collect on them.
- They can be used to cover wallpaper on the wall that has already been scratched by your pet - this is another important advantage of wall models.
- And finally, such a scratching post is easiest to make at home.


We will tell you a detailed algorithm for its production.
- We will need a rectangular piece of plywood or wood panel as the base of the scratching post. The optimal width is 40-45 cm, so that the cat does not touch the wallpaper, stretching its paws to the sides. The length of the scratching post should be slightly greater than the size of the cat itself in the position of its paws extended upward.
- The prepared wooden base must be covered with material on which the cat will sharpen its claws. Carpet with the wrong side facing out is suitable for this purpose (it is better to make it two-layer for maximum strength and durability). You can also use a cotton blanket folded in several layers, or even thick corduroy. The size of the fabric sheet should be slightly larger than the parameters of the wooden rectangle, so that the edges of the material are wrapped on the wrong side and fixed with glue or using a stapler. Another covering option is to wrap a piece of plywood with jute rope or twine.
- We drill several holes on the wall with a drill and attach the scratching post using 4 slats and 6 long screws.


You can also make a corner scratching post, which cats love very much. To do this, you need to take not one, but two pieces of plywood, the width of each of which should be at least 25 cm. We glue a fabric layer onto both wooden sheets and fix the structure with screws on one of the protruding corners of the room or on the vertical plane of the doorway.
However, if you don’t want to spend a lot of time making a full-fledged hanging nail clipper, then you can simply cover the walls to any height with carpet.


Step-by-step instructions for making a floor scratching post.
The main advantage of a floor-mounted scratching post is its mobility - the ability to quickly change the location of this cat attribute in the apartment at your discretion.
There are a huge number of models of floor-standing scratching posts, including those that you can make yourself. Let's talk about the main options that are easiest to make with your own hands.
The simplest and fastest model to make is a regular horizontal scratching post, which can also serve as a cat bed.
Take a sheet of plywood or a regular board. We cover it with carpet on both sides with the wrong side facing out, and the edges of the material can also be sewn with thick threads or secured with a stapler. That's it, our scratching post, also known as a bed, is ready.


But here is a slightly more complex version of the horizontal rag.
To a wooden rectangular board measuring 30*60, we nail a block of the same size on both edges (you can screw them with screws using a drill). They just need to be securely fixed so that the cat does not get injured on the iron parts.
Additionally, you can secure the coating by drilling two holes in the board next to the bars and threading ropes through them, making knots at the ends.

You can make a scratching post not horizontal, but at an angle (in the shape of a slide).
- To do this, we need another wooden plank, the same or slightly shorter length than the main one (the angle of inclination of the future product depends on this).
- We cover both planks with carpet or other hard, dense fabric. We fix the fabric with glue, you can also sew the edges of the fabric from the inside.
- We connect the two parts of the scratching post to each other with furniture corners or tightly driven nails.
- For greater stability, it is better to place such a scratching post next to the wall.


Another fairly easy-to-make (though short-lived) type of floor scratching post is made from cardboard. It will require the following equipment:
- pressed cardboard;
- stationery knife;
- glue;
- scotch.
The procedure is as follows:
- cut a sheet of pressed cardboard with a stationery knife into equal strips approximately 1 cm wide;
- glue them to each other with the smooth side so that the ribbed wavy edges of each strip are on top and bottom;
- wait for the glue to dry;
- and the final touch - we tape the resulting scratching post around the entire perimeter to make the structure more durable.


The most popular type of cat scratcher is the post scratching post.
- To make it, you will need 1 sheet of chipboard, from which we will make a stand for the nail clipper. For this purpose, you can use a former countertop, parts of an old cabinet or other furniture. The base should be wide and stable enough so that the cat does not overturn the entire structure during play.
- The shape of the stand can be round, square or rectangular, at your discretion. If you choose the first option, then you will have to use a compass to first draw an even circle, and then cut it out exactly along the circumference with a jigsaw.
- You can leave the wooden base as is, but it is best to make some kind of covering so that the cats can also use it as a bed. You can cover it with carpet or glue it with jute rope, moving from the edges to the middle.
- If you want to make an additional bed for your pet at the top of the scratching post, you will need another sheet of chipboard or plywood, equal in size to the bottom one.
- The column itself can be made from a metal pipe or several tin cans placed one on top of the other. We connect them to each other using glue, after placing some heavy object in the bottom one for stability of the structure. Then we cover it first with carpet, and then with rope. We connect the column to the base using furniture corners.
- If you make a post from wood, it can be either round or rectangular. The average height is 60-80 cm. It can be covered with nothing or wrapped with sisal or jute cord, pre-lubricated with glue. It is attached to the base with nails or screws.
- We will hang the toy on the top of the scratching post, securing it to the end of the rope.


Almost everyone can make the above options for claws.
But to make a scratching post with a bed and a house, you will need at least minimal carpentry skills and preferably a partner.
- You will need 2 sheets of plywood: one larger (for the base), the second smaller (it will serve as a lounger and should be equal to the size of the cat when extended, both in length and width).
- We take two wooden posts of the same diameter. One of them will be a stand for the house, the second will act as a scratching post, and there will also be a bed on it. The first should be significantly smaller in height than the second - about 30 centimeters.
- We screw both posts to the base with self-tapping screws.
- We coat a large post with glue and wrap a rope made of jute or sisal around it.
- After the glue has dried, we place a smaller sheet of plywood on top of the structure, covered with carpet or furniture fabric. The bed is ready.
- Having made the markings, we cut out the walls, ceiling and bottom of the future house from wood or plywood. They should be the same size, approximately 35*35 cm. We cut a round inlet hole, which we first draw with a compass. We nail all parts of the house to each other. They can also be pre-covered with fabric.
- In the center of the bottom of the house we mark the attachment points to the base post. For greater stability, you can attach it to the scratching post itself, first making markings on the wall. We fasten the house with self-tapping screws.
When a cute and fluffy bundle of joy appears in your home, your belongings are at risk. At one point they can turn into a cat's claw sharpener. That's why the cat needs a scratching post. How to make it yourself?
This article is intended for persons over 18 years of age
Have you already turned 18?
Of course, you can buy a scratching post at any pet store. But it’s much more interesting to make it yourself. A simple and functional version can be made very quickly. It does not take a lot of time. At the same time, you can save a decent amount. After all, all accessories for pets are not cheap. If you wish, you can also make an original scratching post with a house or a bed. It will be able to compete with those sold in the store.
It is worth paying attention to the choice of materials, paying attention to the nature of their manufacture and how they affect the health of animals, whether they are safe for pets or not.
All scratching posts quickly lose their beautiful original appearance. But this only matters to the cat's owner. The animal does not care at all what the object on which it sharpens its claws looks like. The main thing is that it fulfills its function. In addition, cats can very quickly turn a new scratch into something old, ridiculous and tattered.
Also consider the fact that if you buy an expensive scratching post, the cat may not even approach it. After all, he doesn’t care how much money you spent. This happens if a furry pet does not like the smell of the materials and dyes that were used in the manufacture of the product. Never force your cat to use a new accessory. Just because it's expensive doesn't mean it's high quality.
Synthetic materials and paint can negatively affect your pet. He may become lethargic, thin and slow, lose his appetite and may begin to lose his fur.
That is why a homemade scratching post made from proven quality materials is the best option for kittens.
It can be made:
- from rope;
- from cardboard;
- from corrugated cardboard;
- from a cardboard box;
- from a sewer pipe;
- from scrap materials;
- made of wood;
- from carpet;
- from a chair.
There are many options for what you can use to make a claw blade. Choose the appropriate material that will be the most affordable and convenient to purchase.
How to make a scratching post for cats with your own hands?
There are several types of scratching posts:
- floor;
- wall-mounted
The floor can be flat, or it can be combined with a house or a bed. Similar accessories for Maine Coons, Persian cats, British Folds and other breeds take up quite a lot of space. But often they are necessary. Heavy flat ones are used by those whose wall finishing material in the house does not allow attaching a wall scratcher. Of course, they can be replaced with light and simple products made from cardboard or textiles. But they will always be scattered under your feet. But a floor-mounted scratching post can be located under a table or near a chest of drawers or a sofa. And she won't bother you. Posts will be a great idea for pets who live in cramped homes and for those who do not go outside.
Large complexes with houses and beds are perfect for cats who often give birth to babies. Master classes will help you create excellent accessories for furry pets.
DIY cat scratching post: diagram
A flat floor claw clipper is incredibly easy to make. Its basis is a piece of plywood, chipboard or wood 70-100 centimeters long and 40-50 centimeters wide. The base can be wrapped in carpet with the wrong side facing out. An old wool carpet is perfect for this.
Sew the edges of the carpet together with strong threads or secure them together with twine using a crochet hook. This accessory is perfect for a calm adult cat. When one side becomes ragged, you can turn it over. The downside of this sharpener is that it constantly needs to be cleaned of wool.
Let's figure out what a scratching post is. A large and tall scratching post in the shape of a column can be with or without a base. A claw sharpener without a base is attached to the floor or ceiling with metal corners and screws. Ideally, it should be from floor to ceiling. The cat will be delighted with such an attraction.

The claw hammer can be made from wooden trunks 70-100 millimeters thick with peeled bark, as well as from a plastic pipe with a diameter of 50 millimeters, wrapped in thin rope or twine.
Before wrapping, the pipe must be lubricated with glue. During wrapping, the rope must be compacted by tapping it with a hammer. If you want to make a tall post up to the ceiling, it will take quite a lot of twine. It is much more profitable to make a wooden one.
On the base, the column must be made at least ten millimeters high. As a base, you can use multilayer plywood or a heavy board 50-70 centimeters long and 40-50 centimeters wide. For the scratching post you will also need a piece of thick plastic pipe. It must be attached to the central part of the base with metal corners and screws.
Cut a piece of carpeting that is longer and wider than the base. In its center, make a round hole of a size corresponding to the diameter of the pipe. Coat the pipe with glue and wrap it with twine. You can put a toy in the hole.
DIY cat house with scratching post: drawings
At first glance, it may seem that it is very difficult to create such a luxurious complex at home. But if you follow step by step instructions, you can understand that it is very simple.
If you want to make a complex with several houses or beds, you should start with drawings.

If you have several pets at home, make your own house for each of them. All of them can be combined into one large complex.
After developing the drawing and calculating the materials, you can begin manufacturing:
- Prepare the base for the scratching post. If the complex will have one post, use the same stand as for a pillar with a base. If there are several racks, the base must be cut.
- Attach the pipe sections to the base with metal corners.
- Make a pattern for the base cover with holes for the pipes. Place the cover onto the stand and secure it.
- Wrap the pipes with rope or twine.
- Make beds using the technology of creating flat floor scratching posts. Please take into account the size of the animals. It is important that they feel comfortable in the complex. Attach the beds to the pipes with corners.
- Attach a house to one of the beds. It should have a removable design so that it can be washed.
- It is convenient to attach it using a zipper or Velcro. Sew one part to the bed, the second to the base around the perimeter of the house.
- Attach the complex to the floor in the corners so that cats do not turn it over while running and playing.

Even though the scratching post is wall-mounted, it itself does not need to be attached to the wall. To make it, you will need a wooden panel, which will serve as a mount for the future accessory. The height should match the claw sharpener. And you can choose any width, depending on your preferences. If you want to make a corner claw, you need to use two panels.
To create a scratching post, take:
- wooden panel;
- drill;
- screws;
- jute or hemp twine (with a diameter of 5 millimeters) - two small skeins or one large;
- bar.

To create a kitty accessory you will need a wall panel or a regular wooden block. The height of the bar is from 50 to 70 centimeters. To find the exact size, measure the length of your cat without the tail. The height of the bar should be twice as high.
Using a drill, drill six holes in the wooden panel and in the block: two holes each at the bottom, in the middle and at the top. They must be parallel. Insert screws into them.
Carefully wrap the twine around the wooden beam. In this case, it is necessary to secure the edges of the thread well.
The last step is to screw the block with threads to the wooden panel attached to the wall with screws. The scratching post is ready! Your cat will love it! Especially if you present him with an accessory rubbed with kittennip.
Many people do not get a cat for fear of torn or upholstery. Even the most affectionate representative of this family will make “scratches” in or chairs. This happens on an instinctive level; after all, the blood of a wild animal flows in them. In nature, they sharpen their claws on tree bark, grass or ground. The optimal solution is a DIY cat scratching post, which you can easily make at home. Today, the advice of the Homius editors will help you create ideal, and most importantly, harmless conditions for sharpening claws for your pet.
It is impossible to wean a cat from the instinct to sharpen its claws; it is in their genes. Pet owners should know why this happens:
- The claws are constantly growing, they are overgrown with a layer of rough skin, causing discomfort to the animal during outdoor games. Therefore, the cat tries to get rid of this cover on a comfortable surface.
- While the cat sharpens its claws, it gets great pleasure.
- The pet marks its territory. Between the fingertips there are glands that secrete a secretion with a subtle aroma that only animals can smell. In this way they mark personal possessions.
This is interesting! In pet stores you can buy special multi-colored anti-scratch pads that look like a manicure. But not all cats will like this innovation, and the cost of a homemade scratching post will be less.

Classification of claws
The most common type of scratching post is a vertical post wrapped in twine. In addition, accessories can be classified according to the following criteria.
| Classification | Description |
| By shape | Floor, hanging, corner, ring or column. |
| By type of design | In the form of a house, multi-tiered, complemented by shelves or bridges, a town with toys. |
| According to the material of manufacture | A scratching post can be made from wood with twine, or fabric will also work. |
| By size | Miniature, medium, large and monolithic. |

scratching post for cats
How to quickly and easily make a simple cat scratching post with your own hands
There are a lot of options for making scratching posts; you can supplement them with interesting toys or bridges. Let's look at the principle of creating the most common structures using simple examples.
We make a scratching post out of cardboard with our own hands
To make the most budget-friendly and simple scratching post pillow, you will need the following materials and tools:
- cardboard or corrugated cardboard;
- stationery knife;
- piece of fabric;
- thick paper;
- adhesive tape.
Then do the following:
- Disassemble the boxes and draw stripes more than 10 centimeters wide on the surface.
- Cut strips.
- Then you need to twist one strip and glue it. This will be the middle or core of the scratching post.
- Then wind all the other strips in the same way around the core, periodically securing the layers with glue or adhesive tape. Particular attention should be paid to the last layer.
- Wrap it in cloth and secure it.
- Place the structure on thick paper, trace the perimeter, cut it out and secure the base to a scratching post.

You can watch the master class in more detail in the video below:
scratching post bed
How to make a scratching post for a cat from wood with your own hands
Another budget option is a wooden scratching post. A small log or stump picked up in the forest is suitable as a base. The workpiece should first be cleaned with a stiff bristle brush and dried in a dark room.
- Wrap the workpiece with twine completely or individual fragments.
- Secure the workpiece on a wide base, use corners and a drill to do this.
- Tie some fun little toys to the top of the scratching post.
Ready-made sharpeners in stores are wrapped with a special rope, and not every seller will answer what the rope for scratching posts is called. If you wish, you can look for sisal thread, but any rope or twine will completely replace it.

scratching post post
How to make floor scratching posts for cats with your own hands with photos of finished designs
A more complex option is floor structures. You can keep things simple and use an old small coffee table for this purpose. But we will tell you how to make a scratching post for a cat with your own hands in the form of a column, a house and an entire town with photo examples of manufacturing processes and finished works.
Mobile option: floor-mounted flat cat claw sharpener
A flat scratching post is one of the simplest devices. To do this you will need a small sheet of board or plywood. Wrap it on both sides with carpet, wrong side up, or with a rope. The edges can be sewn with thick threads or secured with a stapler. This design can also be used by your pet as a bed.

Step-by-step instructions for making a scratching post in the form of a column with your own hands with photos of the process
To make a floor-mounted claw post, we suggest watching a detailed master class. After becoming familiar with this process, you will be able to make any of the most complex structures with your own hands.
| Illustration | Description of action |
 | Before you make your own cat scratching post, you need to cut out the base from a sheet. It is important that the corners are not sharp. |
 | Glue the rope to the base, starting from the end. After the side edge, proceed to securing the rope to the base. |
 | For the column, take a stretch film tube no more than 40 cm high. For the base, you need to take a piece of wood and make it the same size as the tube. |
 | Insert a piece of wood into the base of the tube and secure with three self-tapping screws. |
 | Next, you need to mark the place where the tube is attached on the back side of the base, screw in 3 self-tapping screws and secure the post. |
 | Using a glue gun, secure the rope to the post from bottom to top. |
 | Glue the joint between the base and the post with a tourniquet, increasing the turn horizontally. |
 | To prevent the cat from subsequently untwisting the end of the rope, you need to unwind it a little, cut off one part and glue it to the base. |
 | Glue three small ropes to the top of the post and tie knots at the ends. |
| | Make a decorative cap for the post. |
The kitten will love playing with this interesting new product, and you can watch the master class in more detail in the video
All the nuances of making your own cat house with a scratching post
After we have described in detail how to make simple designs, you can complicate the task a little and make it with a scratching post, as well as supplement it with beds. First you need to make a sketch and draw a diagram of the future structure. Next, the manufacturing process is as follows:
- Cut holes on the base for installing posts.
- Make a pattern from fabric, cut holes for the posts and secure it to the base using a stapler.
- You can use . They should be secured to the base with metal corners and screws.
- Wrap the twine around the posts.
- Make the upper beds according to the principle of flat claw pads. Attach to the posts using furniture corners.
- Attach soft houses for cats to beds.
It is important! It is advisable to attach a large structure to the wall surface so that cats do not turn it over during games.

scratching post with house
Schemes and sizes of complexes for cats with scratching posts and beds for making yourself
You can draw up a diagram of the future claw blade yourself or use the proposed ready-made examples from the Internet.


scratching post bed
Features of manufacturing wall-mounted scratching posts: photos of finished examples
For a small room, a great option is to mount the scratching post on a wall surface, especially since it is much easier to make it than a floor one. And two more advantages: there is no cat hair left on them, and they cannot be turned over at the most inopportune moment. Therefore, this is an ideal solution for active pets. To work, you will need a sheet of plywood and a rope, which can be pre-painted for decoration.
DIY wall-mounted scratching post for cats
The wall-mounted scratching post must correspond to the size of the animal. It is optimal to choose a length that is 10 centimeters longer than the cat’s extended length. These parameters will help protect the wall from scratches. Recommended surface width is 40 cm.
To make a simple wall-mounted nail clipper, you will need two sheets of plywood, the width of each should be at least 25 cm, but you need to focus on the size and breed of your pet. For a soft layer, you can use a piece of an old carpet or rug, securing it with the inside out, and a rope or several layers of natural fabric will also work. The procedure is as follows:
- Cut the canvas according to the pattern with a margin of about 10 cm, secure it with a stapler on the back side of the plywood. As an option, wrap the sheet with a tourniquet.
- Secure along the perimeter with slats using screws.
- Nail the structure to the wall.

wall-mounted scratching post
Favorite attraction: scratching post on the corner of the wall
To make a corner scratching post, you need to prepare three planks or sheets of plywood with a width of at least 15-20 cm, first fix the carpet on them with the inside out or twine. Install the prepared products at a corner, for example, at a height exceeding the length of the cat in an elongated form, about 10 cm. If desired, you can make a structure the entire height of the box, the pet will be able to climb on it during games.

corner scratching post
Travel scratching post for a cat: DIY master class
If your cat is your constant travel companion, be sure to make a travel scratching post. It will not take up much space, and your pet will be happy with its favorite thing on the road. To make it you will need a small sheet of plywood or rectangular board, wood glue, twine, a piece of rope or a strip of leather and a drill. Manufacturing instructions:
- Drill a hole in the board or plywood for the cord.
- Wrap the structure with a rope, periodically placing it on glue, carefully fixing the ends.
- In order for the accessory to be hung, for example, on, you need to secure the rope in the holes made earlier.

How to negotiate with a cat
Sometimes it is not enough to put up a scratching post; the cat simply may not understand what to do with it. To accustom your animal to a new accessory, use the following proven tips.
When getting animals, people often think only about a pleasant time in their company, but forget about the huge number of different troubles and responsibilities that can cause not the most pleasant emotions. For example, even a funny little kitten is a born hunter with all the instincts of a wild animal.
One of the main cat needs, which people for some reason perceive as an attempt to annoy them or a harmful prank, is sharpening their claws. It’s all very simple: a cat’s claws grow, just like human nails, pieces of keratinized skin then interfere with the animal’s walking and cause discomfort, so the purr will always look for a convenient place to sharpen its claws.
Living in nature, cats, as a rule, sharpen their scratches on the bark of tree trunks, and their claws are sometimes worn out from the fact that their paws run on stones and earth, and not on soft carpets, like those of pets.
Those who are lucky enough to live in people's homes have no choice but to sharpen their claws on upholstered furniture, wallpaper and other items in your interior. However, there is an excellent way out of this situation: simply provide the animal, so to speak, “for personal use,” with a special scratching post for cats: by doing this you will improve the life of your pet and simplify it for yourself. However, be careful: if your cat breaks a nail or you observe any unusual changes in your cat’s nails, be sure to contact your veterinarian.
Basic principles and types
Pet stores offer a huge selection of ready-made scratching posts for cats, but if you take a closer look at them, you will understand that such a product is worth making yourself. The fact is that a scratching post is almost always used as one of the elements of a play complex for a cat, or in conjunction with a house. To install such a structure at home, you need to know the exact dimensions of the height of the room, because the house will be installed between the ceiling and the floor (by surprise).
Despite the fact that the hollow plastic pipes that manufacturers use are very easy to install and easy to carry as a support, they are absolutely unreliable, and any active animal will loosen the entire structure in a couple of months. Don't forget about the price factor.

So, it’s much easier, cheaper and more reliable to make a cat scratching post yourself. There are many master classes, after watching which you can understand the basic principles and scheme of actions.

Before you start making an accessory, think over its design (how you want to make it, from what, how to decorate or complement it, etc.) and decide on several important nuances.

- What type and shape will your design be? The simplest is a vertical scratching post in the form of a high column. You can also make it in the shape of a ring, like a hanging or floor mat (pad).
- What material do you want to use? For strong and durable products, you should take wood or chipboard (fibreboard) sheets. Additionally, pipes made of hard material, sisal rope or jute rope are used. Some are made from rough cardboard or durable fabric.
- How large are you going to make the structure: will it be just a movable post on a stand (attached corner scratching post), or will the cat get a house, or will you aim for a whole play complex, which has numerous tiers, shelves, beds, bridges, etc. At the same time, decide how you will mount the product.
Important nuances
During the preparatory work, make calculations for the height of the scratching post. It should be sufficient for your pet to have the opportunity not only to stretch out to its full height, but also to lean on the product: purrs often like to stretch out when sharpening their claws (the free height of the post for grinding cannot be less than 90-100 mm, and its cross-sectional thickness is no less than 8-10 cm).

If you currently have a small kitten living with you, you need to make a device that takes into account the weight and size of an adult cat. If the kitten is very playful and energetic, be sure to take care of a solid base for the structure (even a simple stand can be screwed to the floor or wall).
When choosing a material, focus on its quality and strength, rather than on beauty. Materials must not be treated with paint or other chemicals. Also, be sure to ensure that the rope does not contain synthetic stretch fibers, because the kitten's claw may get caught and the animal will be injured.
Manufacturing options
The simplest and cheapest option is a tree trunk or stump/block, which many use both as a scratching post (the animal can also climb on it, like its relatives in the wild), and as an original element of decor for their home. However, wood needs to be processed, plus it requires a lot of space.
You can make wall and corner scratching posts very easily and quickly:
- On the corner chosen by the cat, you need to nail two boards, which will first need to be upholstered with carpet or furniture fabric;
- boards or pillows are also nailed to the wall (in the case of pillows, take the coarsest fabric and stuff them tightly. Then you should make pillowcases for the pillows from furniture fabric or sheathe them). The boards are covered in a similar way (you can also use felt, carpeting, or a jute rug) with one caveat: the upholstery is attached to the board with the inside out (you can secure everything with furniture nails or a stapler). When wrapping the planks with rope, pull it as tightly as possible, laying it tightly layer by layer. Be sure to secure the first and last turns. The boards are attached to the wall with screws.
A master class on making a cardboard scratching post will also be very interesting for cat lovers. To make such a product, you will need: a piece of plywood (for the base), a drill, a screwdriver, screws, a wooden dowel and a knife for cutting cardboard. And, of course, the material itself is a lot of thick corrugated cardboard.
- Prepare the base - measure the board, marking the center on it, and drill a hole in the center.
- You need to connect the wooden dowel to the plywood base. To do this, you can use a drill to drill a hole in the center of the dowel, and then screw the screw into the board and screw the dowel to the plywood. It is very important that the future post is screwed absolutely straight.
- Next, you need to prepare templates with diagrams of different levels of corrugated cardboard products. Once you print them out, you can draw the shapes you want on cardboard and then cut them out.
- When cutting, use a special sharp cardboard knife to avoid damaging the material. All layers must be cut along the contour.
- Collect the layers by stringing them onto a column in the order you marked. You should not glue the parts together - this way you will be able to easily replace a damaged or damaged element.

You can choose any shape and size for the product.
Detailed master class
Based on the chosen shape, scale and design, you can search and buy the necessary materials and prepare the appropriate tools for the job.

For guidance, you can follow the master class, since the step-by-step instructions will not let you forget anything. A scratching post is great, but if you complement the design with some other convenient device for the cat (for example, a bed or shelf), she will be very grateful to you.

- You will need 4 rectangular pieces of wood (2 fiberboard and 2 chipboard) of the same size. Take a solid pipe for the post, made of durable material, with a diameter of 80-110 mm. You will also need a wide metal strip, metal corners for fastening, rope, filler (foam rubber is possible) and fabric for upholstery.
- You will cut rectangles out of wood when you decide on the dimensions of your base and bed. Make one rectangular and one oval blank for the bed from fiberboard, and in the same way - from chipboard. To cut an oval from wood, first draw an oval shape on paper and then apply it to the material. If you see that there are rough spots on the wood, it is better to sand them down with sandpaper.
- Cut an oval of the same size from foam rubber - this will be a soft lining for your cat’s rookery. First make the sides out of paper, and then trace these blanks, attaching them to the metal strip.
- Now take care of the column. The selected pipe must be secured. To do this, insert wooden blocks into both ends and screw them with self-tapping screws. There is also the option of securing with metal corners.
- You can assemble the entire structure. To begin with, the post must be fixed in the center of the rectangular base (use two fastening methods - self-tapping screws and corners). Next, the base needs to be covered, for example, with faux fur or velor, etc. It is also better to cover the bottom of the pipe with fabric (can be glued with a heat gun). Glue the joints well so that the cat doesn’t tear anything off. Turning the structure over, fasten the fabric on the reverse side (to make it even more secure, you can use a furniture stapler).
- It's time for the bed. Place oval pieces of fiberboard and chipboard on top of the structure so that their centers coincide with the center of the post. The upper fragment is fixed to the pipe, like the base. Glue the foam blank to the bed and, using the same principle as you did below, cover it with fur or fabric. If you want to make an additional toy for the cat, use a furniture stapler to attach a rope blank for it.
- Be sure to cover the metal edge with foam rubber and fur. Screw it to the bed. It is better to beautifully level the side fur, smooth it and stretch it, attaching it with a stapler to the bottom of the bed. Now you can glue the fiberboard oval to the bottom of the bed so that staples, excess fabric, etc. are not visible. Do the same with the base so that the fabric does not fray or peel off.
- Wrap the rope very tightly around the pipe. In the master class you can see that 2-3 outer turns are even glued so that the rope holds better.
- Attach the toy and call your pet.

Are you interested in the question - how to make a scratching post for a cat? Then we suggest you make a scratching post with your own hands, because in any family where a representative of the cat family lives, sooner or later such a need arises.
By nature, cats are predators, and therefore their main weapon is not only their teeth, but also their claws. In nature, cats actively run and climb trees, during which their claws are worn down. It is important to let our pets have their say. In animals, “to pour out emotions” means to caress, protect territory, sharpen claws. It’s the latter that often brings owners a lot of trouble, a lot of inconvenience and both emotional and material losses. Just look at the damage to new wallpaper and good furniture that you were going to use for a long time.
It is worth making sure that your pet has a “magic wand” – a scratching post. Let's make it with our own hands!
Today, scratching posts are presented in a wide range in stores, the choice is great, but we will make such a device ourselves.
Bringing a log into the house is not always feasible, especially for city dwellers, but wooden slats and blocks can be found in hardware stores. From these we will make a claw holder for the cat.

The slats need to be shortened to the optimal size and glued together.

Compress well with clamps or in a vice for strength.

Mark the distance from the edge.
Attach thick twine to this point.

Cover the area of the glued board with it.

If desired, decorate with durable colored threads.

We drill two holes at an equal distance from the edge on both sides.

We attach a lace, you can take the same twine, you can make a leather lace.

We fix it at a level accessible to the pet from the floor, introduce it and make sure that this item is used for its intended purpose.

In any case, no matter how severe the devastation, do not cut the animal’s claws under any circumstances!

There is another option for making a scratching post, which is presented in the video. He will require from you the following tools and materials:
- Base: plywood, USB, chipboard, PVC pipe or for stacking
- Wrapping: twine, jute rope, linen rope
- Design: carpet, lining fabric
- Tools: construction stapler, knife, screwdriver, glue gun (screws, corners), PVA glue
Balance beam

Let's make a gymnastic beam for the cat, which will give him a lot of joy; he can climb the beam and sharpen his claws at the same time.
A 4-meter cardboard tube was purchased from carpet sellers, on which the carpet is wound.
We shorten the pipe to the required length. We make the lower edge obliquely - then it rests on the floor with its base.
 Sew a piece of carpet onto the pipe (you can glue it). It is advisable to do this overlapping.
The most difficult job is sewing the edge of the carpet. This will have to be done, because the glue at the joint will not hold up, the cat will easily tear it. Sew with thick threads. 
We install the log (optionally on the balcony), screw it to the edge of the carpet with screws.

The lower end is simply installed on the floor. You can also secure it if desired.

So, we learned how to make a scratching post in symbiosis with a balance beam for gymnastics for cats!

Carpet scratching post
Materials for production:
- board
- timber or piece of plastic pipe
- thick plywood or boards for the base
- carpet for covering

If you do not want to beat the scratching post, then you will need a rope; hemp rope, which is very durable, may be suitable for this. If you still decide to upholster, it is recommended to choose a carpet with a woven base rather than a glue base. For climbing and scraping, a woven cover is an ideal and durable option.

So, how to make a scratching post for a cat. First you need to take a column and cover it all with carpet fabric. The simplest option would be to cover the wooden board with a coating, but this needs to be done as tightly as possible. The block should be wrapped with hemp, the turns are secured every 10-15 cm with a bracket, you can also use a special clamp for this. When the post is completely entwined, the mobile scratching post needs to be secured to the base. We select a heavy base so that it stands stable.

If you have a stationary scratching post, then you need to mount it from the wall at a distance of at least 20 cm, and on top you can additionally install a bed, a kind of shelf. We cover such a shelf with carpet, but so that the pile is outward.

There is also the easiest way to make a scratching post. It can be wall-mounted, namely, attach a piece of carpet to the wall, you can choose tapestry fabric, a piece of carpet, etc. All edges must be additionally secured with slats, so they will not fray later, or simply tuck the edges.

It won’t be difficult to accustom a kitten to a scratching post, especially if he is still a baby. It will be more difficult with an adult cat, because it will not be clear to her why it was previously possible to sharpen its claws anywhere, but now it is not possible. However, diligence will help, take your paw and lightly press on the pads, so the cat will release its claws, and run the claws along the scratching post.
It will be convenient to make several scratching posts that can be placed in those places where the cat is already accustomed to sharpening its claws.
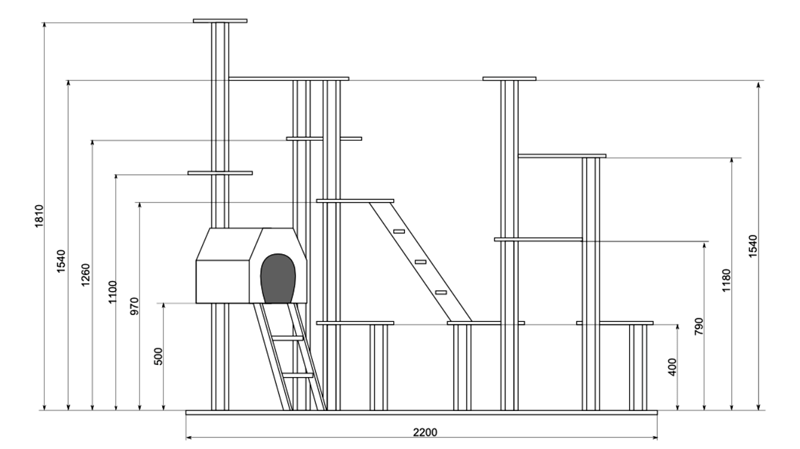
Sports town

The sports town consists of climbing poles, mezzanine paths and several bed-shelves.

The upper mezzanine is made of plywood about 1 cm thick. The width of the path (path) is 35 cm, and the same distance to the ceiling so that the cat can move freely on it.

First, we attach standard metal corners (brackets) under the ceiling, the length of the “arms” is 25cm + 35cm.

We fasten them at a distance of 1-1.5 m from each other. This will prevent the plywood from sagging. For fasteners we use 8 mm plastic dowels with self-tapping screws.

We attach the plywood (cut) to the corners using 12-15 mm bolts, it is advisable to choose bolts with a countersunk head. The top of the plywood must be tightened with a nut. For strength, we attach a block (support point) to the ceiling, and secure it at the bottom with a self-tapping screw.

We attach a side around the perimeter, making it from a 25x15 mm bar. It is also secured with self-tapping screws.

At the end of the path we will make a secret place where the cat will hide.

To make beds, we attach bars for supports, 25x15 mm, in the selected corner. We secure it using self-tapping screws and dowels. We place shelves on them, cut to the shape of a corner. You can use plywood as a material.

Then the pole itself, which acts as a scratching post and a ladder along which the cat will climb up.

For the pole we take a beam of about 100x100 mm, choose the length corresponding to the ceiling. And, of course, the rope. The best option would be hemp. It is best to take a thickness of 16, 19 or 22 mm, because... a very thick one will bend poorly, and a thin one will slip. The length must be calculated independently; for this example, with a rope thickness of 19 mm, a height of 2.65 m, and our timber it took 60 m.

The rope must be wound tightly, with tension. We strengthen every few turns with a staple or nail.

We fix the ends with crimp clamps, nailing them to the beam.

At the end, the plywood parts can be finished with carpet, securing it with a stapler, or we can place mattresses made of thin parallon covered with fabric there. The outer part can be varnished or draped with fabric.

Thus, by making a scratching post for a cat with your own hands, you can make a whole town if you wish.
