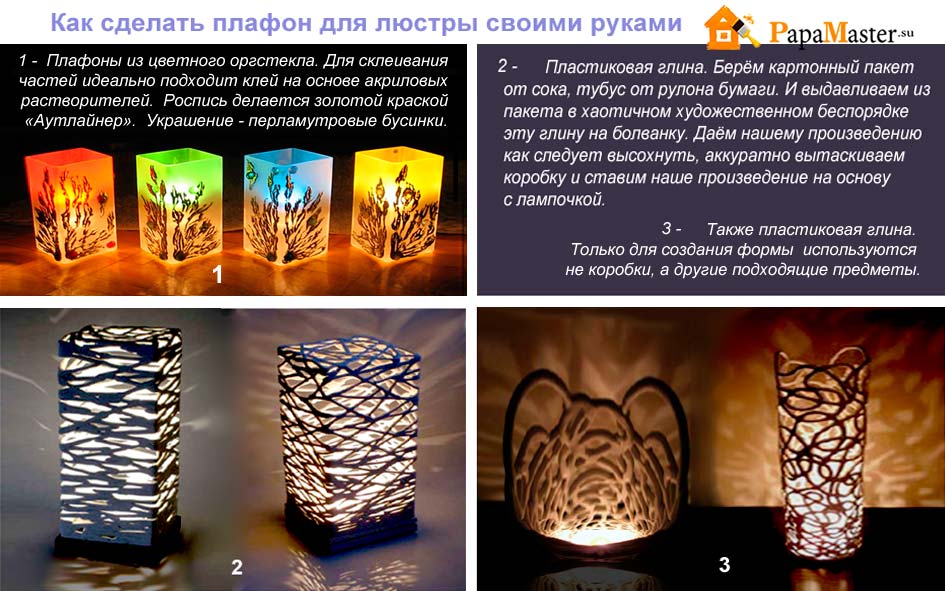
How to make your own lampshade for a chandelier. Master class on how to make a lampshade for a chandelier with your own hands from available materials
It is very easy to transform your home and make it different from others with a minimum investment. This will require imagination, skillful hands, time and patience. Various little things can affect the overall atmosphere, but will not change it significantly, and taking on remaking large things (like furniture, for example) without some experience is risky. So why then put your hand, which is so longing to create? The answer is obvious, just look up.
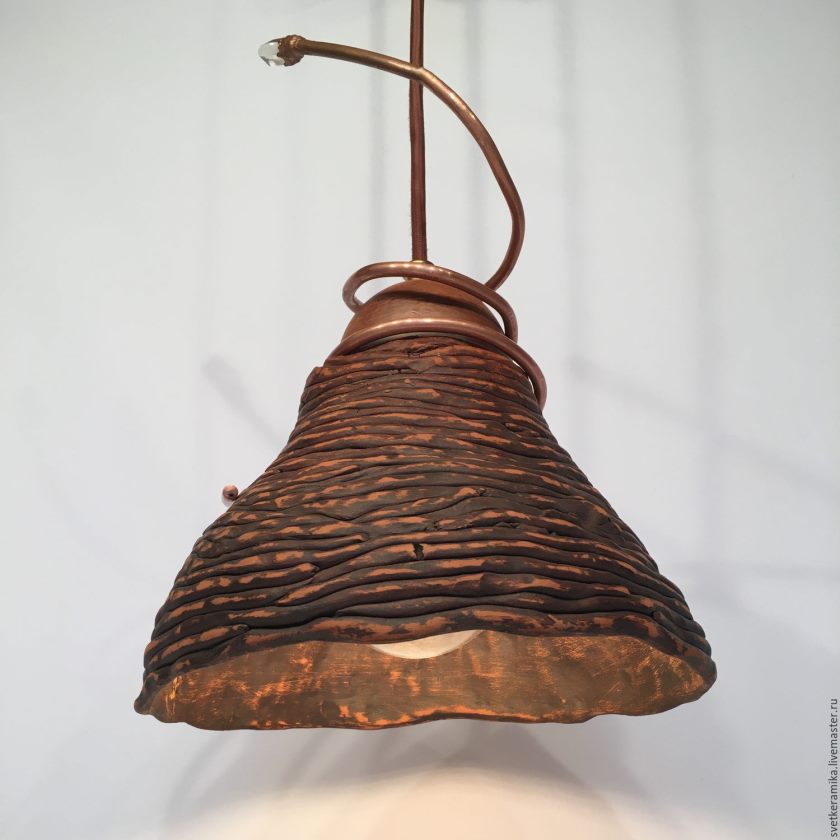
A detailed description of how to make a do-it-yourself chandelier shade for the kitchen
To manufacture this product we you will need the following materials:
- Dishes or other container of the desired shape (vase, pot, basin, bowl, etc.).
- Old newspapers.
- PVA glue.
- Brush.
- Polymer clay.
- A sharp knife with a thin blade (stationery, for example).
- Lace, stencil with a printed ornament or randomly drawn pattern.
Assembling lampshades with your own hands using a step-by-step master class from various materials.
Here's how to make a lampshade for a chandelier with your own hands from these materials:
1. Cover the selected product with the desired shape completely with Vaseline or very rich cream.
2. We tear the newspapers into small pieces and cover the entire mold with the first layer of paper pieces.
3. Lubricate the entire surface with PVA glue (previously diluted in half with water) and glue the pieces of newspaper again. The procedure is repeated about seven or eight times.
4. When the paper form is completely dry, cut it crosswise into two equal parts and remove from the form.
5. We connect these halves together from the inside with tape.
6. Roll out a large layer of clay using a regular rolling pin or glass bottle. Wrap it around the paper form.
7. Apply a napkin and press it so that its design is transferred to the clay. Or we apply a stencil and very quickly trace the drawing with a simple pencil.
8. Cut out excess clay in the required places. Leave the product until completely dry, then remove the paper base.
 how to make a lampshade for a chandelier with your own hands
 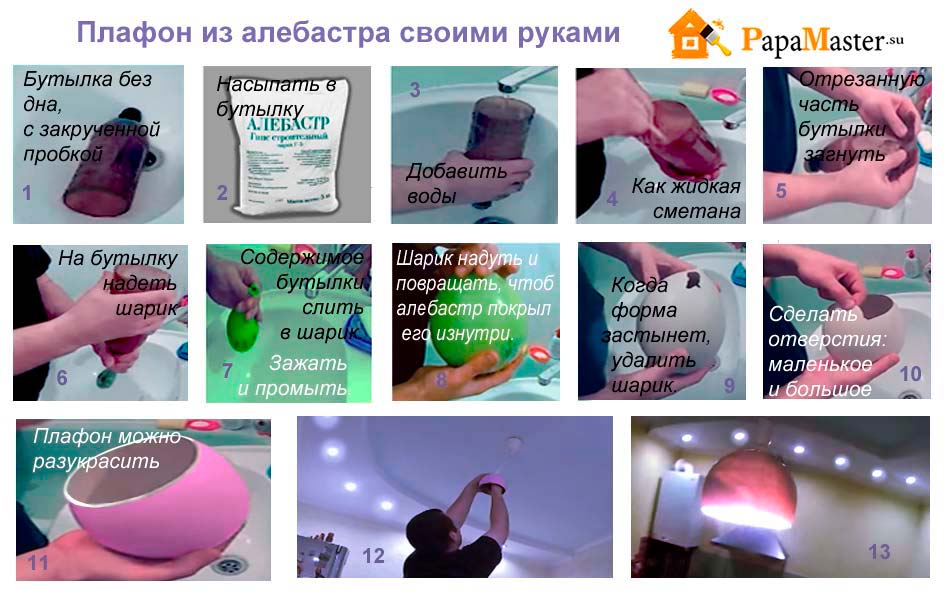 DIY alabaster lampshade
 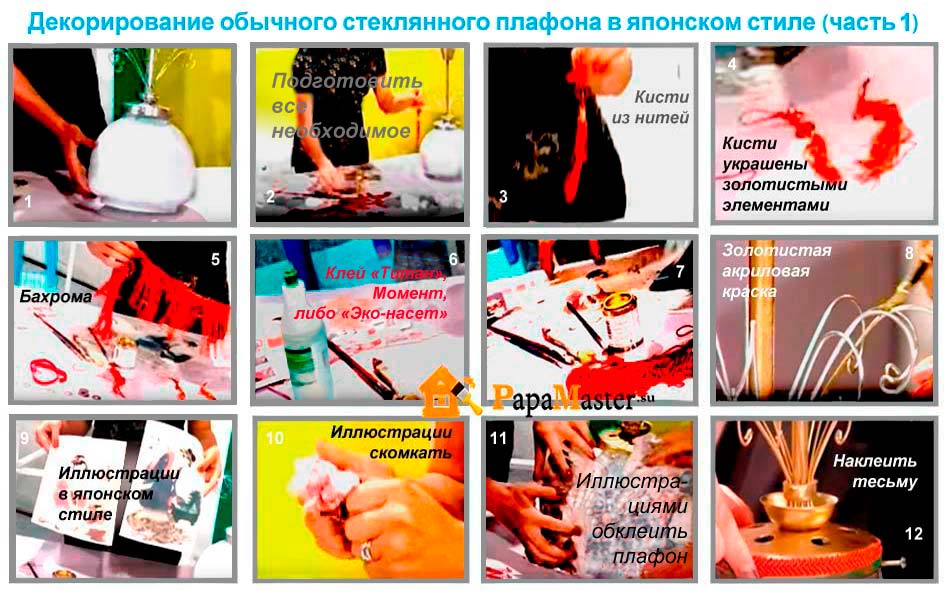 decorating an ordinary glass lampshade in the Japanese style, part 1
 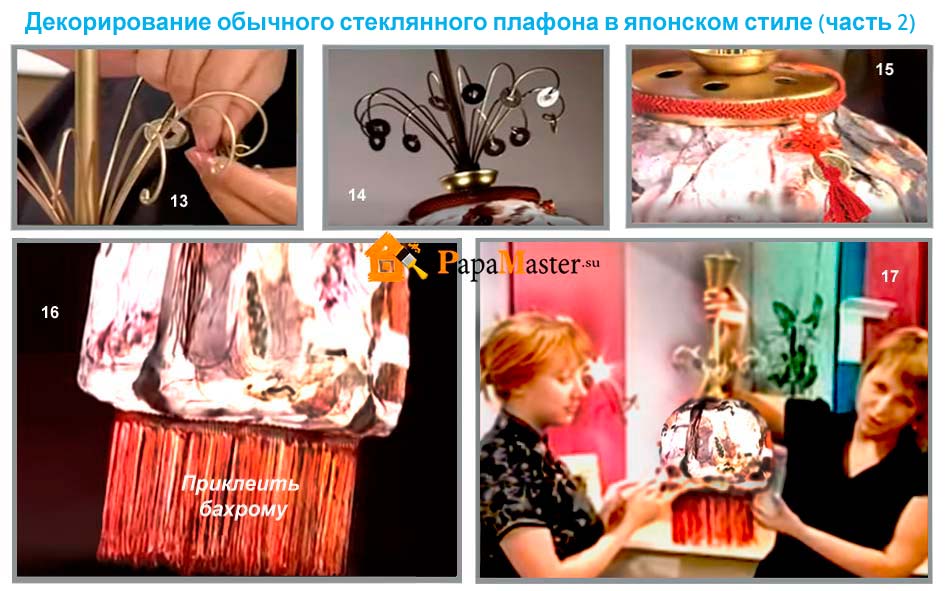 decorating an ordinary glass lampshade in the Japanese style, part 2
DIY wooden chandelier of simple and complex design.
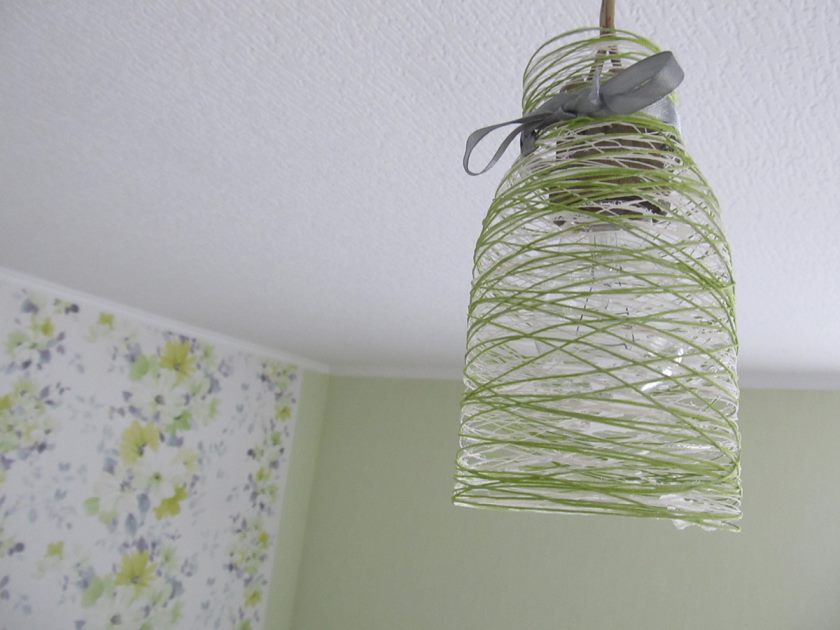
Making a product for a hallway or corridor
During the work you will need the following materials:
- Thin white threads.
- Silicate glue (it does not turn yellow when applied in large quantities and over time).
- Transparent plastic bottle (1.5 or 2 liters).
- Scissors.
- Thick cardboard.
- A jar with a plastic lid for chips.
Now let’s take a closer look at how to make a do-it-yourself chandelier shade for a given room:
1. Pour glue (up to half) into the small container in which the chips were. Cut long pieces of thread. We lower them one by one into a jar, in the lid of which we made a hole with an awl. We thread the edge of each segment into the hole and pull out the segment soaked in glue.
2. Wrap the plastic mold with glue-coated pieces. First along, then across. There is no clear sequence in the winding; wrap it randomly, the main thing is that there are no empty spaces left. Applying the thread too tightly will result in loss of the openwork effect.
3. Leave the product until completely dry. Then, so that only an even cylindrical shape remains, we cut off the unnecessary edges of the bottle: the neck and bottom. It is not necessary to pull out the plastic frame; it can be left so that the product is more rigid and does not deform over time.
4. Cut out a circle from cardboard with a diameter equal to the diameter of the bottle, leaving 4 tabs on the sides (strips of cardboard for fastening). We make a hole in the center, thread a cord into it, to which the cartridge is attached.
5. Insert a cardboard circle into the product, hiding the paws inside it. You can attach them either using a glue gun or a stapler.
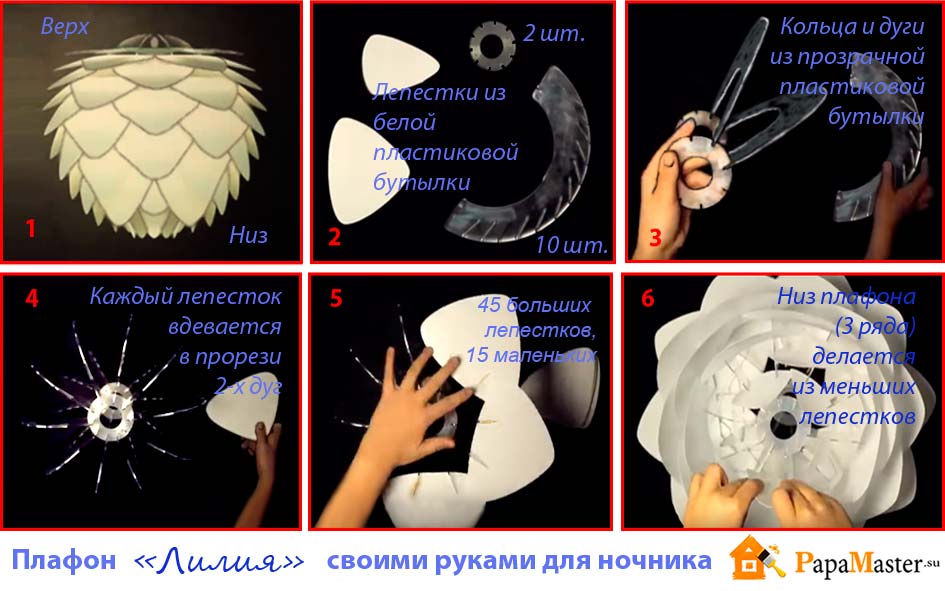 lampshade Lily
  painting glass shades for chandeliers
 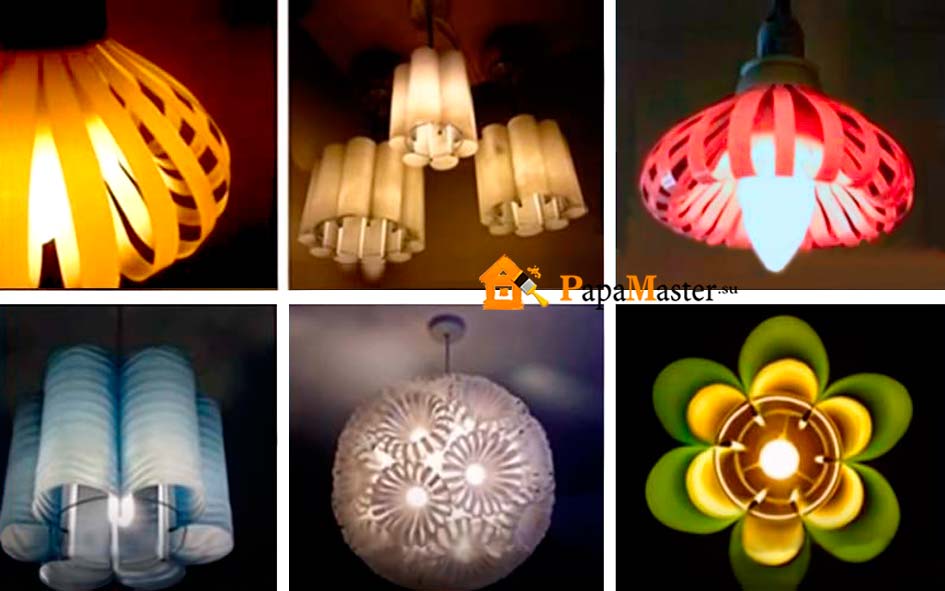 from plastic bottles
 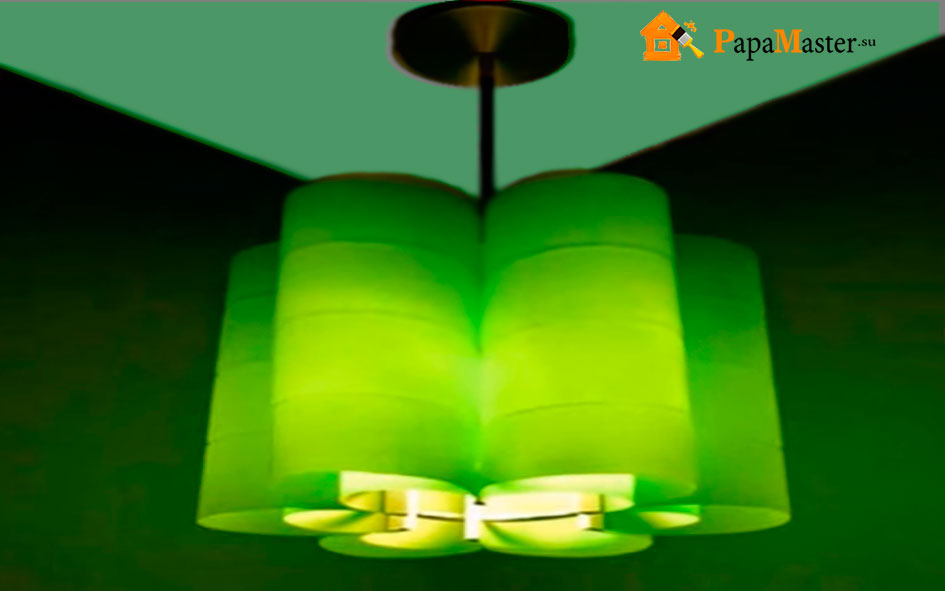 chandelier made of plastic bottles
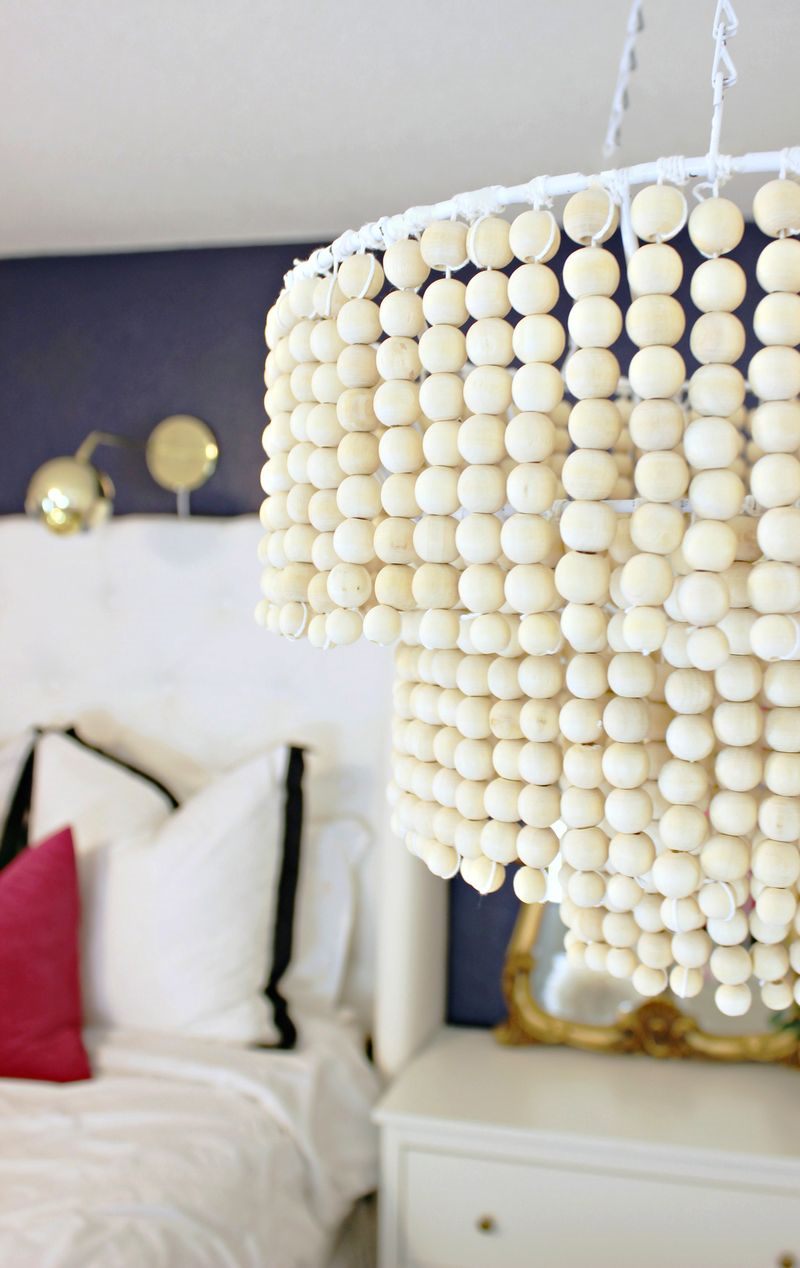
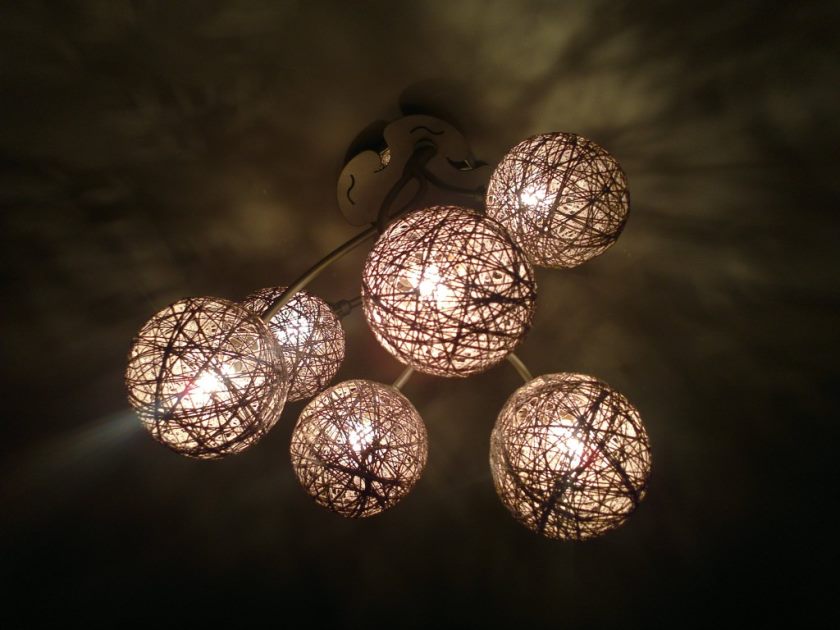
Assembling a product for the living room
Before you make a lampshade for a chandelier with your own hands, intended for this room, you need to acquire the following materials:
- Wooden hoop without lock in two different diameters. If you don’t find one without a lock, no problem, use the second smaller circle from the set, which does not have a lock.
- Braid with long fringe, which can be purchased at interior fabric and other textile stores
- A skein of transparent fishing line.
- Glue gun with scissors.
- Paint that matches the color of the braid (can be in a spray can or acrylic).
The assembly proceeds as follows:
1. Paint the wooden circles for the frame.
2. After drying, measure the length of the fringe threads, subtract about 4-5 cm, and tie the fishing line to a small and large ring at that distance.
3. The pieces of fishing line need to be made larger so that the free edges from the knot on the large ring then serve to fix the frame to the ceiling.
4. First apply glue to the outer side of the small circle and immediately press the braid to it, which is cut in accordance with its diameter. We do not apply glue to the places where the fishing line is attached so that it does not melt.
5. Repeat the manipulation on the large ring.
6. We tie the finished product to a hook in the ceiling at the required height.
It’s not at all difficult to make a similar product for any room in the house yourself. For example, for a nursery you can build from a room Chinese lantern and various ribbons for a themed chandelier in the form of a jellyfish. The main thing in this matter is the presence of imagination and desire.
In stores today there are different lampshades for chandeliers. With your own hands, however, such products can be made quite simply. As a result, you will be able to get a very original solution that cannot be found in any other interior.
Making a lampshade from cardboard
To carry out the work, you will need thin white cardboard, a glue gun, fishing line or thin twine, which can be replaced with scissors, pliers, and wire for the frame.
Features of the work
Lampshades for a chandelier can be made quite simply with your own hands. To do this, you need to prepare all the above materials and tools. Afterwards, the master will have to decide on the dimensions of the product. In the example, a diameter within 30 cm will be considered. This indicates that for manipulation you need to prepare cardboard whose length is 90 cm.
First you need to make a frame, for which a piece of wire is cut. The latter must be given a length of within 98 cm. From this blank you should roll a circle with a diameter of 30 cm, fixing the ends with pliers. Next, 3 hanging elements are cut from fishing line or twine. The length of the pieces should be measured taking into account the height at which the lamp is intended to be hung.
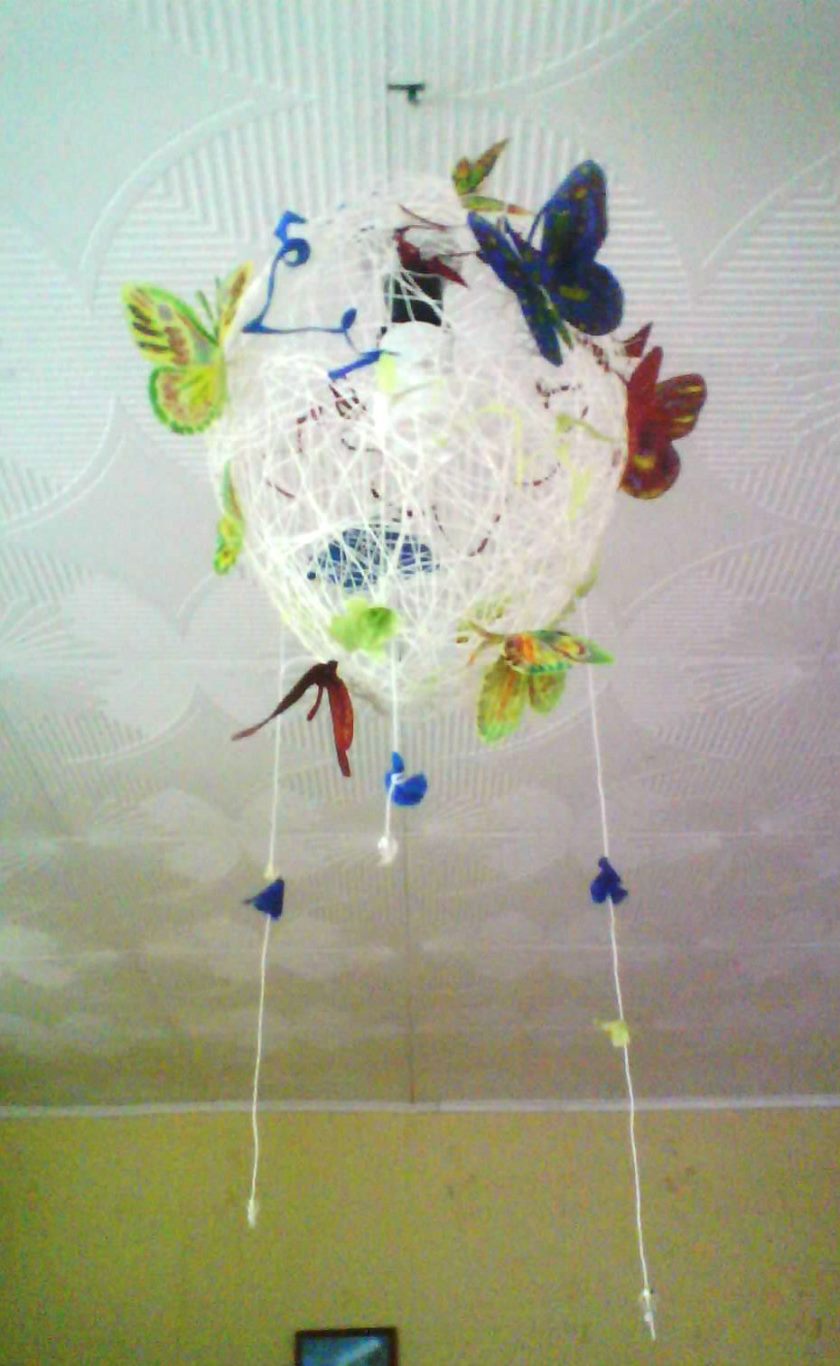
Three elements prepared in advance should be tied with wire in three places. When fixed, the elements are distributed evenly. If you make lampshades for a chandelier with your own hands using the technology described, then at the next stage you need to draw butterflies of different sizes on cardboard, and then cut them out. Now the cardboard is rolled up into a cylinder, the joint is glued with thick paper or stitched with a stapler. The upper part of the lampshade must be fixed to the wire. To do this, it is recommended to use a piece of thin wire or glue.
Final works
![]()
When making lampshades for a chandelier with your own hands, it is important to follow the technology of the work. This is the only way you will be able to achieve a positive result. If the joints and cuts are not very aesthetically pleasing, then you can decorate them with butterflies. This lamp can be used both in a children's room and in a bedroom. Instead of butterflies, you can cut out flowers, snowflakes or stars - basically anything that comes to your mind.
Back to USSR
If you are thinking about how to make a lampshade for a chandelier with your own hands, then you can plunge into memories of the sixties. In those days, floor lamps that were made in the form of a cylinder were especially popular. To carry out such work you will need a crochet hook and scissors. When choosing the first element, you need to combine colors to your taste.
Work technology
Before making a lampshade for a chandelier with your own hands, it is recommended to draw up a sketch. Afterwards you can begin work. To do this, you will need a frame, which can be borrowed from an old lamp; the first braid should be tied to its lower part. The tail should have a length of 5 cm. The braid should be pulled onto the upper ring from the outside, throwing it over and stretching through the lower ring, or rather, its inner side. These actions should be alternated until the next sector of the frame begins.
If you are making a lampshade with your own hands for a chandelier, then the braid should be secured at the next stage. Next comes a braid of a different color. It should be knitted to the next sector, not forgetting to leave a tail. The third sector is filled in the same way using the remaining braid. The tails should be pulled from the bottom using a crochet hook. At this point we can assume that the lampshade from the 60s is ready.
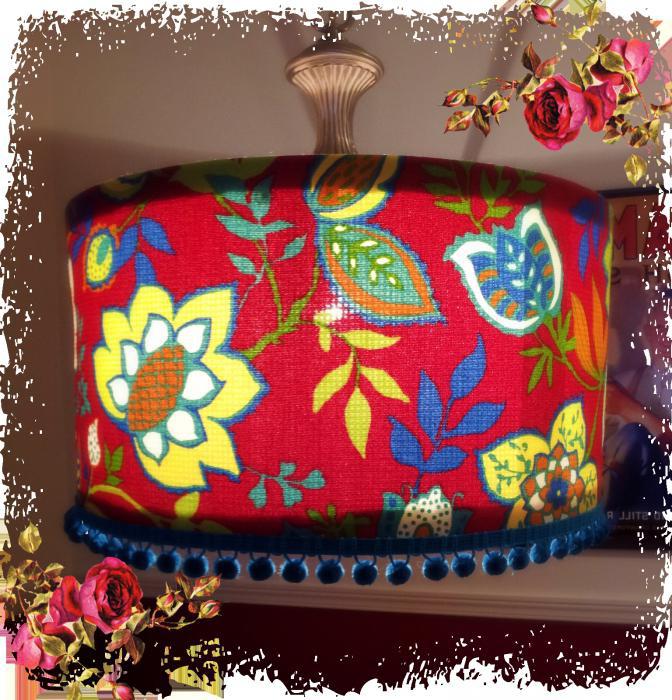
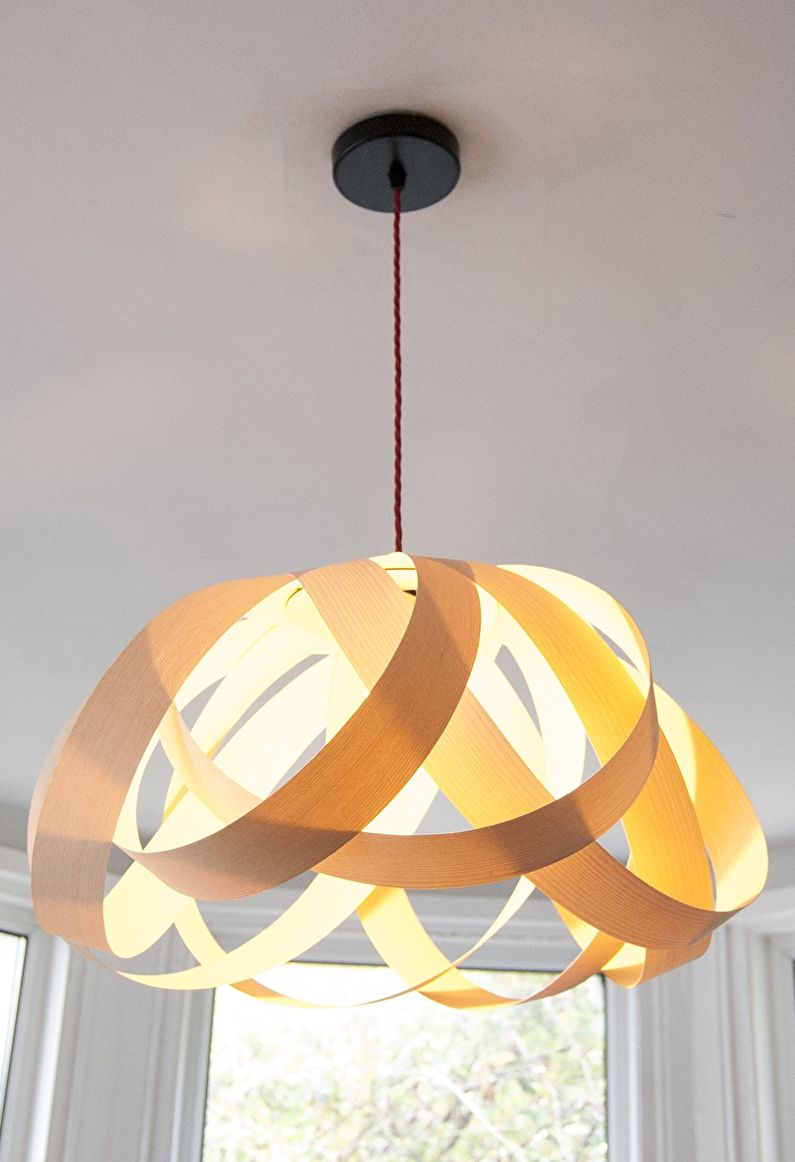
Lampshade made of fringe and braid
If you decide to make a lampshade with your own hands for a chandelier, then in the process of carrying out the work you can also use fringe, which will form the basis for a sufficient interesting idea. Before starting work, you need to prepare two steel hoops or use them. The master will need fishing line, a glue gun, fringed braid and acrylic paint. It should match the color of the braid. You will also need scissors.
Manufacturing method
Before making a lampshade for the hoop or existing hoops, you need to paint them with acrylic paint. While the composition dries, you need to make 3 marks on the rings, placing them at the same distance from each other. Now you need to cut three pieces of fishing line. They need to be tied to a smaller ring, leaving the upper ends with a margin, so that the lamps can be tied later.
Now the master must determine the length of the fringe by subtracting 2 cm from it. At this length, a fishing line should be tied to the second end. This will create a cascade. Now comes the turn of the glue gun, with the help of which you will need to fix it along the lower ring. The same manipulations must be done with the upper ring.
It is important to note that the fishing line can melt under the influence of the glue, so it must be applied in such a way that the materials do not interact while the composition remains hot. For this, glue is applied to the paper, a certain time is waited, and only then can you begin to fix it.
Alternative solutions for lampshades
If you want to make a lampshade for a chandelier with your own hands from fabric, then you can use one of the above technologies. This is especially true for the last option, when the fabric is adjusted to a previously prepared strip, and then cut in such a way that it is possible to obtain strips hanging down. However, it is not necessary to start from scratch if you want to create a beautiful lampshade. For example, you can use a paper lantern and complement it with assorted chocolate or cupcake shapes. The latter are glued to the base of the lantern, which allows you to get a new lampshade design.
Conclusion
If you decide to make your own lampshade for a chandelier from threads, then you can again use the technology described above. The threads are stitched onto a strip prepared in advance, the length of which corresponds to the size of the hoop. Threads can be different in color and length, which allows you to get an unsurpassed effect.
To carry out the work, a paper lamp can also be used, which is complemented by pendants. Glass jars can also become part of the lampshade. To do this, they are painted and, if possible, decorated with engraving. If one of the rooms in your house has a high-tech style, then you can use tin cans, which you don’t even have to paint.
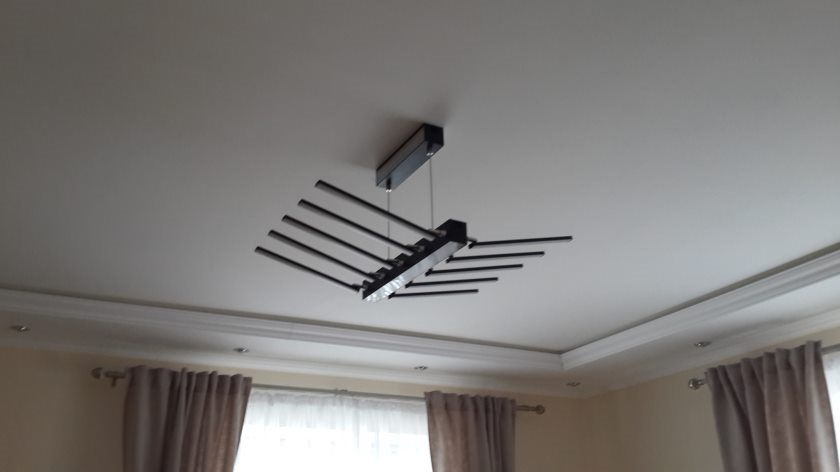
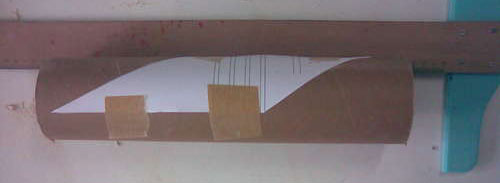
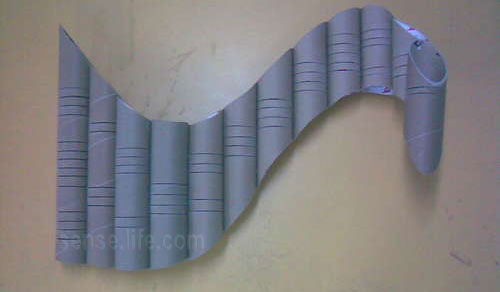
The idea of making a lamp with your own hands came to mind when, after laying linoleum in the house, there was a cardboard pipe left (on which the linoleum was wound).
To make a lamp with your own hands, all you have to do is buy just a little 2 meters of black and red wire, 2 meters of adhesive-backed LED strip, a 12V 1A power supply, spray paint in a can. Of course, the LED strip was a bit expensive, but it was easier to work with. Could be used separately bright LEDs, but there is a lot of hassle with them in terms of wiring them together and fastening them inside the pipe.

Making a lamp with your own hands began with drawing preliminary sketches on paper. There was a desire for the lamp not only to be curved in a plane, but also in space, and have a bizarre 3D wave shape.
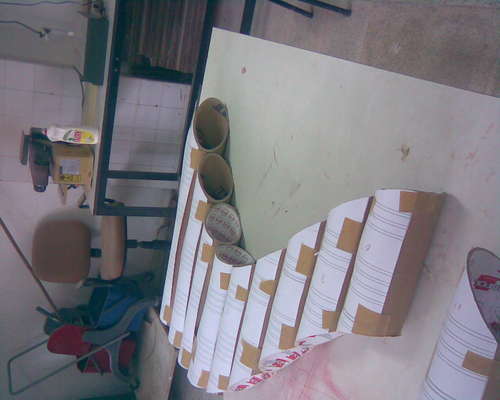
After the sketch on paper satisfied my wishes, I began making the lamp. Each pipe in the drawing was measured, and the pipes were cut according to these dimensions. To obtain the required angles, templates were cut out of paper and attached with tape to the pipe.
All pipes were laid out on the table and adjustments were made to the waveform.
The cuts were made on a stationary circular saw. This produces smooth, burr-free cuts with a width of 2 mm.
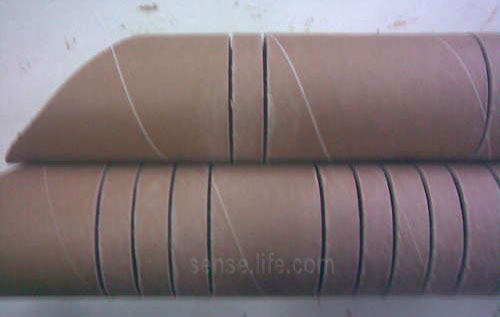
Now you need to connect all the pipes into one. The main task is to make smooth curves; for this it will not hurt to use a template (fibreboard sheet) on the table. Since the pipes are cardboard, they can be connected accordingly using glue PVA, but I would recommend using glues that harden stronger and faster (moment, superglue).
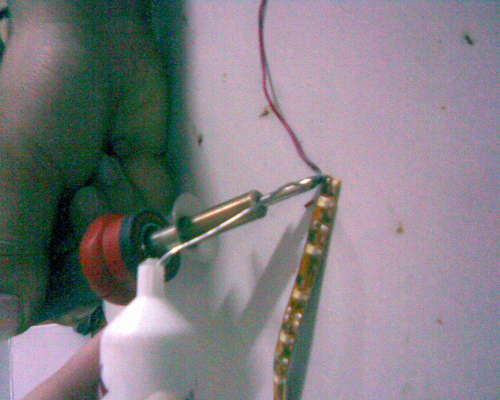
WITH reverse side Wooden strips were screwed onto self-tapping screws so that the homemade lamp could be hung on the wall. And holes were drilled in each pipe to output wires from the LED strips.
The pipes were painted with regular spray paint. The color red was used, since the wall on which the lamp was to be located was white, I wanted to get some contrast.
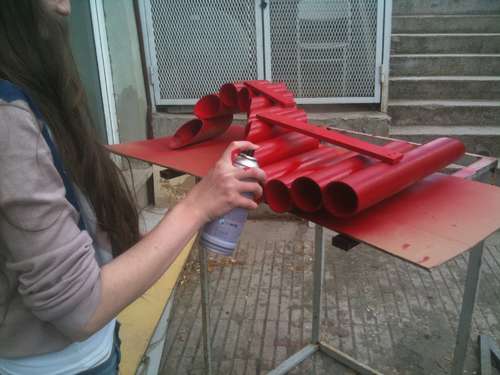
The paint dries very quickly, so you can begin installing the LEDs. The main thing to remember is what to cut LED strip only possible in specially marked areas. The tape must be marked in advance so that it is enough for all 12 pipes.
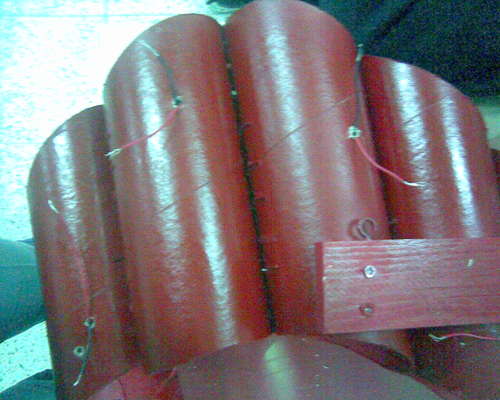
We solder red wires to the “+” contact, and black wires to the “-” contact, so as not to confuse the polarity later.
We place the LED strips inside the pipes and fix them with the adhesive side to the pipe wall, and route the wires through pre-made holes. All that remains is to connect all the wires in parallel (connect red to red, and black to black) and connect to the power supply.
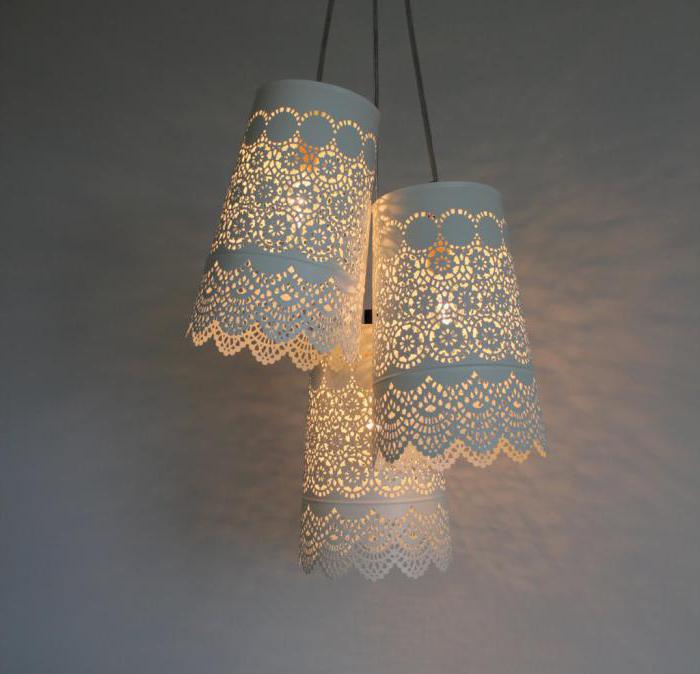
Lamps are not just a source of artificial lighting in the interior, but also an important decorative element, without which the composition looks incomplete. You can create bright accents by making a lampshade for a chandelier with your own hands, because it is not at all necessary to spend huge amounts of money on purchasing designer models. Read about the nuances of work in our article!
Where to begin?
When creating a lampshade with your own hands, keep in mind that using a regular incandescent lamp is not the best idea. It is better to opt for energy-saving light bulbs that do not heat up so much and, accordingly, do not heat nearby parts, thereby ensuring safety. In addition, they are quite economical, which allows you to save money on electricity, and are also durable.
When choosing a material for a lampshade, focus on both aesthetic properties and specifications. Firstly, these must be environmentally friendly, preferably natural, bases that will not distribute unsafe substances with minimal heating.
Secondly, the lampshade should not collect a lot of dust: some surfaces, like fabric ones, are more prone to this than others. Choose an option that is easy to clean and can be easily wiped with a damp cloth. This does not apply to paper, but due to the cheapness and simplicity of the material, such a chandelier can always be replaced if necessary.
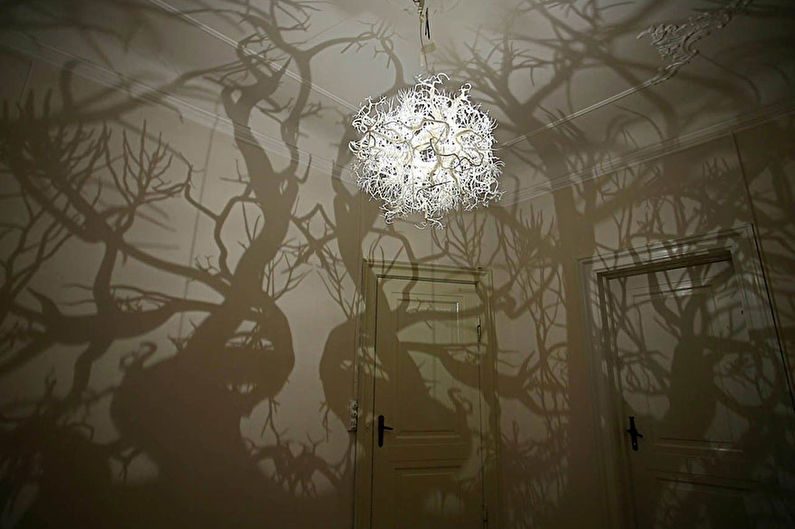
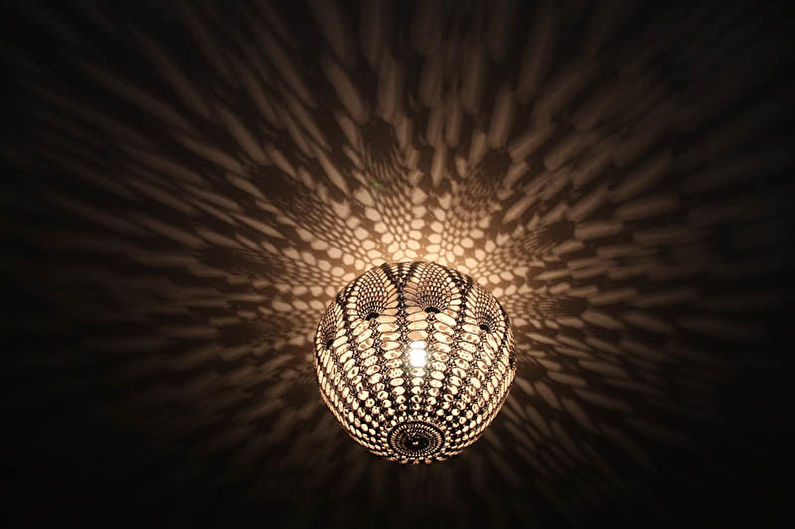
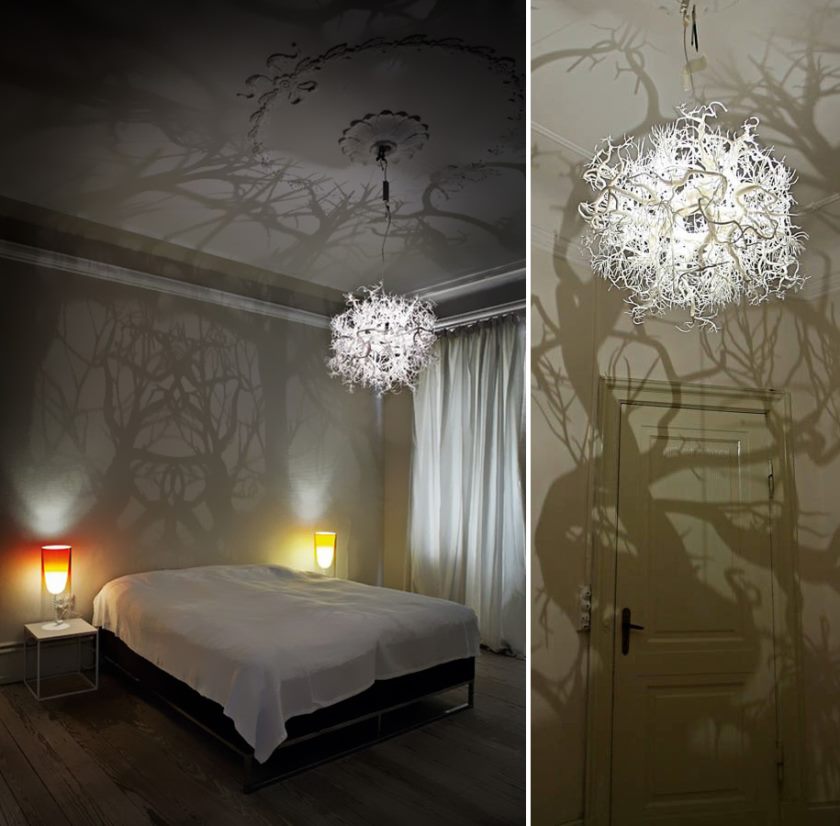
Thirdly, the chandelier should illuminate the room well without darkening it. However, for some interiors, dim lighting is more suitable: in a nursery, bedroom or living room for an intimate atmosphere. In such cases, you can show your imagination by making a lampshade that creates light patterns in the room. You, as the author, can implement any of your decisions - and this is probably the main advantage of homemade lampshades.
Selecting a lampshade to match the interior style
A chandelier can become a bright accent in the interior or an inconspicuous but important addition. With any choice, the lampshade should harmoniously match the style of the room.
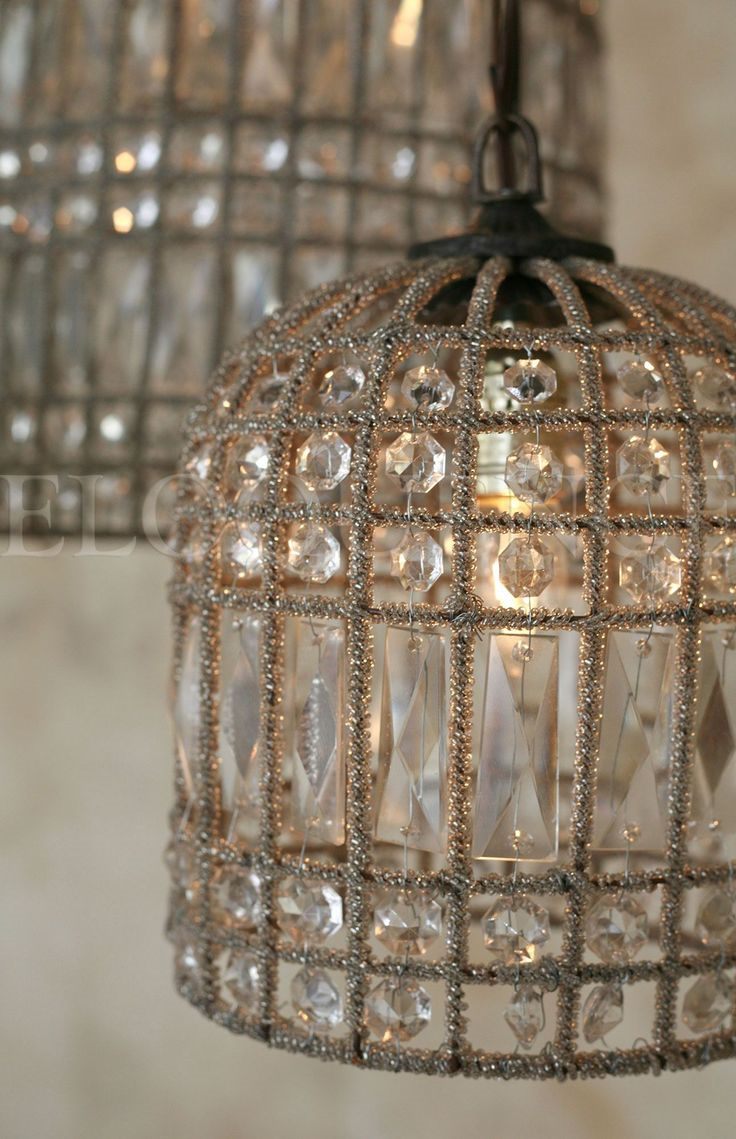
Unfortunately, not every product can be created with your own hands. For example, classics are characterized by elegant crystal, glass or metal products that cannot be made independently. But there are other options.
Minimalism
A laconic and laconic composition of minimalism can easily be disrupted due to one extra detail, which will be especially noticeable in such an interior. Regardless of the type of room, simple geometric shapes, the absence of hanging elements, as well as a uniform color scheme that is included in the overall palette of the space will look appropriate here.
Metal frame structures that slightly darken the light, or paper shades without decorative details, are suitable.
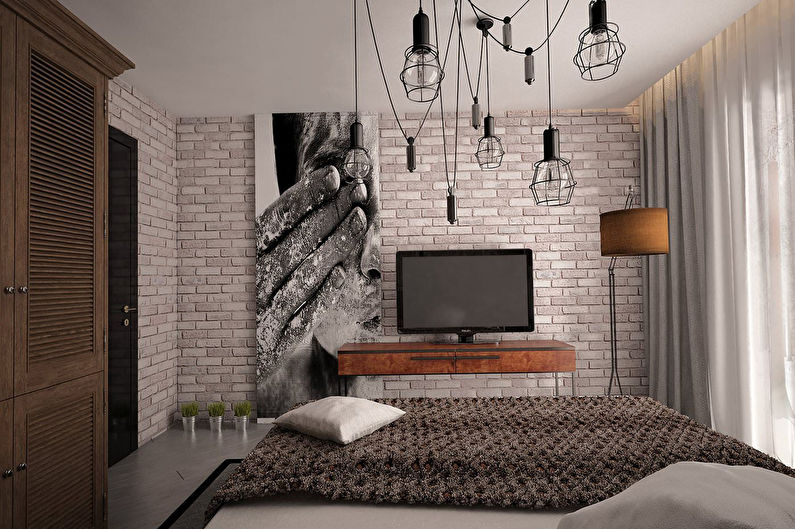
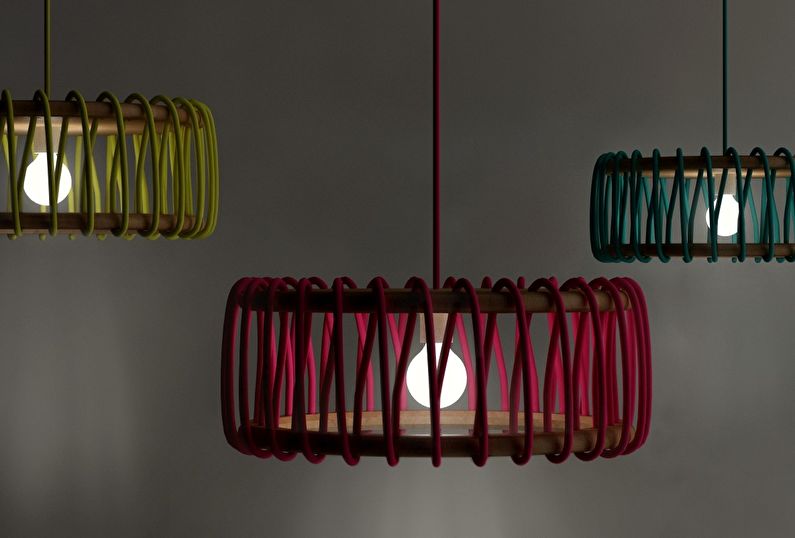
Loft
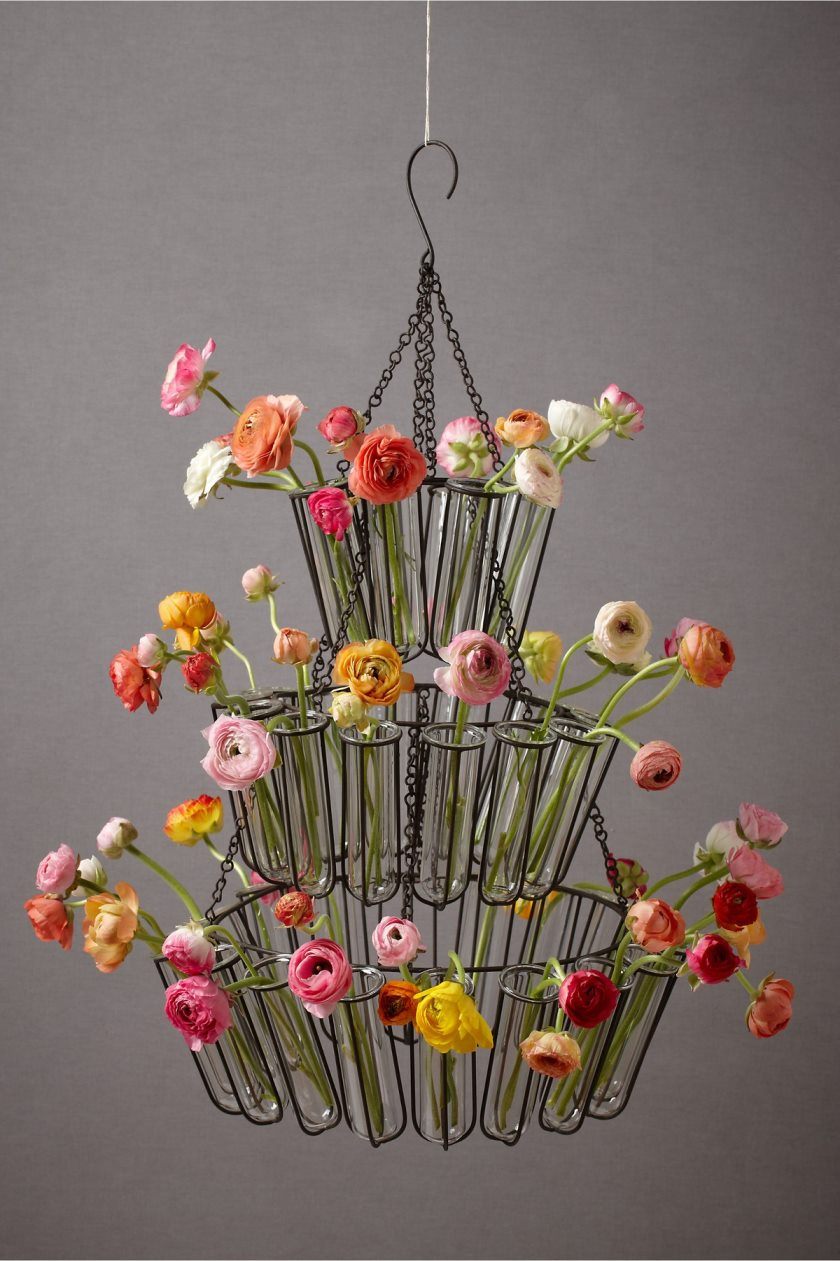
This is where you can really go wild, in a loft interior, in which homemade products made from unusual materials will look organic. It's not scary if appearance chandeliers reveal their non-manufacturing origin, because many details of this style highlight their imperfection as their main advantage.
For lampshades, you can even use familiar objects: transparent cans, metal utensils, frames made of thread or wire. If the ceiling height allows, then a long pendant chandelier with a minimalist cap would be an excellent option.
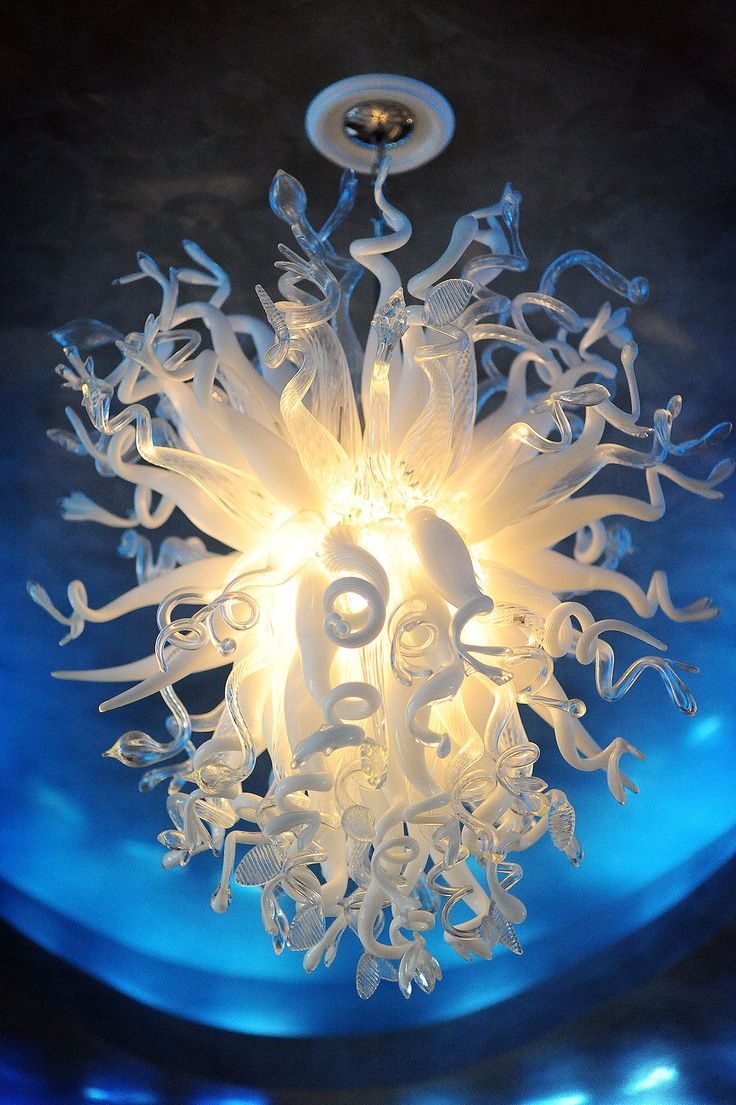
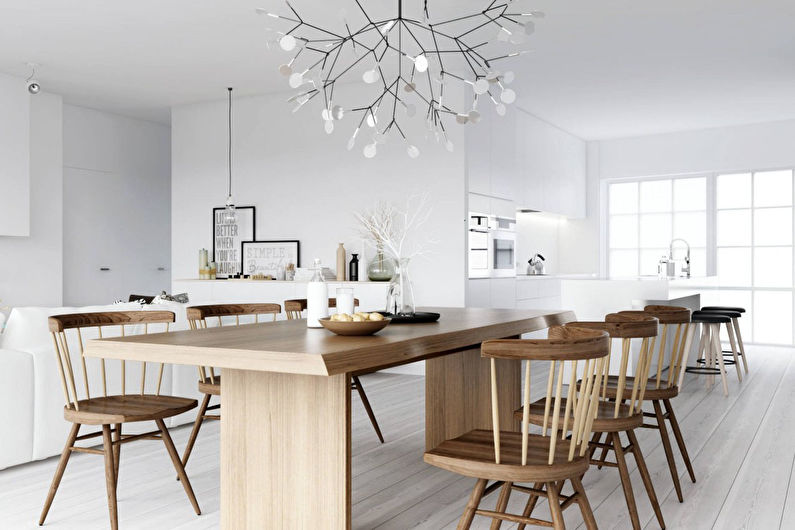
Scandinavian style
Despite its northern origin, this style of interior design looks very cozy and modern. Minimalist in its essence, the Scandinavian style prefers natural materials, as well as light, mostly white, colors.
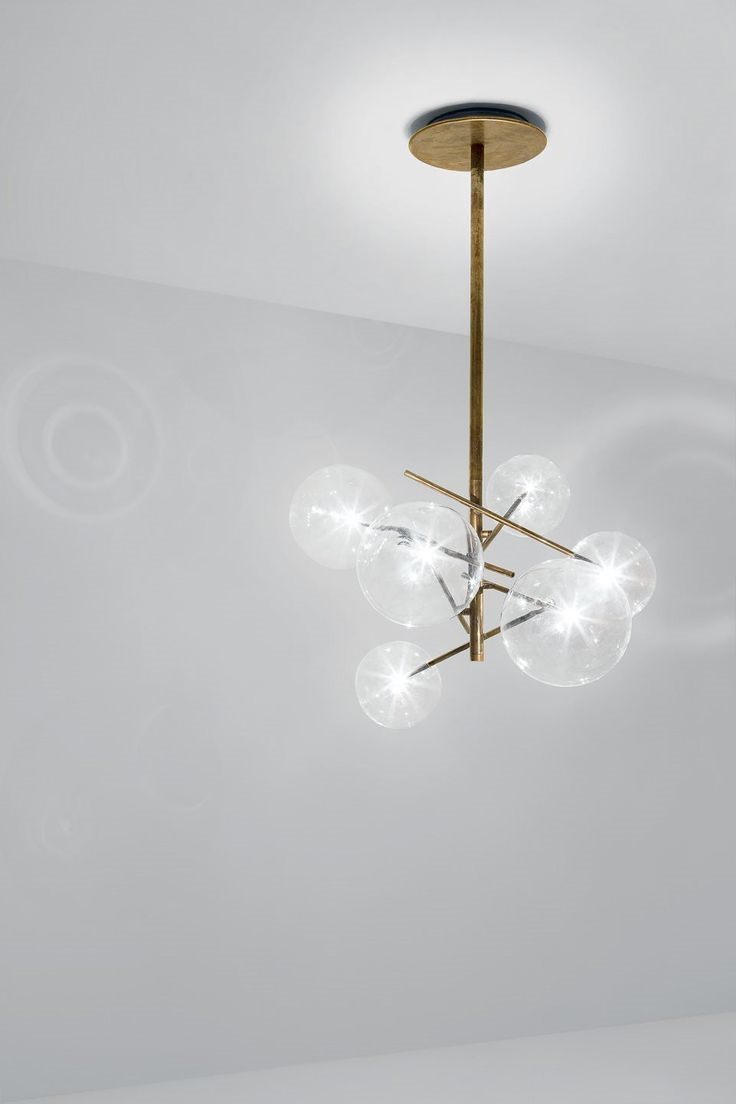
There are many options for chandelier design - the style does not greatly limit the shape. But not everything can be created independently. Ball-shaped, airy models made of thread or paper are suitable.
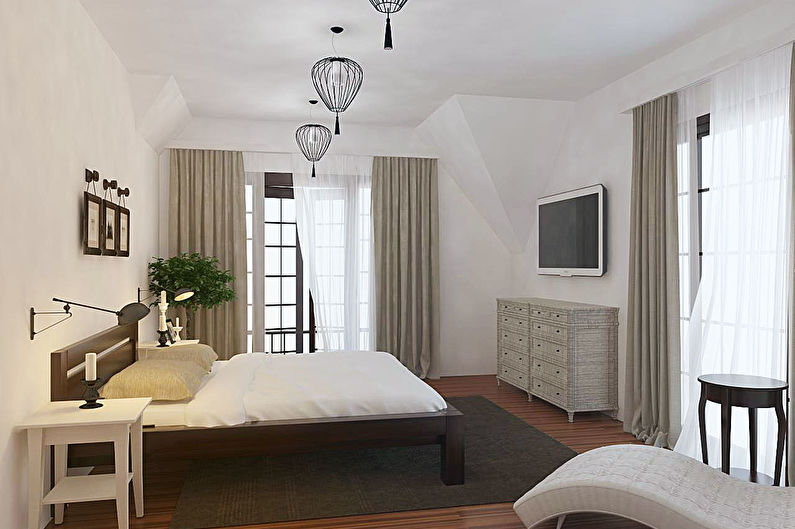
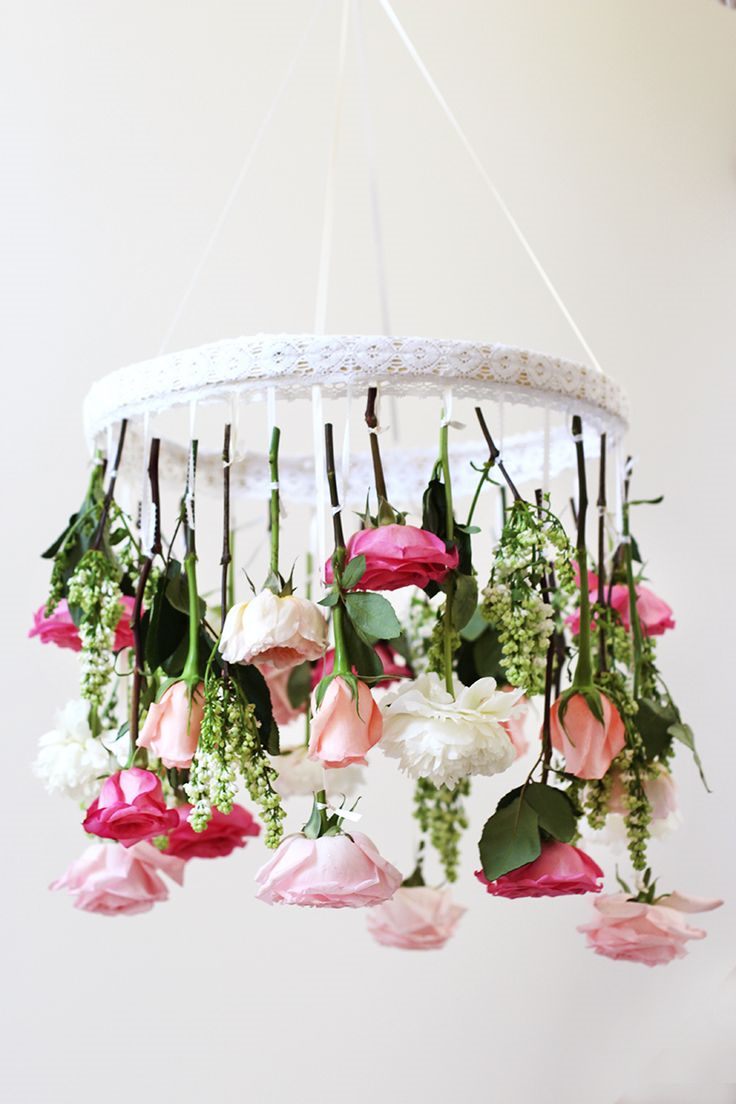
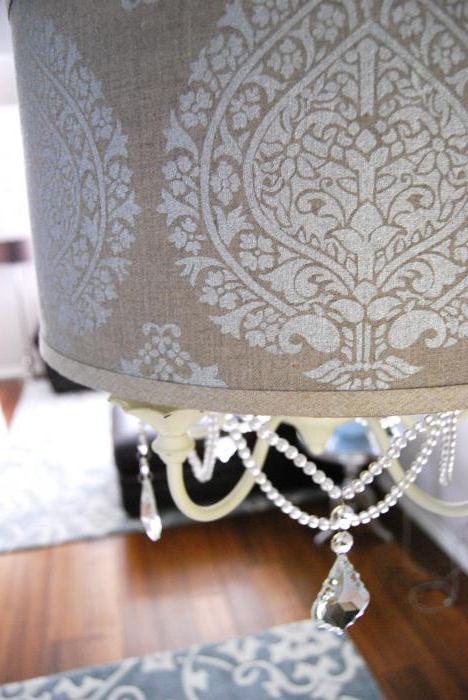
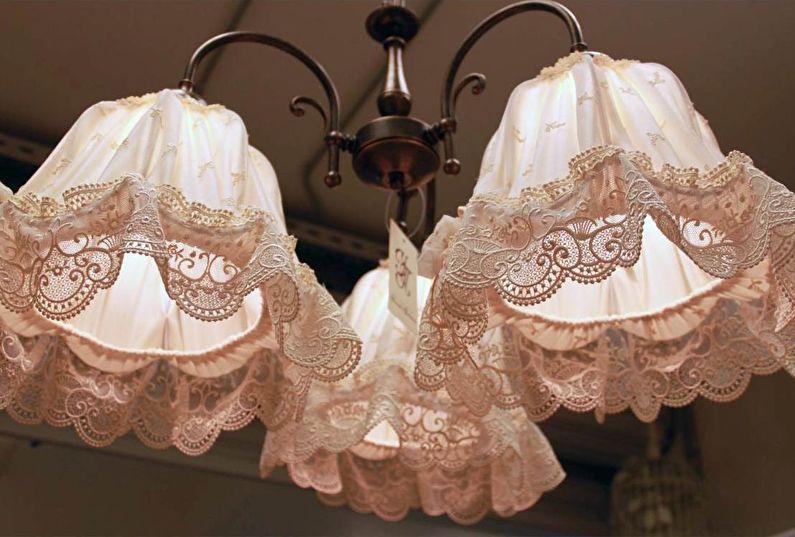
Provence
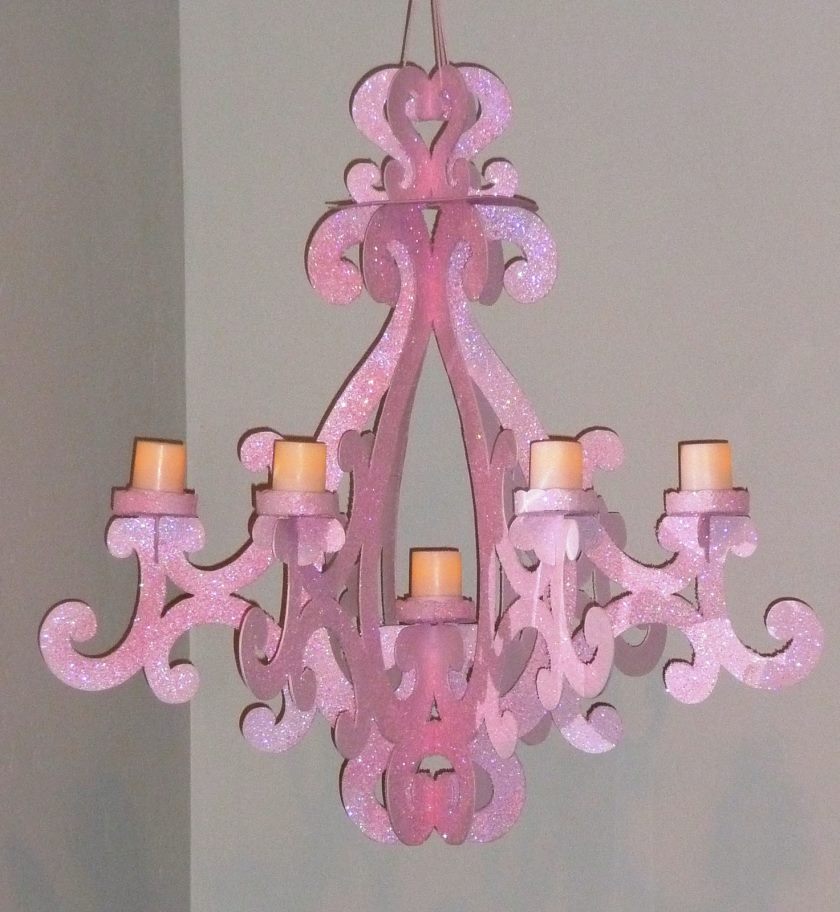
Coming to us from distant French villages, Provence prefers the simple, cozy aesthetics of natural materials, floral patterns, and light shades. This is approximately what a lampshade for a chandelier should be like.
Products made of fabric or lace with a round shape look appropriate. With a small level of skill, you can decorate a glass dome with decoupage, thereby saving money - after all, despite its simplicity, authentic Provence involves significant costs in the arrangement.
![]()
Paper lamps
Despite the fact that paper is not considered the most reliable basis for lampshades, the ease of working with it and its noticeable low cost have made this material very attractive among handicrafts. In addition, with its help you can update your interior at least every month, creating new crafts.
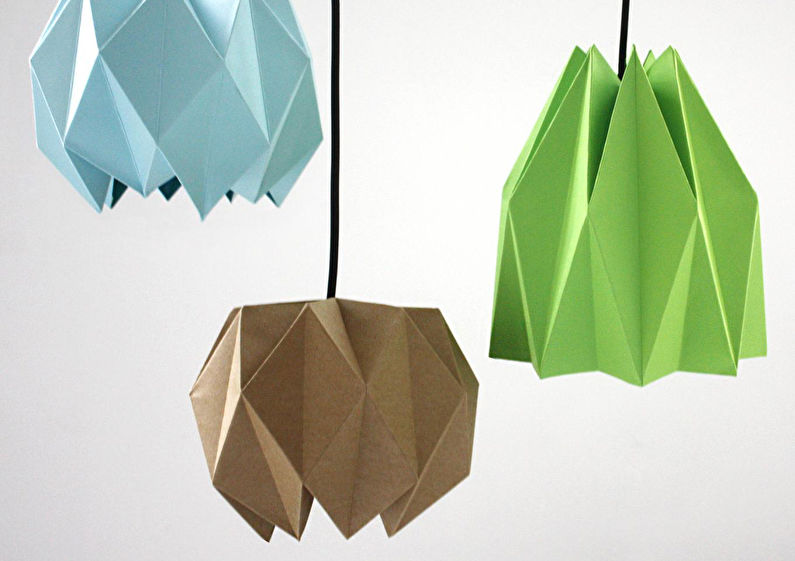
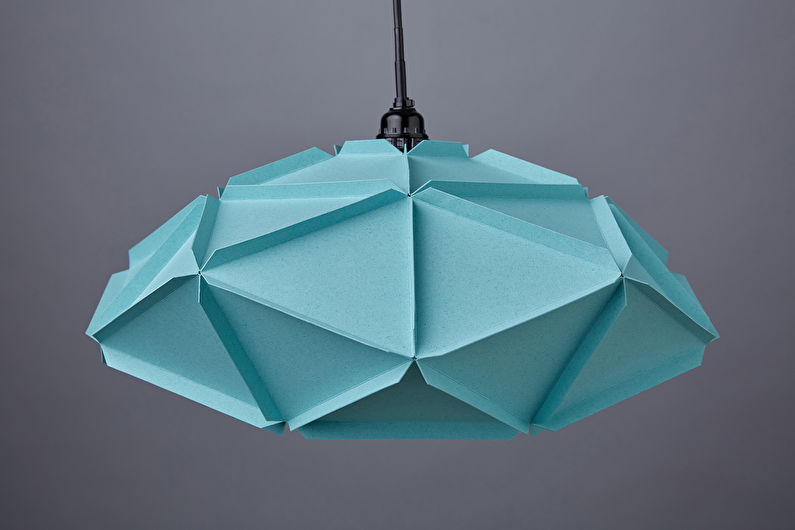
Origami lampshades
Who wasn’t interested in origami as a child, designing little animals or complex modular paper products? Now you can use your skills for more practical purposes. However, even people who have encountered this activity for the first time can also easily master it and make origami lampshades for a chandelier with their own hands.
These are laconic designs of different geometric shapes that will fit perfectly into modern interior. It is not recommended to use very strong paper, as it does not transmit light well.
Figured products
However, lovers of more varied decor can create lampshades of a wide variety of shapes from paper. For example, surround the lamp with paper houses, butterflies or envelopes.
The appearance of such a lampshade also depends on the surface - plain, patterned, newspaper, and so on. By combining these materials, completely different effects can be achieved.
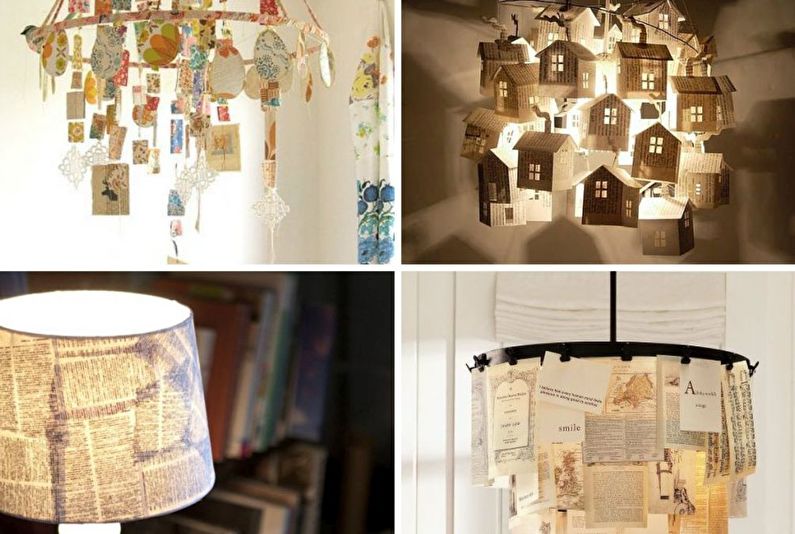
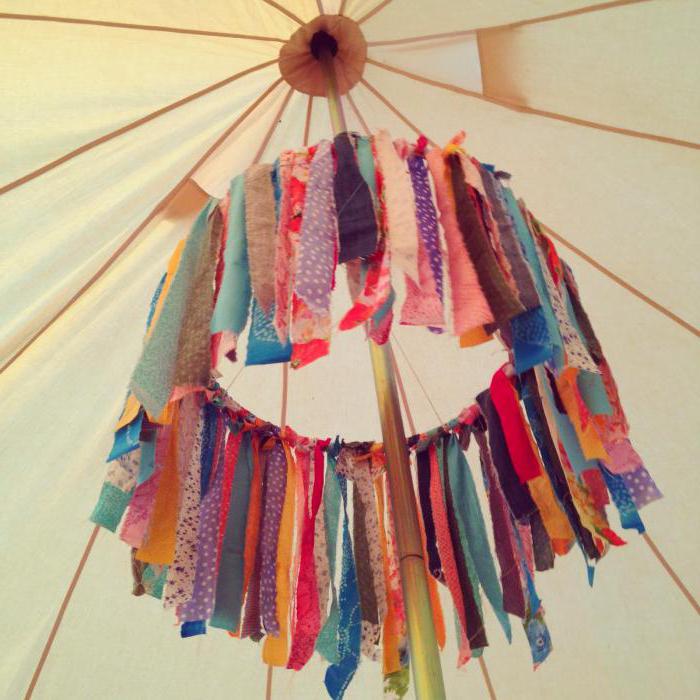
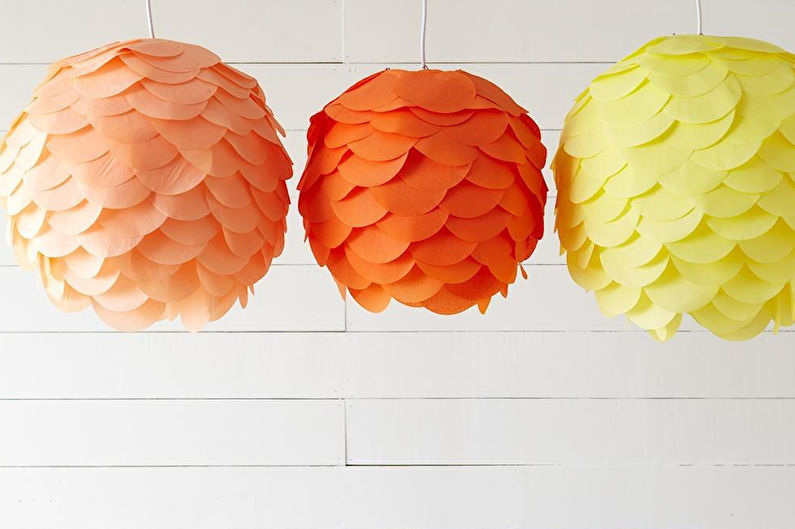
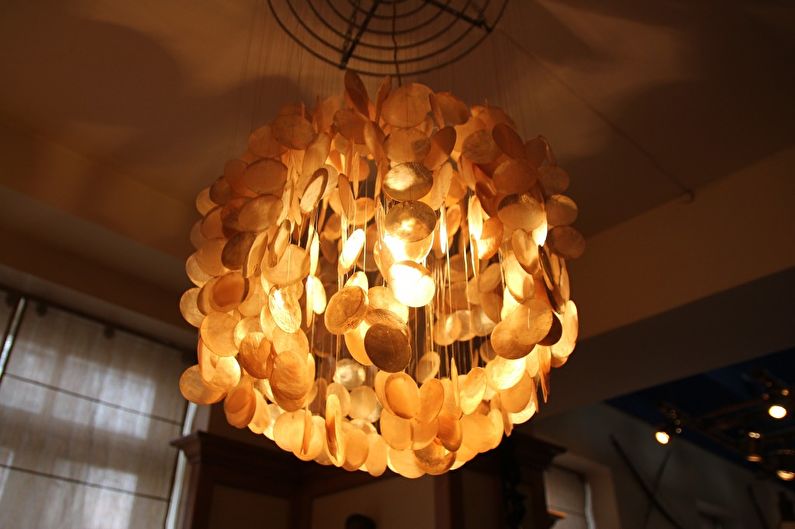
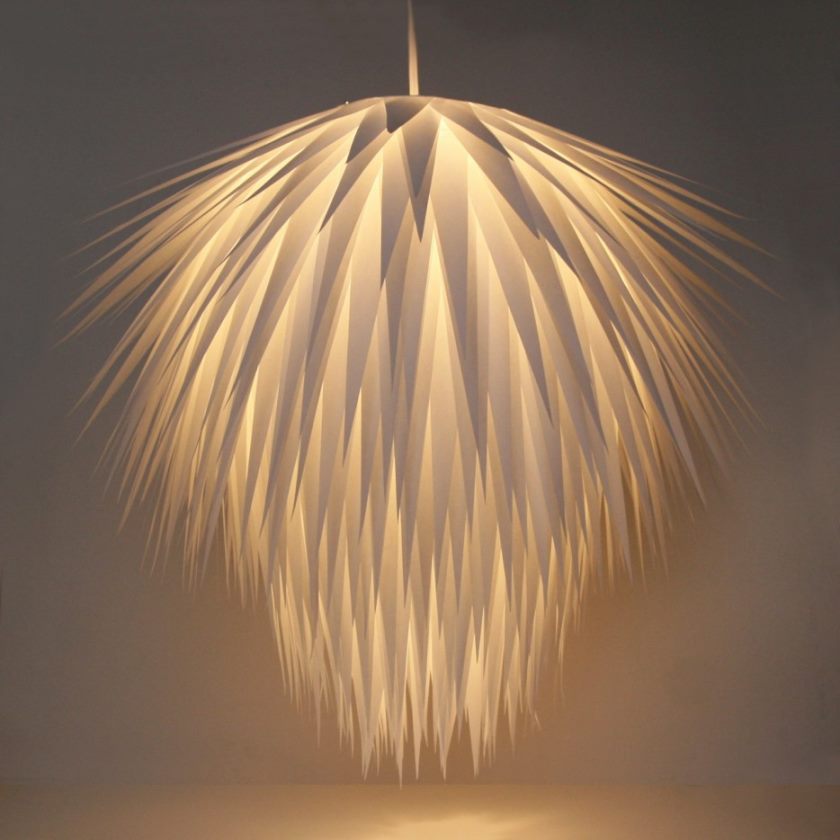
Chinese lanterns
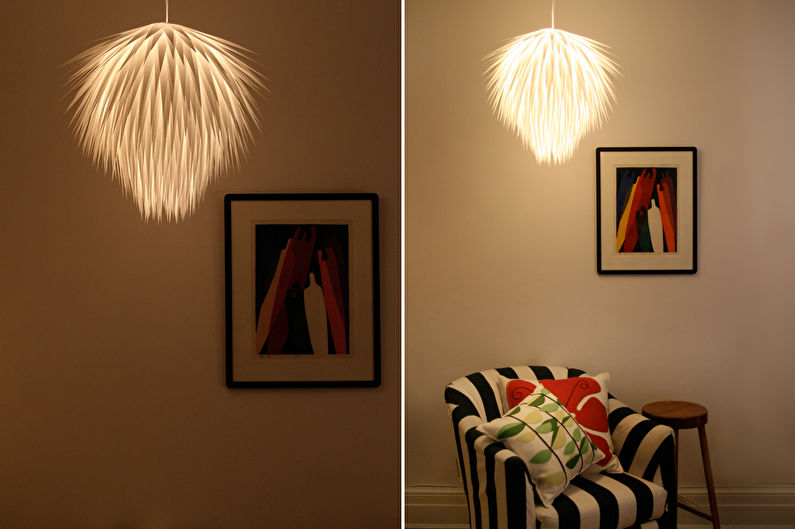
If you have paper lanterns at home, do not rush to use them as an independent lamp, because this is an excellent basis for other experiments.
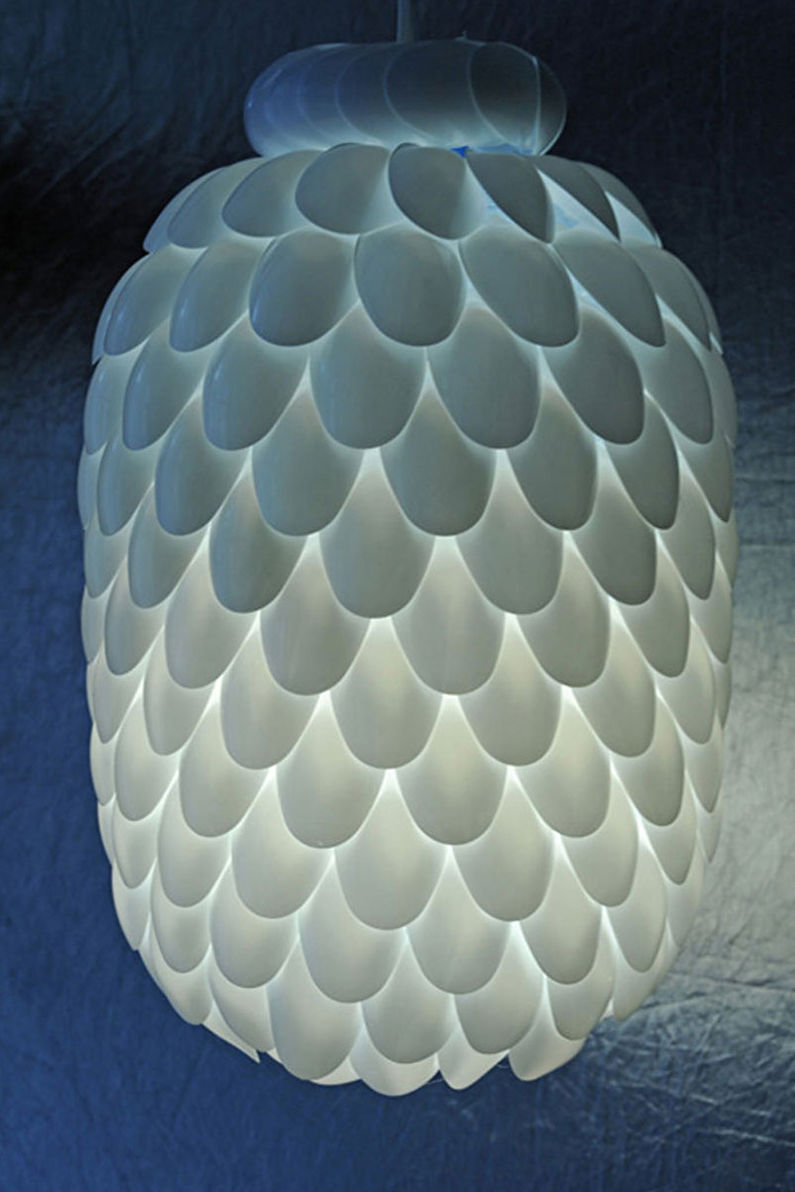
It can be covered with anything you like, but to avoid a homemade look, we suggest decorating the ball with small paper flakes or long “feathers” that will gracefully hang down to the bottom.
Lampshades made of threads
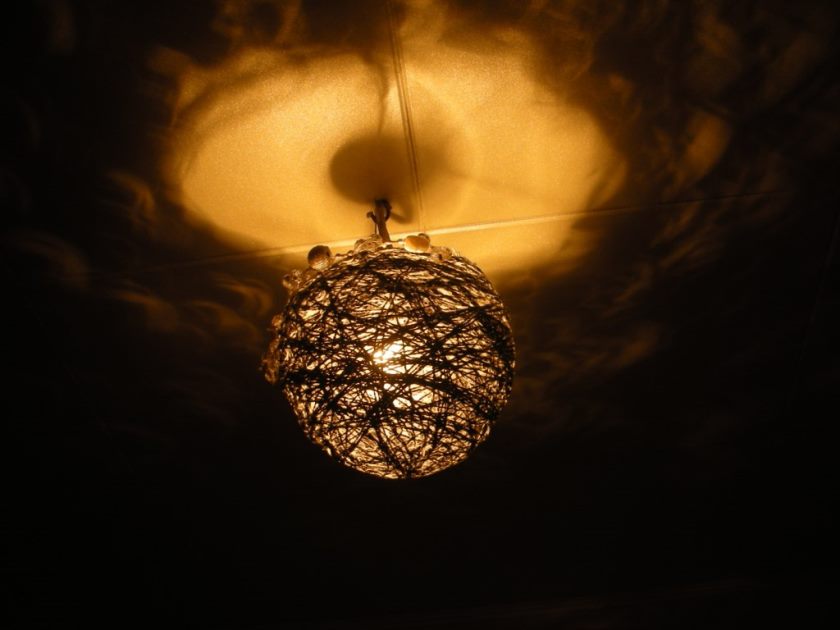
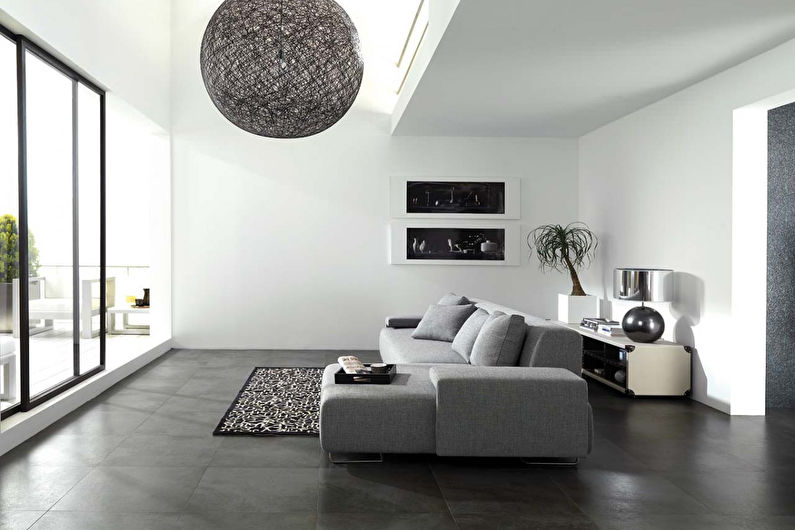
Various threads and ropes are an excellent base for a lampshade, which is suitable for creating an intimate atmosphere due to the darkening effect.
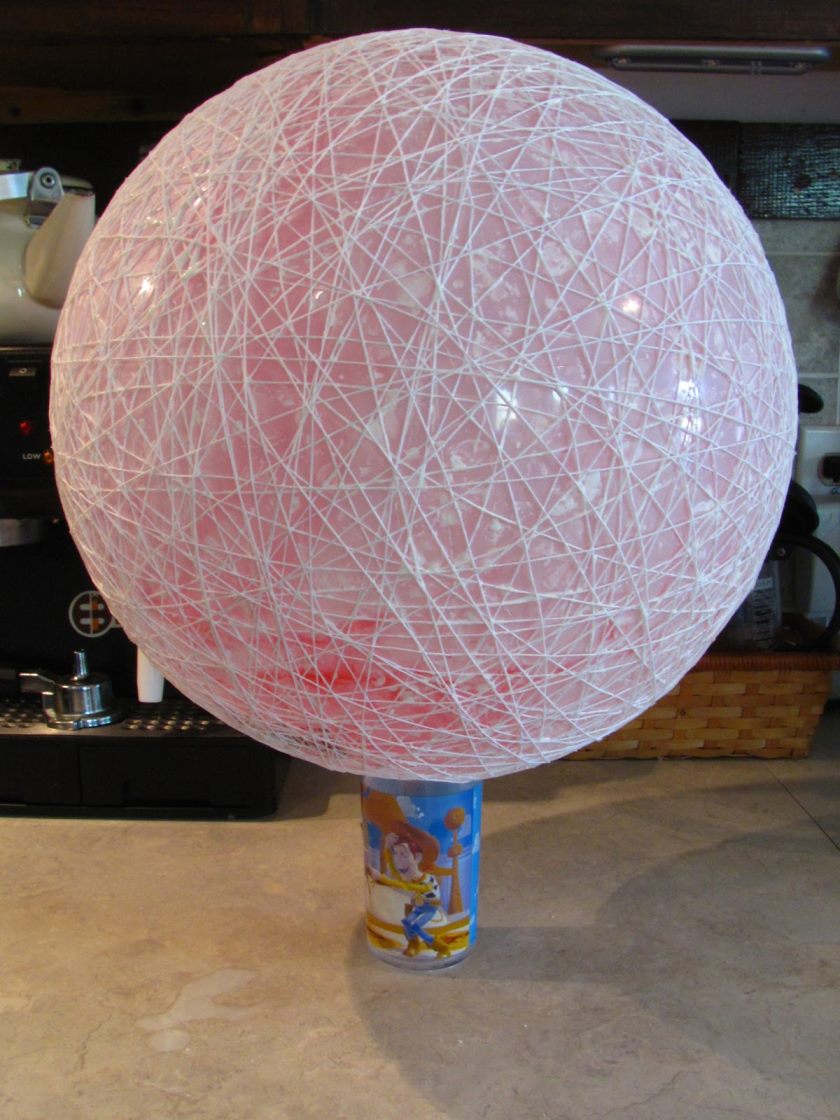
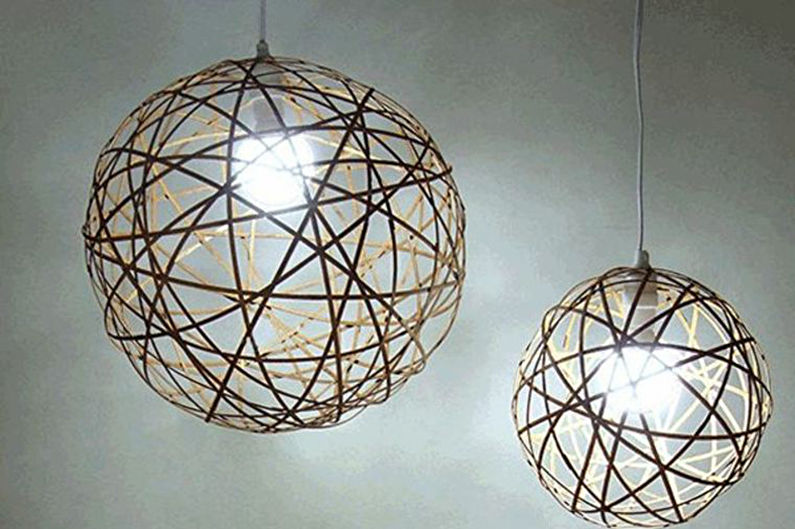
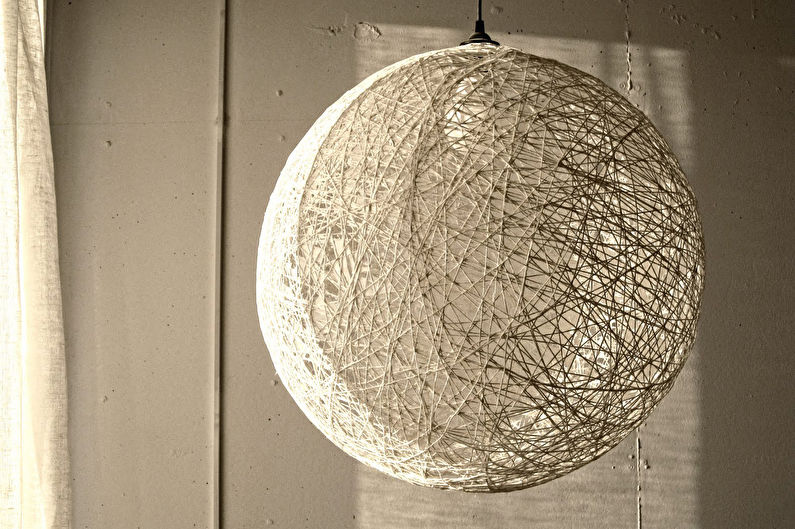
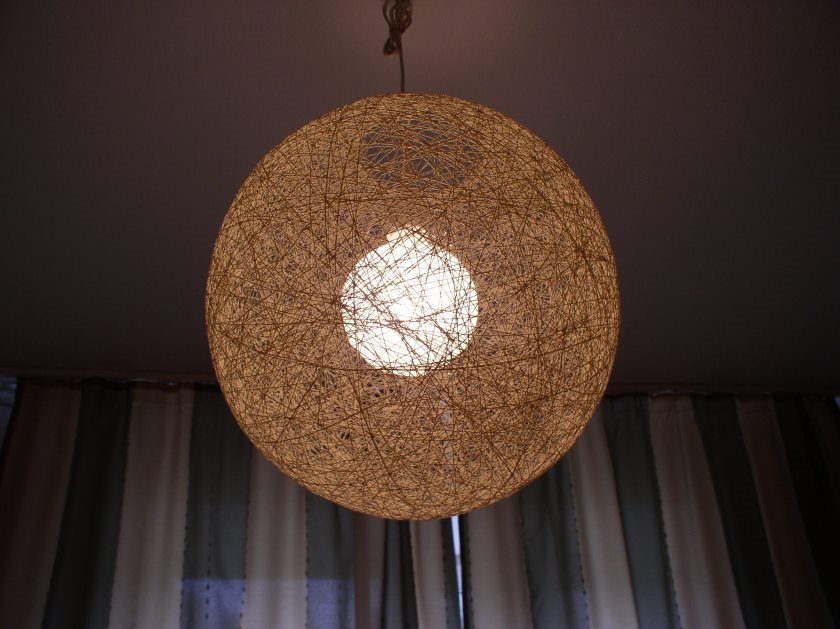
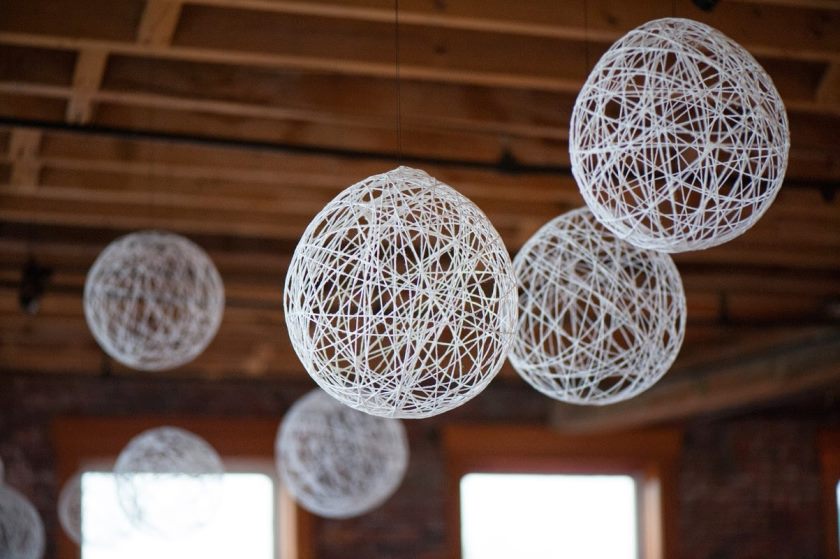
Graceful cocoon
A round lampshade made from randomly twisted threads looks very simple and at the same time stylish. In order for such material to hold the desired shape, it is fixed with glue on a balloon, which is delicately removed after finishing the work.
Although the field for creativity here is small, you can always experiment with colors, weaving in several shades.
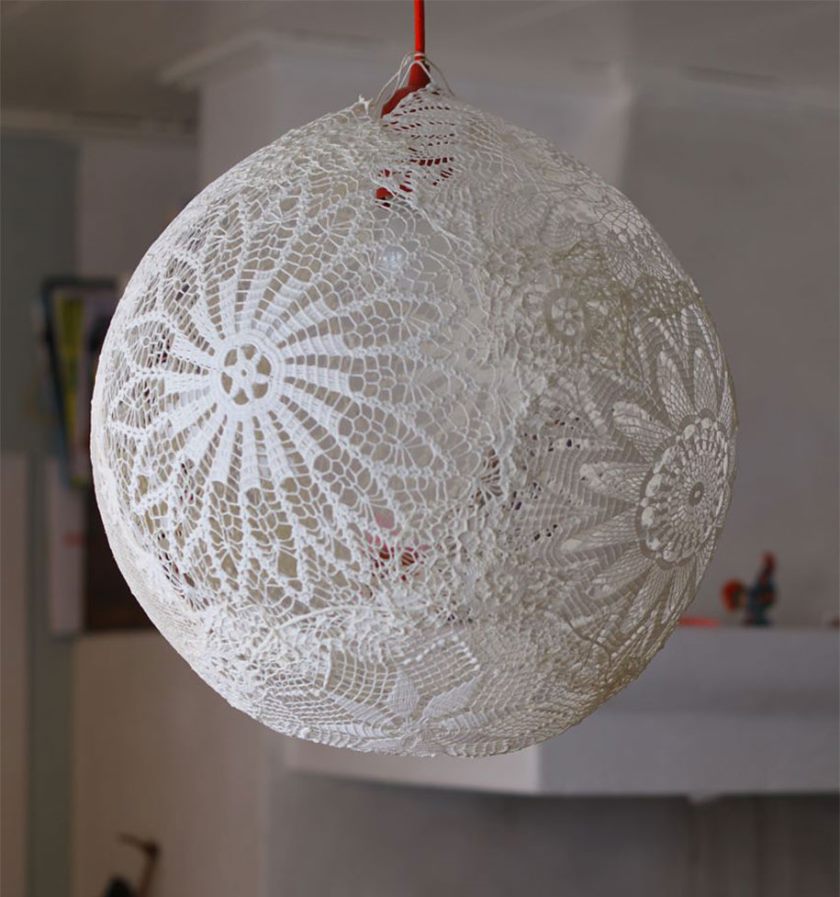
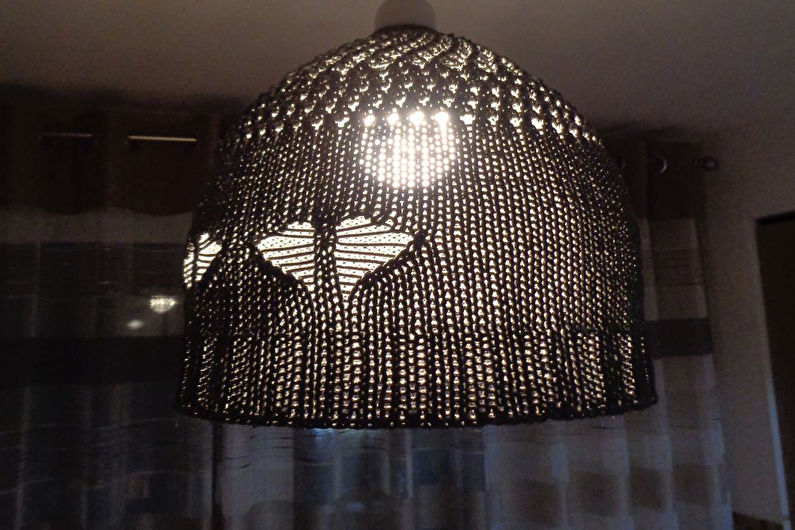
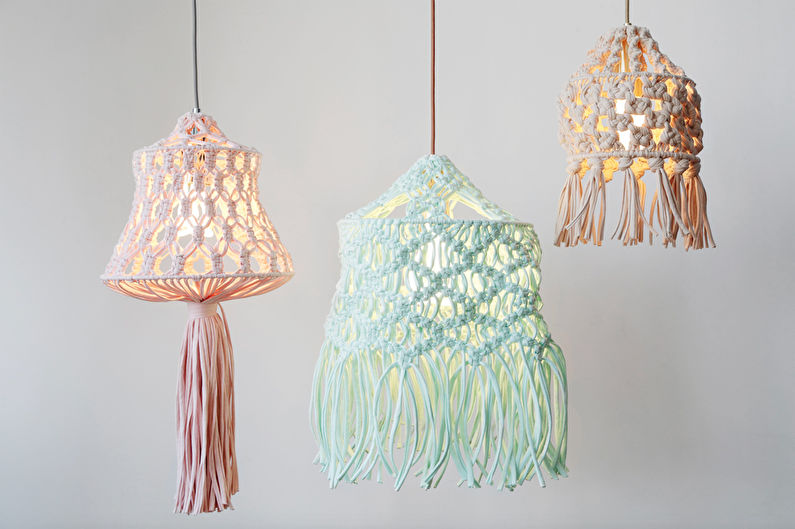
Knitted lampshade
This solution made from threads looks less chaotic. The main conditions for making it are the ability to knit or the presence of a grandmother who will kindly knit a napkin for you. The finished product must be placed on any base - a metal frame, a transparent container, a Chinese ball. Similarly with the first option, you can attach the lampshade to the balloon using glue.
![]()
Bottle lamps
Stylish chandeliers for different types of rooms can even be created from bottles. This includes both glass and plastic containers.
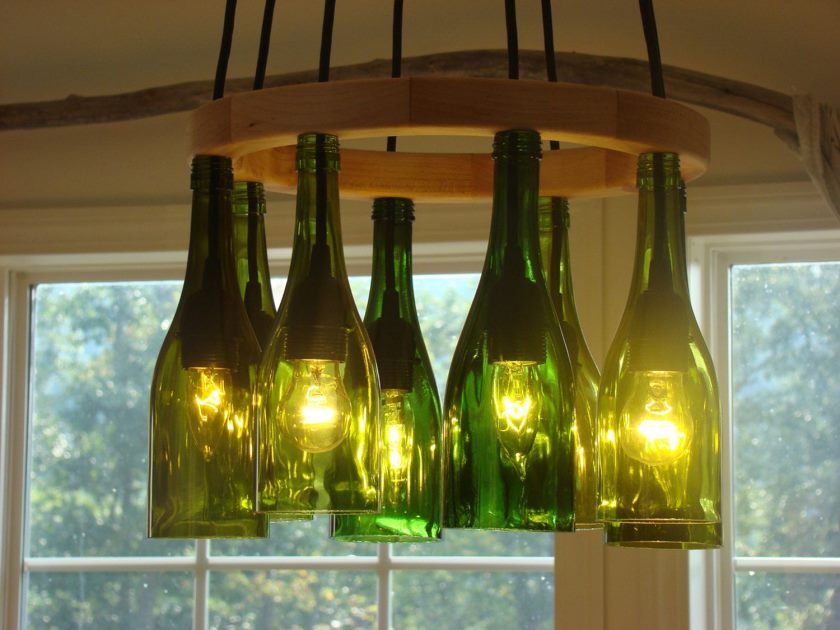
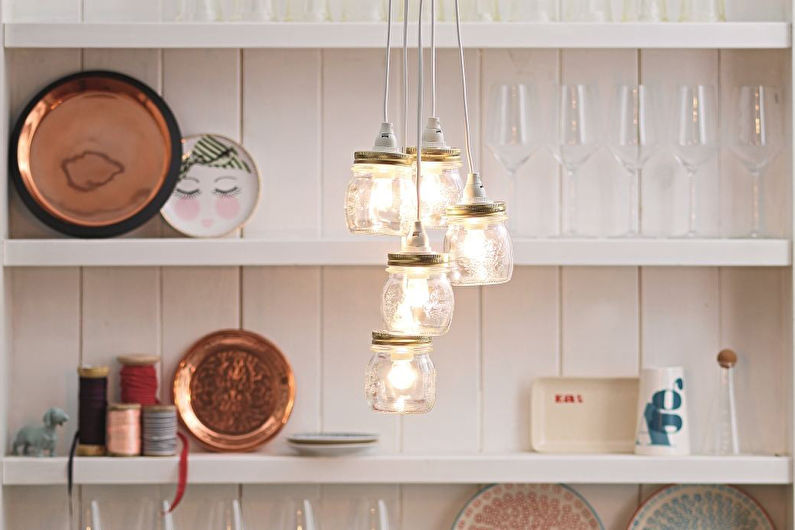
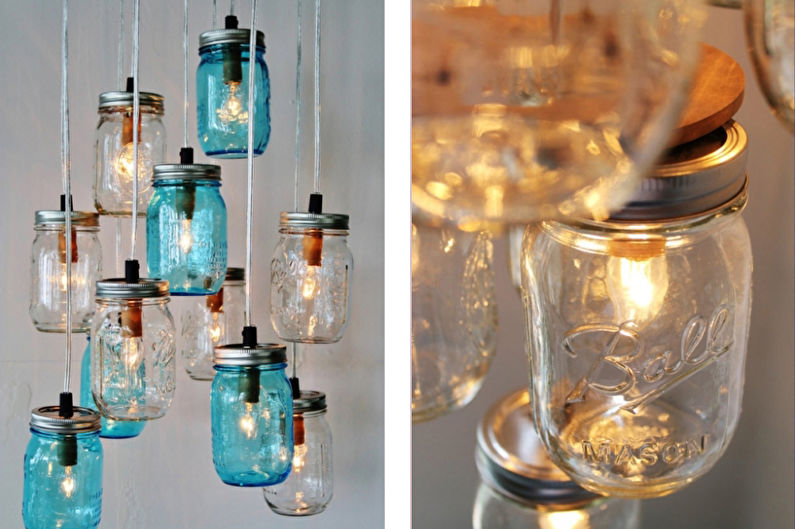
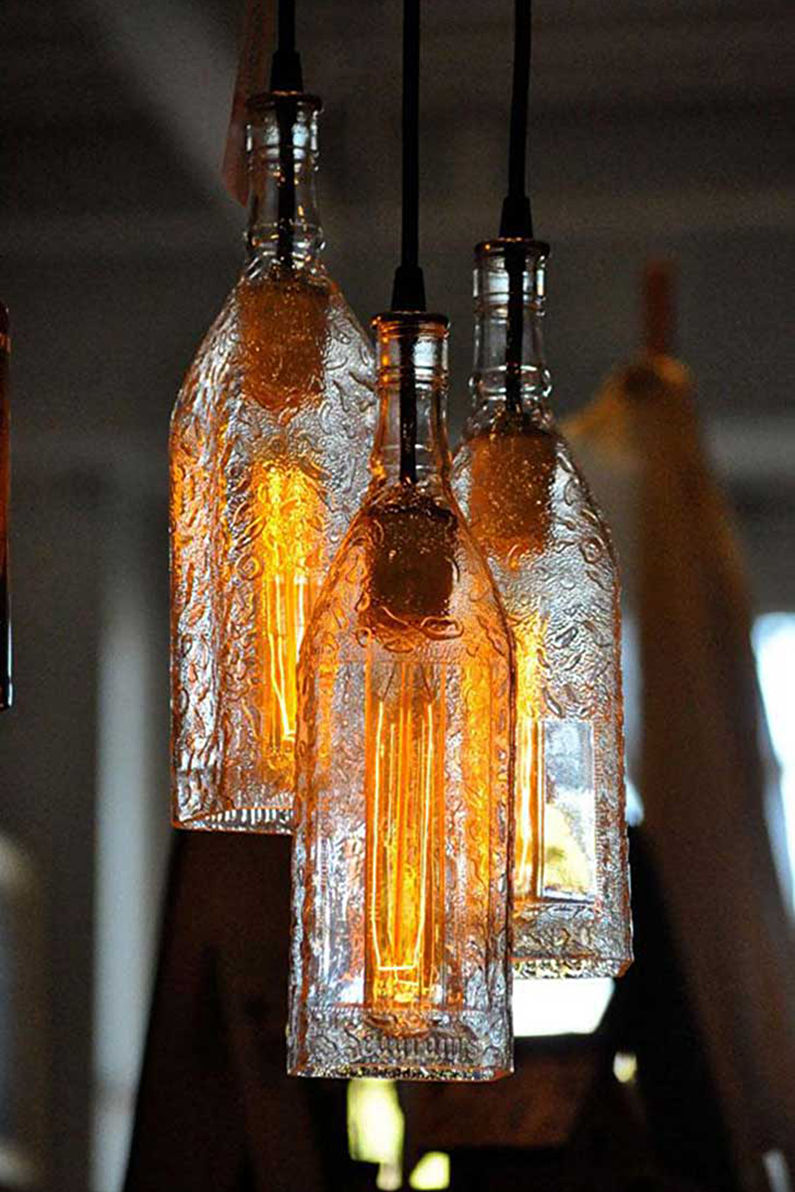
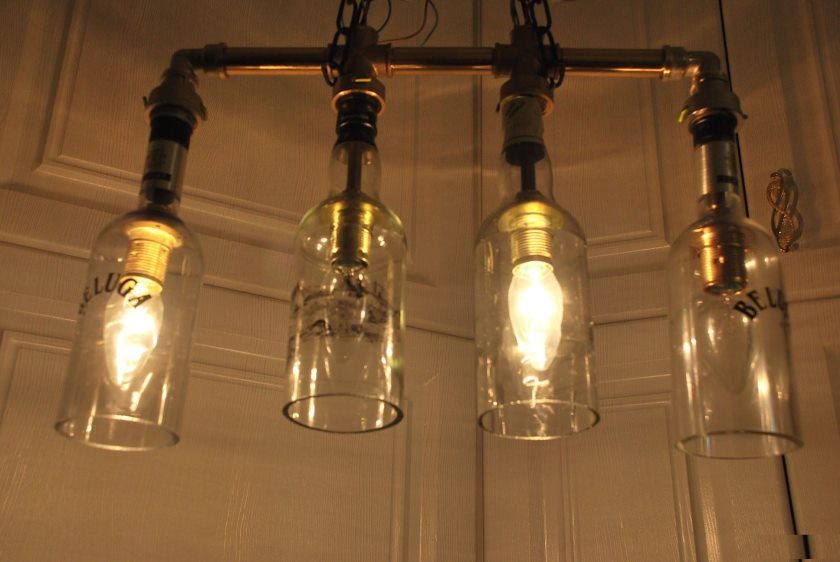
Glass bottles or jars
The principle of working with such a base is simple: choose the most beautiful one and hide the lamp in it. Elongated bottles or small jars can be used. It is necessary to make sure that the glass transmits the amount of light required for the room, and if there is not enough light, several sources can be used.
If the chandelier plays more of a decorative function, the bottle can be covered with acrylic paint or painting.
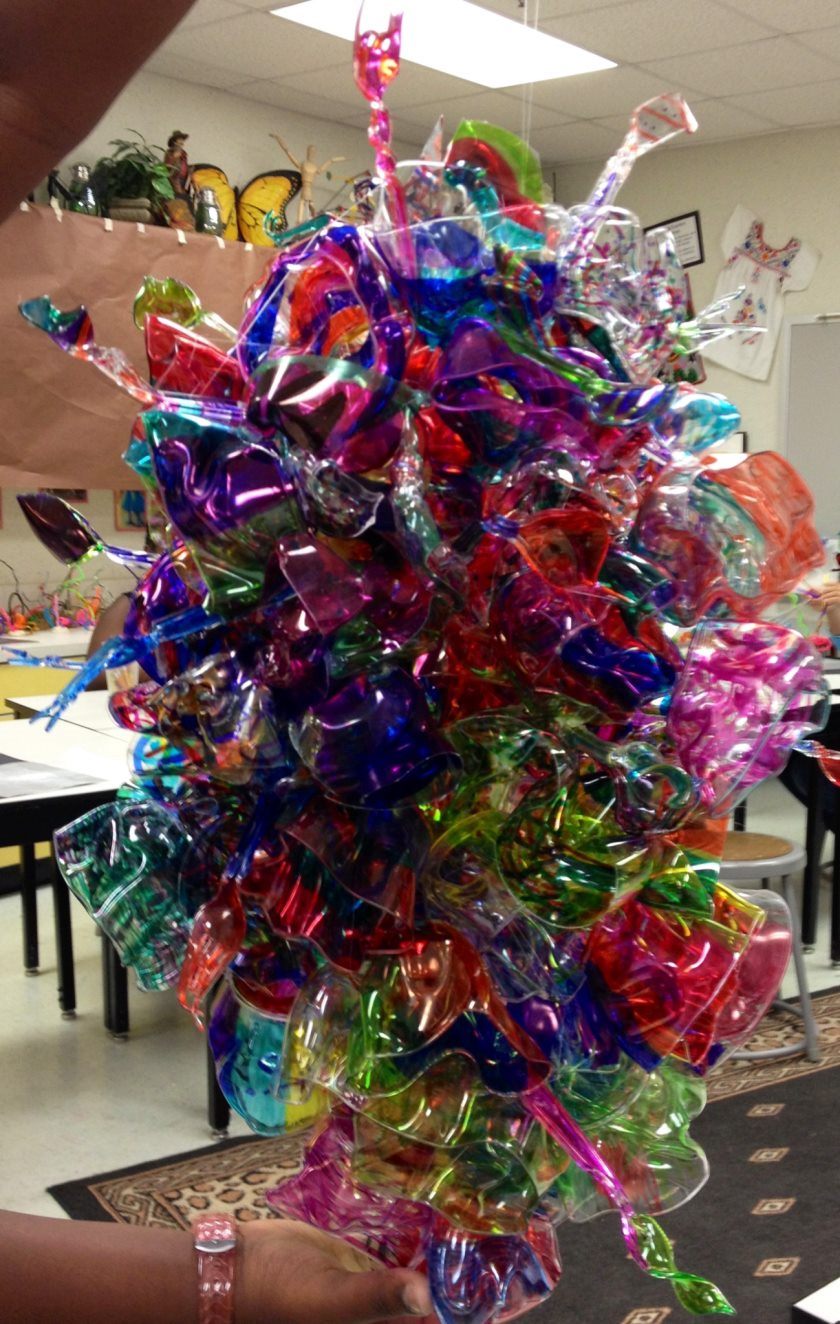
Plastic lampshades
Plastic bottles should not be used untouched. But it’s quite possible to make cheap parts from them for a homemade lampshade.
Luxurious (as far as this word is generally applicable to plastic) look chandeliers from the bottom of ordinary bottles, which are shaped like a flower. They are fastened together with wire for better fixation, creating a variety of compositions.
Another option is a 10-liter eggplant covered with plastic spoons, which are lined up in several rows, like scales. The design will transmit muted but uniform light, which will further decorate the product.
![]()
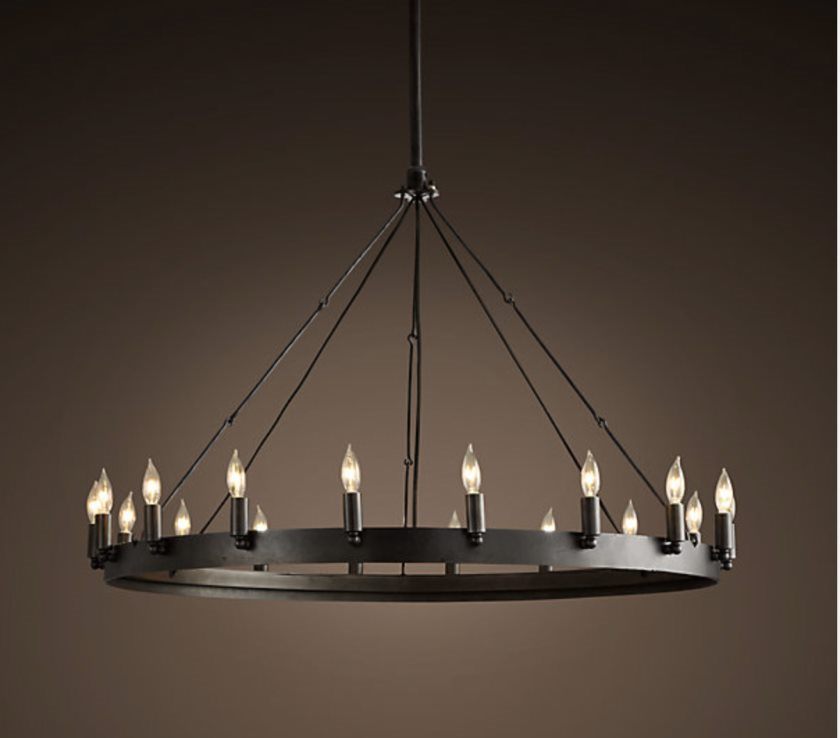
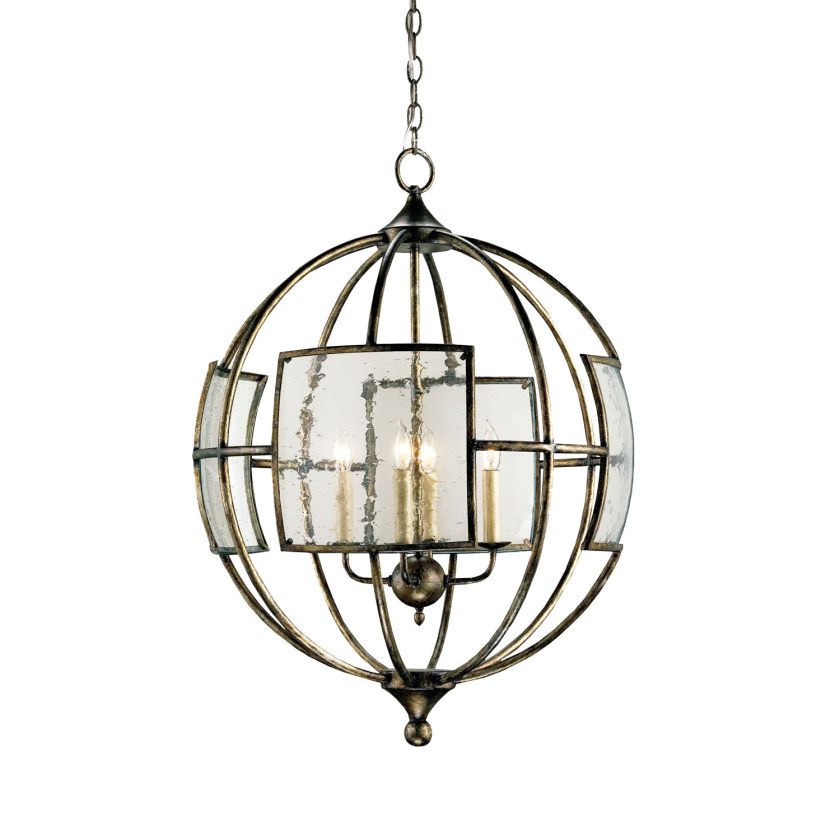
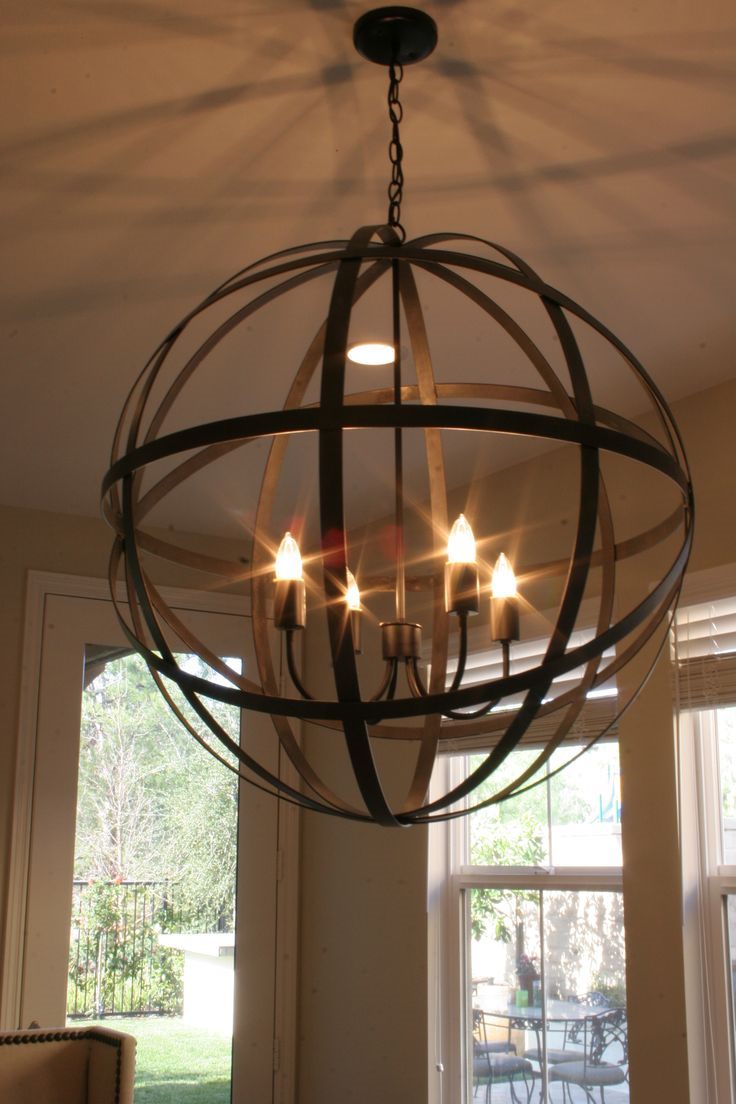
Lampshades made of metal elements
Metal products also offer rather unusual solutions for chandeliers. Fortunately, you don’t need to make them yourself, so you don’t need any special skills in working with metal. But a spectacular appearance is guaranteed in any case.
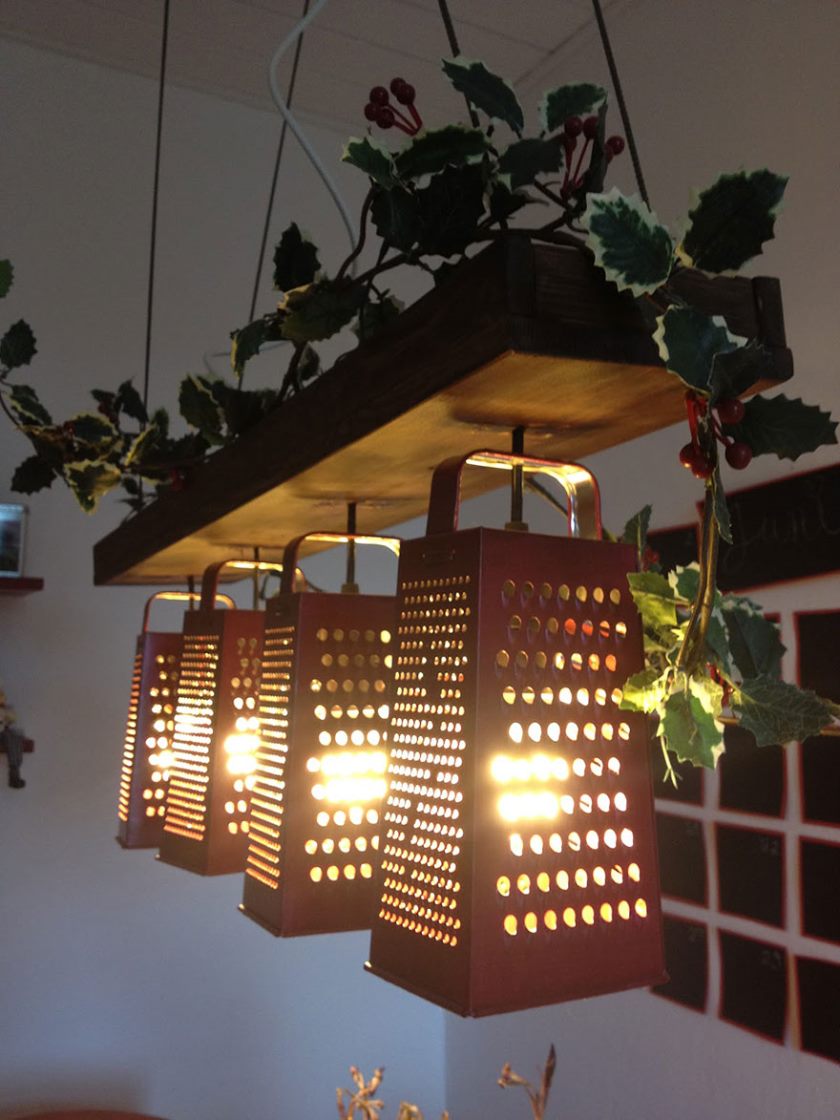
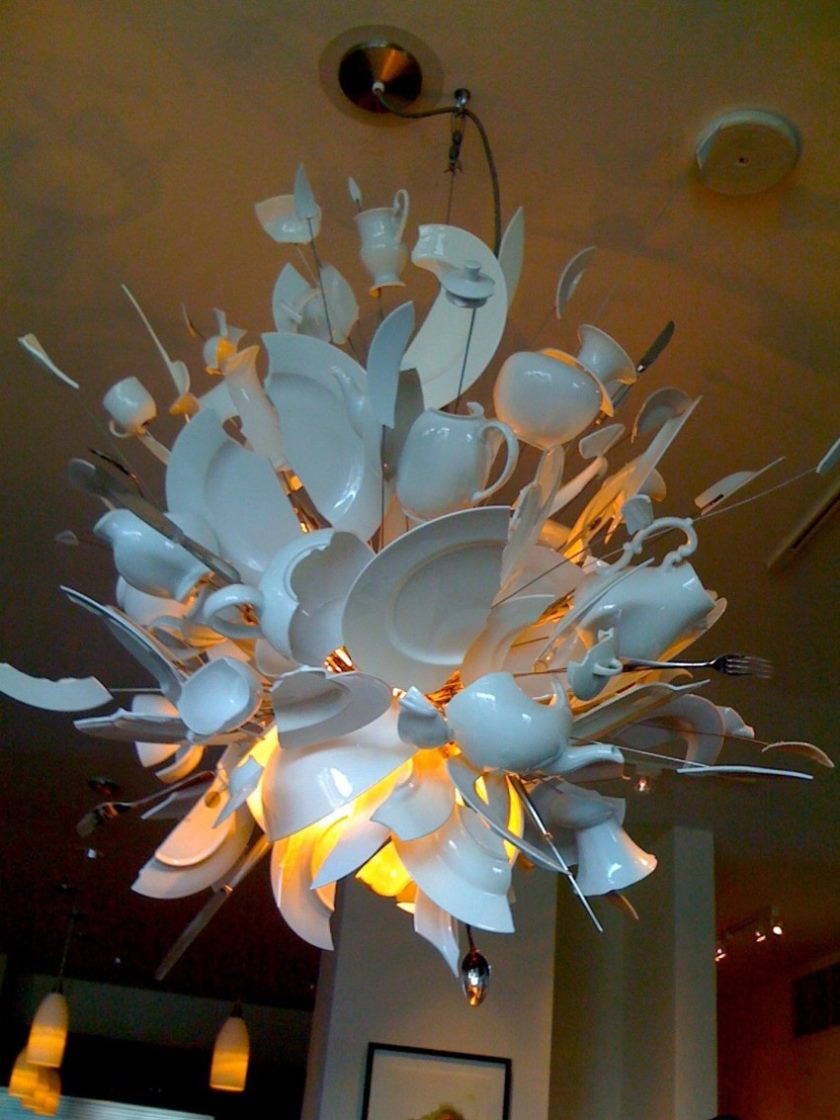
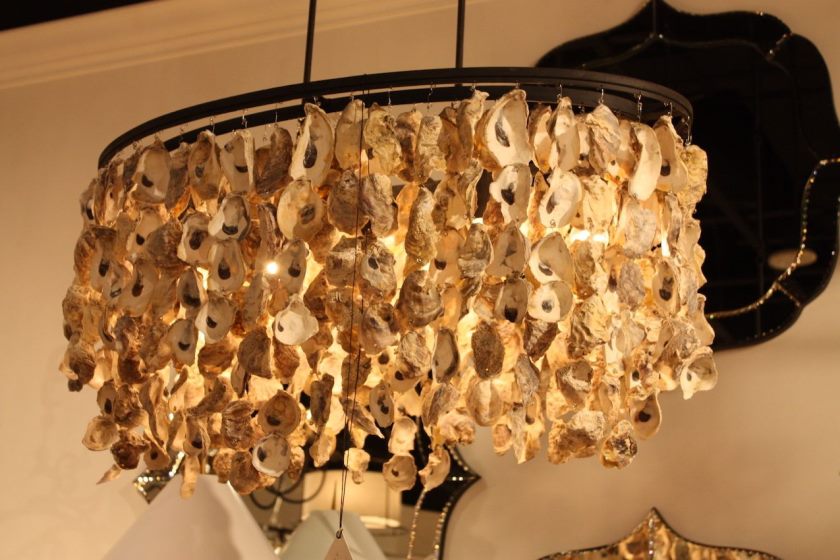
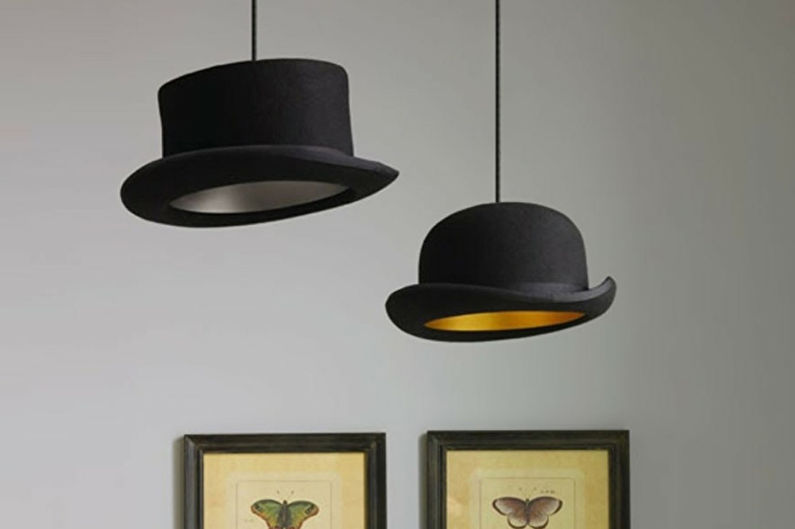
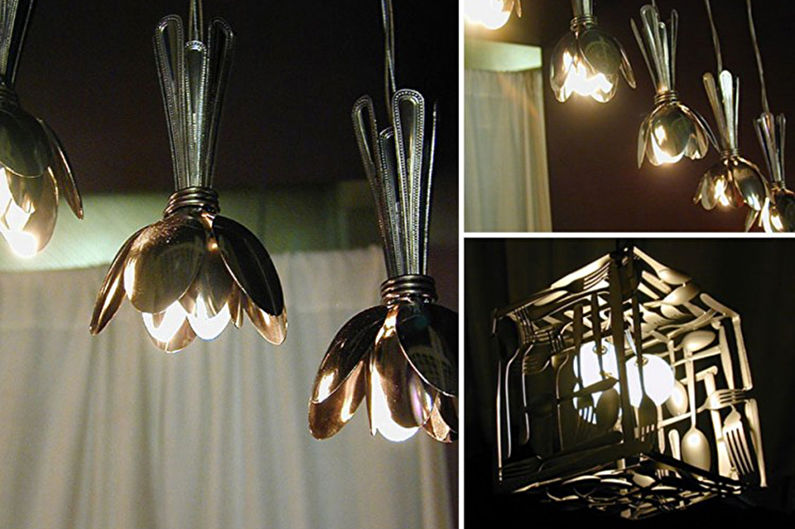
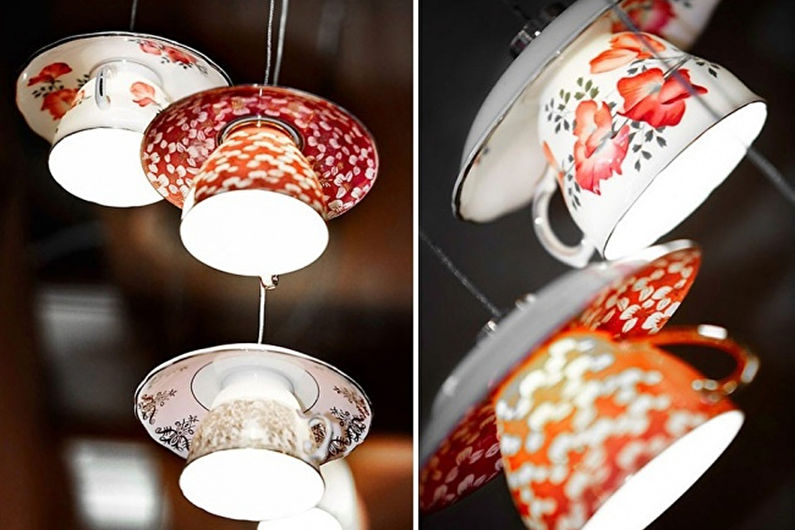
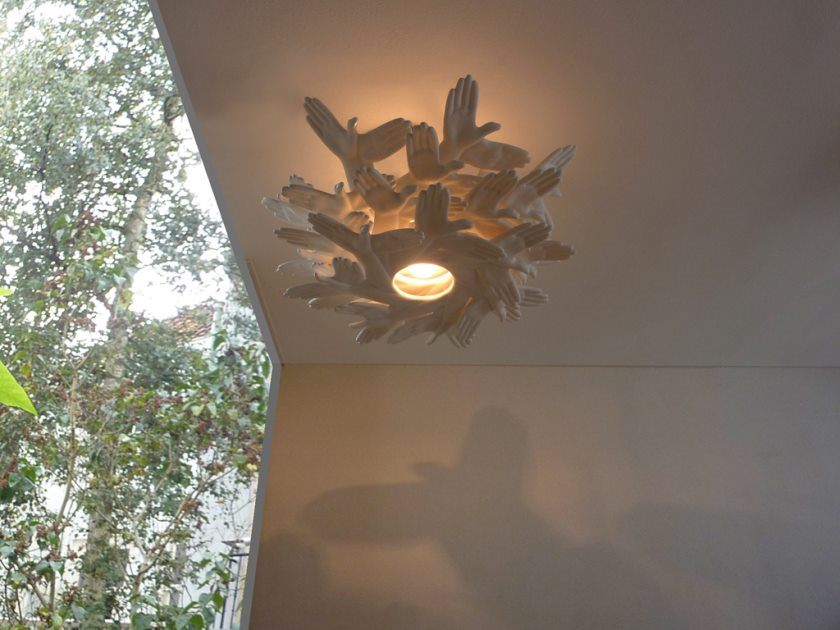
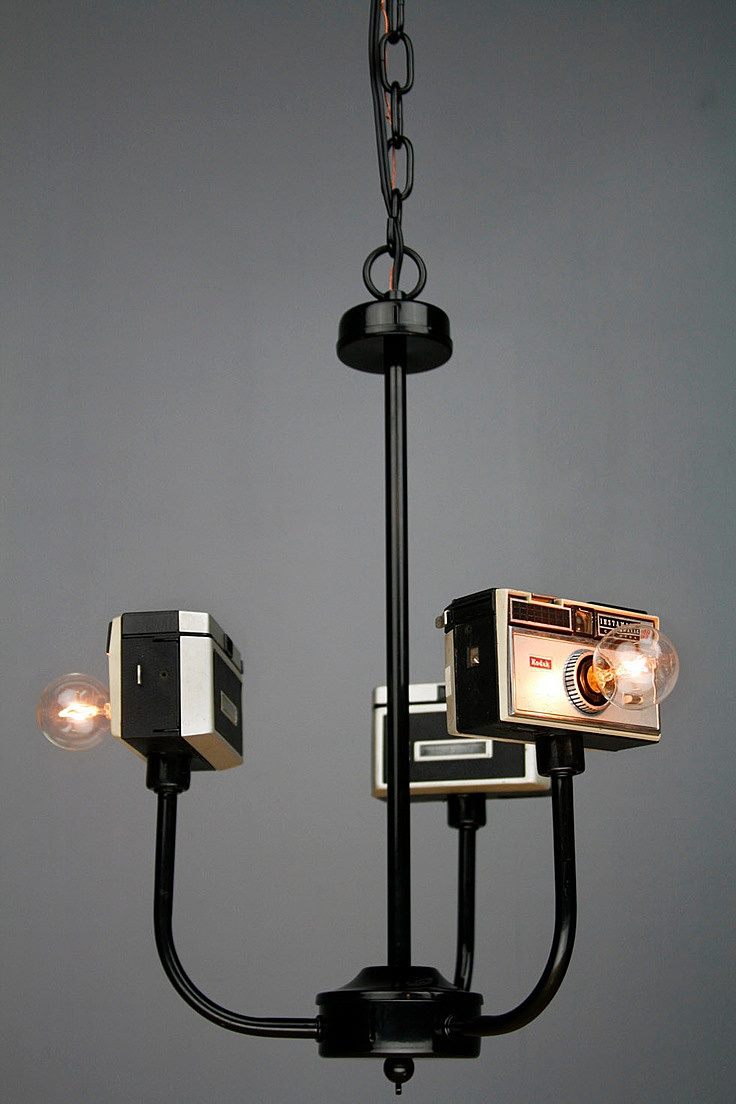
Kitchen appliances
Don’t rush to throw away your old spoons and forks - you will need them to create an original design. By placing a dozen fixtures around the lamp, you will get an excellent shade for a kitchen chandelier that fits perfectly with the theme.
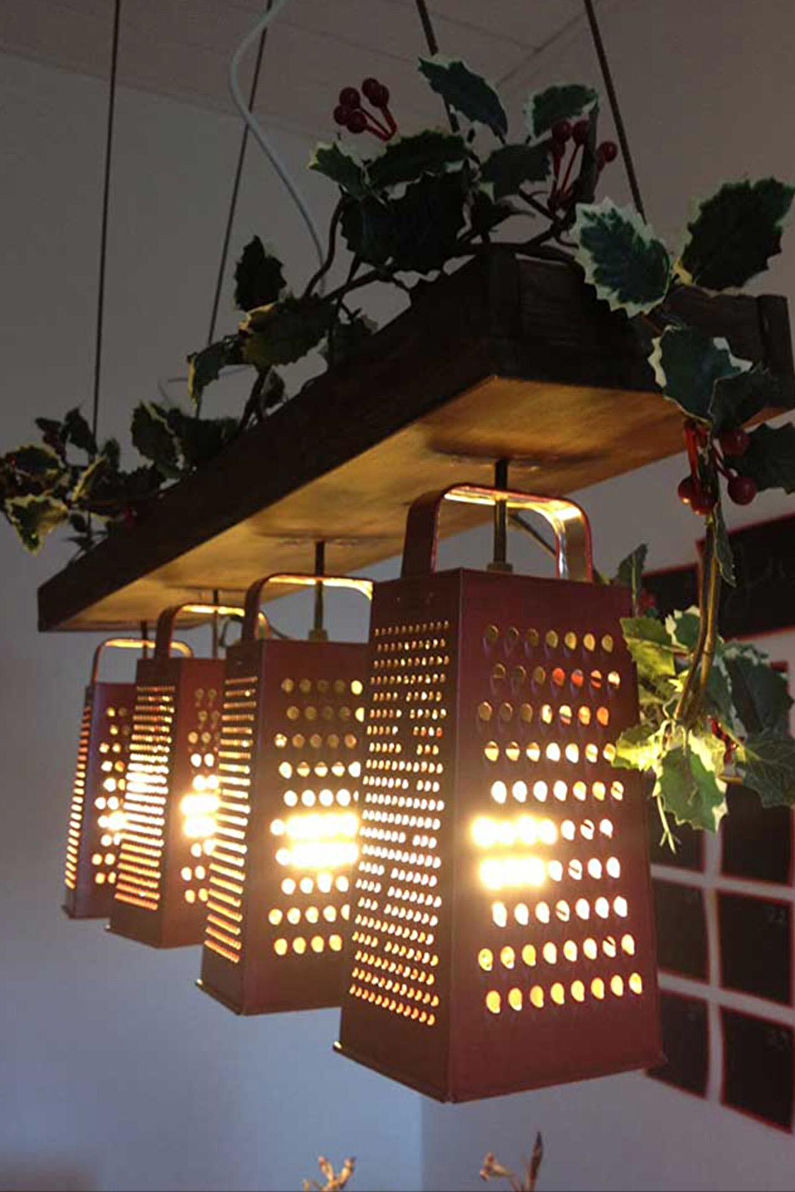
The same effect can be achieved by using, for example, a grater. In general, you can experiment with any devices, especially if your interior is decorated in a loft style. Just make sure that the metal parts do not get too hot.
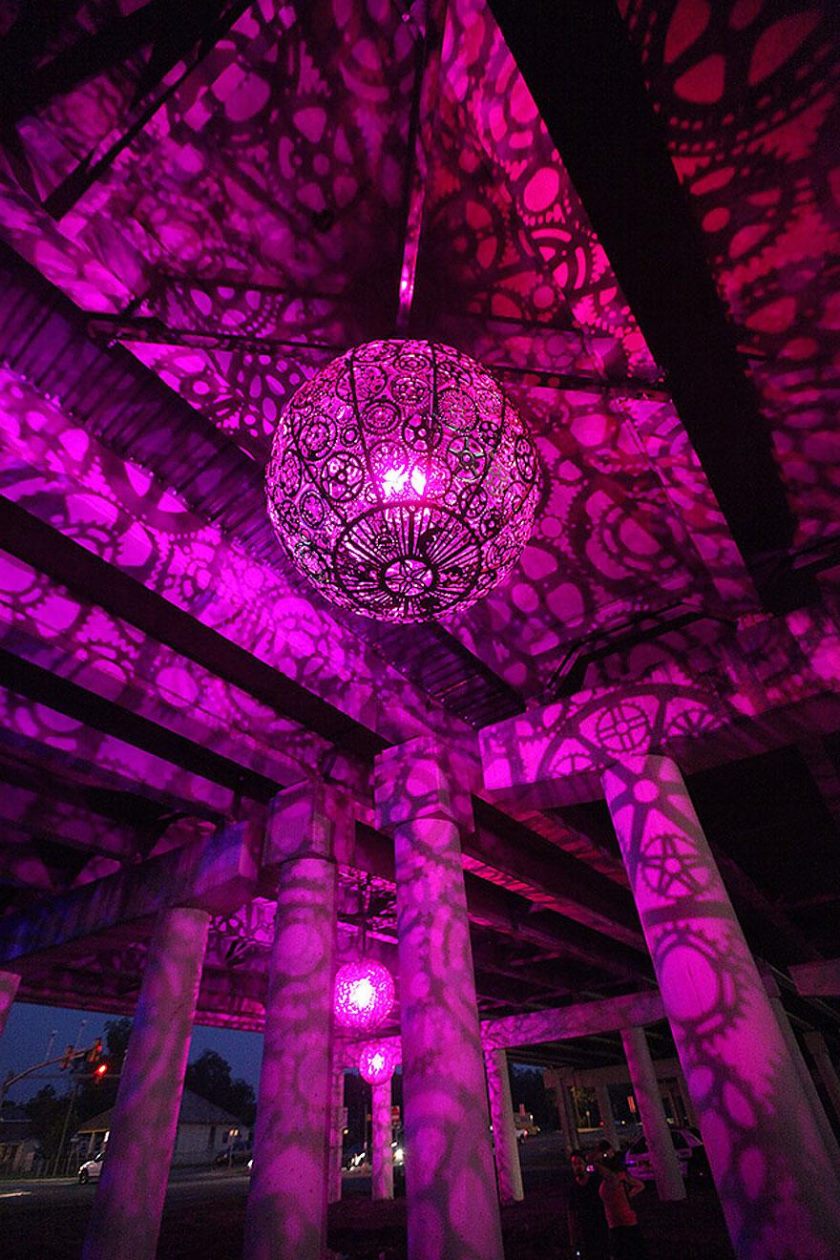
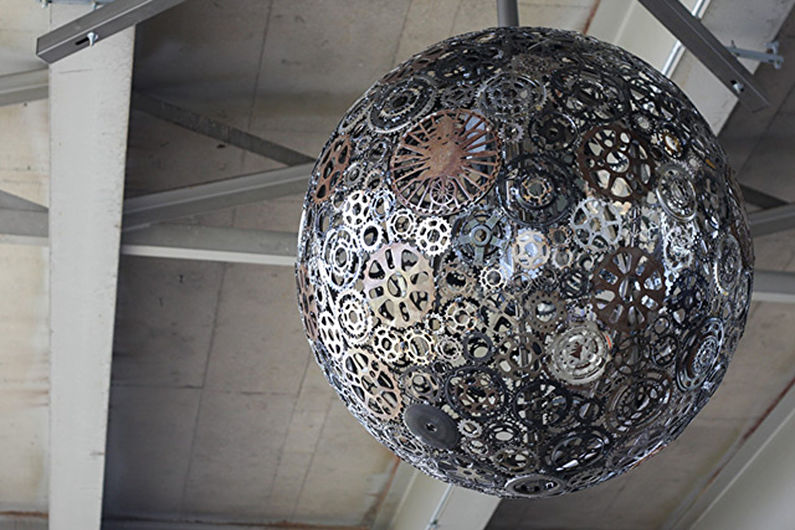
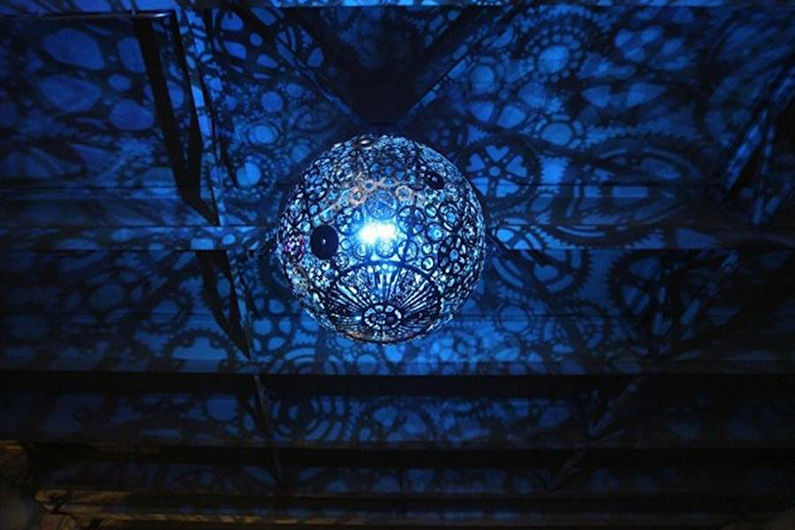
Gear dome
If you want to add a little steampunk into your life, make a chandelier shade out of gears. You can get them by dismantling an old bicycle or buy them at a flea market. But the result is definitely worth the effort!
We looked at the features of making lampshades for chandeliers with our own hands and the most popular solutions from various materials. But, of course, there are many more interesting options - as evidenced by our selection of photographs. Enjoy watching!
Many people have creative inclinations, as well as a rich imagination, which is a good help for the implementation of various creative ideas and ideas. For example, you can easily radically change any piece of furniture in your home. As a clear example, you can turn your attention to an ordinary chandelier. At the same time, rooms where there are unique and unusual interior items, and even made by hand, this gives the room a special atmosphere.
The most widely used chandelier is made by hand from various obsolete materials.
We make a chandelier with our own hands from plastic bottles
1. Using sharp scissors, we make various patterns, shapes and different figures to use on your chandelier.
2. It is necessary to attach several thin rods to the chandelier mount, after which we connect all the other rods, but remove one rod in the middle; this is necessary to place the light bulb. At this stage, the chandelier takes on the appearance of a hedgehog.

3. We connect all the prepared figures with the prepared frame made of rods.

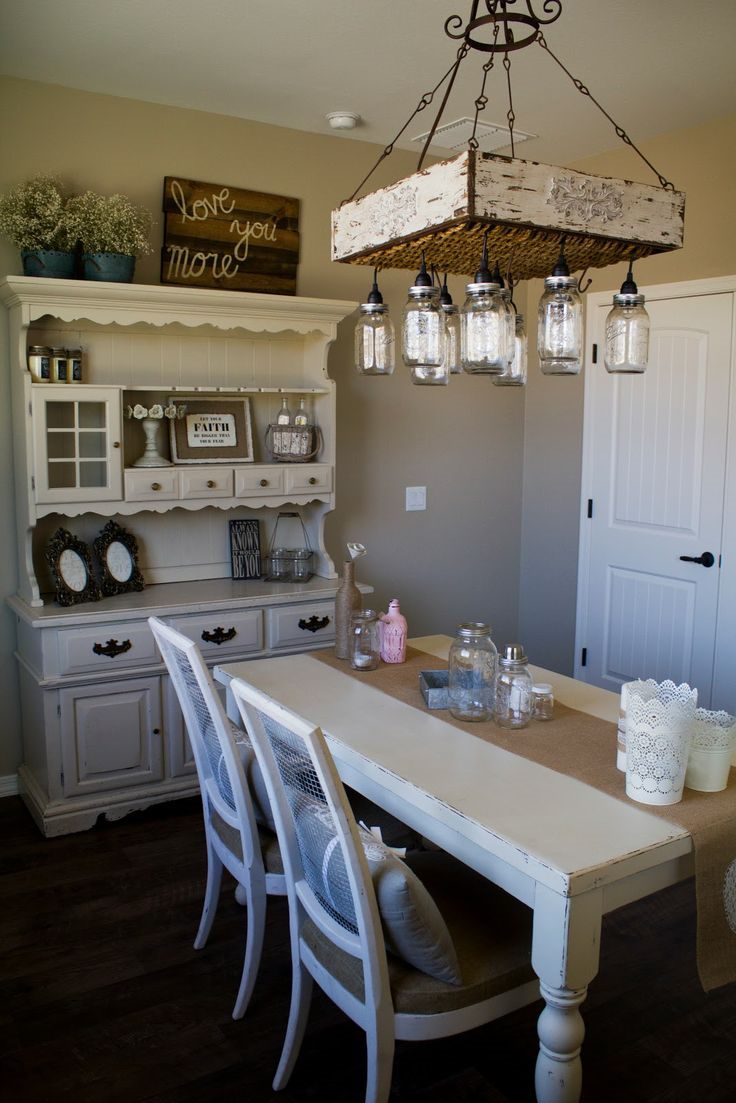
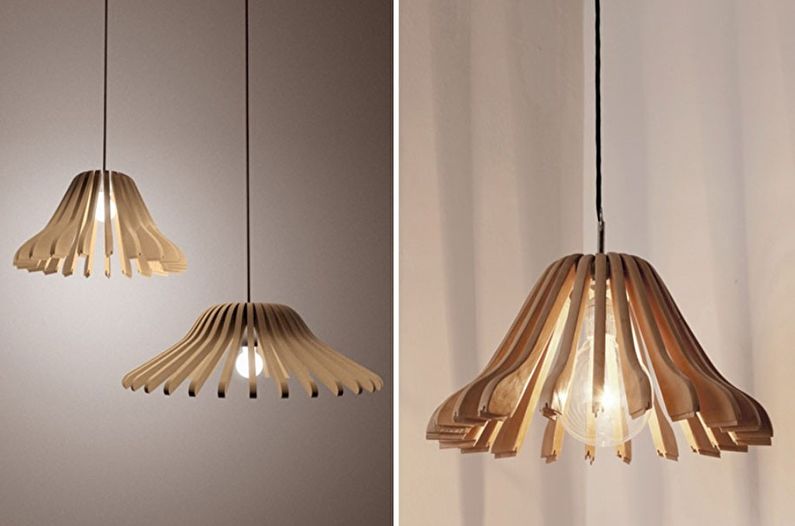
Making a chandelier with your own hands from wood
To make this chandelier you need:
- several wooden planks approximately 40 cm wide.
- several liter jars for making a lampshade.
- paint or varnish for wood.
- small self-cuts necessary for fastening, as well as sanding paper with a fine fraction.
1. To begin with, we sand our planks with sanding paper until the planks become smooth.
2. It is necessary to make a notch on the back side of the slats to install electrical wiring.
3. It is necessary to make three holes where the lampshades will be mounted.
4. Paint the planks in the natural color of the wood.
5. The socket itself must be secured into the hole in the lid; screw the light bulb into it.
6. We use a liter jar as a lampshade, having previously painted it in a bright and light color.
When making a chandelier from various types threads, you need to take:
- plastic bowl or other suitable object of the desired shape.
- different threads having different shades, you can use white threads, but then paint the shape of the lampshade in the desired color
- glue or make a special viscous mass to shape the lampshade.
So, the process of making such a chandelier consists of several stages:
1. First you need to make a special paste, for this we need half a glass of flour, mix half a liter of water and add another glass there hot water and a few spoons of sugar. Mix the entire resulting mass well and let it cool, resulting in a viscous sticky mass.
2. Throw our threads into the resulting mass, after which these threads must be wound on a plastic bowl or other prepared form, and let the product cool for one day.
3. After the threads have dried, they have acquired the required shape of the lampshade and you can separate the threads from the mold.
4. We mount the lampshade on the bottom, and the chandelier is ready and can be hung.
However main feature such lampshades is that all the materials from which the lampshade or chandelier is assembled are very flammable, so for safety reasons it is recommended to use low-power light bulbs of 50-60 Watts.
DIY chandelier - step-by-step instructions
To make a chandelier with your own hands you will need:
- electrical wire, socket and low power light bulb up to 60 watts.
- special frame.
- colored threads and glue.
You can use an old and unnecessary chandelier as a frame, which can be transformed. This is exactly what some modern designers do, giving their old and unnecessary things a second life.
So, you need to decide on the size and fabric that will be used in the work process. Next, you need to sew a cover of the required dimensions and put it on the frame. Almost anything you can imagine can be used as a decorative decoration. In this case, you can use various cut out patterns, beads, buttons and much more. Next, we mount the socket with the light bulb to the lampshade. Every old thing has found a new life.
Chandelier made of threads
At the moment, a chandelier made in the form of a winding of threads is becoming especially popular. This chandelier is very quick to make and looks very beautiful. To make such a chandelier you will need a large amount of PVA glue, but you will also need an ordinary ball or other sphere.
So, inflate the balloon to the desired size, wrap the entire surface of the balloon with threads and apply PVA glue to the threads. Next, let the product dry and then punch the ball, making a small cut resulting in a hole. We mount a light bulb into this hole, and the beautiful chandelier is ready for use.
Photo of a DIY chandelier