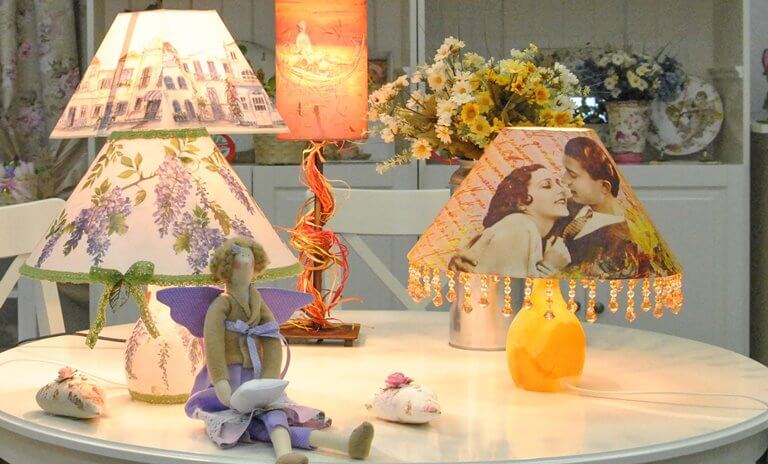
DIY table lamp decoration. Make a table lampshade with your own hands. Stylish lampshade made from tin lids
It happens that a properly working lamp or a favorite night light, inherited from your grandmother, works properly, but is significantly shabby... It’s a shame to throw it away, but it’s impossible to look at it without tears - the fabric is frayed, faded, even torn in places, and the paint and varnish are falling off... Believe me, there is at least 20 ways to improve the situation: either repair the old lampshade, or put a new spin on it, or, at worst, throw it away and create something mega-creative in its place!
A few words from history: in French, abat-jour translates as “light dimmer.” Such mufflers first appeared about two hundred years ago, but their ancestors - dampers for torches and candles - were invented in ancient times. Before that memorable day When the talented designer Louis Tiffany tried to create his first lampshade from pieces of broken multi-colored glass, they were made exclusively from fabric. Around the same time as Tiffany, another equally talented designer, Antonin Doma, invented a crystal lampshade.
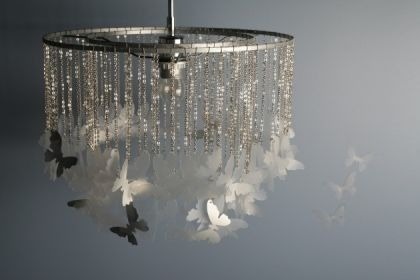
Today, crystal, fabric and glass are not enough - lampshades are made from almost any material known today. You, too, can use almost anything that comes to hand - the main thing is the right combination and sense of proportion! So, 20 ideas for inspiration...
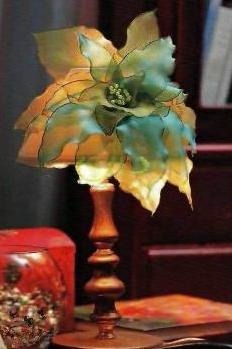
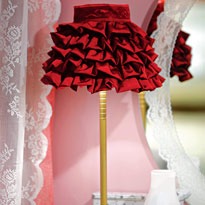
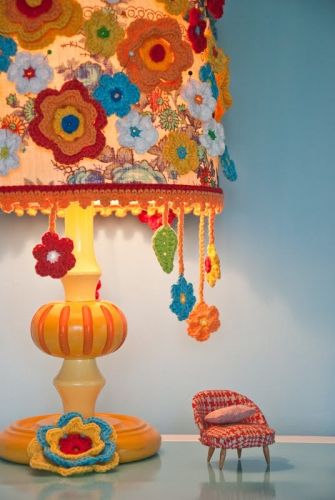
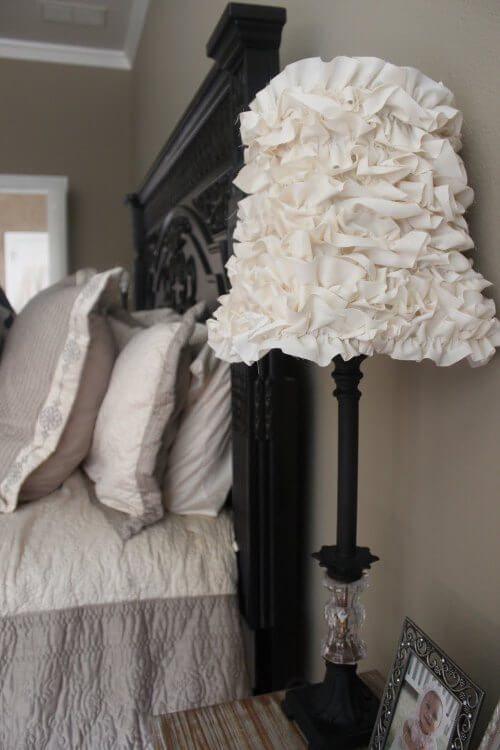
1.Lampshade made of fabric
You can choose absolutely any fabric – from organza to denim. You can simply re-cover the frame with one fabric, or you can create a whole collage from scraps of different textures and colors. Can also be made from fabric artificial flowers and cover the old lampshade with ready-made buds. You can beautifully use children's clothing, as the authors of this original night light - a skirt did...


![]()
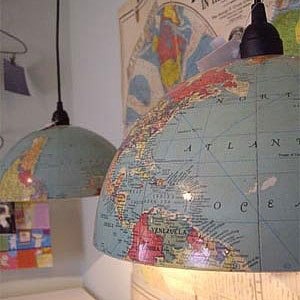
2.Lampshade - globe
Why not? Especially if you place them in the nursery of a little traveler and adventurer!
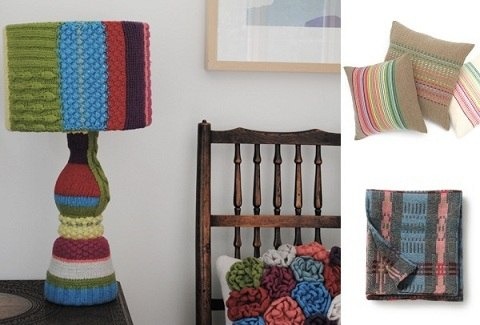
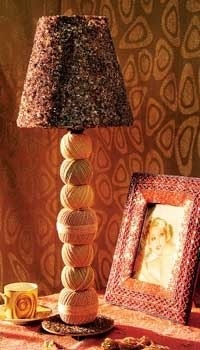
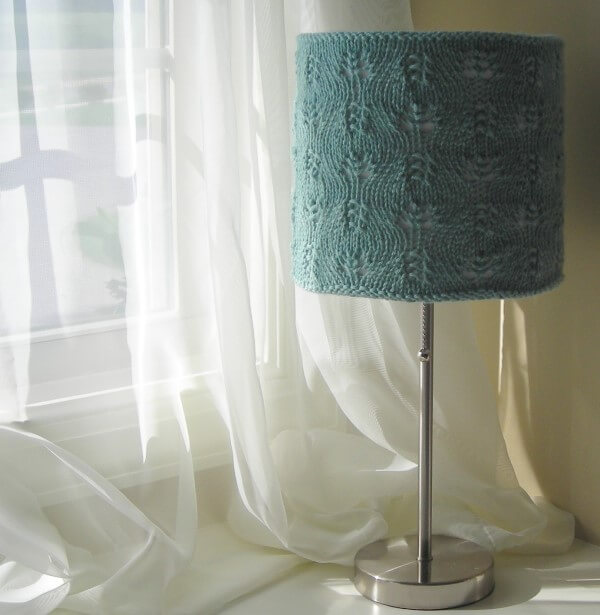
3.We use knitting
If you have a lot of unused balls, or an old worn sweater, you will definitely need them when creating a new lampshade! Of course, you can re-tie the frame of the nightie, but it will be faster to sew a colorful, warm “cover” from an unnecessary sweater. Stick knitting needles into it with the knitting started, or place a basket of yarn next to it - and the atmosphere in the house will become warmer from such a cozy little thing!
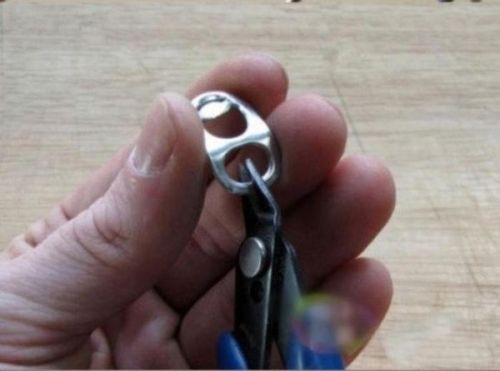
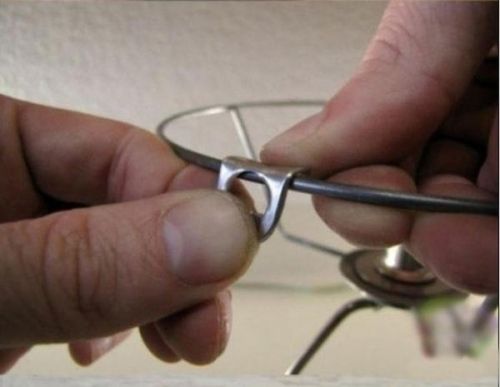
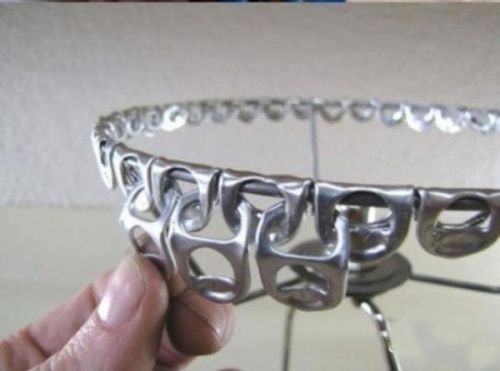
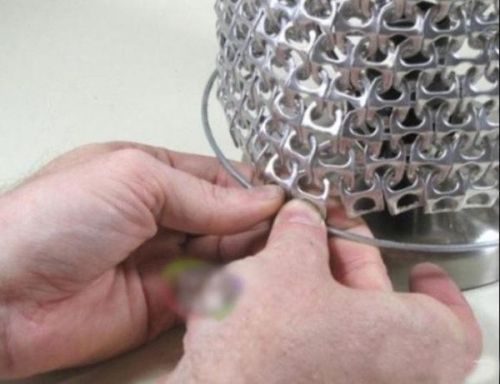
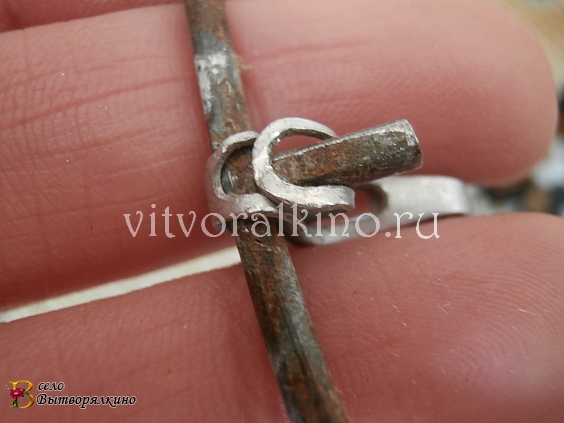
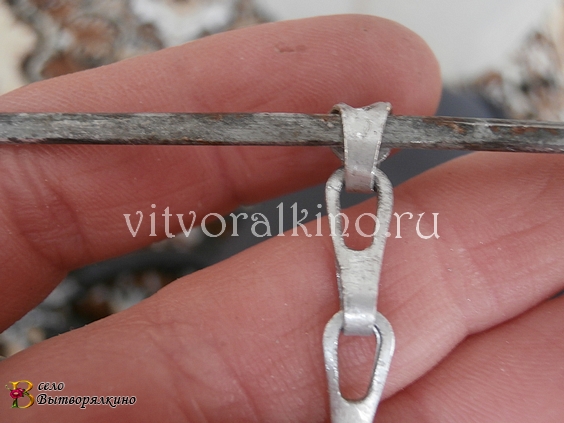
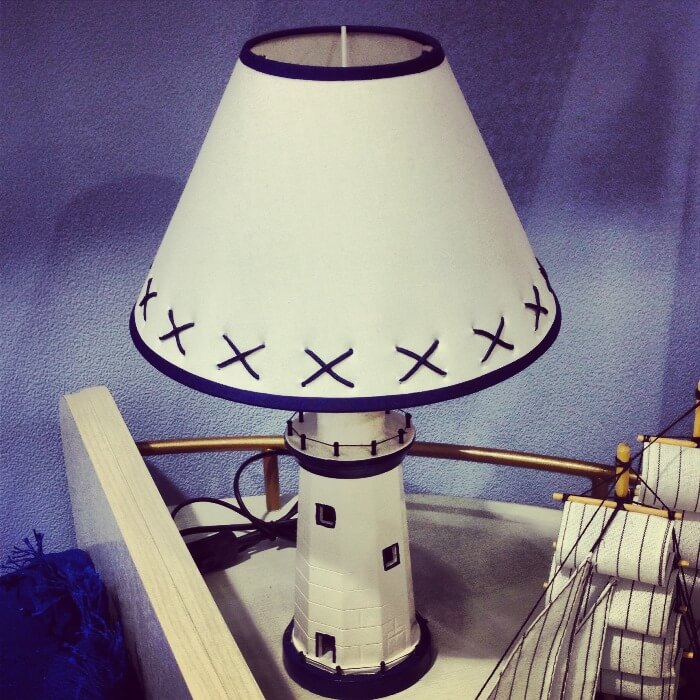
4. Stylish lampshade made from tin lids
This masterpiece is worth working on! First, accumulate as many caps! And secondly, weave such a “chain mail”. But the result pays for everything. There will be no limit to the surprise of guests! Study a detailed master class and create...
Click, the pictures are clickable.
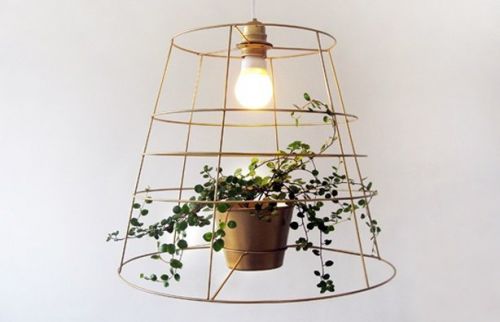
5. Greening the area
Brilliant and, as often happens, very simple idea. We take a flowerpot with the most lush vegetation and attach it to the frame of a floor lamp or night light. It looks very creative and lively.
![]()
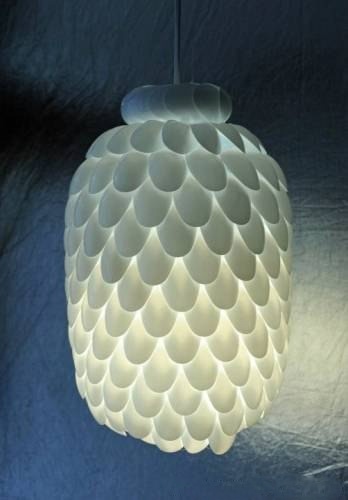
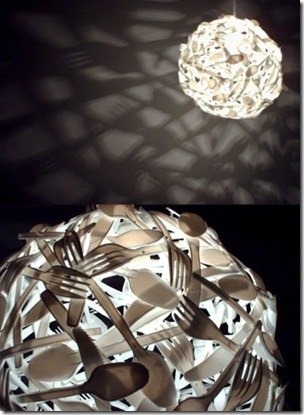
6.Creative lampshades made from disposable tableware
Here you have a large selection of starting materials: forks, spoons, cups, cocktail sticks-umbrellas... The technique for making such lampshades is very similar - all this disposable stuff is glued to a well-lubricated glue balloon. The spoon lampshade, which looks like a large multi-layered bud, is based not on a ball, but on a five-liter plastic bottle.
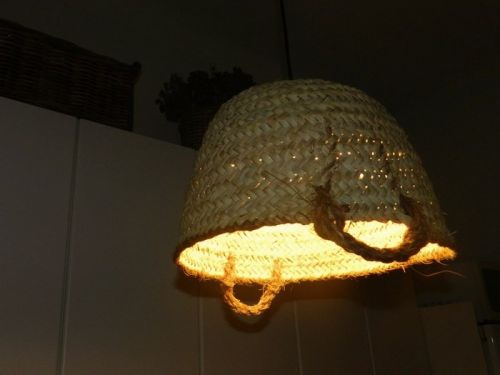
7. Wicker baskets

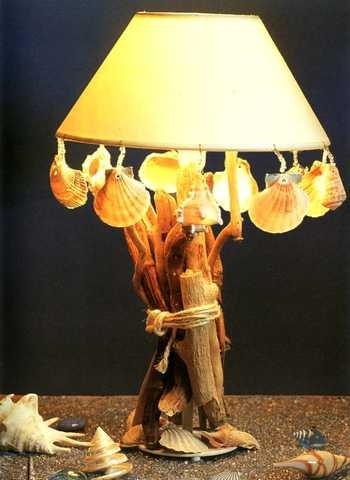
8.Marine style
An old fabric lampshade can be slightly “refreshed” by simply sewing shells along its lower edge. If it is very difficult to punch holes in the shells, you can simply glue them to the fabric!
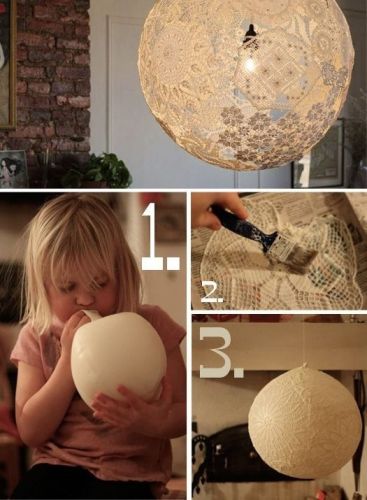
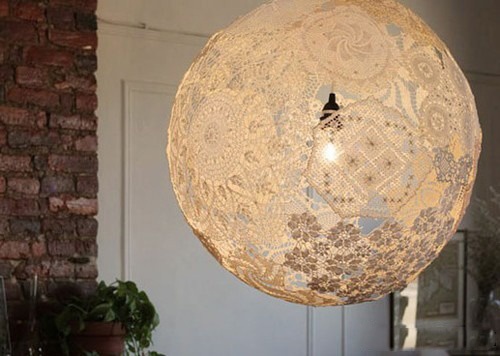
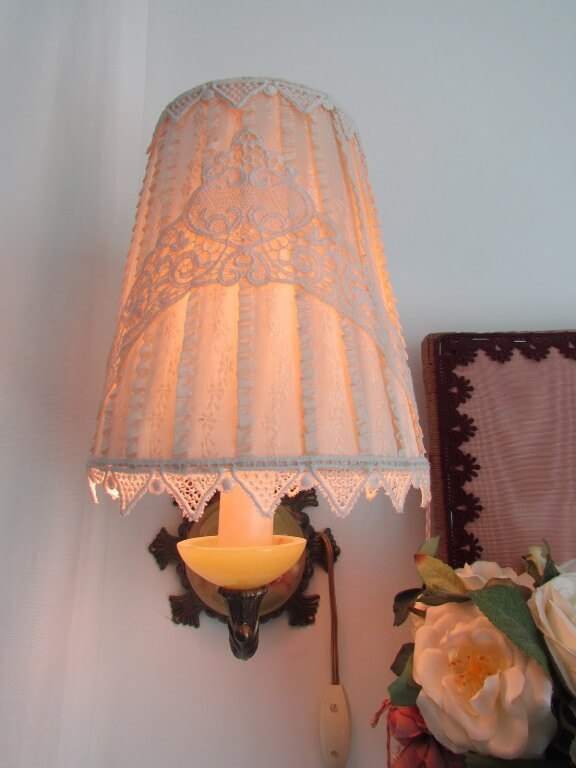
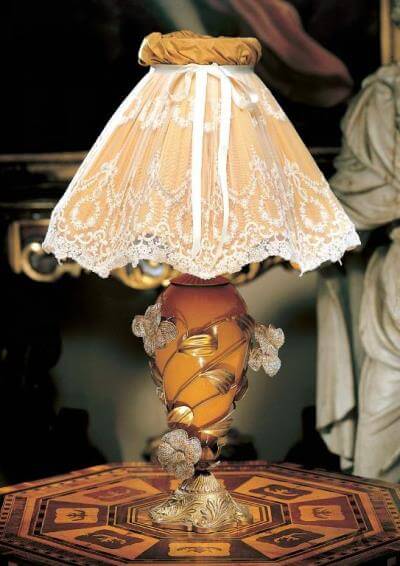
9.Lace or thread
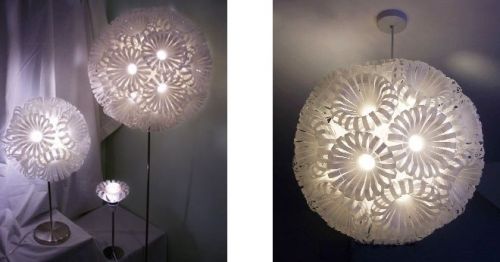
The old version of counterfeiting, which many of us were taught in school - you cheat balloon so that it turns out to be as round as possible and wrap it with woolen thread or straw, periodically moistening it in glue. When the work is completely dry, the ball is pierced and removed. In your hands you are left with a beautiful ball of threads or straws.
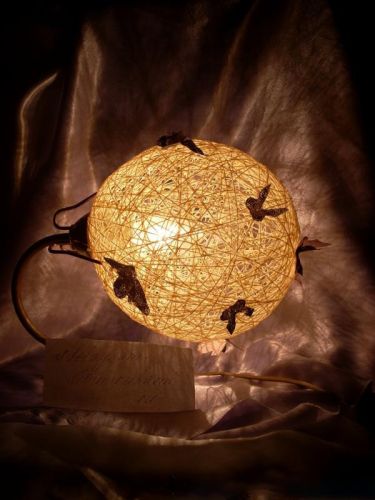
I suggest using lace knitted doilies instead of threads! But remember that you should only pop the ball when all the glue on the product has dried and the lampshade has become tight!
10. Chinese lantern in a new way
Simple chinese lantern You can revive it beyond recognition in an evening with the help of fabric flowers and ordinary gouache! Just draw sakura branches on the flashlight, attach the flowers with glue and that’s it!
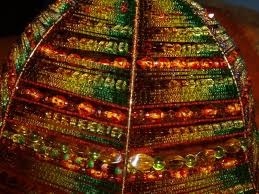
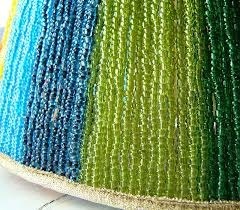
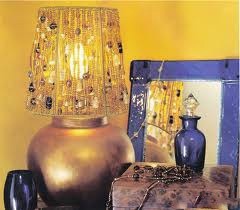
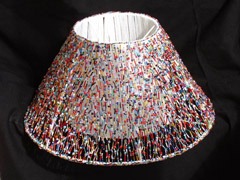
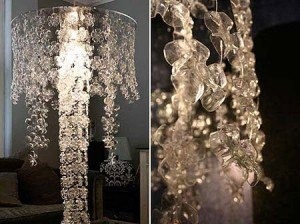
11. Beaded lampshades
Even if you don’t know how to weave complex beadwork and lace, don’t worry! You can simply string a lot of multi-colored beads mixed with beads onto a fishing line and braid the frame with them!
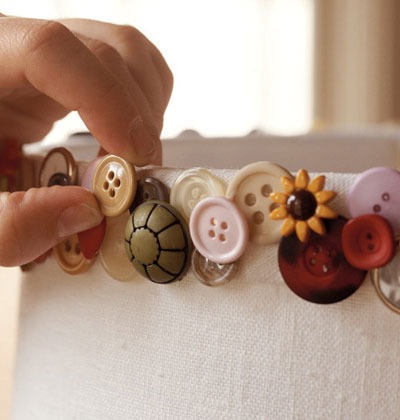
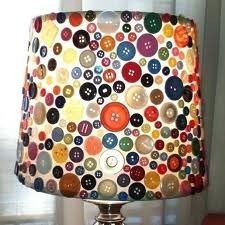
12. Use buttons
13. Wire lace
Unusual and incredibly beautiful! True, creating such beauty will require some skill and perseverance.
14. Lampshade made from a plastic bottle
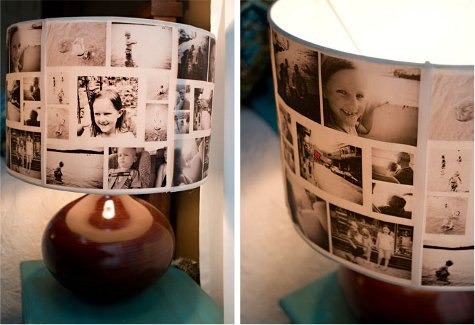
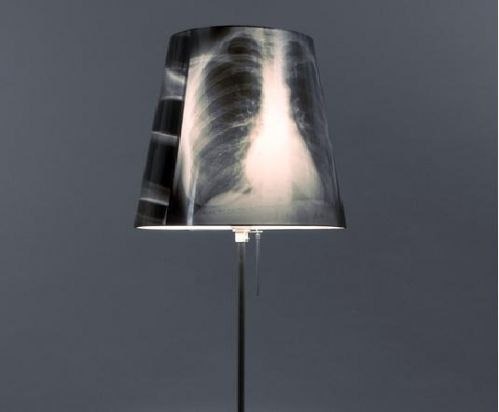
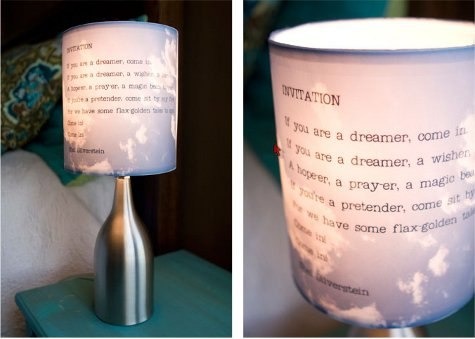
15. Paper or pictures
One of the most simple options updating an old lampshade - pasting it with newspaper clippings or old photos. Some even manage to use unnecessary X-rays!
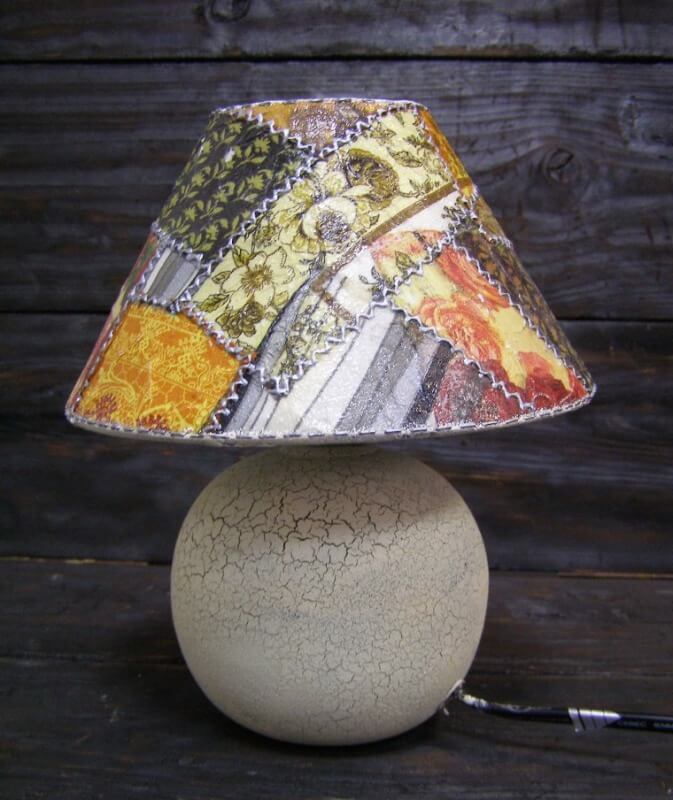
16. Updating a fabric lampshade with decoupage
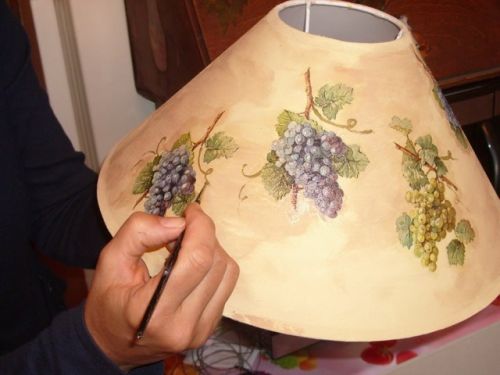
This floor lamp originally had a completely different shade... if this former one can even be called that. A flat plastic pancake is more of a misunderstanding. I honestly tried to find something similar to the original lampshade described, but... there is nothing similar in the entire network.
The old lampshade broke long ago, but the base itself remained. Attached to it was another lampshade from an old broken one. table lamp. The new old lampshade was remade several times.
This is the state in which the floor lamp came into my hands.
Shall we make something interesting out of it?
Let's start with the lampshade, since it is mentioned so often.
Required:
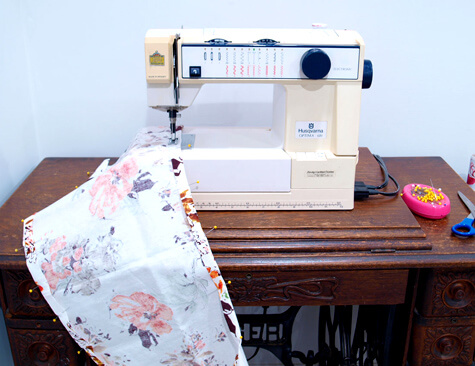
a piece of suitable fabric - 1 meter,
braid - 2 meters,
PVA construction glue, thick,
brush, needle, scissors, thread.
To begin with, I removed the homemade old “case” from the very base.
A beautiful view, to say the least. What was holding on to what... The threads were rotten and torn, the rims were rusty and covered with some kind of white coating, the base itself was dented in places...
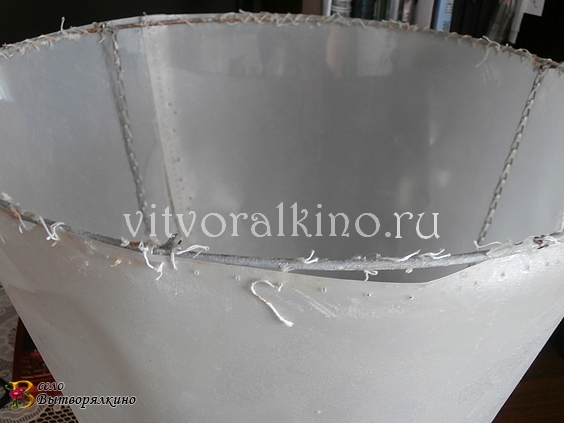
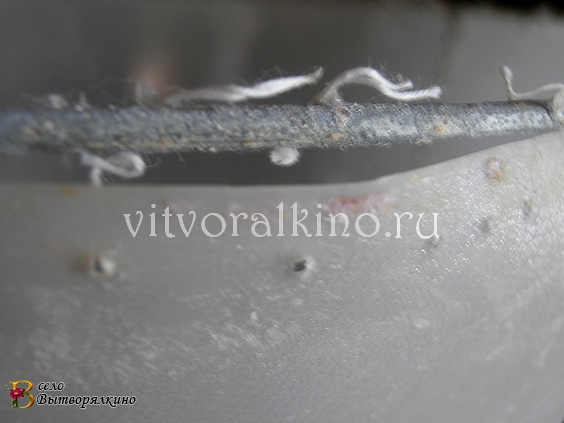
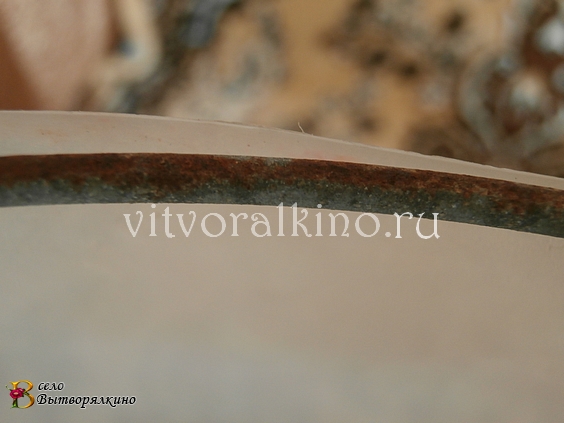
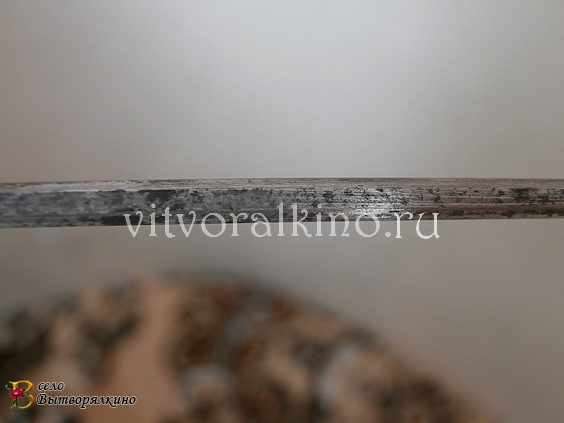
Well, if the threads have broken, then we will help this matter. and we will cut them off completely. This is what I did, freeing the rims from the thread pieces. The rims (you can see the rust in the photo above) were sanded. And I guess this is my mistake. It was lazy to cover it with varnish or something else protective, but it should... probably.
Sanded with regular sandpaper. The number doesn't matter.
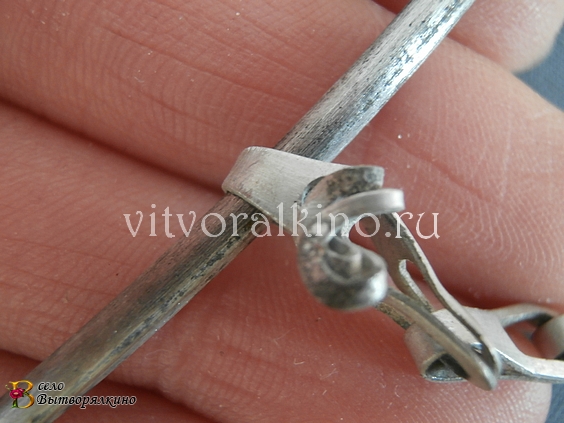
Next, I started working on the chains on which the lampshade is hung. They drove around the entire upper rim wherever they wanted. The same rim had three remarkable pins located at an equal distance from each other. It was to them that she attached the fidget chains.
While the frame was removed from the rims, I traced its outline along the fabric and cut it out.
Using a new nylon thread, I sewed the frame to the rims using the old holes.

The next stage was decor. Using a fleece brush, I applied PVA to the base of the lampshade and applied the fabric, smoothing it over the entire surface. Dried well.
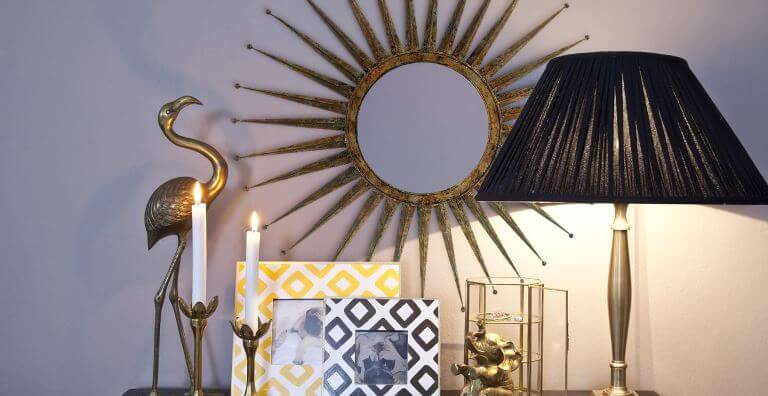
Lighting can either transform or make any room uncomfortable. Suffice it to recall cold hospital corridors, and, for example, cafes, where there is always soft warm light.
Especially in winter, people miss the sun, so it is very important that there is always light at home. A special cozy atmosphere can be created using various lamps or floor lamps. However, it is not always possible to choose a lamp that matches the interior of the room. But don’t be upset, because you can do it for any lamp.
Frame and base for lampshade
First you need to select a lamp or several lamps for which you need to make fabric lampshades. It is better to use lamps with energy-saving or LED lamps. Regular light bulbs can simply burn the fabric, so it’s better not to take risks.
Before you begin, you need to remove the frame for which the lampshade will be created. If the lamp does not have a frame, then it can be purchased, for example, in a special store or construction department. Also, the frame for any lamp, be it a floor lamp, table lamp or chandelier, can be made independently. To do this you will need thick wire and pliers.
The base can have any shape. It will be easier to make a lampshade for a cylindrical or cone-shaped frame.
How to choose fabric for a lampshade
First of all, you need to choose the right fabric for the lampshade. You can use light, hard or dense material. If desired, you can even make a lampshade from wool, it all depends on the creator’s idea and the interior of the room.
If the frame consists of ordinary wire, it is better to use an opaque material to cover it. Dark silk, cotton and taffeta are suitable.
It is also worth remembering that the color of the fabric can give both cold and warm light. In the first case, you can use blue or green fabric, and in the second, yellow, orange or red.
Necessary materials for making a lampshade
Fabric lampshades can be done different ways. If the new lampshade will be glued on top of a regular plain lampshade, then no preparatory work is required.
But if there is only a wire frame, then it is better to first coat it with paint and then wrap it with light or dark cotton tape.
To make the lampshade look neat, you need to sew it on a typewriter.
In addition, you will need:
- iron;
- a simple pencil;
- ruler;
- textile;
- pins;
- threads matching the color of the material;
- kraft paper (or any thick paper, as well as whatman paper);
- glue (you can take a special one for fabric or a universal one).
When all necessary materials and the tools are at hand, you can start sewing DIY lampshade made of fabric.
Lampshade manufacturing process
First step
First you need to make a template to cut the required amount of fabric.
There are two ways: if the frame is cylindrical, then you can measure the circumference and draw one line on the fabric, and then measure the height and draw a second line. After this, all that remains is to draw two more sides of the rectangle and cut out the template.
If the frame is cone-shaped, then you can lay out the paper, take a pencil and gradually roll the frame along the sheet, mark with a dotted line the lines of its sides. The main thing is that the frame rotates completely; to do this, you can mark a reference point on it using a piece of thread or a pin. After this, you can connect the lines and cut out the template.
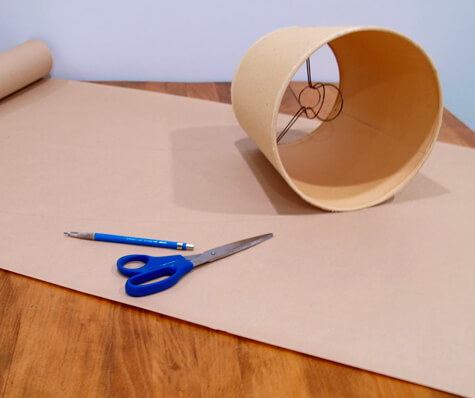
Second step
In order not to cut off more, or worse, less fabric, you need to attach the template to the frame of the lamp - it must completely fit. If the template is larger, you need to cut off the excess paper; if it is smaller, you will have to take the measurements again and make a new template.
Third step
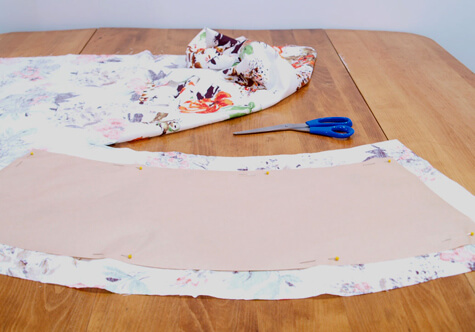
When the size of the template matches the size of the base for the lampshade, you can begin to attach it to the fabric. If the material has a pattern, you need to position the template so that the drawn elements “look” in the right direction. You need to calculate everything so that, for example, you don’t cut off the head of a flying bird. Otherwise the lamp will look ugly.
The template must be applied to the wrong side of the fabric, and then it must be secured with pins. After this, you can carefully trace the template along the contour. If the fabric is dark in color, you can use not a simple pencil, but special fabric crayons or a piece of soap. After this, you need to draw allowances. To do this, you need to draw lines at a distance of one and a half to two centimeters from the boundaries of the template.
Fourth step
Without removing the template from the fabric, you need to carefully remove the pins one at a time and wrap the seam allowances inside. The fold lines must be secured with pins.
Now you need to remove the template and thread the sewing machine. The threads must be chosen so that they are almost invisible on the fabric.

Fifth step
Now you need to sew the resulting part on a typewriter. This needs to be done only on three sides - one of the sides must be left untreated in order to then form a seam on the frame itself.
You need to stitch at a distance of five to seven millimeters from the edge. If desired, you can process the sections. But in any case, they will have to be hidden when the fabric is glued to the frame.
Sixth step
After this, you need to turn on the iron and iron the fabric piece well. If wrinkled parts remain, the fabric will not adhere well to the base, and the lampshade will look ugly.
Seventh step
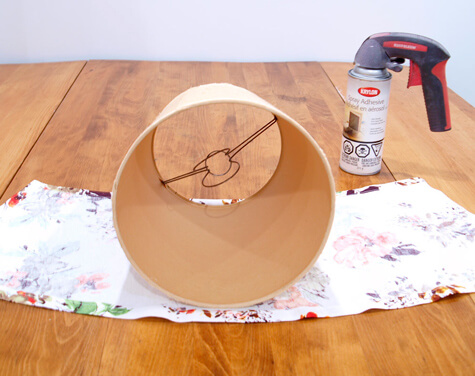
The next part of the work must be carried out in a well-ventilated room. First you need to cover the work surface with unnecessary paper or an old tablecloth and lay out the fabric. Then you need to apply glue to it and leave it for some time, which is indicated in the instructions for the glue.
Eighth step
Now you can glue the fabric to the frame. You need to hide the raw cuts, and make the seam in such a way that the lampshade is covered with a stitched edge.
If the lampshade is attached to a wire base that is wrapped with cotton ribbons, there is no need to apply glue to the entire surface of the workpiece; it is enough only to the part that comes into contact with the frame parts. In this case, you need to stretch the fabric well.
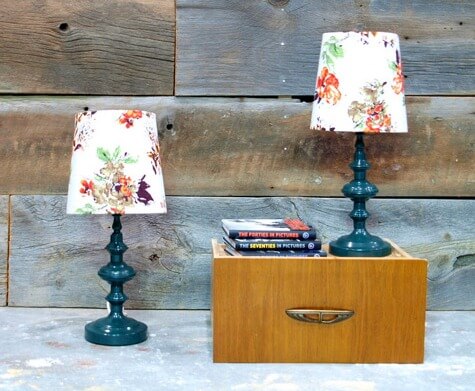
Ninth step
The finished lampshade must be left for some time to dry completely. After about a day, you can put the lampshade on your favorite lamp and enjoy a beautiful object that will definitely decorate any interior.
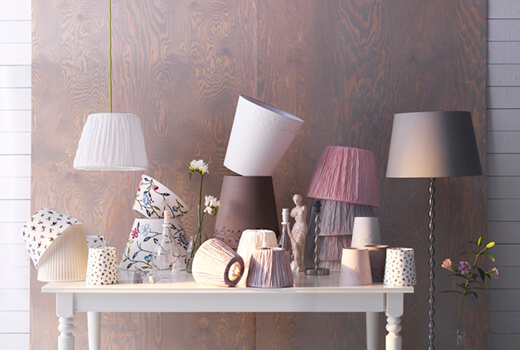
Fabric lampshade decoration
Table lamp with lampshade looks much nicer than just a regular bare lamp. But if a monochromatic color is chosen for the lampshade, then you can decorate it in an original way. Here are some ideas on how to do it interesting decoration fabric lampshade.
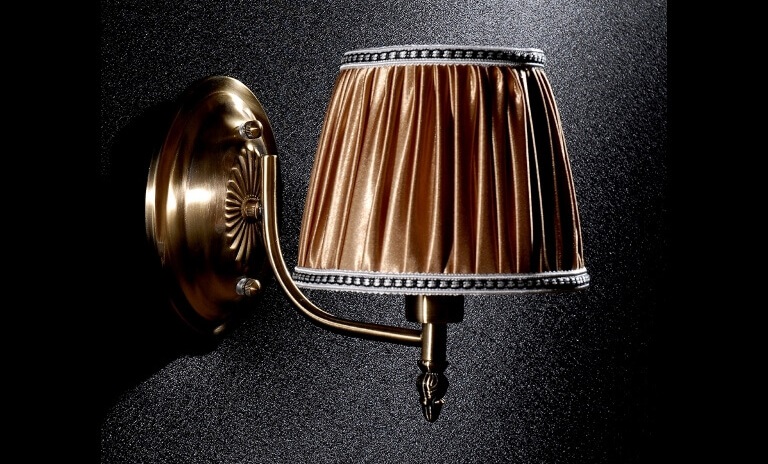
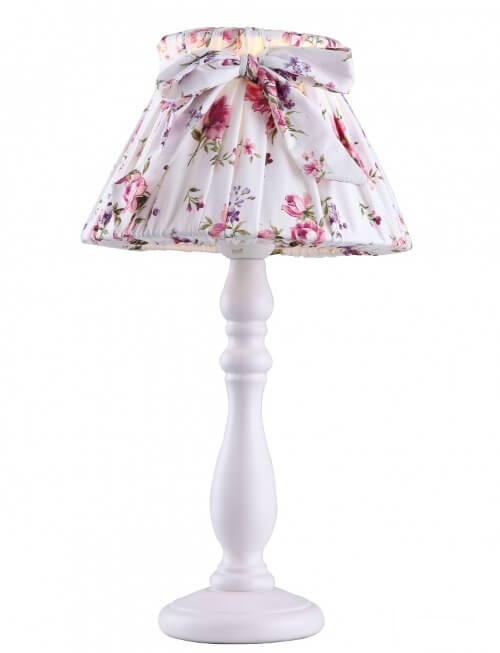
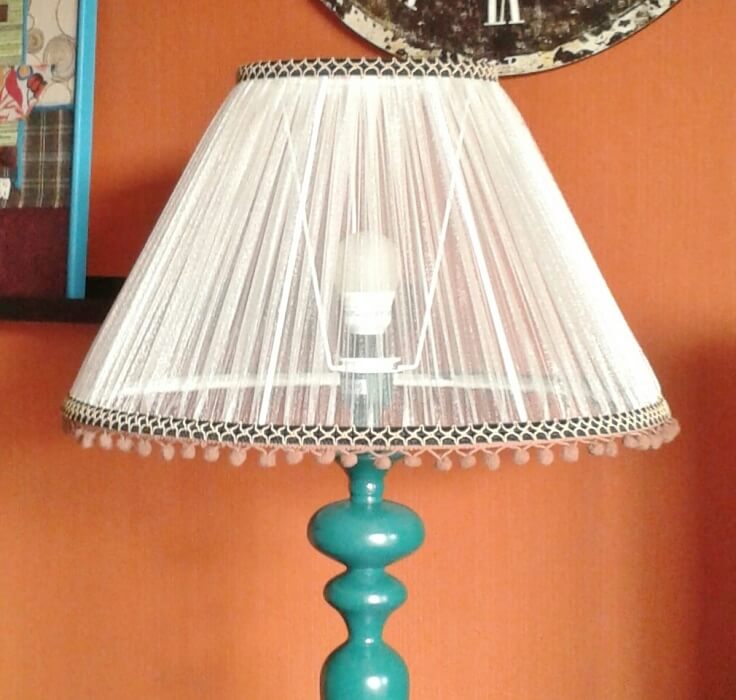
Lampshade in Provencal style
In order to decorate a plain lampshade, you will need a piece of fabric and fringe. Typically, green, turquoise and pastel shades of colors are used for the Provence style; checkered colors or floral patterns are also suitable.
First, you need to select a suitable fabric for a plain lampshade and cut two strips from it - one to decorate the top of the lampshade. This strip of fabric should be long enough to completely wrap the circle and make a bow. The second strip should be the length of the circumference of the bottom of the lampshade, and fringe must be sewn to it. This can be done on a sewing machine.
All free edges of the fabric must be processed so that it does not fray. After this, using glue or thread with a needle, you need to attach the fringed ribbon to the base of the lampshade so that the fringe hangs down. Then you need to decorate the top of the lampshade. To do this, you need to glue or also sew a ribbon along the circumference, and tie the free edges with a bow.
You can also use lace for a Provencal style lampshade. The good thing about this element is that it can simply be glued to the fabric. You can make lace flowers, stripes, or completely cover the fabric lampshade with lace napkins.
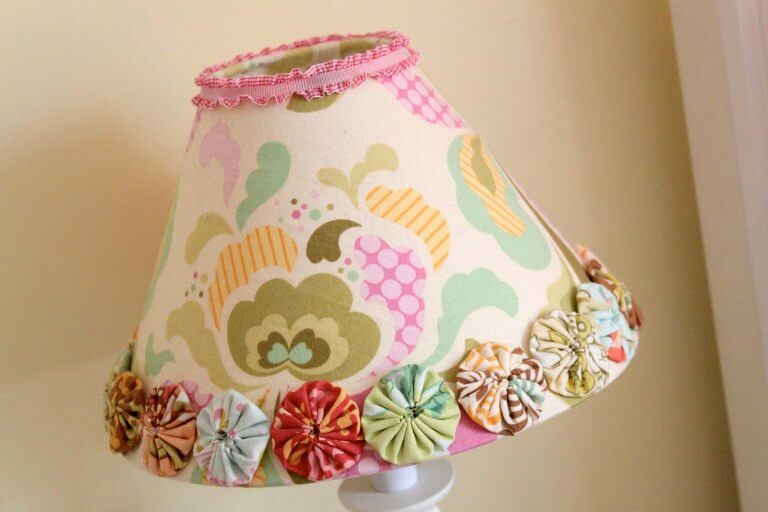
Lampshade with fabric flowers
Another one unusual idea which will allow table lamp with lampshade to become like a flowerbed - decorating with fabric flowers.
Fabric in delicate shades is perfect for flowers; you can use, for example, organza or chiffon, or you can simply take, for example, an old jacket, cut strips and twist them into roses.
You can decorate a lampshade with just a few flowers, but if you have time and patience, you can make a whole bunch of flowers to completely cover the lampshade.
If you have many pieces of different fabric at home, you can make a lampshade from multi-colored scraps.
In order to make such a lampshade, you need to use the technique of sewing pieces to a fabric base. The easiest way is to cut a piece of fabric to the size of the frame and divide it into several wedges.
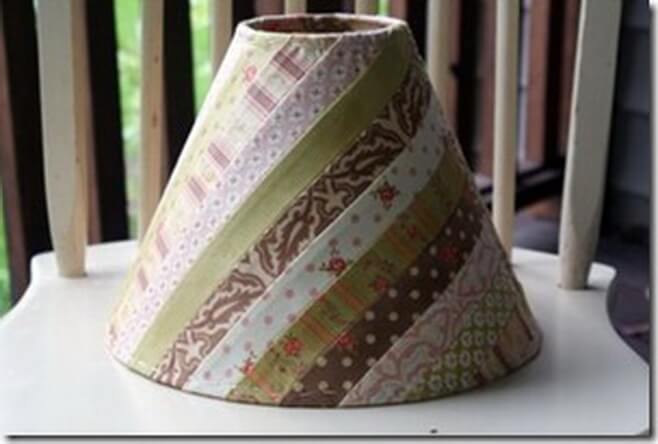
Then you need to sew patches to each wedge the way you like - you can sew strips of fabric diagonally, or make small squares. To avoid delaying the process, it is better to use a sewing machine.
After this, all the wedges with patches will need to be sewn together and glued to the base of the lampshade.
This lamp can fit perfectly into a country style!
Lampshade made of unusual materials
When you make a lampshade yourself, you can give free rein to your imagination and experiment. To make an original thing, you first need to find unusual material.
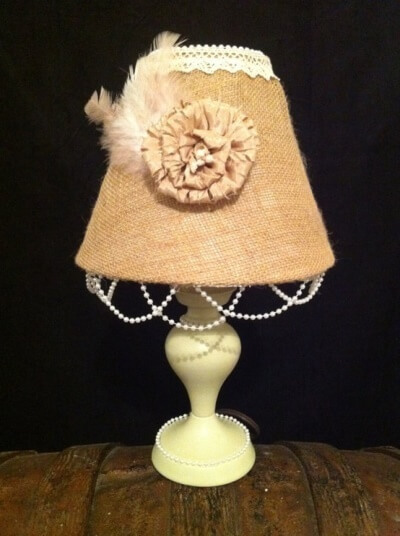
For example, in the kitchen, a lampshade made from burlap can look very interesting. This fabric transmits light well. Such a lampshade can be decorated with some wooden details, for example, clothespins or wooden beads and buttons. You can also use grandma's old lace doilies for decoration. You can also write something on such a lampshade with white or black paint, as they usually write on bags.
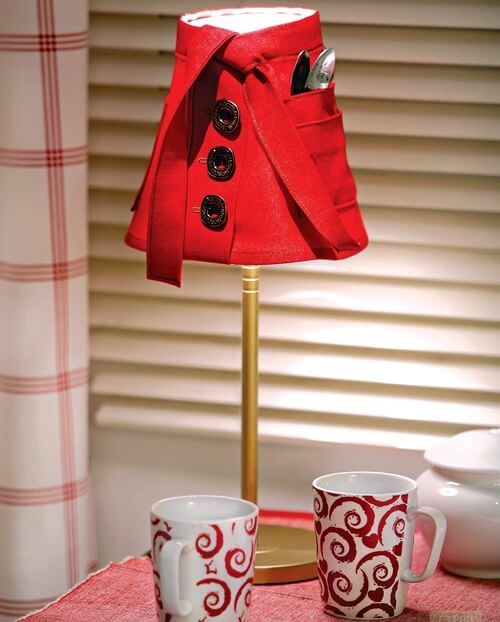
For a teenager's room, you can sew an American-style lampshade. For this you will need denim. And you don’t have to buy it, you can just cut up old jeans - every person probably has such a thing.
Such a lampshade can be decorated, for example, with a denim pocket where you can insert artificial flower or a piece of a checkered handkerchief. You can also use applique for such a lampshade. Pieces of leather are suitable for this.
![]()
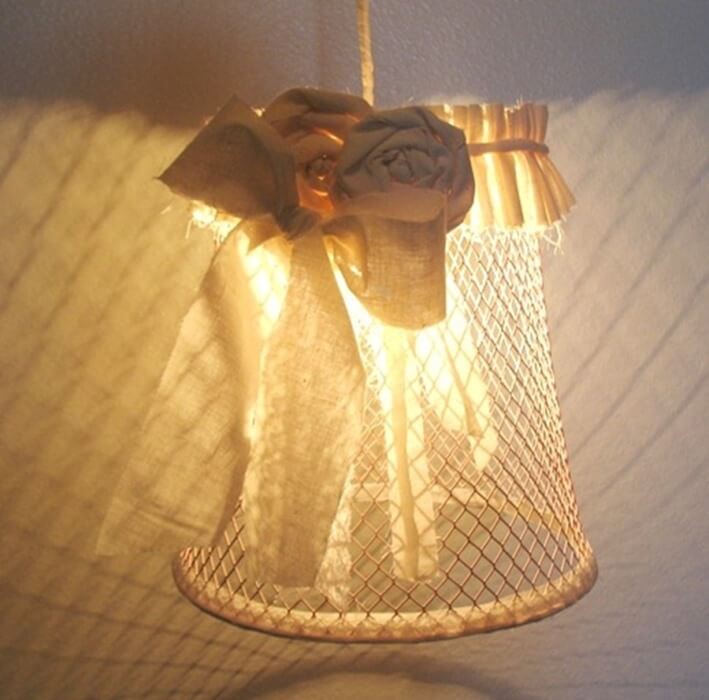
For example, for a lamp that will stand in a girl’s room or bedroom, you can sew a delicate lampshade from mesh. This fabric can be found in any sewing store. A lampshade made of several layers of mesh will look interesting - it will resemble a ballerina’s tutu or a fluffy skirt.
![]()
Instructions
Quite often old ones need updating floor lamp s with fabric lampshades on a wire frame. Before starting work, remove the lampshade from the lamp and remove the old covering from it. It is best to do this over a large sheet of paper. Wash the frame and dry it.
Measure the frame and make a pattern for the new covering. If you have floor lamp with a cylindrical lampshade, measure the height of the stand and the circumference of the bottom ring of the frame. Draw a rectangular pattern using the height of the post as the height of the rectangle. Make the length of the pattern equal to the circumference of the lower ring of the lampshade.
If the sides of your lampshade are rectangles or trapezoids, measure the sides and draw a pattern for one piece. For a complete cover, you will need to cut out as many parts as there are sides to the frame.
Choose fabric for the lampshade. To do this, look through the material that matches the colors of your interior at the switched on lamp and evaluate how the chosen fabric transmits light. Lampshades made of thin fabrics, through which the lamp and frame are visible, are recommended to be made with a lining.
Cut out the covering parts from the fabric according to the prepared pattern. Add enough seam allowance to the top and bottom sides of the pattern to fold the fabric under and create a drawstring for elastic or cord. If you made a pattern for only one segment of the lampshade, add seam allowances to the sides of the piece.
Finish the edges of the lampshade parts with an overcast stitch and sew them along the sides. Fold the bottom and top allowances inward and sew the drawstrings, leaving a small hole through which the elastic or cord will be threaded.
Wrap plain cotton tape around the posts and both frame rings. Stretch the fabric and insert elastic bands into the drawstrings. The finished lampshade can be additionally trimmed with textile or beaded fringe by sewing it to the fabric along the bottom ring. The surface of the lampshade can be decorated with fabric flowers, if the style in which the room is decorated allows this.
Attach the updated lampshade to the lamp stand.
Floor lamp Gives soft side lighting, creating a cozy atmosphere in the room. It is easy to use and can be moved as you need it. this moment. A floor lamp, designed in an original way, becomes a bright accent in the room. If it’s time for your floor lamp to change or refresh the lampshade, then you don’t need to run to the store for a new piece of furniture. Use a little imagination to make your old item sparkle and shine in a new way.
You will need
- Lampshade using decoupage technique:
- - glass lampshade;
- - beautiful napkins;
- - alcohol or detergent;
- - scissors;
- - glue for decoupage;
- - brush;
- - a rag.
- Fabric lampshade:
- - an old fabric lampshade;
- - new fabric;
- - tracing paper;
- - pencil;
- - scissors;
- - sewing machine;
- - threads.
Instructions
Lampshade using decoupage technique Remove the lampshade from the floor lamp and degrease the glass surface. You can wash the lampshade with any detergent or wipe with a cotton swab dipped in alcohol. Place a soft surface on the table to avoid accidentally breaking the glass on the work surface.
Take napkins whose patterns will decorate your floor lamp. The new design of the floor lamp should harmoniously fit into the surrounding interior. So walk around the room with your napkins and visually imagine how the drawing will look from different sides. Make allowances for the fact that light through the glass of the lampshade will make the colors more transparent and lighter.
Carefully cut out the design from the napkin. Scissors with rounded edges are best for this purpose so as not to accidentally tear the thin paper. Peel off the colored top layer.
Transfer the ornament to the lampshade and glue it with glue, carefully brushing it over the design with a brush. Use a special glue for decoupage, after making sure in the instructions that it is suitable for transparent surfaces. Otherwise, streaks may be visible after drying. Securing the napkin with varnish is optional.
Dry your decorative item completely and replace the lampshade.
Fabric lampshade Remove the lampshade by disconnecting all wires. Support the seams on the fabric of the old lampshade where they are attached to the frame. Do this carefully so as not to damage the parts. Old clothes on a floor lamp can become fragile from long use.
Separate the old fabric into pieces. Place them on tracing paper and draw a pattern. If old material the lampshade was pulled tightly onto the frame, take exact measurements.
Sew a new product according to the pattern. For thin fabric that will show through well, sew the details together with a “linen” seam. If the fabric is thick, use an overlocker to finish the edges. Iron all seams.
Pull the sewn lampshade onto the frame. To make this work easier for yourself, first wet the fabric and then secure it with threads to the metal parts. Let it dry taut.
Attach the lampshade to the floor lamp stand.
Change the lamps in the floor lamp. The light can be warm or cold, white and other colors. Choose the lighting that makes you feel most comfortable.
Sources:
- decoupage lampshade in 2017
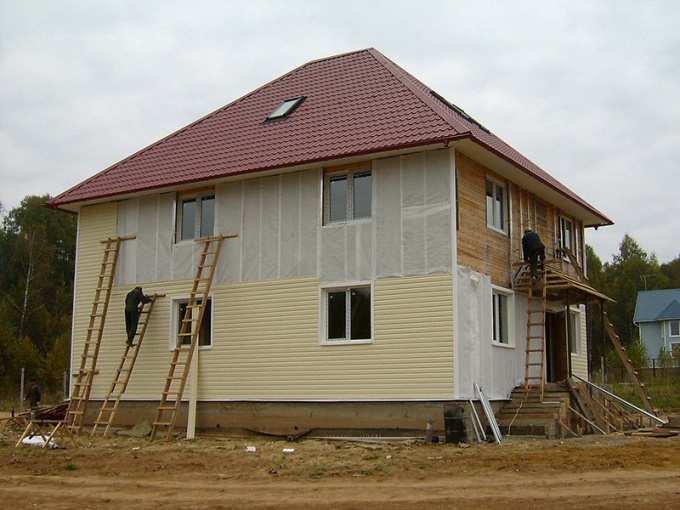
If your house is no longer as beautiful as it used to be, or you decide to sell it, you should think about how to update it. Perhaps there is a draft coming from the cracks, the roof is leaking or house Doesn't hold heat at all. All these problems can be easily solved using modern technologies and materials, and if you hire a construction team, you won’t have to worry about anything. One way or another, in order to update the old house, you must perform the following steps.
You will need
- - time and money;
- - materials (roofing materials, siding, plaster, paint, etc.);
- - working hands.
Instructions
Start giving house a new look with windows and doors. No amount of insulation will work if the doors and windows are warped and cracked, so replace or restore them.
Nowadays it is becoming fashionable to decorate your home with homemade items. Unique things, interior items made in vintage style or decorated using photographs, scraps from grandma's chest will help make the room unusual. The article is devoted to decorating an old plastic lampshade for a table lamp using the “” technique.
Often, before decorating something, it is necessary to restore the surface. We'll tell you how to strengthen and level a plastic lampshade for subsequent decorative finishing.
Restoration of a lampshade for decoupage
Once I already did the restoration and decoupage of the lampshade, then I came across the product with significantly fewer flaws than now. In addition, the dark color of the chosen motif concealed all the unevenness of the light. But a lampshade is an object that transmits light, by definition.Recently I came across a table lamp. Its lampshade had clear designs and floral patterns. The owners got tired of the drawing, and on top of that it had defects: lines from a ballpoint pen, drawn by a child. Upon closer inspection, it became noticeable that the plastic had burst in places.
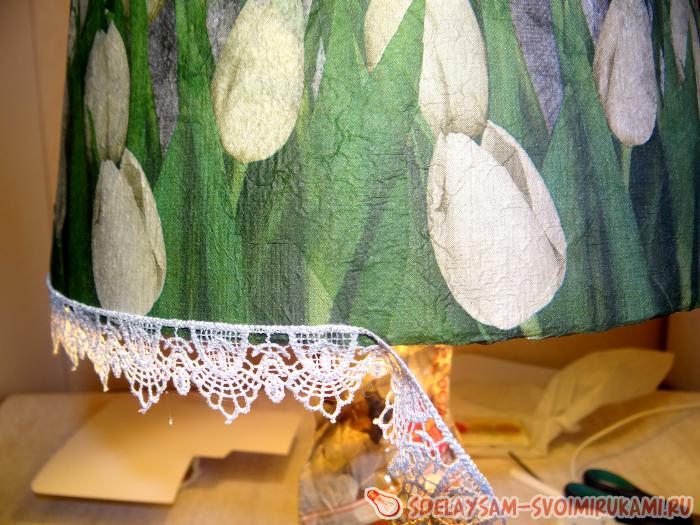
To decoupage this lampshade, I decided to use light motifs. The choice fell on delicate tulips against the background of a wooden ornament; the greenery and tenderness of the flowers captivated me.
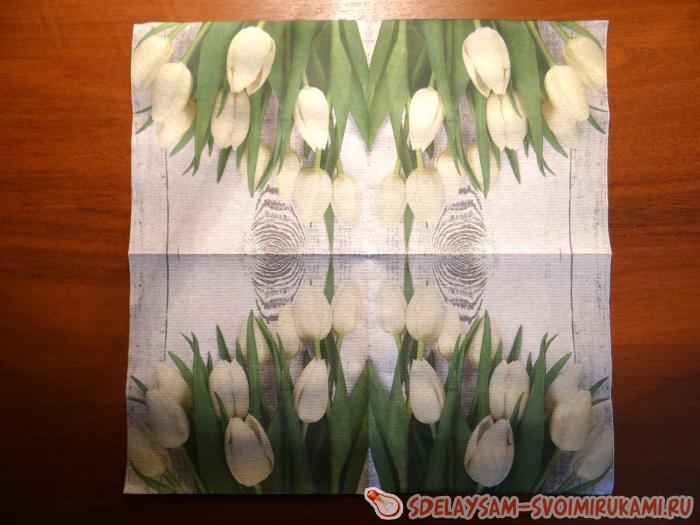
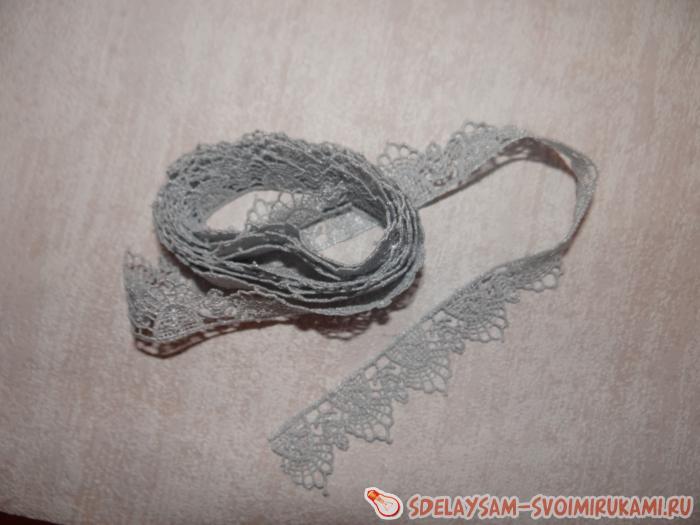
Matching the gray shades of the napkin, I looked at cotton braid (lace) for finishing the bottom of the lampshade.
I would like to tell you more about the restoration of this piece of furniture.
Removing old coating
The leg of the lamp is white, so that paint does not get on it, we will cover it with newspapers.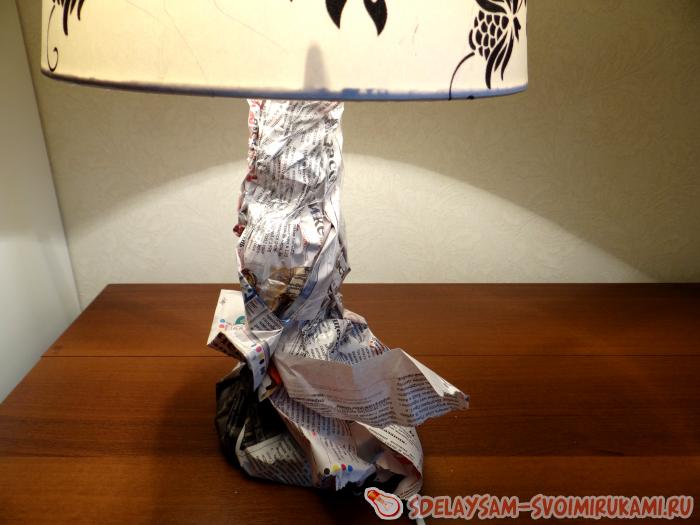
Before starting any decoration at all, it was necessary to understand what kind of object it was and what it was made of. I saw that the lampshade itself was plastic, almost transparent, and on top it was covered with fabric, which was cut according to a pattern and tightly glued to the surface.
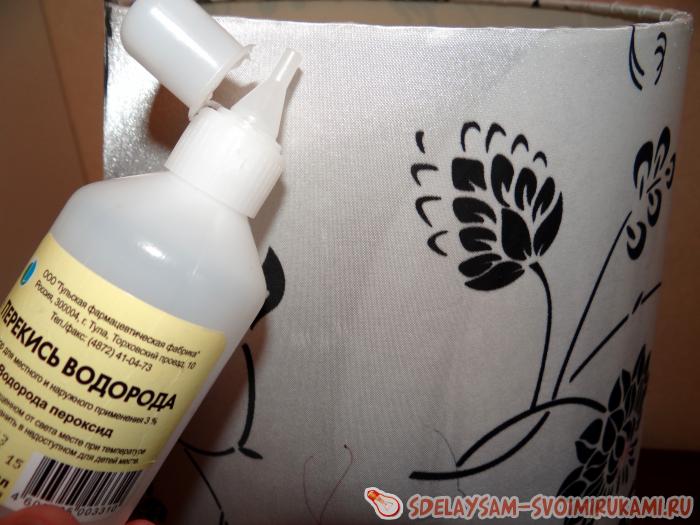
An attempt to lighten the fabric with hydrogen peroxide did not lead to anything, only dust and dirt remained on the cotton wool.
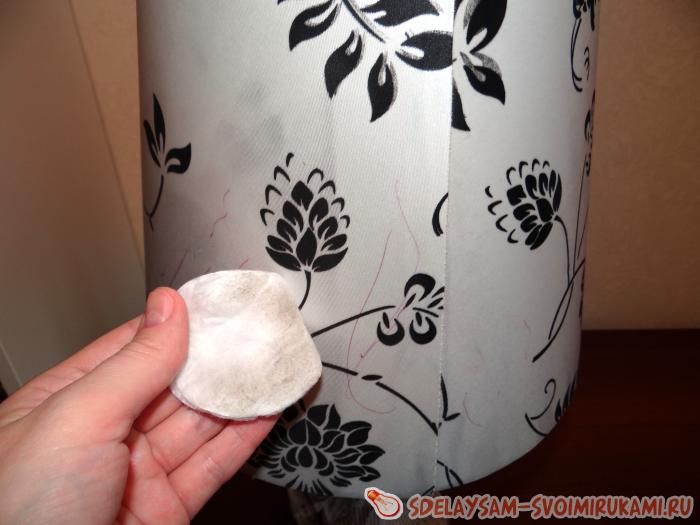
It turned out that the designs were printed on the fabric; the plastic itself did not have a design.
Also, by applying napkins and pieces of old wallpaper, I realized that the flowers show through in any case.
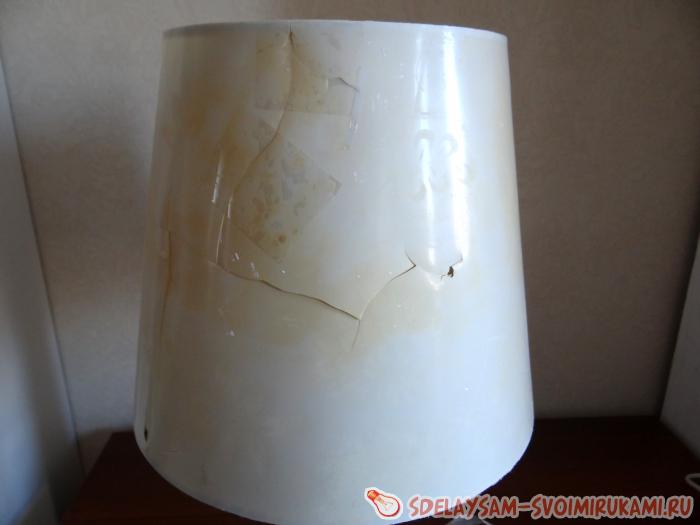
It became clear that the fabric needed to be removed. Whether it was just white or cream, you could try decoupaging right on top of it.
So, let's get rid of the old fabric. I found the seam and carefully began to separate the fabric from the surface it was glued to. Over time, the glue lost its adhesive properties, and the fabric came off easily, but not everywhere.
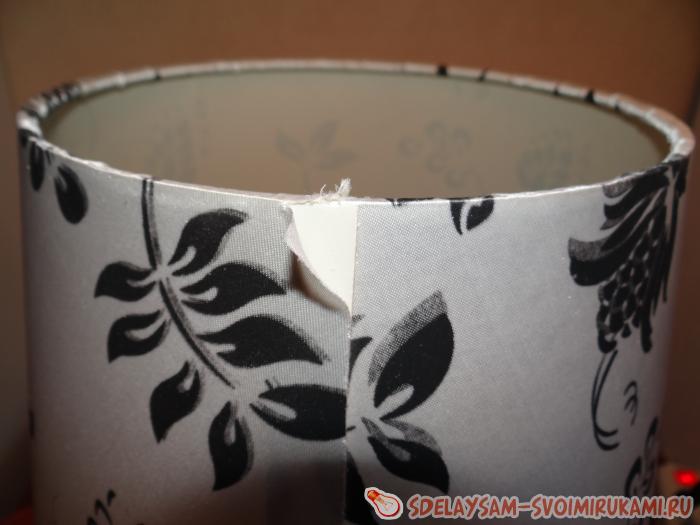
This must be done very carefully: in several places where there were cracks, the lampshade managed to burst.
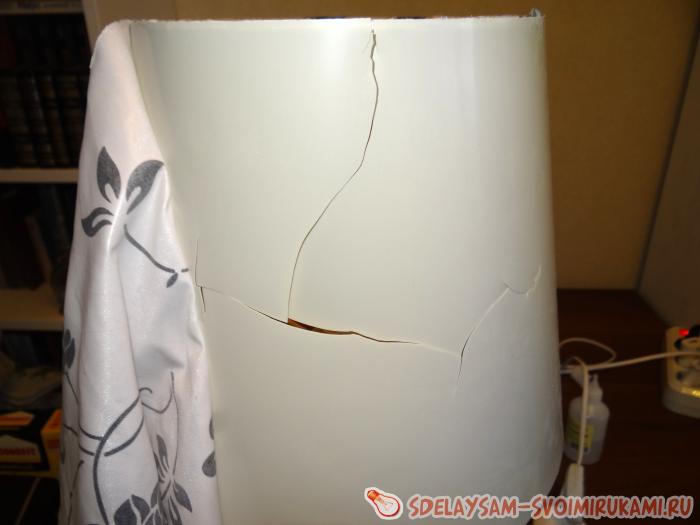
I was ready to finish the work and take the thing to where it belonged, that is, to the trash heap, but my interest in creativity overpowered me. So, the cracks had to be restored.
Restoration, work with cracks
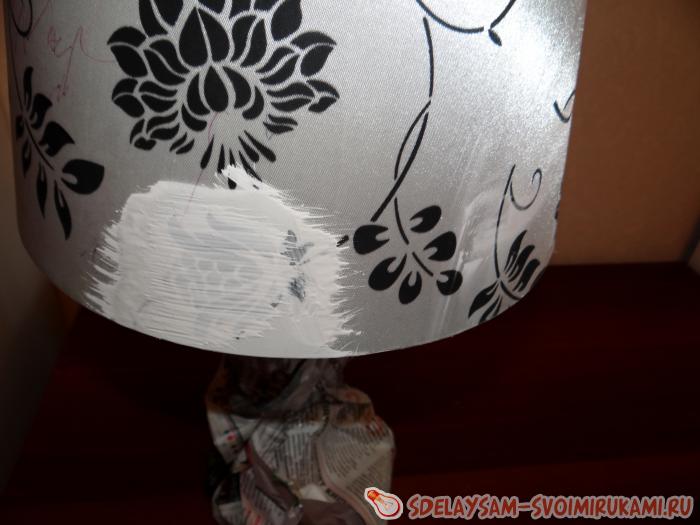
Like the previous time, I started the restoration from the inside (gluing small patches) and from the front (gluing white napkins).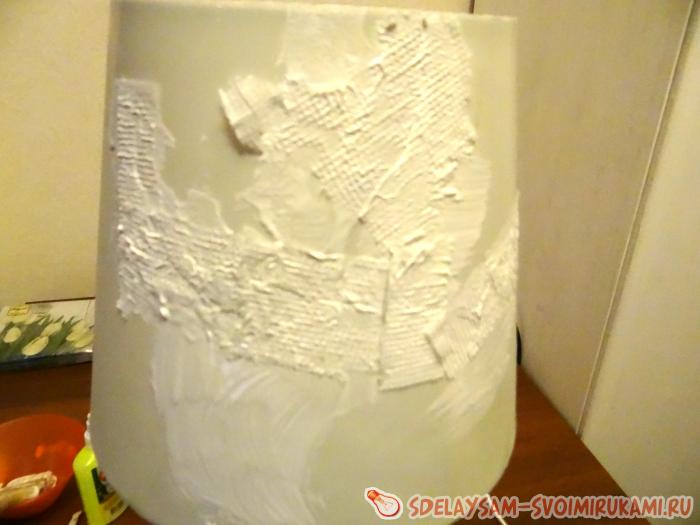
Last time I used white paint instead of a primer: the lampshade was covered with smooth paper of the same color. I started painting plastic now.
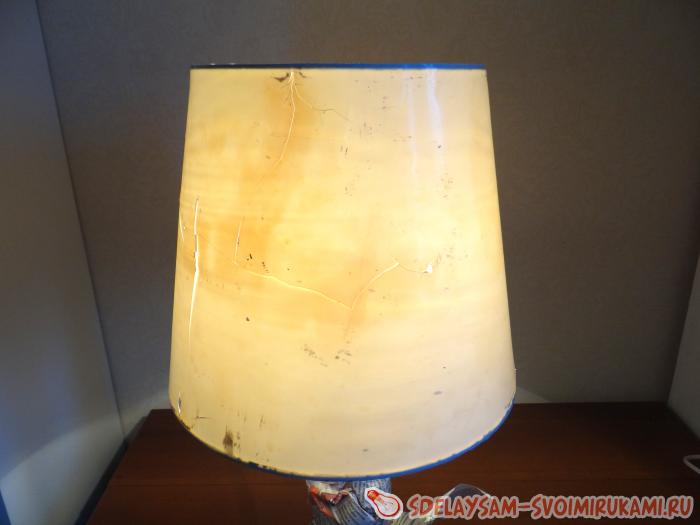
And this is what I got when I turned on the lamp:
All irregularities, cracks, patches were clearly visible in the light. It became clear that a napkin would not hide them. Something had to be done. Several days of thinking led me to the conclusion that the paint needed to be washed off (it’s good that it was not waterproof).
Under running warm water, very carefully I wiped off all the paint with a sponge, not excluding cracks. The patches were all washed away too. And the work began all over again.
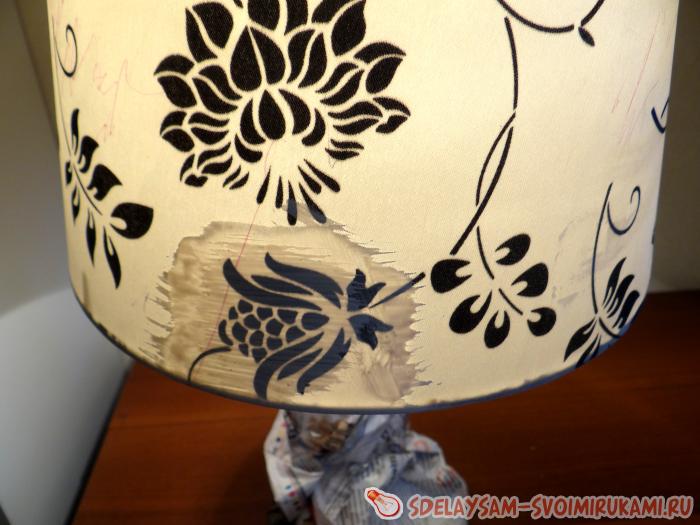
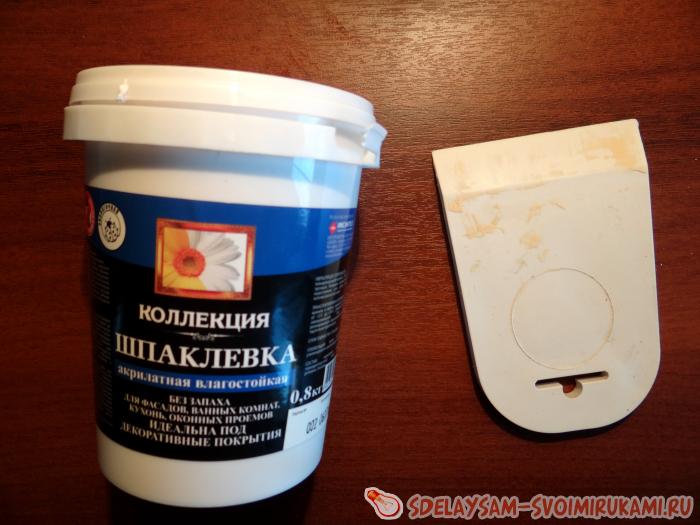
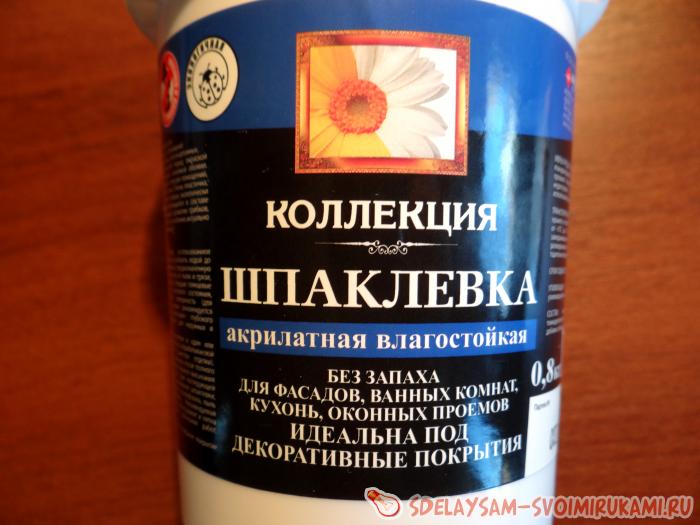
For some time I was choosing a putty (primer). I chose acrylate moisture-resistant putty from the Collection company: the manufacturer promises that it is ideal for decorative coatings, and what is a napkin motif if not a decorative coating?
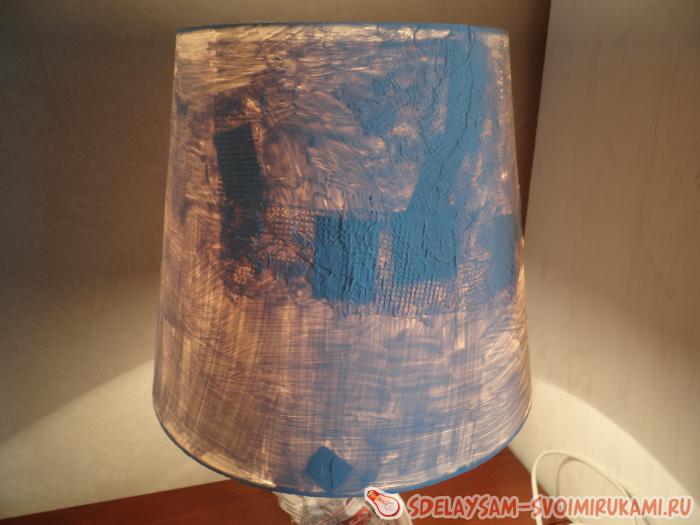
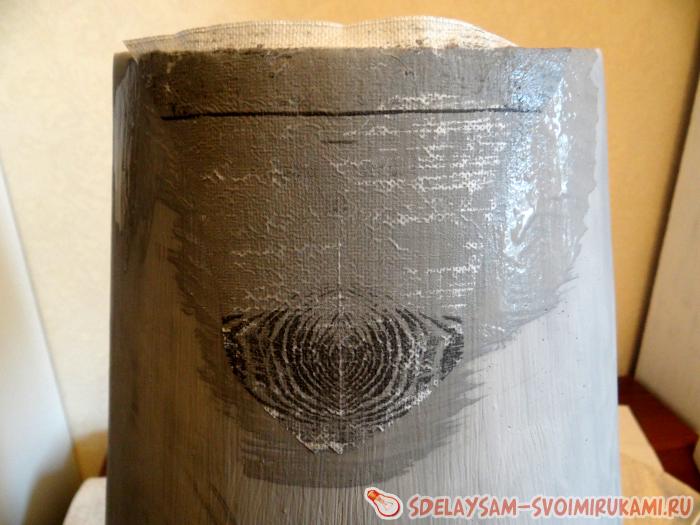
I continued restoration experiments, all of which were carried out with the lamp on, to assess the degree of transparency. Cracks on the back and front sides (if not concave) were sealed with several layers of tape (cut into small squares and glued, trying to avoid bubbles).
The second step was the first coat of primer on the lamp. First I sealed the large cracks, then began to apply the composition to the entire surface.
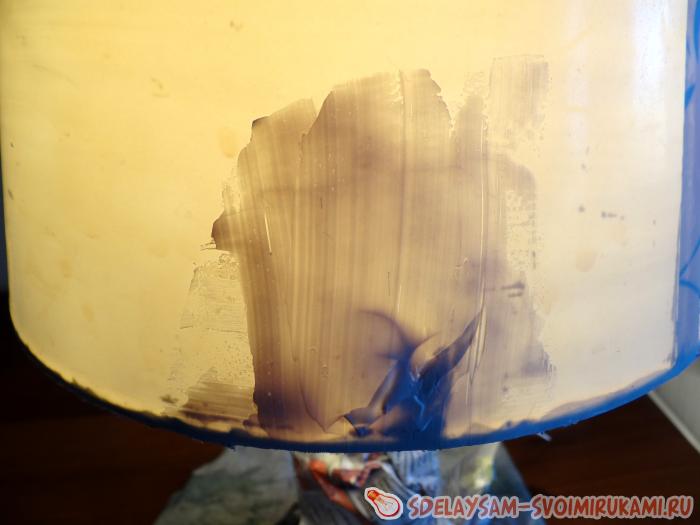
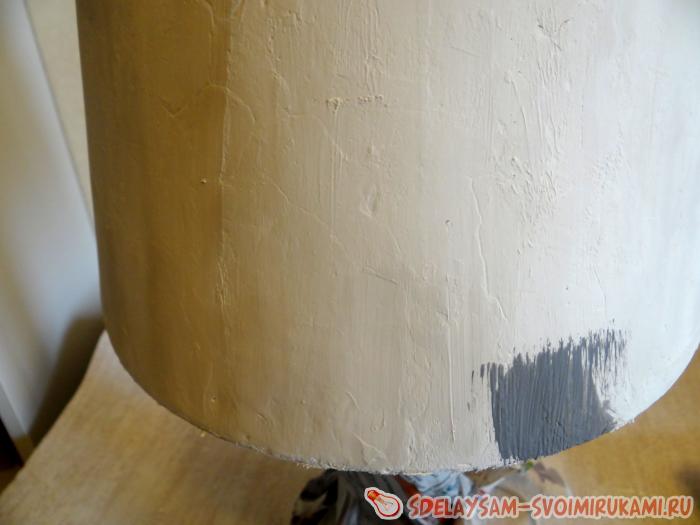
And here’s the problem: it lay evenly only in some places, in some places it became thicker, in others it let in light. I didn't despair, I applied the paste and left it to dry for a couple of hours. After this time, I tried sanding the surface with 60-grit sandpaper and found that all the rough edges were very easy to smooth out.
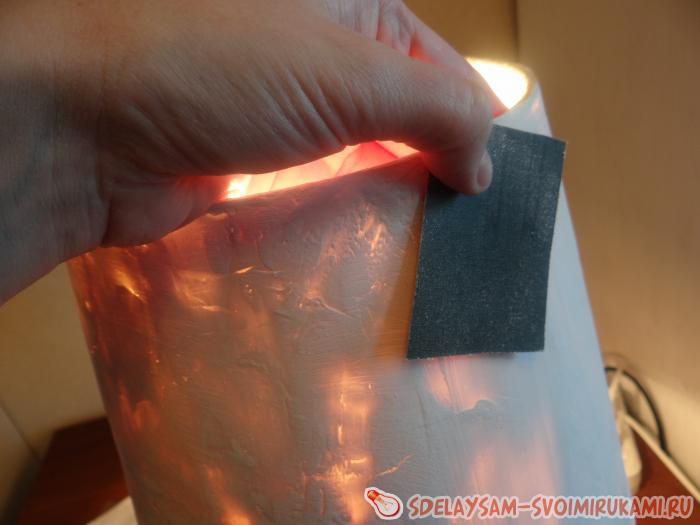
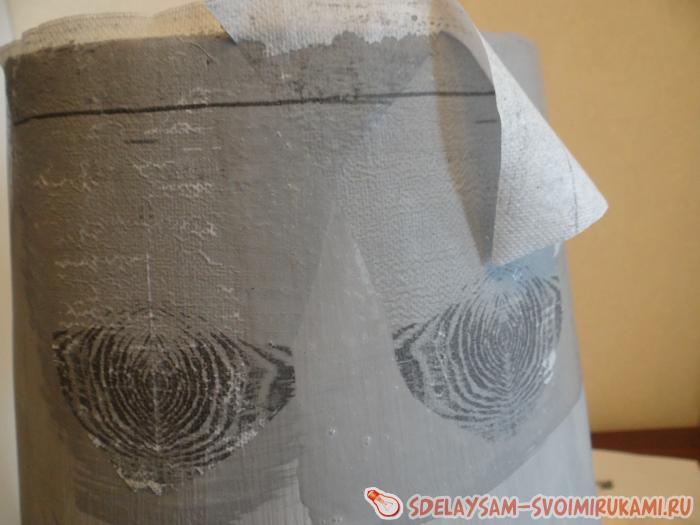
After the first layer had dried, I (with the lamp on!) began to apply the primer thicker and bolder, in broad strokes, trying to ensure that the light was transmitted uniformly. After the surface has dried, it can be sanded and it will be ready for further work.
After the main part has dried, you can add pastes to those places where dots, cracks or other defects are visible. It is convenient to do this with cardboard, using it as a spatula. Leave it to dry again, or you can dry it with a hairdryer.
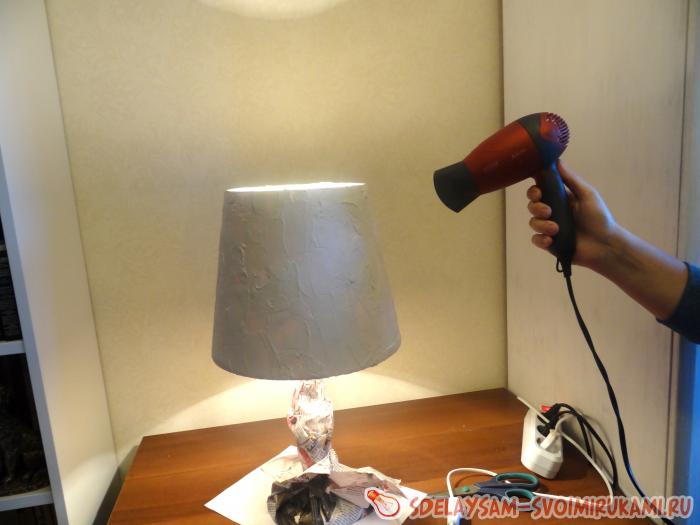
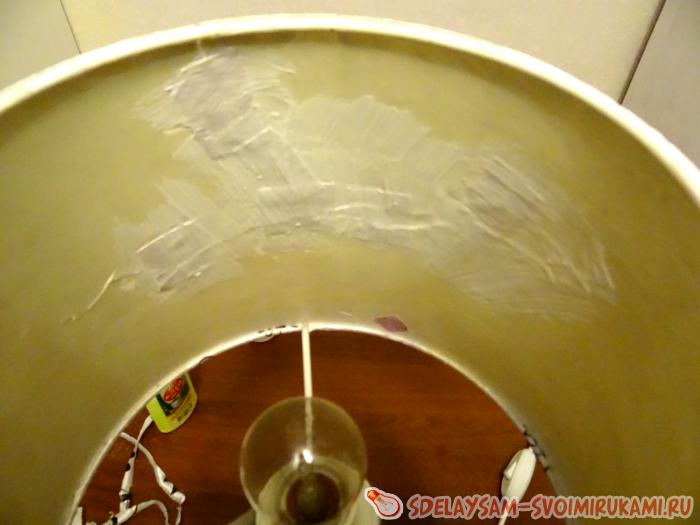
This is what the lampshade looks like after applying putty and sanding the surface:

Now it is clear that the napkin motif will be clearly visible both when the lamp is on and off.
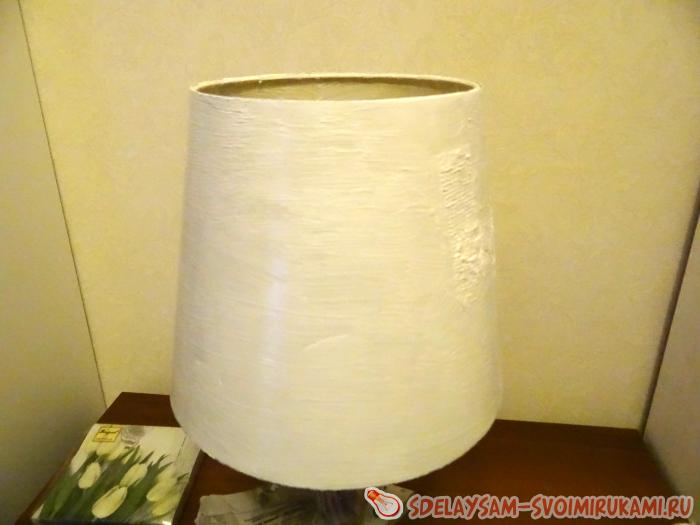
Coloring
After priming, I simply paint the lampshade with gray paint. There is another little secret: I tint (add color) the paint with regular watercolors. Of course, I don’t dilute it with water, but I add a piece of watercolor to the paint and mix it for a long time until the color becomes uniform.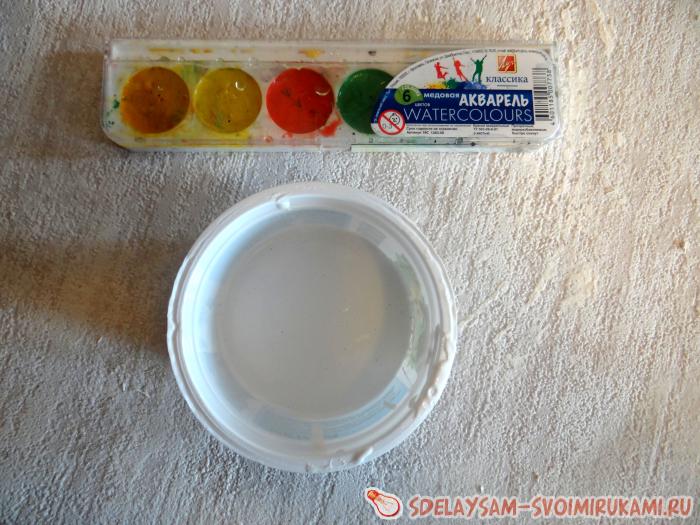
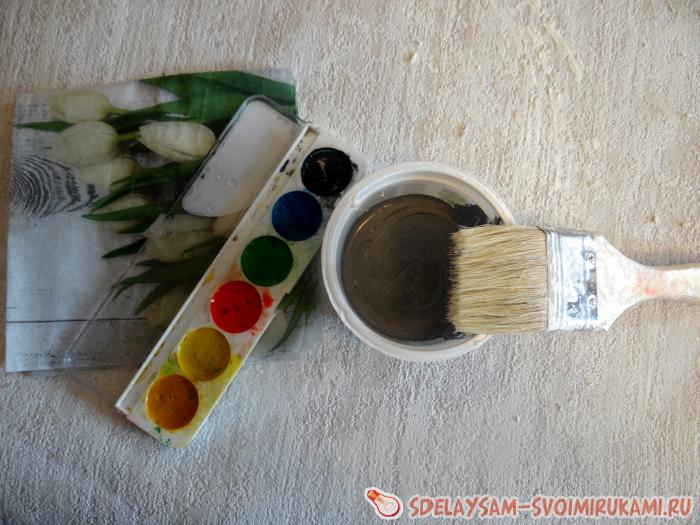
You should try the color in the corner: isn’t it dark? If it is dark, add white paint and mix again.
Now it’s very simple: I paint with a wide brush, leveling the paint layer; if here and there there is a texture in the form of small scratches, then it’s not scary and even interesting. It is still advisable to paint in one chosen direction (either from top to bottom, or in a circle).
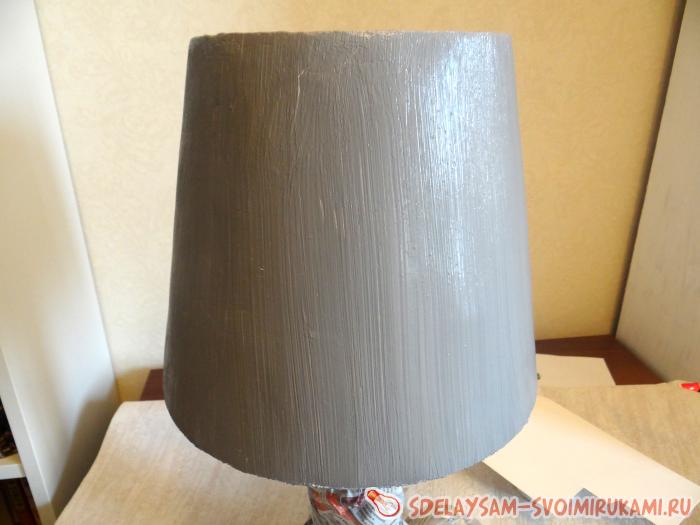
That's all, now the lampshade is ready for decoration in any way! You can decoupage, or you can use ribbons, or paint acrylic paints, applying the selected pattern.
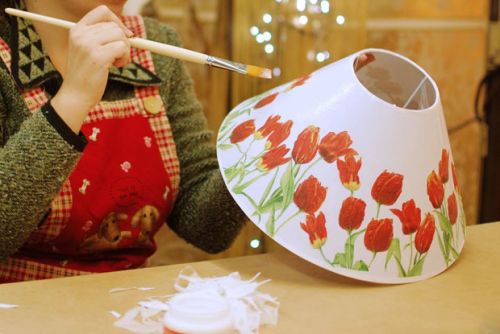
Delicate lilies: lampshade decoupage
Housewives who love and know how to make lovely little things and interior items with their own hands will be interested to learn about this method of decoration as decoupage. This is the design of any surface using colored motifs from three-layer napkins. Indeed, sometimes there are bright, beautiful designs on serving napkins that you just want to transfer, for example, to a lampshade. Such a table lamp will look good in both the bedroom and the living room, and the motifs for decoupage can be chosen in accordance with the overall interior of the room.In the previous part of the article, we already examined in detail the stages of preparing the surface for decoration. Let's summarize.
Paint is not suitable as a primer, and restoration with white napkins is not suitable, as it shows through the plastic. We sealed the cracks from the inside with transparent tape, and then applied putty (primer) to the surface, which was then sanded for a long time with sandpaper No. 60.
The next step will be to carefully treat small cracks and irregularities with this paste.
After sanding, we will apply two layers of paint, and after drying our lampshade will be ready for decoration.
Preparing napkins and decoupage
After the surface has dried and is ready for decoration, you need to select and prepare napkins. The quality of the image greatly influences the final appearance of the item being designed.Recommendations for choosing napkins:
three-layer napkins are better than two-layer ones;
choose motifs taking into account the fact that they will need to be cut out, that is, without small details;
The brighter the colors, the better; do not buy very light or too dark napkins.
Before you start decorating the lamp, separate the colorful layer from the napkin and iron the folds from the inside with an iron. After this, cut out the motifs.
Attention! You can first cut out the motifs, then separate the layers and only then iron them. Choose the option that is convenient for you.
As an adhesive, dilute wallpaper paste a little thinner than for pasting walls.
Think over the composition: attach napkins to the lampshade, imagine the finished product. If a solution has been found and an idea has appeared, you can begin decoupage.
Apply glue with a wide brush to the place where the motif will be. Next, apply the motif with the colorful side up, making sure it sticks in the middle, and then smooth the edges. If everything is done correctly, the napkin will lie flat on its own; you only need to help it a little. This paper is very thin and must be handled delicately. We can say that there is no room for error here.
Gradually cover the entire surface or part of it with motifs, in accordance with your idea. Depending on the motive, the design must be combined in whole or in part. Some patterns do not require a match.
Final touches
Decorate (glue) the top of the lamp.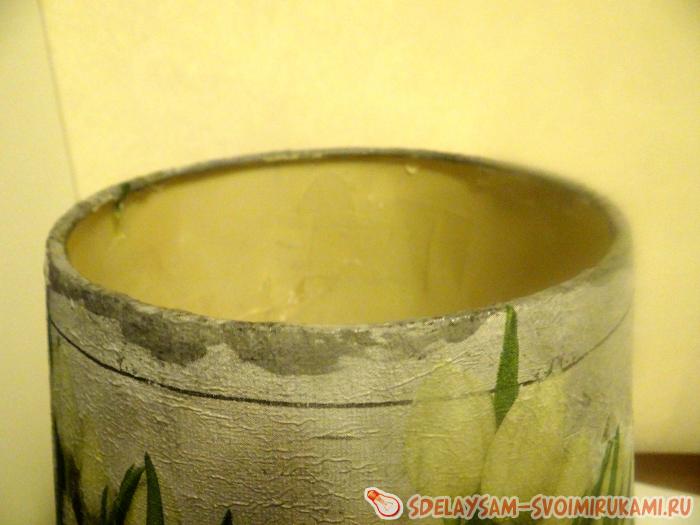
Look at the resulting drawing: perhaps it requires completion of some element. IN in this case I used a simple pencil to mark the flowers that were on a light background.
The varnish will be a layer of transparent wallpaper glue. It dries in a couple of hours.
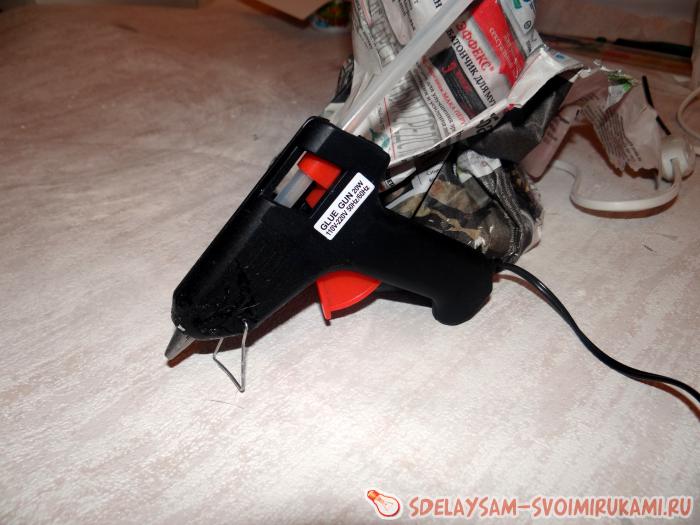
To finish the bottom of the lamp, I used gray braid that matched the style. I fix it with a few drops of glue from a glue gun.
1. Lampshade.
2. Primer or putty with the indication: “for decorative coating.”
3. Sandpaper.
4. Brushes.
5. Watercolor paints.
6. Waterproof white paint.
7. Napkins with matching motifs.
8. Braid.
9. Scissors.
10. Glue gun.
11. Scotch tape.