Decoupage of bottles - step-by-step instructions and description of the progress of decorating with various materials (110 photos). Decoupage bottles with fabric. Master class with step-by-step photos Bottle decor in decoupage style
The essence of this creative process is to cut out various figures and decorate a variety of objects with them. Decoupage of bottles for beginners step by step with photos clearly shows this whole fascinating process. You can decorate not only bottles; this technique is often used to decorate dishes, vases, kitchen utensils, furniture and, in general, everything that catches your eye. Decoupage of bottles is often done for the holidays or as a gift for various celebrations.
The most popular is decoupage of bottles with napkins.
The paper has good adhesive properties and can be glued to almost any surface. Napkins are a very thin material, and the presence of different colors and patterns on them allows your imagination to run wild.
Before starting work, you must prepare all the necessary materials. The most important thing is to find a suitable bottle; it should be smooth with smooth curves. The napkins should be three-layer, and various magazine clippings will also come in handy. Regular acetone is suitable as a degreaser. All decoupage elements must be glued using PVA glue.

Bottle decoupage master class step by step:
- The first step is to prepare the bottle for decoupage; to do this, you need to get rid of the pasted labels. This can be done by soaking the bottle in a soapy solution.
- After removing labels and glue, it is necessary to degrease its surface using acetone or an alcohol-containing compound.
- The next step will be priming the surface.
- After priming, you need to cover it with acrylic paint in an even layer and let it dry.
- Use a foam sponge to darken part of the bottle or its entire surface with acrylic paints.
- Now comes the decoupage process itself. Cut out a design from a napkin and separate it, removing the top layer with the design.
- Apply glue to the bottle, in the place where the picture is glued, and attach the picture, carefully coat it with glue on top with a brush.
- The final step will be to apply a layer of acrylic varnish, and if the application is done in several layers, the decorated product can be washed.
In fact, there is nothing complicated in napkin decoupage; it is important to perform all actions carefully. This craft can be used to decorate the interior or given as a gift for a celebration.
Decoupage bottles for beginners step by step with eggshells
Decoupage of a bottle with eggshell is no less popular. The method is practically no different from napkin decoupage. The bottles look very original; eggshells can also be used to decorate vases, dishes or other objects.
Decoupage for beginners step by step bottles with eggshells:
- It is necessary to prepare materials: a bottle, eggshells, PVA glue, napkins, acetone, foam sponges and brushes;
- Degrease the bottle, cleaned of labels, with acetone;
- Apply primer or acrylic paint in an even layer;
- Apply paint of the main color with a sponge and let dry;
- Cut out the designs you like from the napkin and separate the top layer;
- Transfer the image to the bottle and coat it with glue;
- Egg shells must be prepared, washed, cleaned and thoroughly dried;
- Grind the shells to the desired pieces;
- Coat the surface with glue and use tweezers to lay out the mosaic from the shell;
- After complete drying, the shell must be painted with a piece of foam rubber;
- To complete the decoupage, the bottle should be coated with several layers of varnish.
When applying glue to a picture, you should act carefully. The finished product can decorate any interior. This bottle can also be given as a gift or placed on a holiday table.
Fabric decoupage of bottles for beginners
You can beautifully decorate a bottle using different fabric scraps, and the thinner the fabric, the more elegant the folds in the decoupage will be.

Fabric decoupage of bottles for beginners is best done in combination with napkins:
- The first step is to prepare all the necessary materials: a bottle, cotton fabric, scissors, PVA glue, three-layer napkins, brushes and acrylic paints.
- The bottle must be thoroughly cleaned of labels and glue; this can be done by soaking it in soapy water.
- It is important to degrease the surface with acetone or alcohol.
- The next step is to think about the composition of the decoupage.
- The selected napkin pattern must be carefully torn from the canvas.
- The design of the napkin must be applied to the product, and its edges must be marked with a marker.
- Chintz should be cut randomly into strips.
- Strips of fabric must be soaked in glue diluted with water in a ratio of 3:1, i.e. The consistency of the glue should not be very thick, but not liquid either. If the glue is initially quite liquid, then there is no need to dilute it with water.
- The fabric soaked in glue should be wrung out a little and glued to the bottle in a random order, bypassing the area intended for the napkin.
- The bottle, covered with cloth, should be thoroughly dried at room temperature.
- After drying, the fabric part must be painted with acrylic paint.
- After the paint has dried, you can start gluing the picture from the napkin; to do this, you need to separate the napkin.
- Apply glue to the bottle and attach the image, then very carefully coat the surface of the napkin with glue.
The final stage will be the final painting of the fabric area with the desired shade and the further application of acrylic varnish.
Varnish can be coated in several layers to create a more moisture-resistant surface.
You can decorate with fabric in other ways. Cut a piece of fabric into small pieces and glue it without creating wrinkles. Further decoupage can be done with any decorative little things, for example, beads, rhinestones or shells.
Craquelure: decoupage of bottles step by step
There is another very interesting decoupage technique, in which a layer of paint cracks, and it is called craquelure. To achieve this effect, a special varnish is used, which cracks after drying. Craquelure decoupage can be one-step or two-step; both of these types are simple and can be done with your own hands.

Craquelure decoupage of bottles - step-by-step instructions:
- The prepared surface of the bottle must be degreased;
- Paint the container in several layers with paint darker than the main design and let dry;
- Next, apply the craquelure varnish in an even layer and let the varnish dry a little;
- This is followed by another layer of paint, which is applied with a sponge, at this stage cracks become visible;
- While the composition is drying, you need to prepare a napkin, carefully tear the design off the napkin and separate the top layer;
- Glue the napkin to the bottle with PVA glue, and use a brush to brush the design on top very carefully so as not to tear it;
- The last step will be varnishing the surface with acrylic varnish in 3 layers.
A bottle decorated in this way has a decorative, artificially aged appearance. Craquelure decoupage is relevant for decorating interiors made in various classical styles. You can decorate not only bottles with craquelure; watches made in this style look very interesting. Plates, vases, wooden utensils and many other objects are often decorated with craquelure.
Bottle decoupage lessons for beginners: decorated with toilet paper
You can decorate a bottle with the most unusual materials, one of them is toilet paper. Of course, this material is very specific, however, in the completed work no one will even guess about its use.

Decoupage lessons for beginners bottles decorated with toilet paper:
- This method requires all the same materials as in napkin decoupage, and some toilet paper;
- It is imperative to clean and degrease the surface of the bottle;
- The surface needs to be primed and painted;
- Glue the napkin motif and coat it with a brush;
- The part of the bottle free from the napkin also needs to be thoroughly coated with glue;
- Small pieces of toilet paper are draped onto the surface of the bottle in a random order and left until completely dry;
- Before painting a layer of toilet paper, you need to varnish the picture;
- Paint the toilet paper with acrylic paint;
- Coat the finished composition with varnish.
Decoupage bottles for beginners step by step (video)
Ready-made decoupage does not reveal the materials used to make it. The bottle looks very elegant and can decorate a festive table or apartment interior.
Don't know what to give to a loved one? Don’t rack your brains – the answer is simple! Create a gift with your own hands, it will come out elegantly and with soul. Decoupage of champagne bottles is not only beautiful, but also a necessary gift for the holiday. Such a surprise will decorate the holiday table, and then will show off in the kitchen and delight the happy owner, reminding of you.
Don't know how to make decoupage on glass? Let's take a closer look at the master class on decoupage of bottles with napkins.

Necessary materials
Decoupage is a technique for decorating any surface. It looks like a long-familiar application. Early decoupage creations date back to the 15th century, and in the 17th millennium the craft earned wild popularity and gained fans. Italian craftsmen quickly learned to copy Chinese motifs, decorating furniture and other interior items.

To get started, you need to purchase the following materials:
- glass cleaner;
- acrylic-based varnishes and paints;
- napkins for decoupage;
- brushes of various thicknesses;
- sandpaper;
- waterproof varnish.


Master class on decoupage of bottles with napkins:
- remove the sticker from the bottle;
- dry and treat with glass cleaner;
- It is recommended to do everything with gloves to avoid fingerprints.

The paint does not adhere to non-greased areas;
- prime the entire bottle;
- acrylic varnishes are used in the priming process;
- paint the bottle with white acrylic paint;
- transfer the design from a decoupage card or napkin;
- no special napkins are required, use those that match the pattern;
- Paint the background separately.

The background can be contrasting or similar in tone to the main pattern:
- open everything with acrylic-based varnish;
- the varnish brush needs to be wide and soft;
- unevenness must be sanded;
- there should be no wrinkles or folds;
- Don't forget to apply waterproof varnish at the end.

These are the basics of decoupage that are important to follow. There are a lot of secrets that help improve your work results.

Looking at the master class above, everything seems easy and banal, but it is not. There are a lot of pitfalls in the process, even when everything is done strictly according to the master class. Let's look at a step-by-step master class on decoupage bottles with photos.


You begin the first stage - separating the label from the bottle. We rubbed it thoroughly and soaked it in water for a couple of hours. Despite all efforts, traces of glue remained on the bottle. How to be?!

The solution is very simple. You need to take nail polish remover, wet a cotton swab and wipe the bottle thoroughly. The pellets will gradually be washed off and the surface will become smooth. Useful advice for the future: the bottle must be soaked in a soapy solution and the label will come off easily and with glue.

Are you priming the surface with acrylic paint and the result is not impressive? What to do? After priming the first layer, the brush leaves marks, and after applying the second layer, bald spots form. It's OK. After everything is dry, sand the surface and go over the paint again.

In the future, to avoid such problems, paint with a sponge, dipping it into the paint. The result will surprise you very much. — And finally, the most pleasant and exciting moment - transferring the design from the napkin. Will it wrinkle when glued? Corrected and ruined everything? No problem! Remove the soil and repeat everything from the beginning.

It is necessary to cover the area on which we will glue the napkin with PVA glue. Take a stationery file and place a napkin on it, lightly moisten it and straighten it. You need to apply the napkin along with the file, gradually expelling the remaining air. Remove the file and... miracle. The drawing is so smooth and even that you can’t tell it from what was painted.

From the Internet you know that you can sand if there are folds. We took sandpaper, made a couple of movements and there was nothing left of the drawing. Naturally! You haven't coated it with water-based acrylic varnish yet. Now you can sand it, but only in places where it is required. Afterwards, open it with varnish, preferably several times.

Decoupage of bottles with your own hands is not only a labor-intensive and complex procedure, but also a sea of impressions and emotions from the result obtained.


How to properly care for decorated bottles
It's no secret that handmade items require delicate and careful care than factory-made goods. So that the decoupage bottle does not lose its appearance and delight its owners for a long time, do not forget and ignore several rather memorable principles:

- All varnishes turn yellow over time. Therefore, when bringing ideas with light subjects to life, use exclusively acrylic varnish from a spray can;
- Wipe off dust from decoupage bottles with a damp cloth, but under no circumstances soak them in water!
- Do not place the decoupage item in the refrigerator for a long time. Condensation can soften the coating and it will come off.

Remember the simple rules and try not to break them. Then your work of art will last for many years!

Photo of decoupage bottles


As you know, decorating objects is not a new activity and has a fairly rich and interesting history. Decoupage is rightfully considered one of the most popular decorative finishing techniques. It, in turn, includes many directions, types and styles. Some of them can be mastered quickly, while others, more complex, require special knowledge, experience and skills.
A little history
From French, the name of the decorating technique “decoupage” is translated as “cut”. The purpose of this art is to decorate objects by gluing cut-out figures from colored paper or ready-made designs on them in combination with elements made from other materials.
The decoupage technique first became popular in France back in the 17th-18th centuries. It is divided into several dozen species. Many (the most complex) of them were developed during this time. Some items could take months or years to create due to the large number of different layers required to produce them. It is known that such historical figures as Madame de Pompadour and Marie Antoinette were fond of decoupage.
Objects for decoupage
Items such as furniture, dishes, boxes, postcards, vases and much more are suitable for decoration. By showing your imagination, you can transform any thing beyond recognition and turn a completely unattractive object into a real work of art.
Most often, the decoupage technique is used to decorate bottles of drinks in honor of any holidays. It could be an anniversary, a wedding, or our beloved New Year. Decoupage of bottles is always fashionable, stylish and original.
Types of design. Decopatch
There are only 5 main types of decoupage: decopatch, direct (or classic), reverse, artistic (or smoky) and volumetric. They are all significantly different from each other, but they are still united by basic technology.
Decopatch, which is also called decoupage in the patchwork style, is characterized by the fact that individual motifs are not applied to the object being decorated, but its entire surface is completely filled with pieces of paper with a pattern. It turns out to be some kind of imitation of the patchwork quilt we all know. This decor is created using special deco patch paper. Usually it is stylized to resemble some texture of a fabric pattern or natural fur. But decopatch can also be done using more conventional means used for decoration.

The second type is classic
The direct view involves gluing pictures to any type of surface. In this case, the image must be carefully, smoothly and efficiently attached using a wet, hot or dry method, and it directly depends on the material used. This can be rice paper, decoupage cards or regular napkins.
After all the pictures are glued, they are varnished. When it is completely dry, the surface of the object is sanded until a completely smooth texture is formed. Then, if desired, the drawing can be supplemented, for example, to give it volume, toned or aged.

The third type is reverse
It is used only on transparent glass surfaces. Decoupage of bottles, vases and plates looks very beautiful. In this case, the motif is glued to the opposite side of the object, and the whole process is reversed. This is due to the fact that the surface to be processed is located in front of the front side of the design.
The fourth type is artistic
It is also called smoky. This type of decoupage imitates painting using other techniques and various effects. It provides for a harmonious combination of the pasted motif and the background into a complete picture, where no obvious transitions from one to another should be visible.
Fifth type - volumetric
Using this technique, a mixture of painting and relief is achieved. Texture irregularities are usually created through the use of fabric, structural paste or natural materials. They can be small shells, cereals or eggshells. Volumetric decoupage of bottles with fabric looks especially beautiful.

General instructions for decoupage
Despite the apparent complexity of this decoration technique, it is quite easy to master. Experience, as you know, comes in the process of work, so it’s worth trying to make the simplest bottle decoupage for beginners yourself. The classic type of decoration is perfect for this.
Necessary materials: napkins with a pattern, an empty bottle, scissors, special glue for decoupage or PVA, roller, sponge, brush, varnish and acrylic paints.
● First you need to choose the bottle you would like to decorate. You should not take too elaborate forms. Because the simpler they are, the easier it will be to design the bottle in decoupage style.
● Take a napkin you like and carefully cut out the design shown on it. Since it consists of several layers, it is necessary to separate the topmost one. Don't worry that the drawing will tear - the paper is quite durable. It is with this motive that we will continue to work.
● If you don’t have decoupage glue, you can use PVA, but before doing this you need to dilute it slightly with water. Then we spread the motif and carefully glue it to the surface of the bottle. The pattern must be carefully smoothed, starting from the center and gradually approaching the edges. Since our napkin is a little wet, it can be easily damaged. The glued image is smoothed with a roller, and excess glue is removed with a sponge.
● At this point, decoupage of bottles with napkins can be considered almost complete. But if you wish, tint them with acrylic paints, draw some patterns or stick on beads and shells. In this case, you can do whatever comes to your mind.
● When the bottle is dry, it is coated with a special decoupage varnish. Some, in the absence of one, use colorless nail polish. After this, the product should be taken out to the balcony, where it will finally dry and weather. That's it, your first decoupage item is ready!

Partial decoration with fabric
In order to make such decoupage of bottles with your own hands, you will have to visit not only a store with stationery supplies, but also look where they sell goods for artists. One way or another, all materials are quite accessible. In addition to fabric and a bottle, you will need PVA glue, putty, alcohol, a drawing, which will then be transferred to the fabric, as well as acrylic varnish, primer and paints. It would be great if the set of colors included gold and silver.
Decoupage of bottles always begins with cleaning their surface. It is necessary to thoroughly wash and remove any paper stickers on them. To do this, you just need to soak them in warm water for a while. The bottle is then wiped with alcohol to remove all fat. This procedure is mandatory. After this, the entire surface is coated with acrylic varnish. I must say that it dries quite quickly.
The next stage of decoupage will be the proper preparation of the fabric. To do this, pour glue into a bowl and dilute it with water 1:1. For better contact with the glass surface, a little putty is usually added to it. If the fabric is white, then paint of the desired color is also added there.
Now the material is dipped into the impregnation solution and then wrung out. The shape of the flap is arbitrary, and the size must be large enough to wrap half the bottle. The fabric should be laid in beautiful, elegant folds and left to dry for about a day. After this, you can apply other decorative decorations: beads, sparkles or foam balls. When all the elements are ready, the bottle is opened with varnish.
Full fabric decoration
In order to create decoupage of bottles that are entirely decorated with fabric, you can take scraps of any size. It is better if it is satin, silk or chintz. Before use, they need to be washed and dried well.
We make a solution of PVA glue and water and drop pieces of fabric into it. Then we take out one at a time and attach it to the surface of the bottle with beautiful folds. You can cut out one oval or round piece from which to make a medallion. It must be glued evenly, without a single wrinkle.
Next, when the fabric on the bottle has dried, the medallion is decorated with some kind of pattern, for example, a napkin pattern. In this case, glue is applied only to the reverse part of the motif and strictly along the contour. After it dries, the excess paper is torn off. When finishing the decoupage of bottles with your own hands, the fabric is decorated with various small elements or more voluminous details, such as large beads, flowers made from ribbons or beaded ornaments. If you wish, you can paint your product with watercolor, gouache or acrylic paints. To complete the process, the bottle is varnished and dried.
Master class: decoupage with napkins
Beginners in this business should not take on any overly complex decoration. It is worth trying the simplest classic type of technique, supplemented, if desired, with small volumetric details. Consider decoupaging bottles with napkins. A master class with a step-by-step description of actions will help you in your work.

● Step 1. Choose a napkin with a black and white design you like and tear it off or cut it out. Then carefully separate the topmost layer. We will use it to decorate our product.
● Step 2. Wash the bottle well, remove labels, if any, and degrease the surface with alcohol. Then evenly coat with white acrylic paint.
● Step 3. Glue the cut out napkin motif. To do this, we use PVA glue diluted in half with water.
● Step 4. At the top above the image, carefully paint with a thin brush with white acrylic so as to capture the edges of the napkin.
●Step 5. Now below the drawing we do the same, but only with black paint, and tint it to the very bottom. After the bottle has dried, we open its entire surface 2 times with acrylic varnish.
● Step 6. Thus, we have a very nice and original bottle. You can decorate your creation according to your taste and desire, for example, by gluing white and black beads, bows, etc.
Decoupage wedding bottles
Now in specialized salons and stores you can find any paraphernalia for various special events. Sometimes their diversity is simply amazing! There you can buy very beautiful large flower arches and small boutonnieres, fancy-shaped glasses and decorated bottles, which are displayed on the table for the bride and groom. And it should be noted that all this is not cheap. But why spend a lot of money if you can decoupage bottles with your own hands? In addition, in this case the products will be exclusive.
It’s okay if this is your first time encountering this design technique. Of course, mastering it requires time and special napkins, which are not sold in every store. But there is a simpler option that will allow even a beginner who is not associated with the art of artistic decoration to make original decoupage of wedding bottles.

Simple design
First of all, for simplified decoration using a regular greeting card, you will need a bottle of champagne, the color of which does not matter, white acrylic paint and varnish, and a brush. In addition, you will have to visit a hardware store and purchase silver or gold paint there. You need to choose a card with a wedding theme. It is advisable that the drawing be on a white or other, but always light, background, since it will be much easier to disguise than a dark one.
At the first stage, decoupage of a champagne bottle begins with removing all labels and traces of glue using warm water and a sponge. Then the surface is degreased with acetone or alcohol and covered with white acrylic paint, but the layer may turn out uneven. There is nothing to worry about here, since after all the work is completed this minor defect will be absolutely unnoticeable. The easiest way to apply paint is with a sponge.
The next stage is preparing the postcard. First, it is coated with varnish in 2 layers and left to dry. Don't be afraid that the edges will curl, this is a normal process. Now very carefully you need to separate the top thin layer with the pattern from the cardboard base. You will get an improvised decoupage napkin. Then the design is cut out along the contour. You can leave it whole, but it is best to separate it into separate fragments, for example, images of newlyweds, flowers and doves with rings.
We glue the pictures to the bottle with PVA glue, while we smear not the back of the image, but the product itself, and smooth them out. We dilute light pink and pale blue acrylic paints and, to hide the edges of the card, carefully draw along their edges with a wide brush, carefully shading the borders. We continue decoupaging the champagne bottle by applying silver or gold veins to it, which will hide all small defects and irregularities.
And finally, the final stage is protruding decor, which can be used as silver or golden bows and artificial pearls of different sizes. They will help give your creation a finished look. This completes the decoupage of the wedding bottle.
As you can see for yourself, decorating objects with your own hands is quite an exciting activity. Decoupage is not such a complicated decoration technique. And besides, it does not require too much expense, because it is not for nothing that it arose, as they believe, in the circles of low-income segments of the population. But, despite this, thanks to the imagination of talented people, decoupage was able to turn into real art!
Having mastered the fascinating and simple decoupage of bottles for beginners, ordinary and non-standard bottles of wine, cognac, champagne or bottles that have not yet been drunk can be turned into real works of art that will pleasantly surprise, delight the eye, and as a gift touch to the depths of the soul. What could be better than a gift made with your own hands, in which warmth, love and a piece of your soul are invested?
An original bottle, which is difficult to find a worthy use for, but would also be a pity to throw away, can easily be turned into an exclusive decanter for alcoholic beverages or an unusual flower vase using the decoupage technique. The best part is that this unique technique is available to absolutely everyone, because it does not require special skills or special material and physical costs. The main thing is a great desire, a little free time and a lot of creativity!
Interior decorations from glass containers
to contents
What is hidden behind the mysterious word “decoupage”
Decoupage is a word of French origin, which translated simply means “cutting”. This is a special decorative technique, close to collage and applique, which consists of cutting out images from a wide variety of materials (paper, wood, fabrics, leather, etc.), which are then attached or glued to furniture, dishes, textiles and other types of surfaces for decoration.
In modern decoupage, pictures printed by printing are most often used, and this is not surprising, because paper applications can be glued to almost all types of surfaces - flower pots, vases, bottles, wooden kitchen boards, mugs, books, candles. So, an ordinary white plate can be turned into an amazing wall panel, a chic flower vase can be made from a nondescript bottle, and why not decorate your favorite... toilet bowl with cute daisies or forget-me-nots?! 🙂
The scope for imagination in decoupage is truly limitless! Of course, not just any paper is suitable for decoupage. Most often, three-layer paper napkins of original colors are used, which can be purchased in almost any store. This decoupage technique is called napkin technique. It is actually very convenient: the design you like is carefully cut out along the contour, glued and covered with a protective layer of varnish.

What you need to decoupage bottles
- A clean glass bottle, convenient for decoupage - even, without unnecessary bulges.
- Three-layer napkins with a selected pattern (for beginners, it is advisable to stock up on several napkins in case of damage), special decoupage cards, clippings of favorite pictures from magazines, printouts, etc.
- A product for degreasing the glass surface of a bottle (alcohol, acetone, solvent, nail polish remover).
- To prime the surface of the bottle you will need regular acrylic paint, which can be bought at any hardware store.
- Special decoupage glue or the most common PVA glue.
- Brushes for work of different thicknesses - it is better to take flat ones and always synthetic ones, since natural ones may leave hairs on the surface being treated.
- Colored acrylic paints.
- Acrylic varnish - it looks milky white, but when it dries it becomes transparent.
- Additional decorative elements - sparkles, beads, rhinestones, bows, ribbons.
- One-step or two-step craquelure varnish - if you want to create an antique effect.
- Nail scissors for cutting out selected motif fragments.
- Painting tape for sealing areas not intended for painting.
- Foam roller or piece of foam rubber.
- Disposable plates or special trays for paints and varnishes.
- Sandpaper.
- Rags

Master classes for creative individuals
to contentsStep-by-step guide to decoupage with napkins
- Preparing the surface
First of all, we clean the bottle of labels - soak it in a soapy solution and use sandpaper to wipe off the remaining paper and glue. Now the surface must be degreased with alcohol, vodka, solvent, acetone, nail polish remover or a high-quality glass cleaner.
- Prime the surface of the bottle
It is not at all necessary to prime the surface, but it is the background that will give the composition integrity and completeness, and the fragments of the drawings will look brighter and clearer. The background can be made either over the entire surface of the bottle, or only in those places where you are going to place the motif. To prime the bottle, pour a little acrylic paint of a suitable color into a wide jar or bowl and, if necessary, dilute it with water to a consistency reminiscent of liquid sour cream. The background color should be chosen taking into account the color of the selected image. The bottle should be slightly lighter than the base color of the napkin. Using a foam roller or sponge, apply primer to the surface of the bottle. For greater saturation, two or three layers of paint may be needed. Allow the first coat to dry before applying the second coat. To speed up the process, you can use a hairdryer.

- Cut out motifs for gluing
Take a three-layer paper napkin and use nail scissors to carefully cut out the motifs you like. You don’t have to cut out the picture, but carefully tear it out, then the clear boundaries of the picture will not be visible on the bottle and it will better “fit” into the background. Separate the top layer of the napkin. This is exactly what we need for gluing. For decoupage, you can use not only napkins, but also magazine clippings, reproductions, any other pictures you like, and even printouts made on a printer. If the paper is too thick, first apply several layers of acrylic varnish to the picture, give each layer time to dry completely, soak everything in water for 20 minutes so that the paper is thoroughly soaked. Then the paper is very carefully peeled off from the reverse side of the picture. Now the thin picture can be safely glued to the base. If everything is done properly, the picture will look like it was painted!

- Glue motifs onto the bottle
You can glue pictures with special decoupage glue, as well as undiluted or diluted with water PVA glue (in a 1x1 ratio). We place the napkins dry on a dry surface, and then “coat” them with a brush with glue from the middle to the edges, removing all bubbles and wrinkles. For testing, you can practice on an unnecessary bottle and napkin. Before use, decoupage cards must be soaked briefly in warm water, removed and dried on a towel. All these steps should be performed with extreme caution so as not to accidentally tear the picture. If you are using a decoupage card, grease it on the back side with PVA glue, apply the center to the bottle and, starting from the center, gradually straighten it along the front side with a brush with glue, avoiding the formation of bubbles and folds. You can glue several motifs on the widest part of the bottle, or distribute large and small elements over the entire surface.
Decoupage is a technique that has no frames or boundaries, allowing you to realize creative ideas to the fullest and create truly unique decorative items with your own hands. Decoupage can be done in a variety of ways using paper, textiles, leather, wood, plants, food, etc. on glass containers of any size and shape. The most affordable and effective way to decorate a glass bottle is with napkins. Read the article on how to simply and attractively decorate a bottle using decoupage technique.
Decoupage with napkins and acrylic is the simplest and most effective way of decoration, the technique of which will be clear and simple even for beginners. In order to decorate the bottle, we will need a decorative primer, napkins with an interesting pattern, silver or gold acrylic paint, scissors, PVA glue, a household sponge, and fixing varnish.

In order to get a beautiful and original product, you need:
- Prepare the bottle for decoration: remove the labels, wash and degrease the surface (with alcohol, acetone).
- Cover the bottle with decorative primer and let the layer dry.
- Cut out the outline of the images from the napkin and glue them to the bottle. Applications must be applied dry, covering the design with glue from the center to the periphery.
- Using a sponge, apply acrylic paint using a blotting motion. Wait for the product to dry completely.
- Open the bottle with varnish to fix the image.
This decoupage is perfect for both glass and plastic bottles. Design in this way can be done in any style and theme. The main thing is to choose the appropriate napkins and paint color.
How to decoupage a bottle with a napkin and craquelure
Craquelure is a unique material that can give the surface an aged look. In tandem with floral prints, craquelure decor will allow you to make a unique and incredibly attractive product with your own hands. In order to decorate the bottle, in addition to craquelure and a napkin with a pattern, we will need pastel crayons to match the images on the napkin, light and dark acrylic paints, brushes, a foam sponge, and aqualac.

In order to decorate a bottle, you need:
- Apply dark acrylic paint to a clean, grease-free surface with a foam sponge and wait for it to dry completely.
- Cover the bottle with craquelure varnish.
- After the craquelure has dried, apply light acrylic paint. The layer must be applied quickly using a sponge. You should paint one place only once, otherwise you can paint over the craquelure cracks that appear.
- Open the product with a scuba cap and wait until it dries.
- Paste images cut from a napkin in the standard way, which is described in the first master class, in accordance with the author's idea.
- Use pastel crayons to hide the boundaries between the background of the bottle and the appliqué. You need to apply the pastel with your finger, as if stretching the color from the drawing to the background, making a smooth shading. The color of the chalk must match the color of the element's border.
- Cover the finished product with aqualac in order to maximally level the surface height of the bottle with the image and secure the result.
For the finishing coat of craquelure and decoupage, it is better to choose a matte aqualac so that the product does not have a glossy sheen, which is unusual for antique items. Craquelure decor is accessible and understandable even for novice designers. In this way you can decorate small bottles, “pot-bellied” glass jugs, bottles of non-standard shapes, etc.
DIY decoupage of bottles with napkins using rice paper
Decoupage with rice napkins is the most convenient method of decoration, in which the boundaries between the pattern and the surface of the bottle are almost invisible, and therefore this type of design does not require a lot of time spent working with the background and masking the appliqués. Products made using rice napkins look cleaner and more natural due to the low density of the paper. But working with rice paper requires a certain skill, because images from a napkin should not be cut out “on the edge,” but torn out by hand. Often, this is accompanied by a tear in the picture.
In order to make an attractive bottle, we will need: several rice paper napkins, acrylic paint for the background, decoupage glue or PVA, brushes, foam sponge, finishing coat.

It is better to choose a background color in a pastel range: such shades will allow the napkin to blend most successfully with the bottle, and the designs against such a background will look brighter and more saturated.
The bottle should be decorated step by step:
- A background should be applied to a previously washed and degreased surface using a foam sponge.
- Glue the appliqués. Images can be glued in the usual way (a dry cloth on a dry surface using PVA with water 1:1) or in a “wet” way, which allows you to fix the image as evenly as possible, without bends or air bubbles. To implement this method, the application must be placed on the file facing inward and the napkin held under water for several seconds. After that, place a napkin on the bottle, remove the file and apply glue over the image.
- Open the decoupage with varnish.
When choosing rice paper napkins for decoupage bottles, preference should be given to products with the lowest density (5-14 g/sq.m.).
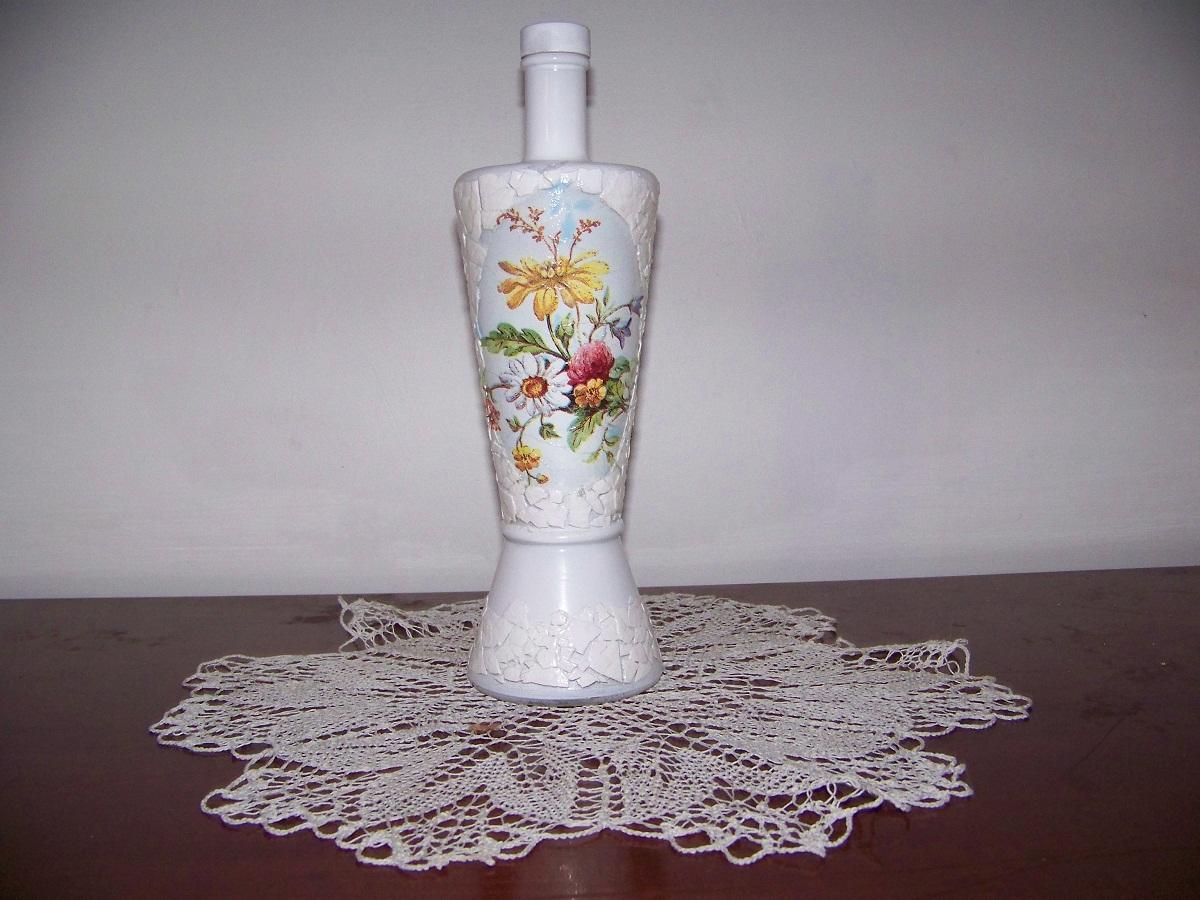
Egg decoupage of bottles with napkins step by step: photo
Decoupage of glass containers can also be done with improvised materials that are easy to find in everyday life, for example, eggshells. This version of decoupage allows you to make a unique product with voluminous, convex details that imitate a mosaic. To decorate a bottle using this technique, we will need primer, pieces of eggshell (approximate size - 15x15 mm), napkins with large prints (roses, butterflies, etc.), acrylic paints, mother-of-pearl pigment, brushes, foam sponge, decoupage glue or PVA, aqualac.

To decorate the bottle you need:
- Apply primer to the prepared glass surface.
- Dry glue the cut out pictures.
- Cover the surface between the images with glue and attach pieces of the shell to it, lightly pressing them. The shell pieces should be placed at a distance of one to two millimeters from each other: this way the mosaic will look more natural and organic.
- Leave the product for 6-8 hours to dry completely.
- Mix white acrylic paint with colored paint to get a pastel shade to match the appliqués on the bottle.
- Without going into the drawings, cover the product with the resulting paint using a foam sponge.
- Apply Aqualac and let the bottle dry.
- Pick up pigment on your finger and rub it into the shell and the space around the images.
- Secure the result with scuba diving.
Decoupage of bottles with napkins for beginners (video)
Bottles decorated using decoupage technique will become an excellent decorative element, emphasizing your creativity and individual style of the apartment. Such bottles can be safely presented as a beautiful and original gift to relatives, friends or colleagues. Decoupage options can be skillfully combined in one product, for example, a bottle can be decorated with craquelure and rice napkins, and to an edge-cut image you can add shadows with pastels or decor with rice shells. The main thing is to get inspired and don’t be afraid to experiment!